


7-16
Alignment & Adjustments
Samsung Electronics
Service Manual
7.5.3 Using Control Panel Menus
A number of menus are available to make it easy for you to change the printer settings.
You can configure your printer from the printer’s control panel.You can also use the control panel menus while the printer
is in use.
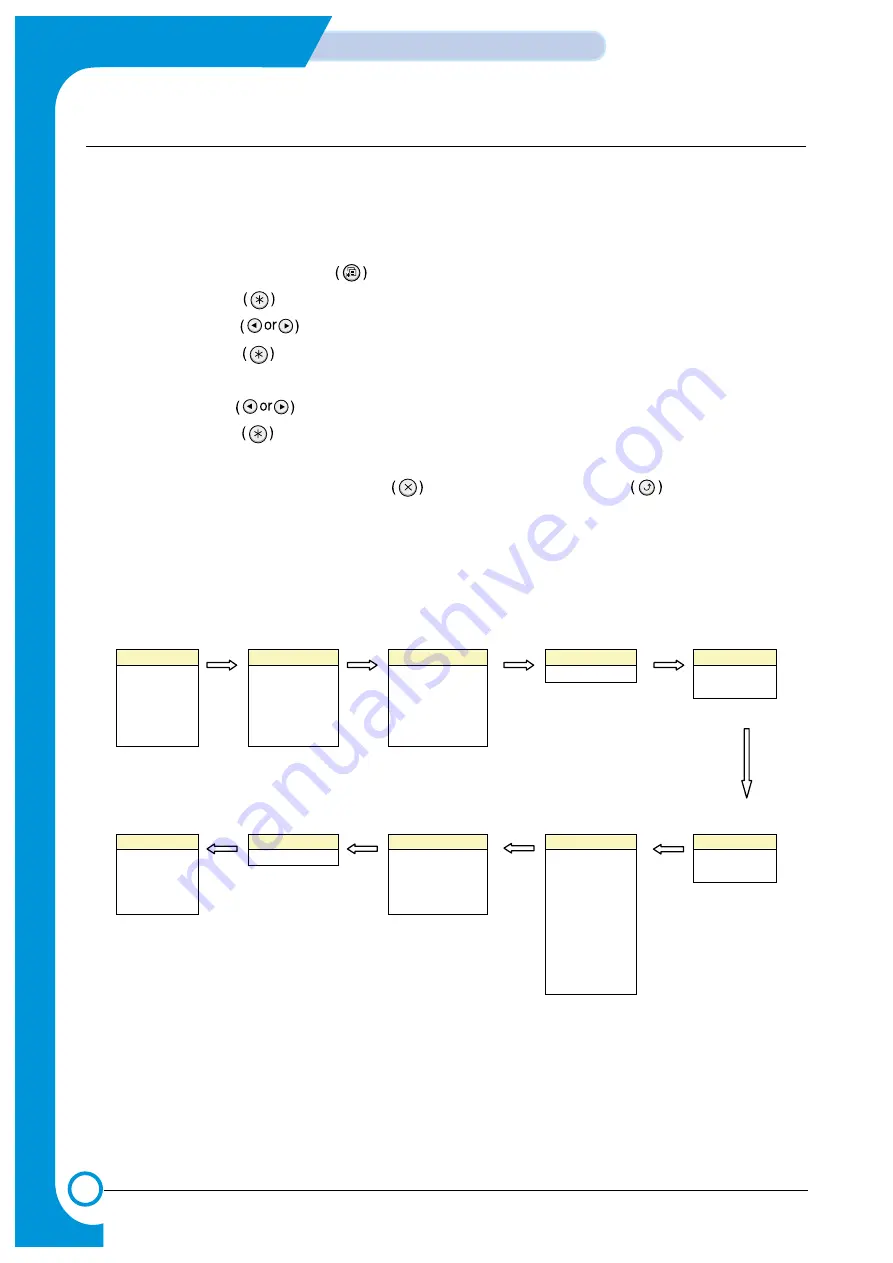
1. In ready mode press the Menu button until you see the menu you want on the bottom line of the display.
2. Press the Enter button to access the menu.
3. Press the scroll button until the menu item you want displays on the bottom line.
4. Press the Enter button to confirm the selected item.
5. If the menu item has submenus, repeat steps 3 and 4.
6. Press the scroll button until the setting option you want displays on the bottom line or enter the required value.
7. Press the Enter button to save your input or selection.
- An asterisk (*) appears next to the selection on the display, indicating that it is now the default.
8. To exit the menu, press the Upper Level button repeatedly, or the Cancel button .
- After 60 seconds of inactivity (no key has been pressed), the printer automatically returns to ready mode.
NOTE: Print settings made from the printer driver override the settings on the control panel.
Information
Paper
Layout
Graphics
Printer
Configuration
Tray Source
Orientation
Resolution
Default Set
Menu Map
Media Size
Duplex
Current Job
Demo Page
Width
Duplex Margin
PS3 Font List
Custom
Custom
Height
Simplex Margin
PCL Font List
Media Type
Copies
Network
PostScript
PCL
Setup
Color
Config. Network
Print PS Error
Typeface
LCD Language
Calibration
Reset Network
Symbol
Emulation
Custom Color
Default Set
Lines
Power Save
Print Net CFG
Pitch
Auto Continue
Jam Recovery
Altitude Adj.
Auto CR
Job Time Out
Maintenance
Summary of Contents for CLP 510N - Color Laser Printer
Page 7: ...1 6 Precautions Service Manual MEMO ...
Page 35: ...4 18 Summary of Product Samsung Electronics Service Manual MEMO ...
Page 49: ...5 14 System Outline Samsung Electronics Service Manual MEMO ...
Page 97: ...6 48 Disassembly and Reassembly Samsung Electronics Service Manual MEMO ...
Page 123: ...7 26 Alignment Adjustments Samsung Electronics Service Manual MEMO ...
Page 149: ...8 26 Troubleshooting Samsung Electronics Service Manual MEMO ...
Page 154: ...9 3 Cover Top Exploded View 6 5 3 0 2 9 1 7 S15 8 S15 4 ...
Page 155: ...9 4 Cover Deve Exploded View 4 0 2 6 12 S14 S14 3 7 9 1 10 5 11 8 ...
Page 158: ...9 7 Deve Drive Ass y Exploded View 0 6 7 8 12 13 17 16 15 14 11 10 5 4 3 1 9 18 19 20 2 ...
Page 161: ...8 0 3 15 9 7 4 1 2 12 S8 14 5 11 13 10 6 9 10 Cassette Ass y Exploded View ...
Page 169: ...7 1 5 12 11 2 0 8 3 6 4 10 9 9 18 Pick up Ass y Exploded View 3 13 ...
Page 171: ...4 0 6 S9 3 5 5 7 1 2 9 20 Guide Paper T2 Ass y Exploded View ...
Page 172: ...S18 9 0 8 S8 7 6 5 10 1 2 3 12 13 S8 11 4 9 21 ITB Cam Ass y Exploded View ...
Page 173: ...2 S8 1 0 3 S5 4 9 22 Dummy Fuser Base Ass y Exploded View ...
Page 195: ...10 10 10 1 Samsung Electronics Block Diagram Service Manual 10 Block Diagram ...
Page 220: ......
Page 221: ......
Page 222: ...D SAMSUNG ELECTRONICS CO LTD E F 2 7 8 A B C 3 4 5 6 ALL RIGHTS RESERVED A B C 1 CRUM_DEVE ...
Page 223: ...CRU_ITB A SAMSUNG ELECTRONICS CO LTD A 2 3 4 5 6 B C ALL RIGHTS RESERVED 7 8 1 B C E F D ...
Page 224: ......


