background image

11

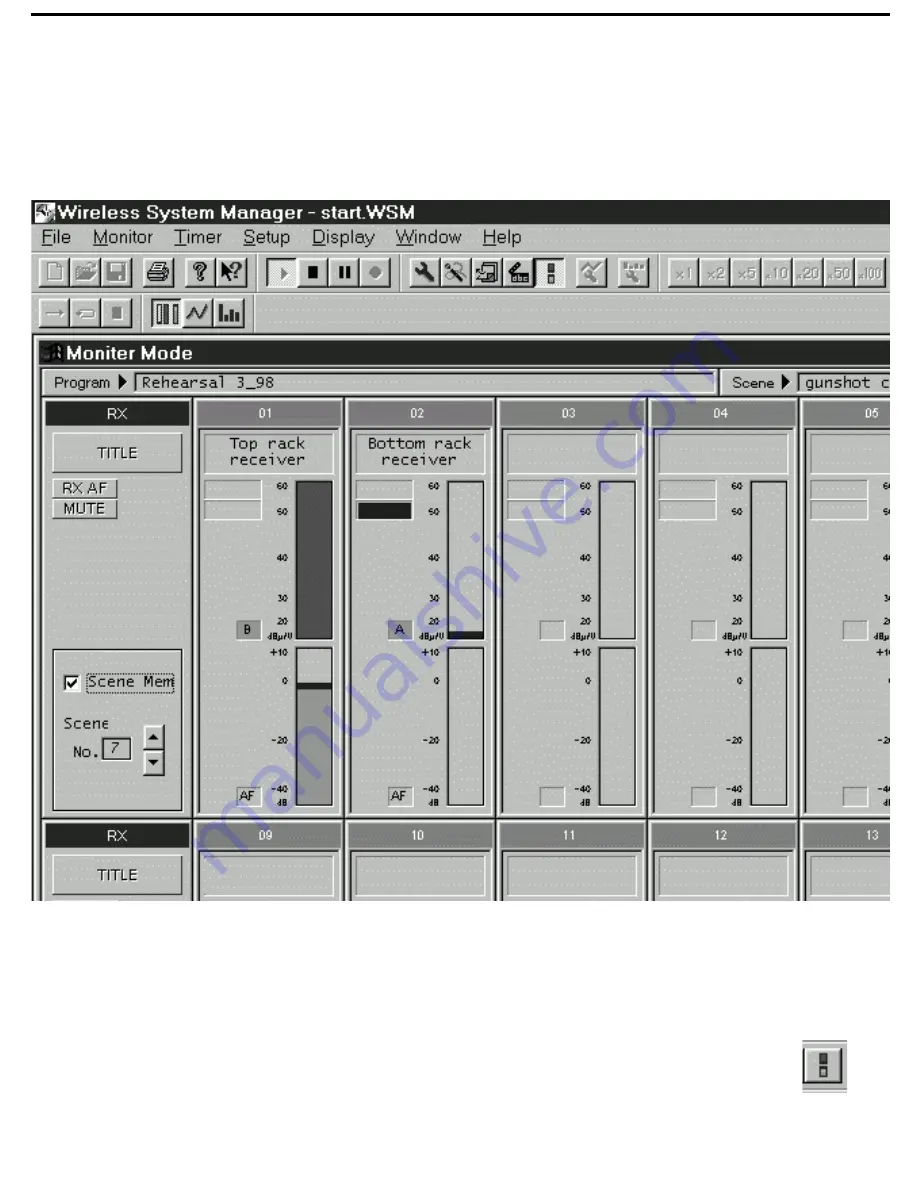
The Simple Monitor Screen

When in Monitor Mode, the WSM screen shows a 

lot 

of information—so much, in fact, that there may be

times when you want a simpler screen display with less data and larger meters (for example, when your
computer monitor is a distance away from your working position).  For this reason, WSM provides an
alternative Monitor screen, called, appropriately enough, the 

Simple Monitor

screen (shown below).

All screen functions are the same as in the Monitor screen, except that there is a single RF Level meter
for each receiver.  This meter shows the RF signal strength being received by the antenna currently in
use, and the legend beside it shows whether the “A” or “B” antenna is the current one.  In addition, there
are fewer items in the Status Display; only Audio Frequency (Rx AF) on/off and Mute on/off are shown
(as in the Monitor screen, when Mute is on, the box is colored red).

To call up this screen, either select the Simple Monitor Screen option from the Setup menu (see page 13
in this manual for more information), or click on the Simple Monitor Screen icon in the Tool Bar, shown in
the illustration on the right.  For more information on the WSM Tool Bar, see page 12 in this manual.

Simple Monitor

icon

Summary of Contents for WSM Wireless System Manager for Windows 95

Page 1: ...OWNERS MANUAL Wireless System Manager for Windows 95 Windows and Windows logo are registered trademarks of Microsoft Corp...

Page 2: ...lvd P O Box 9031 Syosset NY 11791 9031 Phone 1 800 3 SAMSON 1 800 372 6766 Fax 516 364 3888 Table of Contents Introduction 1 Hardware Interconnections 1 Software Installation 5 Launching Wireless Syst...

Page 3: ...Samson Wireless System Manager ever require servicing a Return Authorization number RA is necessary Without this number the unit will not be accepted Please call Samson at 1 800 372 6766 for a Return...

Page 4: ...connector cable to the joystick MIDI port of your computer s Sound Blaster 16 card and the other end to the PC connection on the IF6P If you need to remote your receivers 20 feet or more from the com...

Page 5: ...mini DIN cables to connect the Remote Out of the first receiver to the Remote In of the next one daisy chain fashion Then connect the Remote Out of the last UR6D or UR6DX receiver to the IF6P 1 In If...

Page 6: ...h on the side of both the IF6P and IF6R to 2 Alternatively as shown in the illustrations on the right you can use standard mic cable with XLR connectors again up to 200 meters in length Plug the male...

Page 7: ...perties dialog opens click on the Advanced tab Open the MIDI Devices and Instruments folder and select MIDI for External MIDI Port Click on Properties and the MIDI For External MIDI Port Properties di...

Page 8: ...lling the WSM application you need to first copy the font file named Lucon onto your hard disk This file must be placed inside the Fonts folder in the Windows folder as shown in the illustration on th...

Page 9: ...eated WSM file if one exists WSM files contain the current channel setup all recorded data and the contents of all Scene Memories It then scans all connected receivers to check that all parameters in...

Page 10: ...g Condition from the Settings menu or click on the Drawing Condition icon in the Tool Bar In the resulting dialog select the appropriate receiver tab s then check the data type s you wish to view RF L...

Page 11: ...up menu select the Channel Plan option The Channel Plan dialog shown at right will appear Begin by specifying the number of channels you want to have included in the plan To have WSM generate a channe...

Page 12: ...ied by WSM RX1 and RX2 Titles Audio Frequency RX AF on off Tone Squelch T SQ on off when off the box is colored yellow Mute on off when on the box is colored red Antenna A Attenuation ATT A Antenna B...

Page 13: ...RF Level meter for each receiver This meter shows the RF signal strength being received by the antenna currently in use and the legend beside it shows whether the A or B antenna is the current one In...

Page 14: ...see File Menu on page 13 of this manual Help Tools These icons are available in all screens The left icon displays the WSM version number and copyright information The right icon provides context sens...
Page 15: ...tart the timer Stop it Reset it to 00 hours 00 minutes 00 seconds and Sync it so that it only operates when in Monitor Play or Record mode and stops during Monitoring is Stopped or Paused For more inf...

Page 16: ...B RF Level A B and or AF Level Note Receiver parameters cannot be changed in this dialog to do so return to Monitor Mode and use the Channel Setup dialog see page 10 in this manual for more informati...

Page 17: ...ification by opening the Zoom menu available only in Time Domain Mode Spectrum Analyze Mode The third and final main mode of operation offered by WSM is Spectrum Analyze Mode In this mode WSM uses you...
Page 18: ...aphed onscreen as shown below The horizontal axis shows time elapsed while the vertical axis shows RF level in dB V Note that RX1 in the receiver specified in the Group Select dialog see previous page...

Page 19: ...d licensability depends on the user s classification application and frequency selected This device complies with RSS 210 of Industry Science Canada Operation is subject to the following two condition...

Reviews: