background image

 20  

EB 8310-5 EN

Measures for preparation

Lifting the entire control valve assembly

A swivel lifting hook can be screwed into the 
female thread on the top diaphragm case 
(see section 3.7 on Accessories). The swivel 
lifting hook is designed for setting a control 
valve assembly upright.


Î

See associated valve documentation for 
instructions on how to lift a control valve.

4.3  Storage

Risk of actuator damage due to improper 
storage.


Observe storage instructions.


Avoid long storage times.


Contact SAMSON in case of different stor-
age conditions or long storage periods.

NOTICE

!

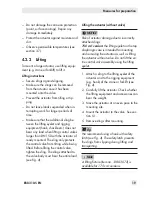
Fig. 4: 

Lifting point on the actuator

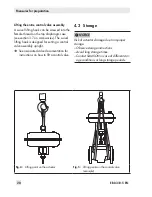
Fig. 5: 

Lifting points on the control valve 

(example)

Summary of Contents for 3277

Page 1: ...ating Instructions EB 8310 5 EN Translation of original instructions Edition January 2017 Type 3271 left and Type 3277 right Pneumatic Actuators Type 3271 and Type 3277 Pneumatic Actuators Actuator ar...

Page 2: ...epartment aftersalesservice samson de The mounting and operating instructions for the devices are included in the scope of delivery The latest documentation is available on our website www samson de P...

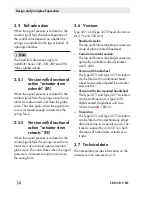
Page 3: ...4 2 Type 3277 12 3 5 Fail safe action 14 3 5 1 Version with direction of action actuator stem extends FA 14 3 5 2 Version with direction of action actuator stem retracts FE 14 3 6 Versions 14 3 7 Tec...

Page 4: ...ctuator stem manually 32 6 6 2 Retracting the actuator stem manually 32 6 7 Travel stop 32 6 7 1 Bottom travel stop minimum travel 32 6 7 2 Top travel stop maximum travel 33 7 Servicing 34 7 1 Replaci...

Page 5: ...ts intended purpose or for damage caused by external forces or any other external factors Refer to the technical data and nameplate for limits and fields of application as well as possible uses Reason...

Page 6: ...ators by the process medium the operating pressure the signal pressure or by moving parts by taking appropriate precautions They must observe all hazard statements warning and caution notes in these m...

Page 7: ...tion 6 4 of EN 60079 14 VDE 0165 Part 1 Referenced documentation The following documents apply in addition to these mounting and operating instructions Mounting and operating instructions for the moun...

Page 8: ...valve in such a way that the actuator does not vent at eye level Use suitable silencers and vent plugs Wear eye protection when working in close proximity to the control valve Risk of personal injury...

Page 9: ...Excessively tightened torques lead to parts wearing out quicker Parts that are not tightened far enough may loosen Observe the specified tightening torques u AB 0100 Risk of actuator damage due to th...

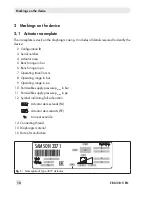
Page 10: ...nch range in psi 7 Operating travel in mm 8 Operating range in bar 9 Operating range in psi 10 Permissible supply pressure pmax in bar 11 Permissible supply pressure pmax in psi 12 Symbol indicating f...

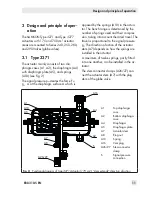
Page 11: ...of springs used and their compres sion taking into account the rated travel The travel is proportional to the signal pressure pst The direction of action of the actuator stem A7 depends on how the sp...

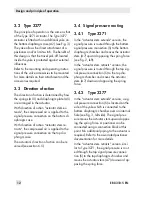
Page 12: ...f action can be re versed see section 6 5 3 4 Signal pressure routing 3 4 1 Type 3271 In the actuator stem extends version the signal pressure is routed through the bottom signal pressure connection S...

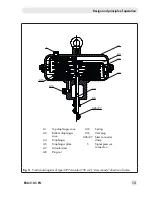
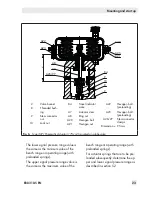
Page 13: ...diaphragm case A4 Diaphragm A5 Diaphragm plate A7 Actuator stem A8 Ring nut A10 Spring A16 Vent plug A26 27 Stem connector clamp S Signal pressure connection A1 A2 A4 A5 A8 A7 A26 27 S A16 A10 Fig 3...

Page 14: ...a mounted globe valve The valve closes when the signal pressure is increased enough to overcome the spring force 3 6 Versions Type 3271 and Type 3277 Pneumatic Actua tor 175 and 750 cm Standard versi...

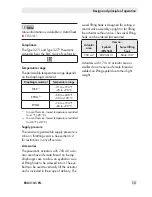
Page 15: ...e supply pressure is 6 bar in throttling service See section 6 2 for restrictions in on off service Accessories The pneumatic actuators with 750 cm actu ator area have a female thread on the top diaph...

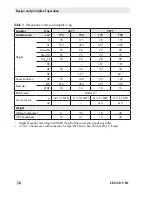
Page 16: ...78 98 H5 101 101 H6 34 34 34 34 H7 65 1 65 1 Travel limitation H8 75 129 75 129 Diameter D 215 394 215 394 D2 10 16 16 16 d thread M30x1 5 2 Air connection a G NPT G 3 8 3 8 NPT G NPT G 3 8 3 8 NPT a...

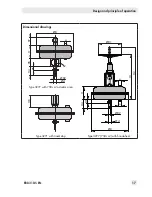
Page 17: ...N 17 Design and principle of operation Dimensional drawings H H7 a2 H5 H4 H6 a D D2 d D1 H2 H1 H H4 H6 D2 d a a D Type 3277 with 750 cm actuator area H8 Type 3271 with travel stop Type 3277 750 cm wit...

Page 18: ...use approved lifting equipment and accessories whose minimum lifting capaci ty is higher than the weight of the actuator Refer to section 3 7 for weights Risk of actuator damage due to incorrectly at...

Page 19: ...while being lifted Before lifting the control valve tighten the sling The slings attached to the valve body must bear the entire load see Fig 4 Lifting the actuator without valve Risk of actuator dam...

Page 20: ...s designed for setting a control valve assembly upright See associated valve documentation for instructions on how to lift a control valve 4 3 Storage Risk of actuator damage due to improper storage O...

Page 21: ...ble temperatures see section 3 7 Do not place any objects on the actuator Special storage instructions for elastomers Elastomer e g actuator diaphragm To keep elastomers in shape and to pre vent crack...

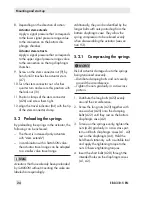
Page 22: ...nting the actuator onto the valve Proceed as follows if the valve and actuator have not been assembled by SAMSON Remove the mounted actuator before mounting another actuator see sec tion 9 2 Preloadin...

Page 23: ...A7 A26 27 9 84 x A22 A23 A20 A21 A25 Fig 6 Type 3271 Pneumatic Actuator 175 cm mounted on globe valve The lower signal pressure range value is the same as the minimum value of the bench range or opera...

Page 24: ...pted to a smaller valve travel range Actuators that have already been preloaded by SAMSON without mounting the valve are labeled correspondingly Additionally they can be identified by the longer bolts...

Page 25: ...s use actuators with preloaded springs when the valve s rated travel is smaller than the rated travel of the actuator Example DN 50 valve with 15 mm rated travel and 750 cm actuator with 30 mm rat ed...

Page 26: ...of 6 bar when used for throttling service 6 2 On off service In on off service the supply pressure must be limited depending on the bench range or operating range of the actuator The applica ble benc...

Page 27: ...ork on the actuator de pressurize all plant sections concerned and the actuator Risk of personal injury due to preloaded springs Actuators with preloaded springs are under tension They can be identifi...

Page 28: ...ure that the seal lip of the dia phragm A4 is inserted correctly be tween compressor A35 and diaphragm plate A5 To prevent the O ring from being dam aged use a suitable tool to slide the O ring onto t...

Page 29: ...and bottom diaphragm cases A1 A2 together using the nuts A21 and bolts A20 Tighten the nuts evenly Observe tightening torques 18 Type 3271 remove the vent plug A16 from the top signal pressure connec...

Page 30: ...A5 O ring A17 Spacer A36 Make sure that the seal lip of the dia phragm A4 is inserted correctly be tween compressor A35 and diaphragm plate A5 To prevent the O ring from being dam aged use a suitable...

Page 31: ...r stem retracts opposing the spring force as the signal pressure increases 19 Affix a new nameplate with changed symbol and new configuration ID to the actuator 6 6 Version with handwheel The stem con...

Page 32: ...tract the actuator stem 3 To change from manual to automatic op eration put the handwheel into the neu tral position by aligning the pointer A55 with the groove on the stem con nector A51 4 Tighten th...

Page 33: ...A78 and remove cover A73 2 Move actuator to the required position of maximum travel 3 Screw back on the cover A73 as far it will go and retighten the lock nut A78 Note A7 Actuator stem A50 Actuator s...

Page 34: ...ales Service department Service and repair work must only be per formed by staff trained for this purpose Risk of actuator damage due to excessively high or low tightening torques Observe the specifie...

Page 35: ...or stem A7 into a vise using protective jaws Make sure that the actuator stem is not damaged 7 Unscrew and remove the nut A33 8 Remove the parts from the actuator stem A7 in the specified order Spacer...

Page 36: ...5 centering them in the intend ed recesses 14 Place on the top diaphragm case A1 Ensure that the compressed air connec tions on the cases A1 A2 are correctly aligned with each other 15 If necessary pr...

Page 37: ...hat the diaphragm does not turn 12 Check whether the springs A10 rest correctly in the bottom diaphragm case A2 13 Apply a suitable lubricant to the actuator stem A7 14 Place the diaphragm plate assem...

Page 38: ...the springs A10 in the diaphragm plate A5 centering them in the intend ed recesses 13 Place on the top diaphragm case A1 Ensure that the compressed air connec tions on the cases A1 A2 are correctly al...

Page 39: ...th each other 13 If necessary preload the springs see section 5 2 14 Fasten the top and bottom diaphragm cases A1 A2 together using the nuts A21 and bolts A20 Tighten the nuts evenly Observe tightenin...

Page 40: ...blocked Check attachment Unblock the actuator Insufficient signal pressure Check the signal pressure Check the signal pressure line for leakage Signal pressure not connected to the correct diaphragm...

Page 41: ...lve out of operation See associated valve documentation 2 Disconnect the pneumatic air supply to depressurize the actuator 9 2 Removing the actuator from the valve 1 Put the control valve out of opera...

Page 42: ...bstances togeth er with your other household waste 2 Valve bonnet 9 Stem connector nut 10 Lock nut A1 Top diaphragm case A2 Bottom diaphragm case A8 Ring nut A20 Hexagon bolt A21 Hexagon nut A22 Hexag...

Page 43: ...addresses of SAMSON AG its subsid iaries representatives and service facilities worldwide can be found on the SAMSON website in all SAMSON product catalogs or on the back of these Mounting and Operat...

Page 44: ...nut 22 Hexagon bolt preloading 23 Hexagon nut preloading 25 Washer 27 Stem connector clamp 29 Hexagon screw 32 Hanger 3 33 Nut 34 Slotted nut 2 35 Compressor 36 Spacer 40 Radial shaft seal 41 Wiper 4...

Page 45: ...EB 8310 5 EN 45 2 300 4 5 10 11 12 78 101 32 22 20 23 21 25 8 41 42 42 40 35 1 16 101 100 33 36 17 7 34 75 16 70 70 73 100 77 34 36 76 17 7 34 27 29 300...

Page 46: ...46 EB 8310 5 EN...

Page 47: ...EB 8310 5 EN 47...

Page 48: ...SAMSON AG MESS UND REGELTECHNIK Weism llerstra e 3 60314 Frankfurt am Main Germany Phone 49 69 4009 0 Fax 49 69 4009 1507 samson samson de www samson de EB 8310 5 EN 2017 03 15 English...

Reviews: