


22
EB 8310-5 EN
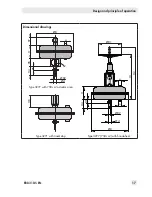
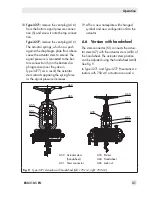
Mounting and start-up
5 Mounting and start-up
SAMSON control valves are delivered ready
for use. In special cases, the valve and actu-
ator are delivered separately and must be
assembled on site. The procedure to mount
and start up the actuator are described in
following.
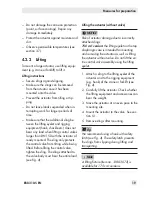
Risk of actuator damage due to excessively
high or low tightening torques.
Observe the specified torques on tightening
actuator components. Excessively tightened
torques lead to parts wearing out quicker.
Parts that are not tightened far enough may
loosen.
Observe the specified tightening torques
(
u
AB 0100).
Risk of actuator damage due to the use of
unsuitable tools.
Only use tools approved by SAMSON
(
u
AB 0100).
See associated valve documentation for
additional mounting instructions.
5.1 Mounting the actuator onto
the valve
Proceed as follows if the valve and actuator
have not been assembled by SAMSON:
−
Remove the mounted actuator before
mounting another actuator (see sec-
tion 9.2).
−
Preloading the actuator springs increases
the thrust and reduces the travel range of
the actuator (see section 5.2).
The valve and actuator are assembled with
special attention paid to the actuator's bench
range and direction of action. These details
are specified on the actuator nameplate (see
section 2.1).
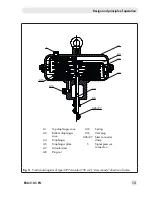
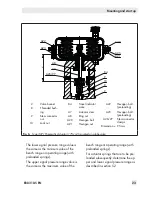
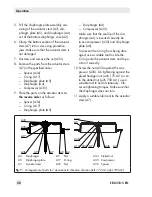
1. Loosen the lock nut (10) and stem con-
nector nut (9) on the valve.
2. Press the plug together with the plug stem
firmly into the seat ring.
3. Thread down the lock nut and stem con-
nector nut.
4. Remove the clamps of the stem connector
(A26) and the ring nut (A8) from the
actuator.
5. Slide the ring nut over the plug stem.
6. Place the actuator onto the valve bonnet
(2) and secure it with the ring nut.
7. Determine the lower and upper signal
pressure range values:
NOTICE
!
NOTICE
!
Note
Note
Tip
Summary of Contents for 3277
Page 46: ...46 EB 8310 5 EN...
Page 47: ...EB 8310 5 EN 47...