background image

Operation

Vistage™ Series Flat-Panel Display Installation/Operation Manual

31 

PRE

L

IMINAR

Y

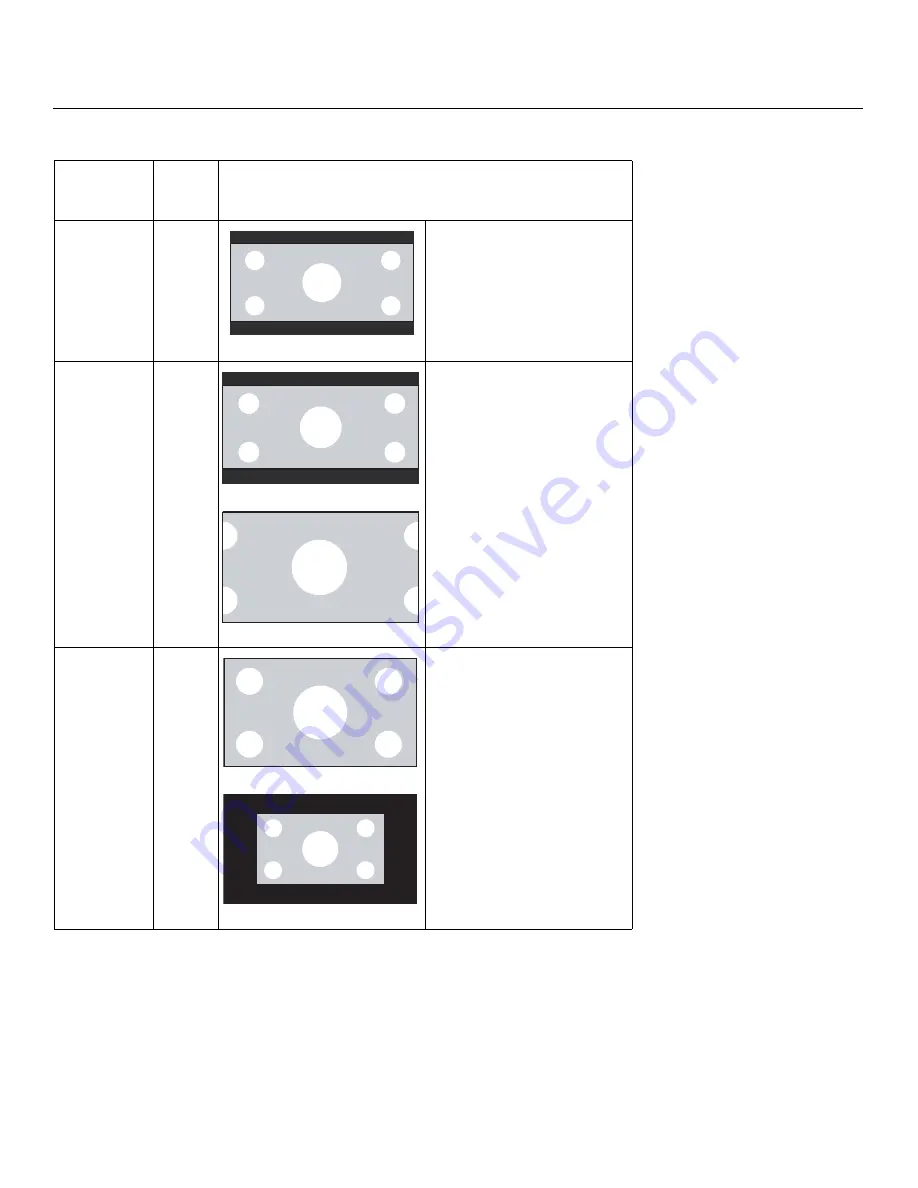
Cinema

CINEMA

Select Cinema to view 2.35:1 
source material on a 16:9 
screen. The upper and lower 
portions of the screen are 
masked, but the geometry of the 
active image area is not 
changed.

Virtual Cinema

V-CINE

A 2.35:1 image is stretched 
anamorphically in both 
directions to fill a 16:9 display 
area. 

The 2.35:1 image is cropped on 
all sides. 

Native

NATIVE

Select Native to display the 
source signal in its native 
resolution, centered in the 
display area with no re-sizing or 
overscan. 

This means, for example, that 
720p HDTV programs will 
display with unused pixels on all 
sides: 320 on the left and right 
sides and 180 above and below. 

With SDTV and EDTV sources, 
the DHD Controller scales the 
image horizontally to achieve a 
16:9 aspect ratio. 

Table 4-1. A

s

pect Ratio 

S

etting

s

 (continued)

A

s

pect Ratio

Remote 

Control

Key

De

s

cription

2.35:1 Image on

16:9 Screen

2.35:1 Image on

16:9 Screen

2.35:1 Image on

16:9 Screen with

Virtual Cinema

1080i HDTV Image

720p HDTV Image

Summary of Contents for Vistage series

Page 1: ...Vistage Series Ultra Thin Flat Panel Displays Models V 50HD and V 63HD INSTALLATION OPERATION MANUAL...

Page 2: ......

Page 3: ...roduct proves to be defective in material or workmanship during the warranty period Runco will repair the product replace the product with a substantially similar new or like new product or refund a p...

Page 4: ...ent The customer will need to address and resolve any shipping damage claims directly with the shipping company 5 The customer is responsible for providing a suitable box to ship the defective product...

Page 5: ...hard to see and will not detract from the display quality or usability at normal viewing distance The following are Runco s criteria for identifying bright or dark sub pixels that would be considered...

Page 6: ...ALL NOT BE LIABLE FOR ANY CLAIM AGAINST THE CUSTOMER BY ANY OTHER PARTY This warranty gives you specific legal rights and you may have other rights which vary from locality to locality Some localities...

Page 7: ...pecified by the manufacturer 12 Use only with a cart stand tripod bracket or table specified by the manufacturer or sold with the apparatus When a cart is used use caution when moving the cart apparat...

Page 8: ...tromagnetic compatibility EMC Part 4 Testing and measurement techniques Section 6 Conducted disturbances induced by radio frequency fields immunity test EN 61000 4 8 Electromagnetic compatibility EMC...

Page 9: ...Canada The Product contains small amounts of tin lead and or mercury Disposal of these materials may be regulated due to environmental considerations Lamp s inside this product contain mercury This pr...

Page 10: ...x Vistage Series Flat Panel Display Installation Operation Manual P R E L I M I N A R Y Notes...

Page 11: ...2 Controls and Functions 5 Vistage Series at a Glance 5 Front Panel Controls and Indicators 5 Rear Panel Connectors 6 DHD Controller Front Panel 7 DHD Controller Rear Panel 8 V 50HD V 63HD Remote Cont...

Page 12: ...sing the On Screen Menus 27 Main Menu 29 Input Source 29 Aspect Ratio 29 Screen 32 Picture 32 Input Position 36 Memory Presets 38 Sleep Timer 39 Information 40 Calibration 41 Service 47 5 Maintenance...

Page 13: ...0 3 6 SCART RGBS Source Connection 21 3 7 Composite Video Source Connections 21 3 8 Audio Processor Connection to DHD Controller 22 3 9 RS 232 Control System Connection 23 3 10 Ethernet Network Connec...

Page 14: ...List of Figures xiv Vistage Series Flat Panel Display Installation Operation Manual P R E L I M I N A R Y Notes...

Page 15: ...anual Runco welcomes your comments about this manual Send them to support Runco com Textual and Graphic Conventions Text Conventions The following conventions are used in this manual in order to clari...

Page 16: ...hey also provide supplemental information CAUTIONS alert users that a given action or omitted action can degrade performance or cause a malfunction WARNINGS appear when a given action or omitted actio...

Page 17: ...technology including Runco s Emissive Cell Structure which delivers exceptional brightness and viewing angles Using a proprietary algorithm each sub pixel is individually modulated to turn on or off b...

Page 18: ...tra slim video processor and scaler Optional bottom mount speaker bar and halo shaped table stand Parts List Your V 50HD V 63HD is shipped with the following items If any items are missing or damaged...

Page 19: ...R Y 2 1 Vistage Series at a Glance Front Panel Controls and Indicators Figure 2 1 and Figure 2 2 show the V 50HD V 63HD front panel controls and indicators Figure 2 1 V 50HD Front Panel Controls and...

Page 20: ...off 3 DISPLAY STAND Optional accessory for table top installations 4 SPEAKER BAR Optional accessory that can be mounted to the bottom of the panel Rear Panel Connectors Figure 2 3 shows the rear panel...

Page 21: ...Figure 2 4 shows the controls and indicators on the DHD Controller front panel the paragraphs that follow describe them Figure 2 4 DHD Controller Front Panel 1 STATUS LED Indicates DHD Controller stat...

Page 22: ...site video inputs for connecting a VCR camcorder or other composite video source The Video 1 input also provides composite sync input for SCART RGBS sources 5 HDMI 1 HDMI 2 HDMI 3 HDMI 4 Digital HDCP...

Page 23: ...remote control and the paragraphs that follow describe its functionality Figure 2 6 DHD Controller V 50HD V 63HD Remote Control ON ISF NT VID 1 VID 2 HD 1 HD 2 VID 3 COMP ISF DAY CUST 1 CUST 2 OFF RA...

Page 24: ...hrough the different source inputs in this order LEFT Button HDMI 4 HDMI 3 HDMI 2 HDMI 1 SCART HD 2 HD 1 Component Composite 3 Composite 2 Composite 1 RIGHT Button Composite 1 Composite 2 Composite 3...

Page 25: ...he SCART video input as the source or to enter the numeric character 9 14 Aspect Ratio Selection Buttons Use these buttons to select an aspect ratio directly as follows NATIVE Displays the source sign...

Page 26: ...Controls and Functions 12 Vistage Series Flat Panel Display Installation Operation Manual P R E L I M I N A R Y Notes...

Page 27: ...Insert the lower tab of the cover into the opening and press down the cover until it clicks in place Notes on Batteries Make sure that the battery polarities are correct when installing the batteries...

Page 28: ...following this one provide detailed instructions Table 3 1 Installation Overview Step Procedure For Details Refer to page 1 Mount the V 50HD V 63HD on a wall refer to instructions provided with the w...

Page 29: ...easily solve this issue Runco recommends using the DHD Controller with a high quality audio receiver that has the ability to effectively synchronize audio and video signals Most mainstream audio recei...

Page 30: ...ips that can help improve your installation Keep the ambient temperature constant and below 35 C 95 F Keep the display away from heating and or air conditioning vents Changes in temperature may cause...

Page 31: ...devices Don t use a 20 foot cable when a 6 foot cable will suffice Ensure that the cables are securely connected Tighten the thumbscrews on connectors that have them Connecting the DHD Controller to t...

Page 32: ...this ensure the best possible picture quality it provides a communication channel for CEC command messages between the display and source component if both support CEC You can also connect computers...

Page 33: ...Video Source Connections Connect your component video sources to the HD1 HD2 and or Component SCART inputs as shown in Figure 3 4 Figure 3 4 Component Video Source Connections Video 1 Y Video 2 Video...

Page 34: ...anual P R E L I M I N A R Y RGBHV Source Connections Connect personal computers and or other RGB sources to the HD1 and or HD2 inputs as shown in Figure 3 5 Figure 3 5 RGBHV Source Connections Pr R Pb...

Page 35: ...r See Figure 3 6 Figure 3 6 SCART RGBS Source Connection Composite Source Connections See Figure 3 7 Figure 3 7 Composite Video Source Connections Video 1 Y Video 2 Video 3 Pr Pb Pr R Pb B Y G HD1 HD2...

Page 36: ...e for monitoring purposes See Figure 3 8 Figure 3 8 Audio Processor Connection to DHD Controller The DHD Controller does not transmit HDMI CEC control messages from the HDMI Audio Out connector For mo...

Page 37: ...r gateway to the Ethernet port on the Primary DHD Controller see Figure 3 10 For more information about configuring and using this connection refer to Network on page 48 Figure 3 10 Ethernet Network C...

Page 38: ...2 Connect the other end to your AC power source 3 Re attach the AC input cover plate routing the power cord through the slot on the plate 4 Connect the DHD Controller to a nearby AC outlet using the...

Page 39: ...ng the V 50HD V 63HD with a personal computer you may need to adjust the display properties of your computer s video card To do this on a Microsoft Windows based PC 1 Choose Settings from the Windows...

Page 40: ...sh Frequency to 60Hz and click OK 1 The native resolution of the V 50HD V 63HD is 1920 x 1080 Other horizontal or vertical resolutions may be scaled upward or downward to fit the display 2 With most c...

Page 41: ...y Memory Presets Recall ISF Night or ISF Day Recall Save Custom 1 or Custom 2 Reset Custom 1 and Custom 2 to Factory Default Sleep Timer Off 30 Minutes 60 Minutes 90 Minutes 2 Hours or 4 Hours Informa...

Page 42: ...mation E Mail Calibration Data Remote Network Control On Off Color Space Auto REC601 REC709 RGB PC or RGB Video Not available on Composite 1 Composite 2 or Composite 3 inputs Miscellaneous Language En...

Page 43: ...7 to its left in this example 16 9 is selected Note that some aspect ratios are unavailable and or not useful with certain types of source material The optimal setting depends on a number of factors...

Page 44: ...er monitors standard television programming and most VHS video cassettes Letterbox LET BOX Letterbox mode scales zooms in on a 4 3 image linearly by the same amount on all sides to fill a 16 9 display...

Page 45: ...all sides Native NATIVE Select Native to display the source signal in its native resolution centered in the display area with no re sizing or overscan This means for example that 720p HDTV programs wi...

Page 46: ...ed by an ISF certified installation technician All signal types require separate processing Therefore you need to calibrate each DHD Controller input separately Although it may be possible to obtain s...

Page 47: ...gray areas are barely visible The lighter gray areas are clearly visible The white areas are a comfortable level of true white The image contains only black gray and white no color Contrast On your e...

Page 48: ...troller front panel 2 Select Service from the Main Menu and press ENTER 3 Enter the Service menu passcode 4 Select Display Device from the Service menu and press ENTER 5 Press ENTER again to select Co...

Page 49: ...appears greener To adjust the tint enable blue only display mode in the Diagnostics menu as you would for adjusting color saturation refer to the previous section Color Saturation Select Tint from th...

Page 50: ...480i video sources Use the left or right arrow buttons to select the desired amount of noise reduction keeping in mind that higher settings which reduce high frequencies may also soften the image Inpu...

Page 51: ...HDTV DVDs and other video sources Overscan is generally not necessary or desirable This control defines the amount of overscan applied to the image The range is from 0 to 20 There are two overscan mod...

Page 52: ...lickering or several soft vertical stripes or bands across the entire image indicates poor pixel tracking Proper pixel tracking helps ensure that the image quality is consistent across the screen that...

Page 53: ...stom 2 memory preset select it press or to highlight Save and press ENTER To reset the Custom 1 or Custom 2 memory preset to its factory default state select it press or to highlight Reset and press E...

Page 54: ...Ethernet network connection To enable network communication via Ethernet refer to IP Configuration on page 48 Field Service Manufacturing The Field Service and Manufacturing menus are password protect...

Page 55: ...e contrast while maintaining good details for blacks and whites If excess ambient light washes out the image and it becomes difficult or impossible to see details in dark areas lower the gamma setting...

Page 56: ...r measurement and management standards Figure 4 7 CIE 1931 Chromaticity Diagram Simple Select Simple mode from the Color Temp menu to choose one of five color temperature presets 3200K 5500K 6500K 750...

Page 57: ...Display Color Common Settings menu described on page 41 but affect the Y Pb and Pr signal components rather than the red green and blue channels Chroma Delay use the Chroma Delay control to correct a...

Page 58: ...clipboard to a different input source signal format and or memory preset do any or all of the following Switch to another input for example from HD1 to HD2 Change the output signal format at the sour...

Page 59: ...omatically Output Shift The controls in the Output Shift menu are similar to those in the Input Position menu except that they change the characteristics of the output signal These settings are saved...

Page 60: ...have the V 50HD V 63HD display the owner s name your name the phrase ISF Calibrated and or any other string up to 30 characters in length Use the up or down cursor button to select a character Use th...

Page 61: ...enu and press ENTER Press or to select Hor or Ver Then press or to change the position Service Use the Service menu to access advanced display configuration settings This menu should be used by ISF ce...

Page 62: ...ing Front or Ceiling Rear Or use the Auto setting to have the display automatically determine the orientation floor or ceiling using an internal sensor Diagnostics Select Diagnostics from the Display...

Page 63: ...the error that occurred or Succeeded Auto Firmware Upgrade Select Auto Firmware Upgrade from the Network menu to enable automatic detection of a newer version of the DHD Controller firmware If one is...

Page 64: ...apsed time since the last notification If a Calibration Data message See Attached File Serial Number DHD Controller serial number Customer Information From Customer Information sub menu see below Best...

Page 65: ...NTER 3 Press or repeatedly to set the highlighted character 4 Press or to select the next or previous character Use the and buttons to change it 5 Press ENTER when you have finished editing that line...

Page 66: ...Miscellaneous Select Miscellaneous from the Service menu to set the following options Language Select Language from the Miscellaneous menu and press the up or down arrows to select the OSD Language En...

Page 67: ...le or undesirable You have multiple DHD Controllers and want to control them independently as opposed to broadcasting commands from a single remote to all of them In this scenario you can use multiple...

Page 68: ...I menu to specify whether or not the EDID extensions from the display device are passed through to the sources connected to the HDMI 1 HDMI 2 HDMI 3 or HDMI 4 inputs By default the extensions are on C...

Page 69: ...de Select Standby Mode from the Service menu to control the DHD Controller s power management feature Choose Low Power the default setting to have the DHD Controller shut down completely when it is tu...

Page 70: ...Operation 56 Vistage Series Flat Panel Display Installation Operation Manual P R E L I M I N A R Y Notes...

Page 71: ...DHD Controller is plugged in and switched on and that the AC outlet is active Replace the batteries Ensure that the DHD Controller is properly connected to the V 50HD V 63HD see Figure 3 2 The displa...

Page 72: ...source Image is too bright and or lacks definition in the bright areas of the image Contrast is set too high Lower the contrast setting Image appears washed out and or dark areas appear too bright Br...

Page 73: ...al port as follows no parity 8 data bits 1 stop bit and no flow control Set the baud rate to 19200 to match that of the DHD Controller RS 232 port Serial Command Syntax Serial commands to the DHD Cont...

Page 74: ...erial Commands Command Parameter min max Value Stored Description Power On Off Commands OFF NA NA Turns display off ON NA NA Turns display on POWER 0 1 NA Turns display on and off POWER NA NA Returns...

Page 75: ...alue CHROMADELAY 7 7 YES Sets a value for input color chroma delay CHROMADELAY NA NA Returns input color chroma delay setting COLOR 50 50 YES Sets a value for color COLOR NA NA Returns color setting v...

Page 76: ...A Returns input vertical position value IWIDTH 0 50 YES Sets the value for input width IWIDTH NA NA Returns input horizontal width value OVERSCAN 0 20 YES Sets the overscan percentage OVERSCAN NA NA R...

Page 77: ...NA NA Sets the screen to Screen 1 SCREEN2 NA NA Sets the screen to Screen 2 Miscellaneous Commands DISPLAY NA NA Returns display device input source value as follows 1 Auto 52 V 50HD 53 V 63HD INRES...

Page 78: ...s released and pressed again This allows the DHD Controller to distinguish between a button that remains down and one that is pressed repeatedly Five 5 address bits The default address is 17 binary 10...

Page 79: ...set to zero Figure 6 1 RC5 Message Format With Toggle Bit 0 Hex 3 4 4 1 Binary 1 1 0 1 0 0 0 1 0 0 0 0 0 1 With Toggle Bit 1 Hex 3 C 4 1 Binary 1 1 1 1 0 0 0 1 0 0 0 0 0 1 Function Start Bits Toggle B...

Page 80: ...x3C74 EXIT HD 1 0x3451 0x3C51 HD1 video input HD 2 0x3452 0x3C52 HD2 video input HDMI 1 0x3453 0x3C53 HDMI1 video input HDMI 2 0x3454 0x3C54 HDMI2 video input HDMI 3 0x3455 0x3C56 HDMI3 video input HD...

Page 81: ...w VID 1 0x344D 0x3C4D Composite video input 1 VID 2 0x3458 0x3C58 Composite video input 2 VID 3 0x3459 0x3C59 Composite video input 3 V CINE 0x346D 0x3C6D Virtual Cinema aspect ratio V WIDE 0x344C 0x3...

Page 82: ...its OSD language when a similar change is made at the source To use CEC connect your CEC compatible sources to the HDMI inputs on the V 50HD V 63HD Set the CEC option to On refer to CEC on page 54 Ad...

Page 83: ...sion 0x9F Abort Message 0xFF User Control Pressed 0x44 User Control Released 0x45 Give OSD Name 0x46 Menu Request 0x8D Give Device Power Status 0x8F The DHD Controller does not transmit HDMI CEC contr...

Page 84: ...External Control 70 Vistage Series Flat Panel Display Installation Operation Manual P R E L I M I N A R Y Notes...

Page 85: ...otocol support via HDMI Ethernet Inputs Refer to Table 7 2 Video Standards NTSC PAL SECAM CEA 861D Calibration ISF Certified Calibration Configuration Contrast Ratio sequential 1 000 000 1 typical 10...

Page 86: ...rete infrared IR remote RS 232 female DB9 for serial commands Consumer Electronics Control CEC protocol support via HDMI Ethernet Ethernet Communication RJ45 female for web server e mail auto firmware...

Page 87: ...7 3 V 50HD Dimensions Figure 7 1 shows the V 50HD dimensions Figure 7 1 V 50HD Dimensions with Optional Speaker Bar Speaker Bar 773 2mm 30 4in 1257mm 49 5in 114 3mm 4 5in 432 3mm 17 0in 802 7mm 31 6i...

Page 88: ...HD Dimensions Figure 7 2 shows the V 63HD dimensions Figure 7 2 V 63HD Dimensions with Optional Speaker Bar 935 2mm 36 8in 1547 4mm 60 9in 1092 5mm 43 0in 114 3mm 4 5in 208mm 8 2in 432 3mm 17 0in 802...

Page 89: ...0x480 640x480 60 00 31 469 25 175 66 59 35 892 29 862 72 00 37 861 31 500 75 00 37 500 31 500 85 00 43 269 36 000 800x600 800x600 60 00 37 879 40 000 72 00 48 077 50 000 75 00 46 875 49 500 85 00 53 6...

Page 90: ...280x720 23 98 24 00 17 982 18 000 59 341 59 400 720 25p 1280x720 25 00 18 750 74 250 720 30p 1280x720 29 97 30 00 22 478 22 500 74 175 74 250 720 50p 1280x720 50 00 37 500 75 250 720 60p 1280x720 60 0...

Page 91: ...60 00 15 734 15 750 3 580 PAL N 50 00 15 625 3 580 SECAM 50 00 15 625 13 500 Table 7 3 Supported Signal Timings by Input continued Format Resolution Refresh Rate Hz Horizontal Frequency kHz PixelFrequ...

Page 92: ...Specifications 78 Vistage Series Flat Panel Display Installation Operation Manual P R E L I M I N A R Y Notes...

Page 93: ......

Page 94: ...Runco International 800 23RUNCO Fax 503 748 8161 www runco com 020 1114 00 Rev A April 2011...

Reviews: