background image

39

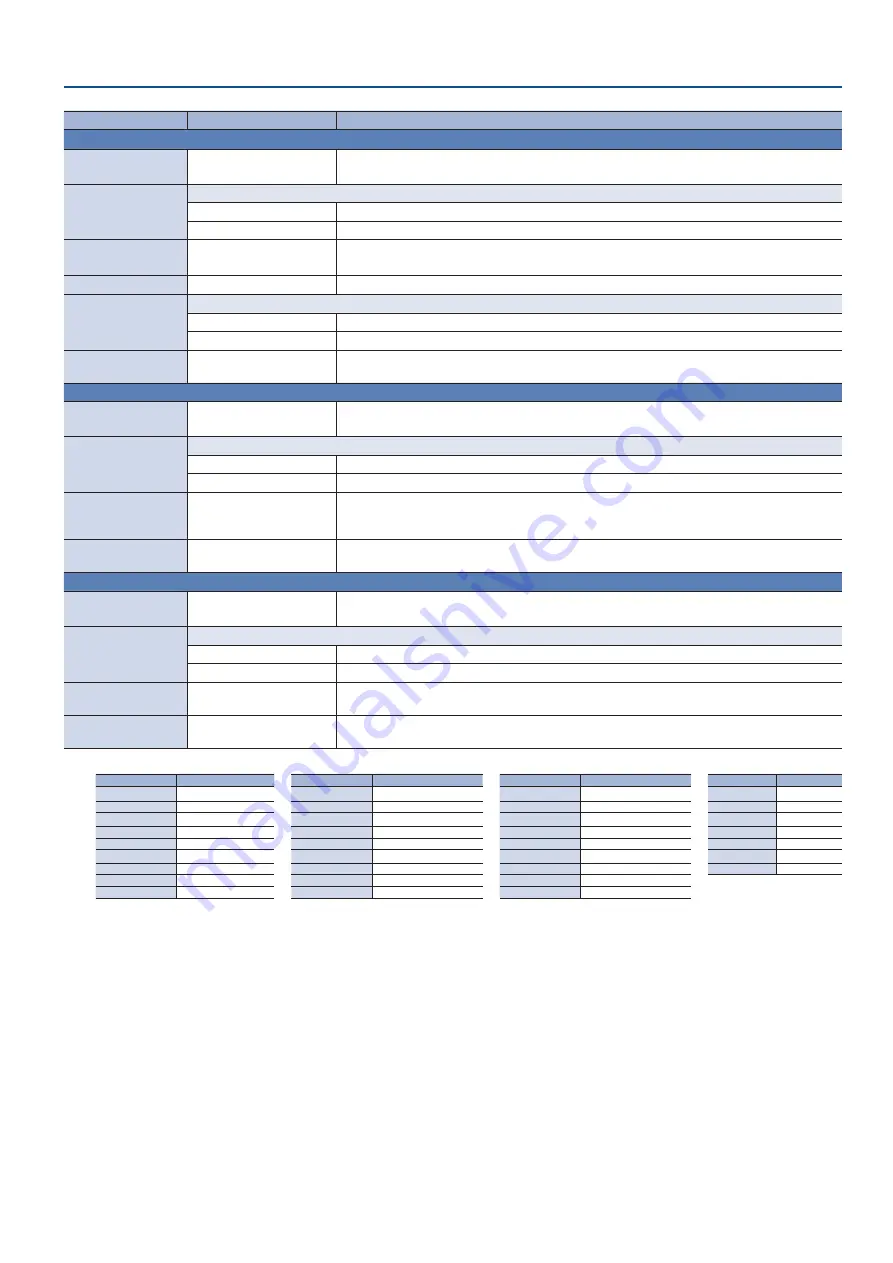
Menu List

Menu item

Value

 (bold text: default value)

Explanation

When ASSIGN = REVERB

SW

OFF, 

ON

Turns reverb on/off.
You can also turn this on/off using the AUDIO EFFECTS button to which the function is assigned.

SW MODE

Specifies the operation of the AUDIO EFFECTS button.
MOMENTARY

The effect is on only while you hold down the button, and turns off when you release the button.

LATCH

The effect alternately turns on/off each time you press the button.

LEVEL

-INF– 

-20 0

–10.0dB

Sets the amount of sound that is returned from the reverb (return level). This adjusts the depth of 

the overall reverb.

TIME

0.0–

0 5

–5.0sec

Specifies the time until the reverberation is no longer heard.

TYPE

Specifies the reverb type.

ROOM

Produces the natural-sounding reverberation of a room.

HALL

Produces the reverberation that is typical of a performance in a concert hall.

LED COLOR

RED, GREEN, YELLOW, BLUE, 

MAGENTA, CYAN

Specifies the illumination color of the AUDIO EFFECTS button.

When ASSIGN = MUTE

SW

OFF

, ON

Turns the mute function on/off for the audio specified by “CH.”
You can also turn this on/off using the AUDIO EFFECTS button to which the function is assigned.

SW MODE

Specifies the operation of the AUDIO EFFECTS button.
MOMENTARY

The effect is on only while you hold down the button, and turns off when you release the button.

LATCH

The effect alternately turns on/off each time you press the button.

CH

HDMI 1–3, 

MIC 1

–2, LINE, 

USB FROM PC, USB STREAM, 

AUX, MAIN

Specify the audio that will be affected by the operation.

LED COLOR

RED, GREEN, YELLOW, BLUE, 

MAGENTA, CYAN

Specifies the illumination color of the AUDIO EFFECTS button.

When ASSIGN = SOLO

SW

OFF

, ON

Turns the solo function on/off for the audio specified by “CH.”
You can also turn this on/off using the AUDIO EFFECTS button to which the function is assigned.

SW MODE

Specifies the operation of the AUDIO EFFECTS button.
MOMENTARY

The effect is on only while you hold down the button, and turns off when you release the button.

LATCH

The effect alternately turns on/off each time you press the button.

CH

HDMI 1–3, 

MIC 1

–2, LINE, 

USB FROM PC

Specify the audio that will be affected by the operation.

LED COLOR

RED, GREEN, YELLOW, BLUE, 

MAGENTA, CYAN

Specifies the illumination color of the AUDIO EFFECTS button.

(*11)  The factory settings for EFFECTS 1–4 are as follows.

Menu item

EFFECTS 1

Menu item

EFFECTS 2

Menu item

EFFECTS 3

Menu item

EFFECTS 4

ASSIGN

VOICE CHANGER

ASSIGN

PLAYBACK (BGM/SE)

ASSIGN

PLAYBACK (BGM/SE)

ASSIGN

REVERB

SW

OFF

SW

OFF

SW

OFF

SW

OFF

SW MODE

LATCH

SW MODE

LATCH

SW MODE

LATCH

SW MODE

LATCH

TARGET

MIC 1

AUDIO ASSIGN

BriskAfternoon

AUDIO ASSIGN

Applause

LEVEL

-20.0dB

PITCH

+12

LEVEL

0.0dB

LEVEL

0.0dB

TIME

0.5sec

FORMANT

+4

LOOP

ON

LOOP

OFF

TYPE

ROOM

ROBOT

OFF

FADE IN

OFF

FADE IN

OFF

LED COLOR

YELLOW

MIX

100

FADE OUT

3.0sec

FADE OUT

1.0sec

LED COLOR

MAGENTA

LED COLOR

CYAN

LED COLOR

BLUE

Summary of Contents for VR-1HD

Page 1: ...ct Preset 19 Applying Effects to Output Audio 20 Correcting a Time Difference Between Video and Audio Delay 20 Silencing Only Specific Audio Mute 21 Checking a Specific Audio Input Solo 21 Interlinking Audio Output to Video Switching Audio Follow 22 Controlling the Volume Automatically Auto Mixing 22 Playing Back Music Files 23 Suppressing Echo in a Web Conference System Echo Canceller 24 About th...

Page 2: ...tory settings You can also assign other functions to each of buttons AUDIO MIXER area p 16 SIG PEAK indicators MIC 1 MIC 2 LINE These are lit green when audio input is detected If the input is excessive the indicator is lit red MIC 1 MIC 2 LINE faders Adjust the volume of the MIC 1 MIC 2 and LINE inputs SIG PEAK indicator USB STREAM Indicates the volume level of the USB output USB STREAM knob Adju...

Page 3: ...l processes such as video compositing and audio effects It is output from the MAIN connector This is the video that is seen by the people who are watching the live stream or presentation SETUP area p 6 MENU button When this is on lit the menu appears on the display that s connected to the MONITOR MENU connector If you re in a lower level this button returns to the next higher level If the highest ...

Page 4: ...his also inputs the audio playback from your computer into the VR 1HD If you are outputting HD video via USB connect this to a USB 3 0 port of your computer If you connect via an extension cable or a USB hub the computer might not recognize the VR 1HD We recommend that you connect the VR 1HD directly to your computer Ground terminal Connect this to an external earth or ground if necessary To preve...

Page 5: ...e sure to turn off the PHANTOM switch Phantom power is common to the MIC 1 and MIC 2 jacks MIC 2 jack Connect your mic here If you connect a condenser mic that requires a phantom power supply turn the PHANTOM switch on NOTE 5 5 If you use a gooseneck mic operating noise might be picked up 5 5 Do not connect a mic that supports plug in power or the mics that are included with Roland VP 03 or JD Xi ...

Page 6: ...it you can change the value more greatly 5 Long pressing the VALUE knob returns the current menu item you re setting to its default value 5 Press the MENU button several times to close the menu MEMO 5 The contents of the menu settings are saved to the unit every four seconds or when you close the menu 5 When you press the LEVEL SETUP button the menu for volume input gain solo and mute settings app...

Page 7: ...80 x 720 59 94p 1280 x 720 50p 1920 x 1080 29 97p 1920 x 1080 25p 7Audio input format MAIN connector MONITOR MENU connector Linear PCM 24 bits 48 kHz stereo USB STREAM port Linear PCM 16 bits 48 kHz stereo Setting the Output Format Here s how to specify the output format as appropriate for the device that s connected MAIN MONITOR MENU connectors 1 MENU button0 VIDEO OUTPUT 0select OUTPUT FORMAT 2 ...

Page 8: ...rs 2 Use the VALUE knob to select a menu item 7MAIN OUTPUT MONITOR MENU OUTPUT Menu item Explanation COLOR SPACE Specifies the color space system for representing colors in video DVI D HDMI Specifies the type of output signal ZOOM 1 Adjusts the zoom ratio POSITION H 1 Adjusts the display position in the horizontal direction POSITION V 1 Adjusts the display position in the vertical direction BRIGHT...

Page 9: ...nnectors you can also assign still images or single color screens to the INPUT 1 3 buttons To make these settings use the MENU button0 VIDEO INPUT 0 INPUT 1 INPUT 3 0 INPUT SOURCE Value Explanation HDMI The video being input from the VIDEO INPUT connector STILL IMAGE 1 2 A still image loaded into the unit p 15 BLACK WHITE GRAY GREEN BLUE Single color screen A still image loaded into the unit canno...

Page 10: ...UE Single color screen Switching theVideo Automatically Auto Switching The video of INPUT 1 3 or of scenes p 12 can be switched automatically the auto switching function You can make operation easier by letting the video switch automatically Operation modes for auto switching Auto switching provides three operation modes that you can select as appropriate for your situation auto scan beat sync and...

Page 11: ...rce SCENE A E SW 4 Turn the VALUE knob to edit the value of the setting and press to confirm 5 Press the MENU button several times to close the menu 7Video follows audio 1 MENU button0 AUTO SWITCHING 0select TYPE 2 Turn the VALUE knob to select VIDEO FOLLOWS AUDIO and press to confirm 3 Use the VALUE knob to select a menu item Menu item Explanation TIME Specifies the time until audio detection res...

Page 12: ...e MENU button0 TRANSITION 0 SCENE TRANSITION Value Explanation BLACK FADE A fade effect enclosing a black screen is applied All screens switch simultaneously MIX FADE A fade effect is applied Screens switch individually Registering 7Picture in picture PinP 1 SCENE EDIT button0 SCENE A SCENE E 0select TYPE Shows the type of screen configuration that is currently registered 2 Turn the VALUE knob to ...

Page 13: ...V CENTER or H CENTER 2 Turn the VALUE knob to edit the value of the setting and press to confirm 3 Press the SCENE EDIT button several times to close the menu MEMO A still image loaded into the unit p 15 cannot be made smaller If you use V STRETCH or H STRETCH to show a still image the stretch effect might not apply correctly depending on the resolution of the still image or the display region of ...

Page 14: ...t 6 Press the MENU button several times to close the menu Key compositing 1 Press the KEY button to turn key compositing on lit The logo or image is shown as a cut 2 To turn off key compositing press the KEY button once again The background video returns as a cut Fading In Out the Main OutputVideo Here s how to perform a fade out from the main output video to a black screen or a fade in from a bla...

Page 15: ...to confirm A list of the still images in the USB flash drive is shown 5 Turn the VALUE knob to select the still image that you want to load and press to confirm A confirmation message appears If you want to cancel the operation press the MENU button 6 Turn the VALUE knob to select YES and press to confirm The still image is loaded into the unit When the operation is finished the message COMPLETED ...

Page 16: ... theVolume Balance Here s how to adjust the volume balance of each input and the overall volume 1 Move the MAIN knob to a position near the indicator 0 dB 2 While monitoring the audio via speakers or headphones adjust the volume balance for the respective inputs Raise the volume level of audio you want to make more prominent for example an emcee microphone and lower the volume level for other audi...

Page 17: ...FECTS 1 button once again Adjusting the voice changer settings 1 MENU button0 AUDIO EFFECTS 0 EFFECTS 1 0 select the menu item Menu item Explanation TARGET Specifies the mic audio to which the effect applies PITCH Adjusts the pitch of the voice in semitone steps A setting of 0 is the original pitch FORMANT Adjusts the character formant of the voice Settings in the negative direction produce a more...

Page 18: ...hat exceeds the specified threshold level is compressed This reduces the difference between the maximum volume and minimum volume making the audio more comfortable for listening 7Limiter Audio that exceeds the specified threshold level is compressed This prevents distortion from occurring when unexpectedly loud audio is input Distortion will occur if audio that exceeds the allowable range of the l...

Page 19: ... 4 button is assigned the reverb on off function You can use the MENU button0 AUDIO EFFECTS 0 EFFECTS 1 EFFECTS 4 0 ASSIGN to change the function that s assigned Using an Effect Preset The VR 1HD provides effect presets for the mics Simply by selecting a preset you can easily apply the effect that s appropriate for your situation Each preset consists of a combination of two effects equalizer high ...

Page 20: ... menu SW Turns the equalizer on off HI Boosts or attenuates the high band HI FREQ Adjusts the center frequency when changing the tone quality in the high band MID Boosts or attenuates the middle band MID FREQ Adjusts the center frequency when changing the tone quality in the middle band MID Q Adjusts the width of the frequency band when boosting or attenuating the middle band LO Boosts or attenuat...

Page 21: ...U button0 AUDIO EFFECTS 0 EFFECTS 1 EFFECTS 4 0use the following menu items to change the function assignment Menu item Explanation ASSIGN Choose MUTE CH Specify the audio that will be affected by the operation Checking a Specific Audio Input Solo Here s how you can temporarily monitor a specific audio input via the headphones solo function The solo function applies to the headphone output It does...

Page 22: ...rce these settings specify the input video INPUT 1 3 that will use the audio follow function Audio is output only when the specified input video is selected OFF The audio is always output regardless of the input video selection 3 Press the MENU button several times to close the menu Controlling theVolume Automatically Auto Mixing The volume adjustments that would normally be done by the operator c...

Page 23: ...nnected 5 With the factory settings the AUDIO EFFECTS 2 3 buttons are assigned the music file play stop function PLAYBACK BGM SE You can use the MENU button0 AUDIO EFFECTS 0 EFFECTS 1 EFFECTS 4 0 ASSIGN to change the function that s assigned Selecting a music file from a USB flash drive Here s how to play back a music file that s saved on a USB flash drive 1 Save the music file in the root directo...

Page 24: ...the AUX Bus A bus is a destination to which input audio is mixed and sent The VR 1HD has two buses the main bus and the AUX bus With the exception of the MAIN connector you can assign a desired bus to each output connector 7Main bus This mixes and outputs all input audio This is the same audio as the main output 7AUX bus This mixes and outputs only the input audio that is sent to the AUX bus This ...

Page 25: ...e standard drivers of the operating system are installed automatically 4 Operate the VR 1HD to prepare the video and audio that you want to output to the computer 5 On your computer verify the input from the VR 1HD Start software that supports the USB video class and audio class and verify the video and audio that are being input from the VR 1HD MEMO If the video is garbled or operation is otherwi...

Page 26: ... still images are saved 5 The state of the ON AIR button The unit always starts with this lit 5 The state of an AUDIO EFFECTS button to which PLAYBACK BGM SE is assigned The unit always starts with this off 5 The positions of the volume knobs and faders Overwrite saving 1 MENU button0 USB MEMORY 0select SAVE SETTINGS The settings files in the USB flash drive are listed 2 Turn the VALUE knob to sel...

Page 27: ...ALUE knob to close the message 5 Press the MENU button several times to close the menu Disabling Panel Operations Panel Lock You can disable operation of the panel s buttons and knobs to prevent unintended operations Panel Lock function Selecting the objects of panel lock 1 MENU button0 SYSTEM 0select PANEL LOCK The PANEL LOCK menu appears 2 Use the VALUE knob to select the object button or knob f...

Page 28: ...l image p 15 that was loaded into the unit will be lost 1 MENU button0 SYSTEM 0select FACTORY RESET A confirmation message appears If you want to cancel the operation press the MENU button 2 Turn the VALUE knob to select YES and press to confirm Factory reset is executed When the operation is finished the message COMPLETED appears 3 Press the VALUE knob to close the message 4 Press the MENU button...

Page 29: ...on color space color depth and audio information Based on the EDID information that the source device receives it will output the most appropriate video format to the VR 1HD ZOOM 10 0 100 0 1000 0 1 2 Adjusts the zoom ratio SCALING TYPE Specifies the scaling type 2 FULL Always displays the picture expanded to full screen irrespective of the aspect ratio of the input video LETTERBOX Enlarges or red...

Page 30: ... is output from the MONITOR MENU connector STATUS Indicates the connection status of the MONITOR MENU connector COLOR SPACE RGB 0 255 RGB 16 235 YCC Specifies the color space system for representing colors in video DVI D HDMI HDMI DVI D Specifies the type of output signal BRIGHTNESS 64 0 64 Adjusts the brightness CONTRAST 64 0 64 Adjusts the contrast SATURATION 64 0 64 Adjusts the saturation RED 6...

Page 31: ...B B A B A B A B A B A B A B A B A A B B A B A B A B A B A B A B A B A A still image loaded into the unit cannot be made smaller If you use V STRETCH or H STRETCH to show a still image the stretch effect might not apply correctly depending on the resolution of the still image or the display region of the screen CENTER 0 0 100 0 Adjusts the position at which the screen is divided A CH LEFT UPPER INP...

Page 32: ... is switched according to the volume When TYPE AUTO SCAN SEQUENCE Specifies the order in which video signals are shown NORMAL INPUT 1 30switch in the order of scenes A E INPUT 1 3 are skipped if there is no video input RANDOM Switch randomly INPUT 1 3 DURATION OFF 1 7 120sec Specifies the time that the video is shown If this is OFF video switching does not affect the input SCENE A E DURATION OFF 1...

Page 33: ... want to keep and can be used to remove hiss or other noise that is heard during periods of silence GATE THRESHOLD 80 0 50 0 0 0dB Specifies the level used as the threshold for removing audio GATE RELEASE 30 860 5000ms Specifies the length of time until the audio is fully attenuated after audio falls below the threshold COMP LMT OFF ON Turns the compressor or limiter on off COMP LMT TYPE Selects t...

Page 34: ... 0 0 15 0dB Boosts or attenuates the middle band MID FREQ 20 0Hz 500Hz 20 0kHz Adjusts the center frequency when changing the tone quality in the middle band MID Q 0 5 1 0 16 0 Adjusts the width of the frequency band when boosting or attenuating the middle band LO 15 0 0 0 15 0dB Boosts or attenuates the low band LO FREQ 20 0 100 500Hz Adjusts the center frequency when changing the tone quality in...

Page 35: ... band LO FREQ 20 0 100 500Hz Adjusts the center frequency when changing the tone quality in the low band PLAYBACK BGM SE Adjust the audio of the music file background music or sound effects that is being played DIGITAL GAIN 42 0 12 0 42 0dB Adjusts the input gain sensitivity LEVEL INF 0 0 10 0dB Adjusts the input volume MUTE OFF ON Turns the mute function on off If this is ON the audio is temporar...

Page 36: ...s the low band LO FREQ 20 0 100 500Hz Adjusts the center frequency when changing the tone quality in the low band AUX BUS Adjusts the audio of the AUX bus LEVEL INF 10 0dB Adjusts the output volume MUTE OFF ON Turns the mute function on off If this is ON the audio is temporarily silenced LIMITER OFF ON Turns the limiter on off Effect Compresses the audio so that the mixed audio does not exceed the...

Page 37: ...AYBACK BGM SE SW OFF INPUT 1 3 AUTO MIXING Menu Menu item Value bold text default value Explanation SW OFF ON Turns the auto mixing function on off Auto mixing is a function that automatically controls the volume adjustments MIC 1 SW OFF ON Specifies whether Auto Mixing is applied ON or not applied OFF MIC 2 SW OFF ON LINE SW OFF ON HDMI 1 SW OFF ON HDMI 2 SW OFF ON HDMI 3 SW OFF ON USB FROM PC SW...

Page 38: ...creating a mechanical robot like impression MIX 0 100 Adjusts the balance between the unprocessed voice 0 and the voice processed by the effect 100 LED COLOR RED GREEN YELLOW BLUE MAGENTA CYAN Specifies the illumination color of the AUDIO EFFECTS button When ASSIGN PLAYBACK BGM SE SW OFF ON Plays stops the background music or sound effect SW MODE Specifies the operation of the AUDIO EFFECTS button...

Page 39: ...he effect alternately turns on off each time you press the button CH HDMI 1 3 MIC 1 2 LINE USB FROM PC USB STREAM AUX MAIN Specify the audio that will be affected by the operation LED COLOR RED GREEN YELLOW BLUE MAGENTA CYAN Specifies the illumination color of the AUDIO EFFECTS button When ASSIGN SOLO SW OFF ON Turns the solo function on off for the audio specified by CH You can also turn this on ...

Page 40: ...s starts with this lit 5 5 The state of an AUDIO EFFECTS button to which PLAYBACK BGM SE is assigned The unit always starts with this off 5 5 The positions of the volume knobs and faders LOAD STILL IMAGE 1 2 Specifies the loading destination for the still image internal memory 1 or 2 When you press the VALUE knob a list of the still images saved in the root directory of the USB flash drive is show...

Page 41: ...N MIC 1 fader MIC 2 FADER OFF ON MIC 2 fader LINE IN FADER OFF ON LINE fader MAIN VOLUME OFF ON MAIN knob USB STREAM VOLUME OFF ON USB STREAM knob PHONES VOLUME OFF ON PHONES knob LEVEL SETUP OFF ON LEVEL SETUP button Locking unlocking the operation panel When you simultaneously hold down the MENU button and SCENE EDIT button for three seconds or longer the operation panel is locked or unlocked p ...

Page 42: ...hones MIC 1 OFF ON MIC 1 2 input MIC 2 OFF ON LINE OFF ON LINE input HDMI 1 OFF ON VIDEO INPUT 1 3 input HDMI 2 OFF ON HDMI 3 OFF ON USB FROM PC OFF ON USB input PLAYBACK BGM SE OFF ON Music files p 23 LEVEL SETUP MUTE 4 5 5 5 Turns the mute function on off If this is ON the audio is temporarily silenced MIC 1 OFF ON MIC 1 2 input MIC 2 OFF ON LINE OFF ON LINE input HDMI 1 OFF ON VIDEO INPUT 1 3 i...

Page 43: ...mend that you connect the VR 1HD directly to your computer Go to the VIDEO OUTPUT menu0 USB STREAM 0execute CONNECTION RESET to try reconnecting the computer and the VR 1HD Could you be using a USB 2 0 cable to connect the VR 1HD and the computer If you re outputting HD video via USB use a USB 3 0 cable to connect the VR 1HD and the computer Can t load a still image Could the still image be a form...

Page 44: ... SCALER SCALER SCALER FS FS FS STILL IMAGE 1 2 1 2 3 CROSS POINT USB MEMORY HDMI 3 HDMI 2 HDMI 1 Video Mixer Block Audio section LINE IN HDMI 1 2 3 USB FROM PC SIG PEAK 3Band EQ 3Band EQ AUTO MIXING AUTO MIXING GATE DELAY DELAY 3Band EQ DELAY GAIN D GAIN D GAIN LEVEL FOLLOW ECHO CANCELLER COMP LIMITER HPF 18 dB oct HOWLING CANCELLER AUDIO PLAYER 1 AUDIO PLAYER 2 AUDIO PLAYER 3 AUDIO PLAYER 4 VOICE...

Page 45: ...COLOR CORRECTOR SCALER OSD MENU SCALER DSK COLOR CORRECTOR MAIN HDMI3THRU MONITOR up to 1080 30p USB STREAM MAIN L R AUX L R L R SOLO L R INPUT BUS REVERB L R M MAIN L R AUX SOLO L R OUTPUT BUS L R AUX DELAY LINE OUT USB LEVEL LEVEL MUTE USB DELAY MAIN PHONES OUT MONITOR USB STREAM 3Band EQ 3Band EQ LIMITER LIMITER REVERB REVERB MAIN LEVEL LEVEL ON AIR AUX LEVEL LEVEL MUTE MUTE LEVEL PinP SPLIT MI...

Page 46: ... Hz or 50 Hz Still Image 2 Maximum Size 1920 x 1200 pixels Format Windows Bitmap File bmp 24 bit color uncompressed Video Effects Scene PinP Split Transition Black fade Mix fade Key Composition Luminance key Other Still Image playback Output fade Audio Video WHITE or BLACK Test pattern output 1 Output refresh rate is 75 Hz when frame rate is set to 50 Hz 2 It can be loaded up to 2 files from USB f...

Page 47: ...o follows audio Power Supply AC adaptor Current Draw 2 A Power Consumption 24 W Operation Temperature 0 to 40 degrees Celsius 32 to 104 degrees Fahrenheit Dimensions 314 W x 169 D x 66 H mm 12 3 8 W x 6 11 16 D x 2 5 8 H inches Weight excluding AC adaptor 1 6 kg 3 lbs 9 oz Accessories Startup Guide Leaflet USING THE UNIT SAFELY AC adaptor Power cord 0 dBu 0 775 Vrms This document explains the spec...

Page 48: ... 1 MENU AUDIO EFFECTS 2 AUDIO EFFECTS 2 MENU AUDIO EFFECTS 3 AUDIO EFFECTS 3 MENU AUDIO EFFECTS 4 AUDIO EFFECTS 4 MENU MIC 1 fader INPUT MIC 1 MENU MIC 2 fader INPUT MIC 2 MENU LINE fader INPUT LINE MENU USB STREAM knob AUDIO USB STREAM MENU MAIN knob MAIN BUS MENU KEY KEY MENU ON AIR ON AIR SCENE EDIT SCENE MENU SCENE A SCENE A MENU SCENE B SCENE B MENU SCENE C SCENE C MENU SCENE D SCENE D MENU S...

Reviews: