37
Using the JUNO-DS with DAW Software
Assigning Functions to Knobs and Sliders
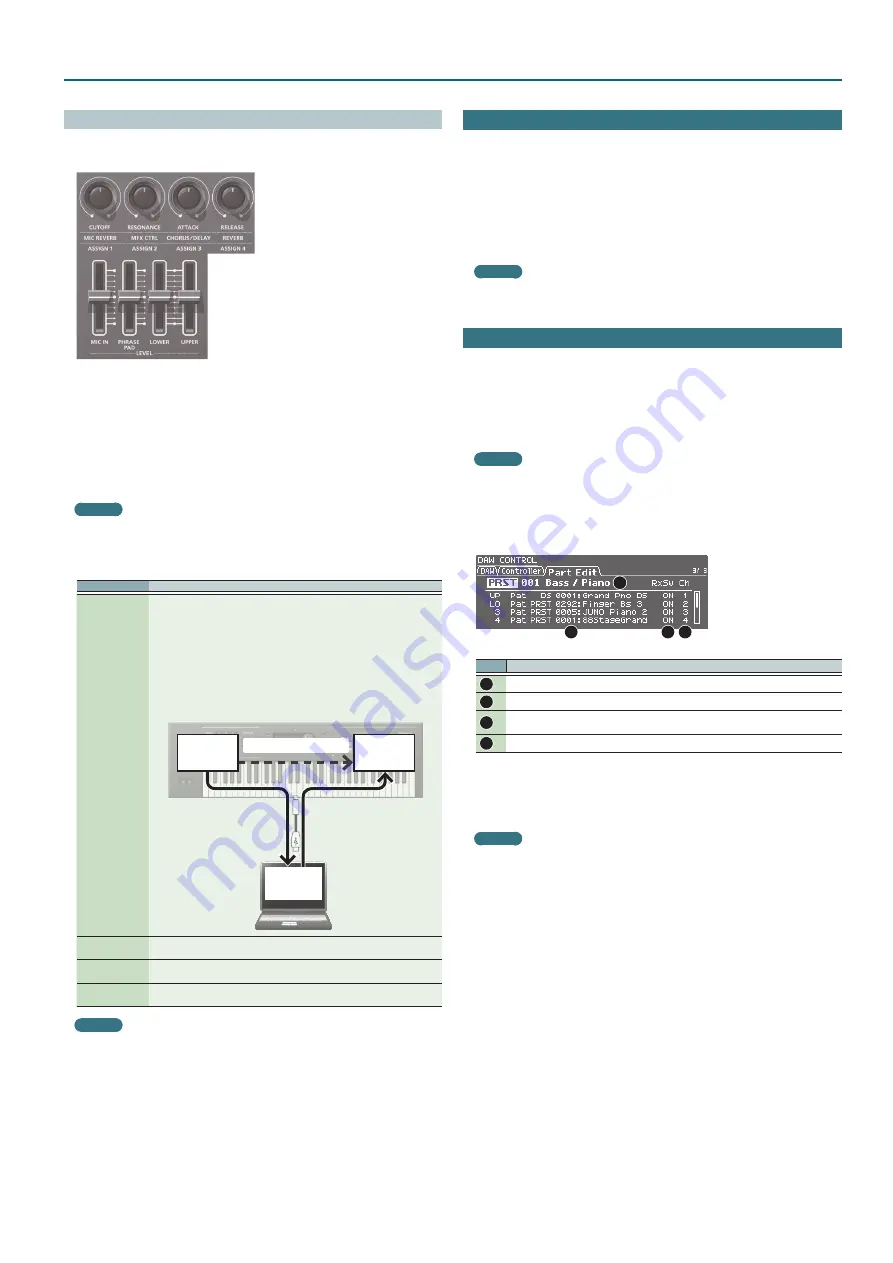
You can assign functions to the control knobs (1–4) and the [LEVEL] sliders (1–4).
Knob 1
Knob 2
Knob 3
Knob 4
Slider
1
Slider
2
Slider
3
Slider
4
You can store sixteen sets of these assignments, with each set containing the
assignments of the control knobs (1–4) and the [LEVEL] sliders (1–4).
1 .
In the DAW CONTROL screen, select the “Controller” tab.
2 .
Select the set of assignments that you want to edit.
MEMO
You can press the [ENTER] button and rename the set.
3 .
Move the cursor to the parameter that you want to edit, and use the value
dial to change the value.
Parameter
Explanation
Local Switch
Turns the Local switch on/off when in DAW Control mode.
If you’re using a DAW software with the JUNO-DS’s keyboard controller
section and sound generator section, you should turn the Local Switch “OFF.”
Here’s why.
We need to connect these sections in the following order: the JUNO-DS’s
keyboard a DAW software the JUNO-DS’s sound generator. Since the
JUNO-DS’s keyboard section and sound generator section are connected
internally, such a connection order would normally be impossible. However,
if the Local Switch is “OFF,” the JUNO-DS’s keyboard section and its sound
generator section will be independent, allowing you to use a DAW software
as shown here in the illustration.
Local Off
Sound
generator
DAW
software
Keyboard
Tx Channel
Specifies the MIDI transmit channel used when in DAW Control mode.
Set this as desired.
Knob 1–4
Select the MIDI messages that are transmitted when you turn the control
knobs (1–4).
Slider 1–4
Select the MIDI messages that are transmitted when you control the [LEVEL]
sliders (1–4).
MEMO
If you want your settings to be remembered, save the DAW CONTROL settings
Using the JUNO-DS As a MIDI Keyboard
Your playing on the JUNO-DS’s keyboard (MIDI data) can be recorded into your DAW
software, or used to play software instruments.
1 .
Connect the JUNO-DS to your computer.
2 .
Press the [DAW CONTROL] button to make it light.
The DAW CONTROL screen appears.
3 .
In the DAW CONTROL screen, select the “Controller” tab.
4 .
Turn the Local Switch “OFF.”
MEMO
Set the MIDI transmit channel as necessary (Tx Channel: p. 37).
Playing the JUNO-DS’s Sound Generator from DAW Software
Performance data (MIDI data) played back by your DAW software can make the
JUNO-DS’s sound generator produce sound.
1 .
Connect the JUNO-DS to your computer.
2 .
Press the [DAW CONTROL] button to make it light.
3 .
Start your DAW software, and open the project file that you want to play.
MEMO
Before you continue, select “JUNO-DS” as the MIDI input device and output
device.
For details on how to make this setting, refer to the owner’s manual of your DAW
software.
4 .
In the DAW CONTROL screen, select the “Part Edit” tab.
1
2
3
4
No.
Explanation
1
Performance
2
Patches that are assigned to each part
3
Receive switch for each part
If you set to “OFF,” MIDI messages are not received.
4
Receive channel for each part
*
Depending on the channel settings of your DAW, messages that switch studio
sets may be transmitted on the channel of a part, causing the tone to switch. If
this occurs, check the channel settings of your DAW.
5 .
Change the settings as necessary.
MEMO
It is convenient to turn receive switch on/off if you temporarily want to stop
receiving MIDI messages.
6 .
In your DAW software, set the transmit channels of the tracks that you’re
playing back to match the receive channel settings of the JUNO-DS.
For details on how to make this setting, refer to the owner’s manual of your DAW
software.
7 .
Play back your DAW software.
You hear the playback sounded by the JUNO-DS’s patches.


