background image


112

Playing Rhythms


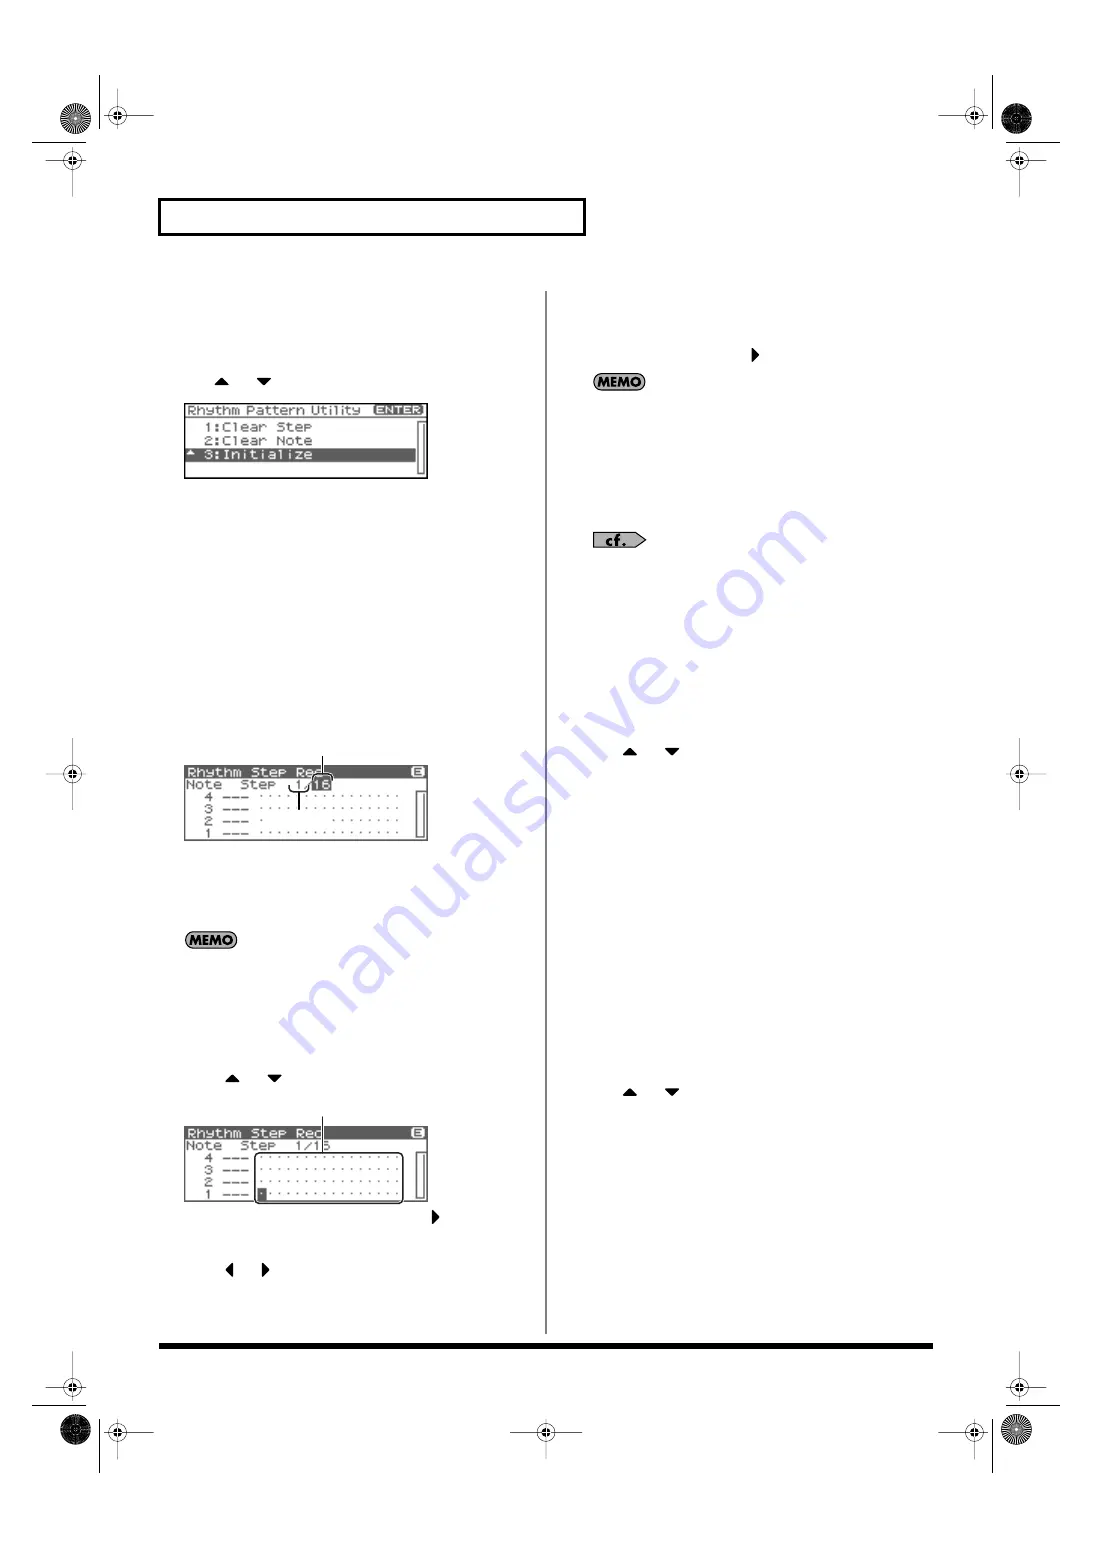
1. Initialize the rhythm pattern


1.


In the Rhythm Step Rec screen, press [MENU].


The Rhythm Pattern Utility screen will appear.


2.


Use 

 or 

 to select “Initialize.”


fig.13-018


3.


Press [ENTER].


A message will ask you for confirmation.


4.


Press [ENTER].


The initialization will be carried out, and you’ll be returned to 
the previous screen.

To cancel, press [EXIT].


2. Changing the Length of a 
Rhythm Pattern


1.


Move the cursor to the End Step (length of the rhythm 
pattern).


fig.13-019.e


2.


Turn the VALUE dial or use [INC][DEC] to change the length 
of the arpeggio style

Value


End Step:


1–32


When you initialize a rhythm pattern, the End Step is set to 
“16.”


3. Use your external MIDI 
keyboard to input data


1.


Press 

 or 

 to move the cursor to the grid display.


fig.13-020.e


To view the 17th and subsequent steps, press 

 to switch the 

display.


2.


Press 

 or 

 to specify the step that you want to input.


3.


Play your external MIDI keyboard.


A note will be input at the specified step, and the Fantom-XR 
will wait for you to input the next step. 

To input a rest, simply press 

 to advance to the next step. 


• To input a chord, press more than one key before taking your 

hand off the keyboard.

• The force (velocity) with which you strike the key is also 

recorded. This lets you add expressive dynamics to the rhythm 
pattern you create.

• A maximum of sixteen note numbers (specified pitches) can be 

used in one Style.


To save the Rhythm Pattern you created, refer to p. 114.


Deleting all data at the cursor 
location step (Clear Step)


If you input unwanted data by mistake, here’s how to delete all data 
at that step. 


1.


Press [MENU] in the Rhythm Step Rec screen.


The Rhythm Pattern Utility screen will appear.


2.


Use 

 or 

 to select “Clear Step.”


3.


Press [ENTER].


A message will ask you for confirmation.


4.


Press [ENTER].


The clear step will be carried out, and you’ll be returned to the 
previous screen.

To cancel, press [EXIT].


Deleting all notes at the cursor 
location pitch (Clear Note)


If you input unwanted data by mistake, here’s how to delete all 
notes at that pitch. When editing a rhythm pattern, you can use this 
to (for example) delete only the kick drum notes from the pattern.


1.


Press [MENU] in the Rhythm Step Rec screen.


The Rhythm Pattern Utility screen will appear.


2.


Use 

 or 

 to select “Clear Note.”


3.


Press [ENTER].


A message will ask you for confirmation.


4.


Press [ENTER].


The clear note will be carried out, and you’ll be returned to the 
previous screen.

To cancel, press [EXIT].

End Step

Current Step

Grid

Fantom-XR_r_e.book 112 ページ 2006年4月4日 火曜日 午前10時14分

Summary of Contents for Fantom XR

Page 1: ...ANIA TEL 266 364 609 RUSSIA MuTek Dorozhnaya ul 3 korp 6 117 545 Moscow RUSSIA TEL 095 981 4967 SLOVAKIA DAN Acoustic s r o Povazská 18 SK 940 01 Nové Zámky TEL 035 6424 330 SPAIN Roland Iberia S L Paseo García Faria 33 35 08005 Barcelona SPAIN TEL 93 493 91 00 SWEDEN Roland Scandinavia A S SWEDISH SALES OFFICE Danvik Center 28 2 tr S 131 30 Nacka SWEDEN TEL 0 8 702 00 20 SWITZERLAND Roland Switze...

Page 2: ... the point where they exit from the apparatus 11 Only use attachments accessories specified by the manufacturer 12 Unplug this apparatus during lightning storms or when unused for long periods of time 13 Refer all servicing to qualified service personnel Servicing is required when the apparatus has been damaged in any way such as power supply cord or plug is damaged liquid has been spilled or obje...

Page 3: ...r soft drinks etc to penetrate the unit 012a Immediately turn the power off remove the power cord from the outlet and request servicing by your retailer the nearest Roland Service Center or an authorized Roland distributor as listed on the Information page when The power supply cord or the plug has been damaged or If smoke or unusual odor occurs Objects have fallen into or liquid has been spilled ...

Page 4: ...TY INSTRUCTIONS and USING THE UNIT SAFELY on pages 2 4 please read and observe the following Power Supply 301 Do not connect this unit to same electrical outlet that is being used by an electrical appliance that is controlled by an inverter such as a refrigerator washing machine microwave oven or air conditioner or that contains a motor Depending on the way in which the electrical appliance is use...

Page 5: ... manufacturer of the cable Before Using Cards Using Memory Cards 704 Carefully insert the memory Card all the way in until it is firmly in place 705 Never touch the terminals of the memory card Also avoid getting the terminals dirty 707 This unit s memory card slot accepts CompactFlash memory cards 708 CompactFlash cards are constructed using precision components handle the cards carefully paying ...

Page 6: ... Phrase Preview 23 Playing a Patch on the Fantom XR from an External MIDI Device MIDI Keyboard 23 Choosing a Patch 24 Basic Procedure for Choosing a Patch 24 Choosing a Group 24 Choosing a Patch by Category 25 Choosing a Rhythm Set 27 Basic Procedure for Choosing a Rhythm Set 27 Various connection examples 28 Connection example 1 Using the Fantom XR as a sound module for live performance 28 Connec...

Page 7: ...Patches by Category 42 Selecting Patches Rhythm sets by Group 43 Selecting Favorite Patches 43 Selecting Patches by Keywords Keyword Search 44 Playing Percussion Instruments 45 Selecting a Rhythm Set 45 Creating a Patch 46 How to Make Patch Settings 46 Patch Edit Menu screen structure 46 How to Make Patch Settings 47 Selecting the Tone to edit Tone Select 47 Selecting the Tones That Will Sound Ton...

Page 8: ...aying in Performance Mode 84 About the Performance Play Screen 84 Selecting a Performance 84 Selecting Favorite Performances Favorite Performance 85 Selecting a Part 86 Selecting the Sound for a Part 86 About the Performance Mixer Screen 86 Selecting a Part 86 Editing the Part Settings 87 Performing with the Arpeggio Rhythm function 87 Viewing MIDI Messages for Each Part Part Information 87 Creati...

Page 9: ...rd Memory Function On and Off 104 Selecting Chord Forms 104 Sounding a chord in the order of its notes Rolled Chord 105 Creating Your Own Chord Forms 105 Saving the Chord Forms You Have Created Write 106 Recording chords on your external sequencer 106 Playing Rhythms 107 About Rhythm Patterns 107 Using Rhythm Groups 107 Playing Rhythm 107 Turning Rhythm On and Off 107 Select the Rhythm Group 108 D...

Page 10: ...124 Creating a Rhythm Set from samples Create Rhythm Set 125 If you re starting from Patch mode 125 If you re starting from Performance mode 125 Creating a Patch from Multiple Samples Create Multisample 126 Removing Unwanted Portions of a Sample Truncate 127 Boosting or Limiting the High frequency Range of the Sample Emphasis 128 Maximizing the Volume of a Sample Normalize 128 Amp 129 Stretching o...

Page 11: ...y Settings Factory Reset 162 Basic Procedure 162 Backing Up User Data User Backup 162 Restoring User Data that You Backed Up User Restore 162 Factory Reset 162 Using Fantom X Editor 163 Installing Fantom X Editor into Your Computer 163 Making Connections 163 Using Fantom X Librarian 163 Fantom X Editor System Requirements 164 System Requirements Windows 164 System Requirements Mac OS 164 Playing S...

Page 12: ... the Memory Card 174 Writing data to the card 174 Installing the PC Card Protector 174 Appendix 175 Troubleshooting 176 Parameter List 181 Effects List 193 Error Messages 218 Performance List 219 Patch List 220 Rhythm Set List 226 Waveform List 235 Arpeggio Style List 239 Chord Form List 239 Rhythm Pattern List 240 Rhythm Group List 243 About MIDI 244 MIDI Implementation 245 Specifications 272 Ind...

Page 13: ...delivering functionality that rivals dedicated samplers There s also an Auto Sync function that can automatically match the length of a measure to the current tempo 16 MB of sampling memory is provided as standard and you can install expansion DIMM modules to expand this to as much as 528 MB A full complement of interfaces USB connector for connection to your computer USB MIDI support allows data ...

Page 14: ...xternal input is too high F EXIT Return to the previous screen In some screens this causes the currently executing function to be aborted G VALUE QUICK dial This is used to modify values To change the value more rapidly turn this dial while pressing it H ENTER Use this button to execute an operation I CURSOR button Moves the cursor location up down left right LIST button To view a list of sounds o...

Page 15: ...urce only of the type marked on the bottom of the unit S DIGITAL IN OUT Connectors These are coaxial type digital in out connectors These connectors input and output a digital audio signal stereo The output signal is identical to the signal that is output from the OUTPUT A MIX jacks T MIDI Connectors IN OUT THRU These connectors can be connected to other MIDI devices to receive and transmit MIDI m...

Page 16: ...t malfunction and or damage to speakers or other devices always turn down the volume and turn off the power on all devices before making any connections MIDI IN MIDI OUT Mixer etc Power amp Monitor speakers powered Stereo headphones External MIDI device MIDI Keyboard Sequencer etc to Power outlet In order to fully experience the Fantom XR s sound we recommend using a stereo amp speaker system If y...

Page 17: ... volume controls of the Fantom XR and all connected audio devices been turned to their lowest settings 2 Turn on the POWER switch located on the front panel of the Fantom XR fig 02 003 942 This unit is equipped with a protection circuit A brief interval a few seconds after power up is required before the unit will operate normally 3 Turn on the power for any connected amplifiers or speakers Turnin...

Page 18: ... to select System 3 Press ENTER The System Setup screen will appear 4 The parameters are organized into several edit groups Use or to select System Startup 5 Press or to move the cursor to LCD Contrast fig 02 005 6 Turn the VALUE dial or use INC DEC to set the value Higher values will make the characters darker Value 1 20 7 To save the modified setting press SHIFT so it lights and then press to sa...

Page 19: ...to select Factory Reset and then press ENTER A message will ask you for confirmation 4 Press ENTER to execute the Factory Reset To cancel press EXIT 5 When the display indicates Power Off turn the power off then on again Turning Off the Power Reset to Default Factory Settings Factory Reset If you need to turn off the power completely first turn off the POWER switch then unplug the power cord from ...

Page 20: ...20 Getting Ready Fantom XR_r_e book 20 ページ 2006年4月4日 火曜日 午前10時14分 ...

Page 21: ...21 Quick Start Fantom XR_r_e book 21 ページ 2006年4月4日 火曜日 午前10時14分 ...

Page 22: ... Hear Me Scott Tibbs 2004 Roland Corporation 2 The Escape David Ahlund 2004 Roland Corporation 3 Moon Cluster Tatsuya Nishiwaki 2004 Roland Corporation 4 Still Solace Scott Tibbs 2004 Roland Corporation 5 Nu Ages Christian Sales 2004 Roland Corporation 6 Cellular Tissue Hisashi Saito 2004 Roland Corporation 7 AKEBONO Satoshi Mishiba 2004 Roland Corporation fig 03 001 2 3 2 4 1 When you perform dem...

Page 23: ...to MIDI messages it receives from an external MIDI device such as a MIDI keyboard or sequencer Try connecting your MIDI keyboard and playing sounds on the Fantom XR Connecting the MIDI Keyboard Connect the MIDI keyboard as shown in the following fig 03 005 e Matching MIDI Channels In order for the Fantom XR to respond to MIDI data sent by an external MIDI device both devices must be set to use the...

Page 24: ...R User PR A Preset A PR H Preset H GM General MIDI Card Memory Card XP A Expansion A XP F Expansion F fig 03 007 e Alternatively press CURSOR to move the cursor to the patch group and turn the VALUE dial or use INC DEC to select the patch group Choosing a Patch Basic Procedure for Choosing a Patch Choosing a Group fig 03 006 2 3 3 1 Patch number The value will change more rapidly if you turn the d...

Page 25: ...echno Synth Techno Synth MLT Mallet Mallet PLS Pulsating Pulsating Synth ORG Organ Electric and Church Or gan FX Synth FX Synth FX Noise etc ACD Accordion Accordion SYN Other Synth Poly Synth HR M Harmonica Harmonica Blues Harp BPD Bright Pad Bright Pad Synth AGT AC Guitar Acoustic Guitar SPD Soft Pad Soft Pad Synth EGT EL Guitar Electric Guitar VOX Vox Vox Choir DGT DIST Guitar Distortion Guitar ...

Page 26: ...in selecting patches from the next category Locking the category will prevent this fig 05 004 e 6 Press e to move the cursor to the patch number 7 Turn the VALUE dial or use INC DEC to select the patch You can select sounds within a category regardless of the patch group Lock icon unlocked To unlock the category turn the VALUE dial or use DEC Lock icon locked In Patch mode you can also use a varie...

Page 27: ...or use INC DEC to set the patch type to Rhythm fig 03 010 The rest of the procedure is the same as when choosing a Patch Choosing a Rhythm Set Basic Procedure for Choosing a Rhythm Set Patch type The value will change in larger steps if you turn the VALUE dial while holding down VALUE There are no categories for rhythm sets so you can t choose them by category Fantom XR_r_e book 27 ページ 2006年4月4日 火...

Page 28: ...itor or librarian Since you can edit sounds or manage data via the USB connector you ll be able to make last minute changes at the gig fig 03 012 e Parameter settings on the Fantom XR USB Mode MIDI if using USB MIDI STORAGE if transferring files Set this to MIDI mode so you can use the USB connector for the Fantom X Editor MIDI IN MIDI IN MIDI OUT MIDI THRU Edit sounds and manage data Computer Oth...

Page 29: ...SB connector USB MIDI Thru ON Messages from MIDI IN will be sent without change to your computer via USB MIDI Use this setting if you re using sequencer software Settings for the sequencer software on your computer Turn on the parameter named MIDI Thru or Thru MIDI messages received by your sequencer software will be sent without change to the Fantom XR via USB MIDI This lets you listen to your so...

Page 30: ...DI Thru ON With this setting data received at the Fantom XR s MIDI IN is sent to your computer without change Units 2 and 3 No particular settings are necessary The same MIDI data will be sent to all sound modules Use the Part Receive Switch p 92 settings on each sound module to make the module play only the data you intend Settings for the sequencer software on your computer Turn on the parameter...

Page 31: ...31 Advanced Use Fantom XR_r_e book 31 ページ 2006年4月4日 火曜日 午前10時14分 ...

Page 32: ...formance mode refer to p 37 When using the Fantom XR you will notice that a variety of different categories come into play when working with sounds What follows is a simple explanation of each sound category Tones On the Fantom XR the tones are the smallest unit of sound However it is not possible to play a tone by itself The patch is the unit of sound which can be played and the tones are the bas...

Page 33: ...instruments as possible be available to you at the same time Therefore each key note number of a rhythm set will produce a different percussion instrument fig 04 004 e Each percussion instrument consists of the following four elements For details refer to the explanations for Tones WG Wave Generator TVF Time Variant Filter TVA Time Variant Amplifier Envelope Performances A performance has a patch ...

Page 34: ...T is selected Note Priority in Performance Mode Since Performance mode is usually used to play an ensemble consisting of several patches it is important to decide which parts take priority Priority is specified by the Voice Reserve settings p 92 When a note within a patch needs to be turned off to make room for a new note the Patch Priority setting of the patch will apply p 49 Voice Reserve The Fa...

Page 35: ... unit s settings Multi Effects The multi effects are multi purpose effects that completely change the sound type by changing the sound itself Contained are 78 different effects types select and use the type that suits your aims In addition to effects types composed of simple effects such as Distortion Flanger and other such effects you can also set up a wide variety of other effects even connectin...

Page 36: ...yed as a patch or rhythm set You can also import WAV AIFF format files and use them in the same way Samples A sample contains the waveform data sampled by the Fantom XR In addition to the actual waveform data itself a sample also contains parameters such as start point loop start and loop end The Fantom XR can hold 9 000 samples fig 04 011 e Multisamples Two or more samples assigned to the keyboar...

Page 37: ...R Use the following procedure to switch between these modes Patch mode This mode allows you to play individual sounds patches rhythm sets To select Patch mode 1 Press MODE so the button lights in red fig 04 014_50 Performance mode To select Performance Mode This mode allows you to combine multiple sounds patches or rhythm sets 1 Press MODE so the button lights in green fig 04 015_50 Where Samples ...

Page 38: ...he VALUE dial while you turn it the value will change in larger steps INC and DEC Pressing INC increases the value and DEC decreases it Keep the button pressed for continuous adjustment For faster value increases keep INC pressed down and press DEC For decreasing value faster keep DEC pressed down and press INC The Fantom XR s SHIFT button works only in conjunction with other buttons In general yo...

Page 39: ...e cursor Switch between uppercase and lowercase letters If you decide to discard your input press EXIT Available characters symbols are space A Z a z 0 9 _ Using keywords to input a name You can also select and input individual words keywords frequently used in a patch name For example this is a quick way to input names of instruments such as Piano or Guitar or related terms such as Control or Dan...

Page 40: ...d then store the modified patch in User memory Groups A H already contain 128 prepared patches each for a total of 1024 patches GM GM2 This is an internal group of patches compatible with General MIDI 2 a system of MIDI function specifications designed to transcend differences between makers and types of devices these patches cannot be overwritten Furthermore settings of currently selected patches...

Page 41: ...Acoustic Piano EP EL Piano Electric Piano KEY Keyboards Other Keyboards Clav Harpsichord etc BEL Bell Bell Bell Pad MLT Mallet Mallet ORG Organ Electric and Church Organ ACD Accordion Accordion HRM Harmonica Harmonica Blues Harp AGT AC Guitar Acoustic Guitar EGT EL Guitar Electric Guitar DGT DIST Guitar Distortion Guitar BS Bass Acoustic Electric Bass SBS Synth Bass Synth Bass STR Strings Strings ...

Page 42: ...ithin a category regardless of the patch group You can display a list of patches and select a patch from that list You can use any of the following methods to select a patch Selecting Patches by Category p 42 Selecting Patches by Group p 43 Selecting Favorite Patches Favorite Patch p 43 Selecting Patches by keywords p 44 Selecting Rhythm sets by Group p 43 1 In the Patch Play screen press SHIFT so...

Page 43: ...ently used patches in one place by registering them in the Favorite Patch By using this function you can rapidly select favorite patches from internal memory or a Wave Expansion Board If a patch stored in a Wave Expansion Board has been registered as a Favorite Patch it cannot be selected unless the corresponding wave expansion board is installed 1 In step 3 of Selecting Patches Rhythm sets by Gro...

Page 44: ...ywords within the patch name For example if you search for piano sounds using the keyword Piano you ll see a list of sounds containing the characters Piano 1 In the Patch Play screen select a sound that contains a keyword As an example we ll use the keyword Piano fig 05 030 2 In step 3 of Selecting Patches Rhythm sets by Group p 43 choose Keyword Search 3 Press ENTER The Keyword Search screen will...

Page 45: ...vices these rhythm sets cannot be overwritten Furthermore settings of currently selected rhythm sets from this group cannot be changed The Fantom XR includes nine preset rhythm sets XP A F Wave Expansion Boards installed in EXP A F Slots These groups are for when using rhythm sets from a Wave Expansion Board installed in slots EXP A F and cannot be rewritten However you can modify the settings of ...

Page 46: ... parameters at random It makes sense to start with a patch whose sound is related to what you have in mind Decide which tones will sound p 47 When creating a patch it is important to decide which tones you are going to use In the Patch Edit screen set Tone Switch 1 4 to specify whether each tone will sound on or not off It is also important to turn off unused tones to avoid wasting voices unnecess...

Page 47: ... edit 9 Save the changes you ve made p 69 If you do not wish to save changes press EXIT to return to the Patch Play screen If you return to the Patch Play screen without saving the indication E is displayed in the upper right of the Patch Play screen This E indication disappears when you save the patch to the Fantom XR s internal user memory or to the memory card If you turn off the power or selec...

Page 48: ... an example of sound electric organ that combines one shot and looped waveforms fig 06 005 e Cautions When Using a One shot Waveform It is not possible to use the envelope to modify a one shot waveform to create a decay that is longer than the original waveform or to turn it into a sustaining sound If you were to program such an envelope you would be attempting to shape a portion of the sound that...

Page 49: ... 50 One cent is 1 100th of a semitone Stretch Tune Depth This setting allows you to apply stretched tuning to the patch Stretched tuning is a system by which acoustic pianos are normally tuned causing the lower range to be lower and the higher range to be higher than the mathematical tuning ratios would otherwise dictate With a setting of OFF the patch s tuning will be equal temperament A setting ...

Page 50: ...pecifies whether the patch will play polyphonically POLY or monophonically MONO The MONO setting is effective when playing a solo instrument patch such as sax or flute Value MONO Only the last played note will sound POLY Two or more notes can be played simultaneously Legato Switch Legato Switch is valid when the Mono Poly parameter is set to MONO This setting specifies whether the Legato Switch wi...

Page 51: ...the next note to take more time Value 0 127 You can use the force with which keys are played or MIDI messages to control the way each Tone is played This is referred to as the Tone Mix Table TMT For details on these settings refer to How to Make Patch Settings p 46 Patch TMT Structure Type 1 2 3 4 Determines how tone 1 and 2 or tone 3 and 4 are connected Value 1 10 The following 10 different Types...

Page 52: ...d of tone 2 4 Since the ring modulated sound can be mixed with tone 2 4 tone 1 3 TVA can adjust the amount of the ring modulated sound When TYPE 2 10 is selected and one tone of a pair is turned off the other tone will be sounded as TYPE 1 regardless of the displayed setting If you limit the keyboard area in which a tone will sound Keyboard Range p 53 or limit the range of velocities for which it ...

Page 53: ...regardless of any Velocity messages When set to CYCLE the patch s constituent tones will sound consecutively regardless of any Velocity messages Value OFF ON RANDOM CYCLE Instead of using Velocity you can also have tones substituted using the Matrix Control p 54 However the keyboard velocity and the Matrix Control cannot be used simultaneously to make different tones to sound When using the Matrix...

Page 54: ...different tones to sound in response to notes played at different strengths velocity on the keyboard p 53 However the Matrix Control and the keyboard velocity cannot be used simultaneously to make different tones to sound When you want to make the different tones to sound set the Velocity Control parameter p 53 to OFF For details on these settings refer to How to Make Patch Settings p 46 Patch WG ...

Page 55: ...parameter has elapsed fig 06 051 e HOLD Although the tone begins to play after the time specified in the Delay Time parameter has elapsed if the key is released before the time specified in the Delay Time parameter has elapsed the tone is not played fig 06 052 e OFF N Rather than being played while the key is pressed the tone begins to play once the period of time specified in the Delay Time param...

Page 56: ... octave higher i e 12 keys upward on the keyboard If you want the pitch to rise one octave as on a conventional keyboard set this to 100 If you want the pitch to rise two octaves set this to 200 Conversely set this to a negative value if you want the pitch to fall With a setting of 0 all keys will produce the same pitch Value 200 190 180 170 160 150 140 130 120 110 100 90 80 70 60 50 40 30 20 10 0...

Page 57: ... to affect the Time 4 value of the pitch envelope If you want Time 4 to be speeded up for quickly released notes set this parameter to a positive value If you want it to be slowed down set this to a negative value Value 63 63 P Env Time KF Pitch Envelope Time Keyfollow Use this setting if you want the pitch envelope times Time 2 Time 4 to be affected by the keyboard location Based on the pitch env...

Page 58: ... Cutoff frequency While this filter is also good for use with simulated acoustic instrument sounds the nuance it exhibits differs from that of the LPF2 even with the same TVF Envelope settings If you set LPF2 or LPF3 the setting for the Resonance parameter will be ignored p 58 Cutoff Frequency Selects the frequency at which the filter begins to have an effect on the waveform s frequency components...

Page 59: ... strongly played notes to have a greater Resonance effect set this parameter to positive settings If you want strongly played notes to have less Resonance use negative settings Value 63 63 Patch TVF Env Patch TVF Envelope F Env Depth TVF Envelope Depth Specifies the depth of the TVF envelope Higher settings will cause the TVF envelope to produce greater change Negative settings will invert the sha...

Page 60: ...ow to Make Patch Settings p 46 Patch TVA Tone Level Sets the volume of the tone This setting is useful primarily for adjusting the volume balance between tones Value 0 127 Level V Curve TVA Level Velocity Curve You can select from seven curves that determine how keyboard playing strength will affect the volume If you do not want the volume of the tone to be affected by the force with which you pla...

Page 61: ...ttings will produce a greater amount of change Value 0 63 Alternate Pan Depth This setting causes panning to be alternated between left and right each time a key is pressed Higher settings will produce a greater amount of change L or R settings will reverse the order in which the pan will alternate between left and right For example if two tones are set to L and R respectively the panning of the t...

Page 62: ...ut Value MFX Output in stereo through multi effects You can also apply chorus or reverb to the sound that passes through multi effects A B Output to the OUTPUT A MIX jack or OUTPUT B jack in stereo without passing through multi effects 1 4 Output to the INDIVIDUAL 1 4 jacks in mono without passing through multi effects TONE Outputs according to the settings for each tone If you ve made settings so...

Page 63: ...s not sent through MFX Value 0 127 Tone Reverb Send Send Level Output non MFX Sets the level of the signal sent to reverb for each tone if the tone is not sent through MFX Value 0 127 For details on these settings refer to How to Make Patch Settings p 46 An LFO Low Frequency Oscillator causes change over a cycle in a sound Each tone has two LFOs LFO1 LFO2 and these can be used to cyclically change...

Page 64: ...Pitch Depth parameter and Rate parameter the vibrato will be applied automatically following a certain interval after the key is pressed This effect is called Delay Vibrato Delay Time KF LFO1 LFO2 Delay Time Keyfollow Adjusts the value for the Delay Time parameter depending on the key position relative to the C4 key center C To decrease the time that elapses before the LFO effect is applied the ef...

Page 65: ...unit of the step data corresponds to a pitch of 50 cents Value 36 36 How to Apply the LFO Apply the LFO gradually after the key is pressed fig 06 043 e Fade Mode ON Delay Time The time from when the keyboard is played until the LFO begins to be applied Fade Time The time over which the LFO amplitude will reach the maximum after the Delay Time has elapsed Apply the LFO immediately when the key is p...

Page 66: ...e basis whether or not the sound will be held when a Hold 1 message is received after a key is released but before the sound has decayed to silence If you want to sustain the sound set this ON When using this function also set the Rx Hold 1 parameter ON This function is effective for piano sounds Value OFF ON For details on these settings refer to How to Make Patch Settings p 46 Controller related...

Page 67: ...d parameters only then set these to OFF There are parameters that let you specify whether specific MIDI messages will be received for each channel in a performance p 92 When a patch with Matrix Control settings is assigned to a part confirm that any MIDI messages used for the Matrix Control will be received If the Fantom XR is set up such that reception of MIDI messages is disabled then the Matrix...

Page 68: ...Depth of Frequency Modulation for FXM FXM DEPTH Controlling the amount of realtime stretch shrink TIME This will have no effect if Realtime Time Stretch p 55 is not selected If matrix control sensitivity is set to the stretch shrink time will become shorter and if set to the time will become longer Changing Specific Multi Effects Parameters MFX CTRL1 4 Change the parameter that was specified by MF...

Page 69: ... patch for comparison the Compare function The patch auditioned using the Compare function may sound slightly different than when it is played normally 6 Turn the VALUE dial or use INC DEC to make settings 7 Press CURSOR to move the cursor select the Destination copy destination patch tone number 8 Turn the VALUE dial or use INC DEC to make settings 9 Press ENTER A message will ask you for confirm...

Page 70: ...dition the write destination patch the Compare function Before saving a patch you can use this function to verify that you re not accidentally overwriting a patch you really want to keep The patch auditioned using the Compare function may sound slightly different than when it is played normally 7 If you want to change the write destination turn the VALUE dial or use INC DEC to re specify the write...

Page 71: ... turn the VALUE dial or use CURSOR to select the edit group containing the rhythm set parameter you want to adjust 4 Press the VALUE dial or ENTER The screen that you see will depend on the edit group of the selected parameter fig 07 002a Functions of Rhythm Set Parameters p 73 5 Press or to move the cursor to the parameter you wish to modify You can also press or to move to an edit group of anoth...

Page 72: ...ms contain sounds that have short decays A one shot waveform records the initial rise and fall of the sound Some of the Fantom XR s one shot waveforms are sounds that are complete in themselves such as percussive instrument sounds The Fantom XR also contains many other one shot waveforms that are elements of other sounds These include attack components such as piano hammer sounds and guitar fret n...

Page 73: ...ume levels of the tones from which the rhythm set is composed is set with the Tone Level parameter p 80 The volume levels of the Waves from which the rhythm tone is composed is set with the Wave Level parameter p 76 Rhythm Tone Name You can assign a name of up to 12 characters to the rhythm tone Use to move the cursor and use the VALUE dial to select a character Value space A Z a z 0 9 _ For detai...

Page 74: ...this setting will have no effect Tone Receive Pan Mode Rhythm Tone Receive Pan Mode For each rhythm tone specify how pan messages will be received Value CONTINUOUS Whenever Pan messages are received the stereo position of the tone will be changed KEY ON The pan of the tone will be changed only when the next note is played If a pan message is received while a note is sounding the panning will not c...

Page 75: ...ameter ON will cause pitch related settings p 77 and FXM related settings p 75 to be ignored If a sample is selected for a tone you must first set the BPM tempo parameter of the sample If a sample is selected for a tone Wave Tempo Sync will require twice the normal number of voices FXM Switch This sets whether FXM will be used ON or not OFF Value OFF ON FXM Color Specifies how FXM will perform fre...

Page 76: ...ssigned to the rhythm tone For details on these settings refer to How to Make Rhythm Set Settings p 71 Rhythm WMT WMT Velocity Control Velocity Control Switch WMT Velocity Control determines whether a different rhythm tone is played ON or not OFF depending on the force with which the key is played velocity When set to RND the rhythm set s constituent rhythm tones will sound randomly regardless of ...

Page 77: ...ch Envelope Higher settings will cause the pitch envelope to produce greater change Negative settings will invert the shape of the envelope Value 12 12 P Env V Sens Pitch Envelope Velocity Sensitivity Keyboard playing dynamics can be used to control the depth of the pitch envelope If you want the pitch envelope to have more effect for strongly played notes set this parameter to a positive value If...

Page 78: ...lter is half that of the LPF This makes it a comparatively warmer low pass filter This filter is good for use with simulated instrument sounds such as the acoustic piano LPF3 Low Pass Filter 3 Although frequency components above the Cutoff frequency Cutoff Frequency are cut the sensitivity of this filter changes according to the Cutoff frequency While this filter is also good for use with simulate...

Page 79: ...velocity Value FIX 1 7 fig 06 036 F Env V Sens TVF Envelope Velocity Sensitivity Specifies how keyboard playing dynamics will affect the depth of the TVF envelope Positive settings will cause the TVF envelope to have a greater effect for strongly played notes and negative settings will cause the effect to be less Value 63 63 F Env T1 V Sens TVF Envelope Time 1 Velocity Sensitivity This allows keyb...

Page 80: ...tween left and right each time a key is pressed Higher settings will produce a greater amount of change L or R settings will reverse the order in which the pan will alternate between left and right For example if two rhythm tones are set to L and R respectively the panning of the two rhythm tones will alternate each time they are played Value L63 0 63R This will affect only waves whose Wave Alter ...

Page 81: ...unds are separately routed to the INDIVIDUAL 1 jack and INDIVIDUAL 2 jack but no plug is actually inserted in the INDIVIDUAL 2 jack the sounds routed to INDIVIDUAL 1 and INDIVIDUAL 2 will be mixed and output from the INDIVIDUAL 1 jack If the Mix Parallel parameter is set to MIX all sounds are output from the OUTPUT A MIX jacks in stereo p 158 If you ve set Tone Out Assign to MFX set the MFX Output...

Page 82: ...ation 5 Press ENTER The initialization will be carried out and you ll be returned to the previous screen To cancel press EXIT This operation copies the settings of any desired rhythm set to the currently selected rhythm set You can use this feature to make the editing process faster and easier 1 In the Patch Play screen select the copy destination rhythm set p 45 2 In the Rhythm Edit Menu screen p...

Page 83: ...g you to select the write destination rhythm set fig 07 011 5 Press or to select the write destination The write destination can be either the Fantom XR s internal user area User or a memory card Card You can also use GROUP to select the write destination 6 Turn the VALUE dial or use INC DEC to select the patch number At this time you can press the OUTPUT knob to audition the write destination rhy...

Page 84: ... XR which can be rewritten Performances you yourself create can be stored in this group The Fantom XR contains 64 preset performances PRST Preset This is the group inside the Fantom XR which cannot be rewritten However you may modify the settings of the currently selected performance and then store the modified performance in User memory The Fantom XR contains 64 preset performances CARD Memory Ca...

Page 85: ...it lights and then press The Performance List screen will appear 3 Press MENU The Performance List Menu screen will appear 4 Turn the VALUE dial or use INC DEC to select Favorite Performance fig 08 005_50 5 Press ENTER The Favorite Performance screen will appear 6 Press or to switch the performance group and press or to select the performance 7 Press ENTER to confirm your choice of performance Reg...

Page 86: ... 008a To cancel press EXIT 3 Press or to switch the patch group and press or to select the patch By pressing the OUTPUT knob you can audition a patch using a preselected phrase appropriate for that type category of patch Phrase Preview 4 Press ENTER to close the Patch List screen Selecting Patches from the List p 42 The Fantom XR provides a mixer screen that lets you view and edit settings such as...

Page 87: ... operations from an external MIDI controller 1 Access the Performance Play screen p 84 2 Press MENU The Top Menu screen will appear 3 Turn VALUE dial or press INC DEC to select Part Information 4 Press ENTER The Part Information screen will appear fig 08 018 5 Use or to select the message that you want to check Mod Modulation messages Breath Breath messages Foot Type Foot type messages Volume Volu...

Page 88: ...tch group or patch number you can press SHIFT so it lights and then press to open the Patch List screen and choose a patch from the list p 42 When the cursor is at a patch group or patch number you can press SHIFT so it lights and then press to open the Patch Edit screen and edit a patch p 95 When the cursor is located at the patch group or patch number you can press GROUP to switch the group of t...

Page 89: ...If you ve set Tone Out Assign to MFX set the MFX Output Assign parameter to specify the output destination of the sound that has passed through the multi effects Chorus and reverb are output in mono at all times The output destination of the signal after passing through the chorus is set with the Chorus Output Select and the Chorus Output Assign The output destination of the signal after passing t...

Page 90: ... is set to 127 maximum there will be no change in the Release Time Offset even when this is set to a positive value The same applies to the TVF envelope Decay Time Offset Adjusts the TVA TVF Envelope Decay Time for the patch or rhythm set assigned to a part Value 64 63 Mono Poly Set this parameter to MONO when the patch assigned to the part is to be played monophonically or to POLY when the patch ...

Page 91: ...Keyboard Range Lower Specifies the lowest note that the tone will sound for each part Value C 1 UPPER Key Range Upper Part Keyboard Range Upper Specifies the highest note that the tone will sound for each part Value LOWER G9 When the Key Range p 53 is set for each individual tone in a patch sounds are produced in the range where the Key Range of each tone and the Key Range for the part overlap fig...

Page 92: ...ides If you want to use the Pitch Bend Range setting of the patch assigned to the part p 56 set this to PAT Value 0 24 PAT Receive Switch Part Receive Switch For each part specify whether MIDI messages will be received ON or not OFF If this is OFF the part will not respond Normally you should leave this ON but you can turn it OFF when you do not want a specific part to be playing during song playb...

Page 93: ...DI channel specify whether MIDI Pitch Bend messages will be received ON or not OFF Rx Poly Key Pressure Receive Polyphonic Key Pressure Switch For each MIDI channel specify whether MIDI polyphonic key pressure messages will be received ON or not OFF Parameter List Equal Temperament This tuning divides the octave into 12 equal parts and is the most widely used method of temperament used in Western ...

Page 94: ...atched enabling them to be played at the same time Accordingly a certain amount of time may elapse between reception of the Note messages and playing of the sounds Turn this setting to ON only as needed Velocity Curve Type Velocity Curve selects for each MIDI channel one of the four following Velocity Curve types that best matches the touch of the connected MIDI keyboard Set this to OFF if you are...

Page 95: ...ze operation will affect only the currently selected sound the sounds that are stored in user memory will not be affected If you wish to restore all of the Fantom XR s settings to their factory values perform a Factory Reset p 162 1 In the Performance Play screen make sure that the cursor is located at the performance group or performance number 2 Press MENU The Top Menu screen will appear 3 Use o...

Page 96: ...pear allowing you to select the write destination performance fig 09 022 5 Press or to select the write destination The write destination can be either the Fantom XR s internal user area User or a memory card Card 6 Turn the VALUE dial or use INC DEC to select the performance number 7 Press ENTER A message will ask you for confirmation fig 09 023 8 Press ENTER to execute the save operation To canc...

Page 97: ...002 If this is on an arpeggio will be produced according to the notes you hold down on an external MIDI keyboard In arpeggio settings the Style Arpeggio Style p 98 is particularly important The playback pattern of the arpeggio is determined mainly by this selection For details regarding each parameter refer to Arpeggio Settings p 98 By using the following procedure you can produce arpeggios even w...

Page 98: ... in preset memory and user memory Value U001 128 User P001 128 Preset You can press GROUP to switch between User and Preset memory For more on the prepared Arpeggio Styles already programmed in the Fantom XR refer to Arpeggio Style List p 239 This sets the arpeggio tempo Editing the Tempo setting will change the System setting Tempo p 156 The tempo setting cannot be saved as part of the Arpeggio S...

Page 99: ...e full length of the note set in the grid type FULL Even if the linked grid is not connected with a tie the same note continues to sound until the point at which the next new sound is specified This selects the method used to play sounds motif when you have a greater number of notes than programmed for the Arpeggio Style When the number of keys played is less than the number of notes in the Style ...

Page 100: ...l and the Rhy Ptn Channel p 111 are both set to the same channel the Rhythm function will not operate if the Arpeggio function or Chord Memory function are on Not only can you use the prepared internal Arpeggio Styles that determine how arpeggios are played but you can also create them as well This way you can enjoy performing your own original arpeggios Arpeggio Style you create can be stored in ...

Page 101: ...e arpeggio you create A maximum of sixteen note numbers specified pitches can be used in one Arpeggio Style To save the Arpeggio Style you created refer to p 103 Deleting all data at the cursor location step Clear Step If you input unwanted data by mistake here s how to delete all data at that step 1 Press MENU in the Arpeggio Step Rec screen The Arpeggio Style Utility screen will appear 2 Use or ...

Page 102: ...change fig 11 010 2 Turn the VALUE dial to change the value Value C G9 You can also use your external MIDI keyboard to change the note number You can t change the note number to a note number that s already used by the style Editing the note velocity 1 Use CURSOR to move the cursor to the grid where you wish to edit data fig 11 010a 2 Turn the VALUE dial to change the value The current value is sh...

Page 103: ...ed by the Fantom XR can be recorded on an external sequencer To do this you will normally leave the settings as shown in the connection example on p 29 and make the following settings only while recording the arpeggiated phrase Settings on the Fantom XR USB MIDI Thru OFF Tx Note ON In the Patch Mode Settings on your external MIDI keyboard Set the transmit channel to match the receive channel of th...

Page 104: ...is is referenced to the C4 key parallel chords are played by pressing other keys Changing the chord form will change the notes in the chord 1 In the Arpeggio Chord Switch screen in Performance mode the Arp Chd Rhy Switch screen press or to select Chord 2 Press SHIFT so it lights and then press Or press ENTER The Chord Form screen will appear fig 12 004 Another way to access the Chord Form screen i...

Page 105: ...you use the prepared internal Chord Forms which determine the constituent notes of chords played using the Chord Memory function but you can also freely create and rewrite them as well 1 Select the Chord Form you wish to edit 2 Press SHIFT so it lights and then press The Chord Form Edit screen will appear Alternatively you can press ENTER to access the screen fig 12 007 3 Use your external MIDI ke...

Page 106: ... an external sequencer To do this you will normally leave the settings as shown in the connection example on p 29 and make the following settings only while recording what you play using the Chord Memory function Settings on the Fantom XR USB MIDI Thru OFF Tx Note ON In the Patch Mode Settings on your external MIDI keyboard Set the transmit channel to match the receive channel of the Fantom XR s P...

Page 107: ...rmance they are handled as separate data This means that a rhythm group can be used with more than one patch or performance 1 Press ARP If you re in Patch mode In Patch mode select a rhythm set before you continue The Rhythm Switch screen will appear fig 13 002 If you re in Performance mode The Arp Chd Rhy Switch screen will appear Turn the VALUE dial or press or to select Rhythm fig 13 003 2 Pres...

Page 108: ...o each note fig 13 007 e You can also audition the rhythm patterns using just the Fantom XR without using any external equipment Move the cursor to Note and turn the VALUE dial or use INC DEC to select a note then press the OUTPUT knob to audition the rhythm pattern assigned to that note The rhythm pattern assigned to each note is displayed below Note If you want to change the rhythm pattern refer...

Page 109: ...s by varying the strength of your strike Range REAL 1 127 5 If you want to save the rhythm group you created proceed to step 2 of Saving the Rhythm Group You Have Created Write p 109 If you don t want to save it press EXIT When you save a Performance the Rhythm Pattern on off status the Rhythm Group number and the settings of the Rhythm Pattern screen p 111 are also saved If you want to create a c...

Page 110: ... sets the Rhythm pattern tempo Editing the Tempo setting will change the System setting Tempo p 156 The tempo setting cannot be saved in the Rhythm Group Value 5 300 When you play rhythm patterns the velocity of each note is determined by the velocity of the notes programmed within the arpeggio style You can adjust the amount spread of this dynamic variation With a setting of 100 the notes will ha...

Page 111: ...he Arpeggio Channel p 100 and the Rhy Ptn Channel are set to the same channel the Rhythm function will not operate if the Arpeggio function or Chord Memory function is on Not only can you use the prepared internal Rhythm Pattern that determine how rhythm patterns are played but you can also create them as well This way you can enjoy performing your own original rhythm pattern A rhythm pattern you ...

Page 112: ...ff the keyboard The force velocity with which you strike the key is also recorded This lets you add expressive dynamics to the rhythm pattern you create A maximum of sixteen note numbers specified pitches can be used in one Style To save the Rhythm Pattern you created refer to p 114 Deleting all data at the cursor location step Clear Step If you input unwanted data by mistake here s how to delete ...

Page 113: ...fferent snare sound 1 Use or to move the cursor to the note number you wish to change fig 13 022 2 Turn the VALUE dial to change the value Value C G9 You can also use your external MIDI keyboard to change the note number You can t change this to a note number that s already used by the style Editing the velocity of a note 1 Use CURSOR to move the cursor to the grid where you wish to edit data fig ...

Page 114: ...atterns generated by the Fantom XR can be recorded on an external sequencer To do this you will normally leave the settings as shown in the connection example on p 29 and make the following settings only while recording the rhythm patterns Settings on the Fantom XR USB MIDI Thru OFF Tx Note ON In the Patch Mode Settings on your external MIDI keyboard Set the transmit channel to match the receive c...

Page 115: ... each parameter and turn the VALUE dial or use INC DEC to make the setting Input Select Specifies the input source of the sound to be sampled Value DIGITAL IN DIGITAL IN connector LINE IN L R INPUT jacks L R stereo LINE IN L INPUT jack L mono MICROPHONE INPUT jack L mono mic level Digital Input Level If you ve set Input Select to DIGITAL IN this adjusts the input level from the DIGITAL IN connecto...

Page 116: ...ettings screen you can edit parameters for the type of input effect you selected For details on the parameters that can be edited refer to the section Input Effect Parameters p 217 5 Press EXIT to return to the previous screen In the Input Effect screen you can press SHIFT so it lights then press to move the cursor to the Input Effect type Input Effect settings Input Effect Switching input effects...

Page 117: ...en will show the amount of free memory If the free memory reaches 0 no further sampling is possible 2 Press or to select Sampling mode Sampling Sample a sound from an external input source Re Sampling Resample the sound of the internal sound generator The external audio source will not be input The volume of a phrase that you resample may be less than the volume of the original phrase If necessary...

Page 118: ...when the input sound is detected Value ON OFF Before you turn Auto Trig on perform steps 6 to set the input level Auto Trigger Level This specifies the volume at which sampling will begin when Auto Trigger Sw is ON Value 0 7 A setting of 0 is the minimum Gap Time Specifies the length of the silences at which the sample will be divided if the Sampling Mode is set to Auto Divide Whenever there is a ...

Page 119: ...4 008 9 Press EXIT to go back to the previous screen 1 During sampling press ENTER The sample will be divided at the point where you pressed the button and the subsequent material will be sampled as a sample of the next number When sampling in mono you can divide the material into a maximum of 256 samples When sampling in stereo you can divide the material into a maximum of 128 samples L R total 2...

Page 120: ... and then press DEC 2 Press MENU The Sample Utility screen will appear 3 Use or to select Load Sample 4 Press ENTER A message will ask you for confirmation 5 Press ENTER to load the sample To cancel press EXIT In the Sample Edit screen you can press MENU and select Load Sample to load the currently displayed sample Selecting a Sample Sample List Selecting a Sample Loading a Sample The sample list ...

Page 121: ...move the currently displayed sample Here s how to completely delete a sample file You cannot delete the preset samples 1 In the Sample List screen select the sample you wish to delete If you want to select two or more samples select the sample and press INC A check mark will be added to the selected sample To remove the check mark press DEC To add a check mark to all samples of the selected group ...

Page 122: ... be looped 1 In the Sample List screen select the sample you wish to edit 2 Press ENTER or hold down SHIFT so it lights and then press SAMPLING The Sample Edit screen will appear fig 15 001 3 Use or to select the parameter and turn the VALUE dial or use INC DEC to get the value you want It s convenient to zoom in when you need to make small changes and zoom out when you need to make major changes ...

Page 123: ...Sample Utility screen will appear 3 Use or to select Sample Parameter 4 Press ENTER The Sample Parameter screen will appear fig 15 009 Alternatively you can access the Sample Parameter screen from the Sample Edit screen by pressing MENU to get the Sample Utility choosing Sample Parameter from the menu and pressing ENTER 5 Use or to select the parameter and turn the VALUE dial or use INC DEC to get...

Page 124: ...XIT 1 In the Sample List screen select the sample from which you want to create a patch You can press OUTPUT knob to audition the selected sample 2 Press MENU The Sample Utility screen will appear 3 Use or to select Create Patch 4 Press ENTER The Create Patch screen will appear 5 Press or to specify the part to which the new patch is to be assigned fig 15 011 6 Press ENTER The Create Patch screen ...

Page 125: ...he assigned rhythm set will be On 6 Press ENTER A message will ask you for confirmation 7 Press ENTER The sample will be created as a rhythm set To cancel press EXIT 1 In the Sample List screen select the sample s from which you want to create a rhythm set If you want to select two or more samples select the sample and press INC A check mark will be added to the selected sample To remove the check...

Page 126: ... select the write destination Multisamples consisting of user samples will be written to User and multisamples consisting of card samples will be written to Card 8 Press ENTER A message will ask you to confirm the operation fig 15 019 Creating a Patch from Multiple Samples Create Multisample In order to hear a multisample you ll need to assign it to a Part as a Patch Choose the desired samples to ...

Page 127: ...ear Specify the Original Key of the selected sample If you open the Sample List screen from the Sample Parameter screen in this way you can press ENTER to return directly to the Sample Parameter screen This is convenient when you re setting the Original Key of several samples 8 Repeat steps 5 7 to specify the Original Key of each sample 9 When you ve finished setting the Original Key of all sample...

Page 128: ...Press ENTER A message will ask you for confirmation 8 Press ENTER to execute the Emphasis operation To cancel press EXIT This operation raises the level of the entire sample as much as possible without exceeding the maximum level In some cases the volume of a phrase you resampled p 117 will be lower than the volume of the original phrase In this case it is a good idea to boost the volume by execut...

Page 129: ...ntly selected sample will be replaced by the edited sample 9 Press ENTER A message will ask you for confirmation 10 Press ENTER to execute the operation To cancel press EXIT This operation stretches or shrinks the sample to modify the length or tempo You can stretch or shrink the sample by a factor of one half to double the original length You cannot execute this with more than one sample selected...

Page 130: ...sample will be automatically divided according to your settings and the points will be specified A maximum of 15 division points will be set 16 regions To cancel press EXIT 8 Audition the sample as described in the section Auditioning the Divided Samples p 130 If you want to re make settings move the point Moving a Dividing Point p 131 9 Press ENTER A message will ask you for confirmation 10 To ex...

Page 131: ...on assigning names refer to Assigning a Name p 39 4 When you have finished inputting the name press ENTER A screen will appear allowing you to select the write destination sample fig 15 031 5 Press or to select the write destination The write destination can be either the Fantom XR s internal user area User or a memory card Card You can also use GROUP to select the write destination 6 Turn the VAL...

Page 132: ...ved with the Patch Performance or System settings When you power on the Fantom XR these switches will all be turned on The MST mastering on off setting is saved as a System setting p 155 This lets you specify adjustments that you always want to apply to the overall sound of the entire Fantom XR For example you might specify that some compression be always applied to the midrange frequency band in ...

Page 133: ...ions of Effect Parameters p 134 For the editing procedure refer to Making Effect Settings p 134 fig 22 004 Applying Effects in Patch Mode Signal Flow Diagram Routing Tone 2 Tone 3 Tone 4 Patch Rhythm Output Chorus Output Reverb Output MFX Output Chorus Mastering OUTPUT A OUTPUT B Reverb 1 2 3 7 8 9 10 12 13 13 14 16 17 MAIN REV 4 5 MFX 6 Tone1 1 2 4 5 6 11 12 13 14 7 8 9 10 3 16 17 15 11 15 Fantom...

Page 134: ...l that is sent to the output destination specified by Output Assign Value 0 127 Tone Chorus Send Level MFX non MFX Sets the level of the signal sent to chorus for each tone Value 0 127 Tone Reverb Send Level MFX non MFX Sets the level of the signal sent to reverb for each tone Value 0 127 Patch Output Assign Specifies how the direct sound of each patch will be output Value MFX Output in stereo thr...

Page 135: ... has passed through the multi effects Chorus and reverb are output in mono at all times The output destination of the signal after passing through the chorus is set with the Chorus Output Select and the Chorus Output Assign The output destination of the signal after passing through the reverb is set with the Reverb Output Assign MFX fig 22 021 MFX Type Multi Effects Type Use this parameter to sele...

Page 136: ... sound is routed when Chorus Output Select is set to MAIN or M R Value A Output to the OUTPUT A MIX jacks in stereo B Output to the OUTPUT B jacks in stereo When Chorus Output Select is set to REV this setting will have no effect If the Mix Parallel parameter is set to MIX all sounds are output from the OUTPUT A MIX jacks in stereo p 158 Reverb fig 22 023 Reverb Type Selects the type of reverb Val...

Page 137: ...tches or performances For details on the Mastering Effect refer to Mastering Effects p 146 MFX Control To access the MFX Control screen 1 From the Effect Edit Menu screen turn the VALUE dial or use INC DEC to select CTRL fig 22 0052 2 Press ENTER Control 1 4 Src Multi Effects Control Source 1 4 Sets the MIDI message used to change the multi effects parameter with the multi effects control Value OF...

Page 138: ... if you don t want to apply the effect Value 63 63 Multi Effects Control If you wanted to change the volume of multi effects sounds the delay time of Delay and the like using an external MIDI device you would need to send System Exclusive messages MIDI messages designed exclusively for the Fantom XR However System Exclusive messages tend to be complicated and the amount of data that needs to be tr...

Page 139: ...ries In the Signal Flow Diagram Routing below numbers 1 17 correspond to the Fantom XR s Effect Edit Menu screens p 140 For details on parameters 1 17 refer to Functions of Effect Parameters p 140 For the editing procedure refer to Making Effect Settings p 140 fig 22 007 Applying Effects in Performance Mode Signal Flow Diagram Routing Patch Rhythm Patch Rhythm Output Chorus Output Reverb Output Ch...

Page 140: ...Level p 89 Part Output Level Set the level of the signal that is sent to the output destination specified by Part Output Assign Value 0 127 Part Chorus Send Level Sets the level of the signal sent to chorus for each part Value 0 127 Part Reverb Send Level Sets the level of the signal sent to reverb for each part Value 0 127 Part Output Assign Specifies for each part how the direct sound will be ou...

Page 141: ...ameters refer to Multi Effects Parameter p 193 Value 0 Through 78 MFX1 3 Output Multi Effects 1 3 Output fig 22 026a MFX Output Level Multi Effects Output Level Adjusts the volume of the sound that has passed through the multi effects Value 0 127 MFX Chorus Send Level Multi Effects Chorus Send Level Adjusts the amount of chorus for the sound that passes through multi effects If you don t want to a...

Page 142: ... sound is routed when Chorus Output Select is set to MAIN or M R Value A Output to the OUTPUT A MIX jacks in stereo B Output to the OUTPUT B jacks in stereo When Chorus Output Select is set to REV this setting will have no effect If the Mix Parallel parameter is set to MIX all sounds are output from the OUTPUT A MIX jacks in stereo p 158 Reverb fig 22 028 Reverb Type Selects the type of reverb Val...

Page 143: ...rformances For details on the Mastering Effect refer to Mastering Effects p 146 fig 22 029 MFX Control To access the MFX Control screen 1 From the Effect Edit Menu screen turn the VALUE dial or use INC DEC to select CTRL fig 22 0063 2 Press ENTER Control 1 4 Src Multi Effects Control Source 1 4 Sets the MIDI message used to change the multi effects parameter with the multi effects control Value OF...

Page 144: ...u don t want to apply the effect Value 63 63 MFX Control Channel Multi Effects Control Channel This determines the channel that will be used for reception when using the Multi effects Control to modify multi effects parameters in real time when the MFX1 3 Source parameter p 145 is set to PRF Set this to OFF when the Multi effects Control is not being used Value 1 16 OFF This parameter is not found...

Page 145: ...ormance settings select PRF If you wish to use the settings of the patch rhythm set assigned to one of the parts select the part number Value PRF P1 P16 Specifying the Effect Source When Patch or Rhythm Set Settings Are Selected When the patch or rhythm set s multi effects settings are selected those settings are shown in each of the performance s multi effects setting screens and the settings can...

Page 146: ... volume more consistent When mixing down to MD or DAT or when you procedure your own original audio CD this lets you master at an optimized level Mastering effect settings apply to the entire Fantom XR These settings are not for individual patches or performances The mastering effect is applied to the sound that is output from the OUTPUT A MIX jacks It will not be applied to the sound that is outp...

Page 147: ... Value 0 24 dB In the Mastering screen you can press MENU to execute the following menu items Saving the Mastering settings Save the current settings as user settings Only one set of user settings can be saved 1 In the Mastering screen press SHIFT so it lights and then press Preset Hard Comp Preset Soft Comp Preset Lo Boost Preset Mid Boost Preset Hi Boost Recall preset settings for each type User...

Page 148: ... will be selected fig 23 001 j To cancel press EXIT 8 If you want the Fantom XR to start up in USB Storage mode the next time it is powered up press SHIFT so it lights and then press to store the System settings For details on operations in USB Storage mode refer to Transferring Files to or from Your Computer Storage Mode p 149 Selecting MIDI Mode You must switch the Fantom XR to MIDI mode before ...

Page 149: ...transfer files such as patch and waves to or from a connected computer Connect or disconnect the USB cable only when the Fantom XR is powered off Never connect or disconnect the USB cable or turn off the power while in USB mode or while data is being transferred 1 With the Fantom XR not connected start up your computer 2 Use a USB cable to connect the Fantom XR to your computer 3 Turn on the power...

Page 150: ...der Windows Me 2000 XP Users 1 In My Computer right click the removable hard disk icon and execute Remove Macintosh Users 1 Drag the Fantom XR drive icon into the trash If you want to power off the Fantom XR when it is connected to your computer in Storage mode you must first cancel USB communication on your computer as described here Windows Me 2000 XP Users 1 Use the device eject button shown in...

Page 151: ...emporary and will be lost when you turn off the power If you want to save the sample press SHIFT so it lights and then press to save the sample Driver Installation and Settings In order to use the Fantom XR as a USB MIDI device from your computer you must first install the USB MIDI driver The USB MIDI driver is on the included Fantom X Driver CD ROM In order to use USB in MIDI mode you must instal...

Page 152: ...d the application sequencer software etc that is running on the USB connected computer The USB MIDI Driver sends data from the application to the Fantom XR and passes data from the Fantom XR to the application fig 23 006 Application USB MIDI Driver Computer USB connector USB cable USB connector Fantom XR Fantom XR_r_e book 152 ページ 2006年4月4日 火曜日 午前10時14分 ...

Page 153: ...wing folders Don t place files of any other format in the user memory or memory card 1 In the Patch Play screen p 40 or the Performance Play screen p 84 press MENU The Top Menu screen will appear 2 Press or to select File Utility 3 Press ENTER The File Utility screen will appear fig 24 001 4 Press GROUP to select the file group USER Files in user memory CARD Files on a memory card 5 Press CURSOR t...

Page 154: ...file is to be moved 4 To move the file press ENTER To cancel press EXIT Here s how you can delete a selected file or files with check marks F3 Card Format Format initialize a memory card 1 In the File Utility screen select the file that you want to delete 2 Press MENU The File Utility Menu screen will appear 3 Press or to select File Delete and press ENTER A message will ask you for confirmation 4...

Page 155: ...epeat steps 4 6 to set each System parameter you want to edit Changes you make to the System function settings are only temporary they will be discarded as soon as the power is turned off If you want to keep any changes you ve made in the system settings you must save them in internal system memory When you perform the save procedure the data that previously occupied the save destination will be l...

Page 156: ...elf without synchronizing to another device SLAVE The Fantom XR will be the slave Choose this setting when you want the Fantom XR to synchronize to MIDI Clock messages received from another MIDI device Tempo System Tempo 5 300 Sets the system tempo When Sync Mode is set to SLAVE the tempo will synchronize to the clock messages received from an external MIDI device so the tempo value will be ignore...

Page 157: ...stem On messages will be received ON or not OFF Rx GS Reset Receive GS Reset Switch OFF ON Specifies whether GS Reset messages will be received ON or not OFF System USB Parameter Value Description USB Mode STORAGE MIDI Selects the mode in which the USB connector will be used Storage Storage mode Select this if you want to transfer files MIDI MIDI mode Select this if you want to exchange MIDI messa...

Page 158: ...rom the left OUTPUT A MIX jack sounds which are set to be output from the INDIVIDUAL 4 jack are output from the right OUTPUT A MIX jack Sounds output from the PHONES jack are the same as those output from the OUTPUT A MIX jacks Therefore any sounds set with Output Assign to be output from the OUTPUT B jacks is not output from the PHONES jack Be sure to have any sound you want to hear through the h...

Page 159: ...ay screen p 40 or the Performance Play screen p 84 press MENU The Top Menu screen will appear 2 or to select Master Level fig 25 004 3 Turn the VALUE dial or use INC DEC to adjust the master level The Master Level setting is temporary and will be lost when you turn off the power If you want to keep the Master Level setting you edited save the master level in the internal system memory Saving the S...

Page 160: ...aments other than equal temperament The pitch is specified in one cent units relative to the equal tempered pitch One cent is 1 100th of a semitone The selected scale applies to MIDI messages received from an external MIDI device Patch Scale Tune for C B 64 63 Make scale tune settings for Patch mode For details on these settings refer to How to Make System Function Settings p 155 Equal Temperament...

Page 161: ...fied time the sample will be divided at that point and the next sample number will be assigned to the sound that follows This parameter is valid only when you are using Auto Divide Sampling Input Select DIGITAL IN LINE L R LINE L MICROPHONE Input source of the external input sound DIGITAL IN DIGITAL INPUT jack LINE L R INPUT jacks L R stereo LINE L INPUT jack L mono MICROPHONE INPUT jack mono mic ...

Page 162: ...e Fantom XR When you execute User Restore the current contents of the user area will be completely erased 1 Into the slot insert the memory card on which user data has been saved 2 Select User Restore in the Utility Menu screen and press ENTER A message will ask you for confirmation 3 To execute the restoration press ENTER To cancel press EXIT 4 When the display indicates Power Off turn the power ...

Page 163: ... on your computer It provides an efficient way to manage patch rhythm set and performance data In order to use the librarian included on the Fantom X Editor CD ROM you will need to put the Fantom XR in Librarian mode The same is true when you want to use a separately sold librarian 1 Press MENU The Top Menu screen will appear 2 Use or to select Librarian 3 Press ENTER Librarian mode will be select...

Page 164: ...as Microsoft Windows operating system Pentium is a registered trademark of Intel Corporation Operating System Mac OS Classic 8 6 and 9 x Mac OS X 10 2 or later CPU Clock PowerPC G3 233 MHz or higher Classic PowerPC G3 500 MHz or higher X Memory RAM 128 MB or more 256 MB or more recommended Display Colors 800 x 600 or higher 32 000 colors or more 1024 x 768 or higher recommended Hard Disk 120 M byt...

Page 165: ...y screen appears 4 Press GROUP to select the file group that you want to play USER Files in user memory CARD Files on a memory card 5 Turn the VALUE dial or use INC DEC to select the file you want to play fig 29 001 By pressing SHIFT so it lights and press INC DEC you can jump to the beginning or end of the song list 6 Press ENTER to start playback When the selected file has finished playing the n...

Page 166: ...ch any of the printed circuit pathways or connection terminals 911 Do not touch any of the printed circuit pathways or connection terminals 912 Never use excessive force when installing a circuit board If it doesn t fit properly on the first attempt remove the board and try again 913 When circuit board installation is complete double check your work 914 Always turn the unit off and unplug the powe...

Page 167: ...he power as described in Turning On the Power p 17 2 Press MENU The Top Menu screen will appear 3 Press or to select System 4 Press ENTER 5 Press or to display System SRX Info screen The System screen will appear Verify that the name of the installed Wave Expansion Board is displayed fig 30 007_50 If appears next to the installed slot name it s possible that the installed Wave Expansion Board is n...

Page 168: ...rte 911 F Ne pas toucher aux circuits imprimés ou aux connecteurs 912 F Ne jamais forcer lors de l installation de la carte de circuits imprimés Si la carte s ajuste mal au premier essai enlevez la carte et recommencez l installation 913 F Quand l installation de la carte de circuits imprimés est terminée revérifiez si tout est bien installé 914 F Toujours éteindre et débrancher l appareil avant d...

Page 169: ... 17 2 Appuyer sur MENU Le menu principal s affichera à l écran 3 Appuyer sur ou sur pour sélectionner System 4 Appuyer sur ENTER 5 Appuyer sur ou sur pour afficher l écran System SRX Info L écran System Edit s affiche Vérifiez que le nom de la carte d expansion Wave installeé s est affiché fig 30 007 Si est affiché à côté du nom de la fente dans laquelle la carte est installée il est possible que ...

Page 170: ...y of the printed circuit pathways or connection terminals 912 Never use excessive force when installing a circuit board If it doesn t fit properly on the first attempt remove the board and try again 913 When circuit board installation is complete double check your work 914 Modified Always turn the unit off and unplug the power cord before attempting installation of the memory DIMM board 915 Modifi...

Page 171: ...the memory is not being recognized properly Turn off the power as described in Turning Off the Power p 19 and re install the memory correctly Specifications of the expansion memory DIMM that can be used Number of pins 168 pin Speed 100 MHz PC100 CL 2 133 MHz PC133 CL 3 Voltage 3 3 V Capacity 64 128 256 512 MB Board height 38 mm or less The Fantom XR has been confirmed to work with standard memory ...

Page 172: ...11 F Ne pas toucher aux circuits imprimés ou aux connecteurs 912 F Ne jamais forcer lors de l installation de la carte de circuits imprimés Si la carte s ajuste mal au premier essai enlevez la carte et recommencez l installation 913 F Quand l installation de la carte de circuits imprimés est terminée revérifiez si tout est bien installé 914 F Modified Avant de procéder à l installation d un module...

Page 173: ...oire n ait pas été détectée correctement Éteindre tel que décrit sous Turning Off the Power p 19 et réinstaller la mémoire conformément aux instructions Spécifications des modules de mémoire DIMM qui peuvent être utilisés Nombre de broches 168 pin Vitesse 100 MHz PC100 CL 2 133 MHz PC133 CL 3 Tension 3 3 V Capacité 64 128 256 512 MB Hauteur de la carte 38 mm ou moins Il a été confirmé que le Fanto...

Page 174: ...fig 31a 001 Patches rhythm sets performances and samples can be written to the card For details on the writing procedure refer to the explanation for the corresponding parameters The Fantom XR provides a PC card protector to prevent theft of the memory card To install the PC card protector use the following procedure 1 Insert the memory card into the PC CARD card slot 2 Use the attached screws to ...

Page 175: ...175 Appendix Fantom XR_r_e book 175 ページ 2006年4月4日 火曜日 午前10時14分 ...

Page 176: ...k that the specified Wave Expansion Board is installed properly in the specified slot p 166 p 168 Has the volume been lowered by MIDI messages volume messages or expression messages received from an external MIDI device In the case of Performance mode the value of volume messages Volume and expression messages Expression can be viewed in the Part Information window p 87 Have the samples been loade...

Page 177: ...d to a Patch even if the Pan is set all the way to one side you will still be able to hear sounds of the effect component from the other channel Sometimes when playing legato the pitch won t rise Why is this When the Legato Switch parameter p 50 is ON and the Legato Retrigger parameter p 50 is OFF and you hold down keys in the high register to play legato the upper pitch limit of the wave may be e...

Page 178: ...used Using the Matrix Control or other such means to control the LFO results in noise when the Pan is changed suddenly Lower the change in speed LFO Rate Due to the specialized processing used for the Pan which alters the volume level in each of the left and right sides sudden Pan movements causing rapid changes in these levels creates large changes in volume and noise from this may be audible as ...

Page 179: ...ta System Exclusive messages contain large amounts of data thus placing a heavy burden on sequencers and sound modules Try repositioning data and changing System Exclusive messages to Control Changes for any data for which Control Changes can be substituted Is there an Aftertouch or other such large Control Change at the point where the song performance is sluggish Move the location of the data If...

Page 180: ...DIMM modules p 170 p 172 Sampled sound contains excessive noise or distortion Check the following points Is the input level appropriate If the input level is too high the sampled sound will be distorted If it is too low noise will be heard When sampling turn the LEVEL knob in the Sampling Standby screen p 117 to adjust the level while watching the level meter displayed in the upper part of the dis...

Page 181: ...ento Mode NORMAL LEGATO Portamento Type RATE TIME Portamento Start PITCH NOTE Portamento Time 0 127 Parameter Value Structure Type 1 2 1 10 Booster 1 2 Booster Gain 1 2 0 6 12 18 Structure Type 3 4 1 10 Booster 3 4 Booster Gain 3 4 0 6 12 18 Key Fade Lower Keyboard Fade Width Lower 0 127 Key Range Lower Keyboard Range Lower C 1 UPPER Key Range Upper Keyboard Range Upper LOWER G9 Key Fade Upper Key...

Page 182: ...110 120 130 140 150 160 170 180 190 200 Pitch Bend Range Up Pitch Bend Range Up 0 48 Pitch Bend Range Down Pitch Bend Range Down 48 0 Parameter Value P Env Depth Pitch Envelope Depth 12 12 P Env V Sens Pitch Envelope Velocity Sensitivity 63 63 P Env T1 V Sens Pitch Envelope Time 1 Velocity Sensitivity 63 63 P Env T4 V Sens Pitch Envelope Time 4 Velocity Sensitivity 63 63 P Env Time KF Pitch Envelo...

Page 183: ... 100 100 Random Pan Depth 0 63 Alter Pan Depth Alternate Pan Depth L63 0 63R Parameter Value A Env T1 V Sens TVA Envelope Time 1 Velocity Sensitivity 63 63 A Env T4 V Sens TVA Envelope Time 4 Velocity Sensitivity 63 63 A Env Time KF TVA Envelope Time Keyfollow 100 90 80 70 60 50 40 30 20 10 0 10 20 30 40 50 60 70 80 90 100 A Env Time 1 4 TVA Envelope Time 1 4 0 127 A Env Level 1 3 TVA Envelope Lev...

Page 184: ... 1 4 Matrix Control 1 4 Destination 1 4 OFF PITCH CUTOFF RESONANCE LEVEL PAN OUTPUT LEVEL CHORUS SEND REVERB SEND LFO1 PCH DEPTH LFO2 PCH DEPTH LFO1 TVF DEPTH LFO2 TVF DEPTH LFO1 TVA DEPTH LFO2 TVA DEPTH LFO1 PAN DEPTH LFO2 PAN DEPTH LFO1 RATE LFO2 RATE PIT ENV A TIME PIT ENV D TIME PIT ENV R TIME TVF ENV A TIME TVF ENV D TIME TVF ENV R TIME TVA ENV A TIME TVA ENV D TIME TVA ENV R TIME TMT FXM DEP...

Page 185: ...ession Switch OFF ON Tone Receive Hold 1 Rhythm Tone Receive Hold 1 Switch OFF ON Tone Receive Pan Mode Rhythm Tone Receive Pan Mode CONTINUOUS KEY ON One Shot Mode OFF ON Aft Time Ctrl Sens Aftertouch Time Control Sensitivity 63 63 Parameter Value Wave Group INT EXP SAMP MSAM Wave Bank When the wave group is INT A or B When the wave group is EXP A F When the wave group is SAMP PRST USER CARD When...

Page 186: ...ity 63 63 P Env T1 V Sens Pitch Envelope Time 1 Velocity Sensitivity 63 63 P Env T4 V Sens Pitch Envelope Time 4 Velocity Sensitivity 63 63 P Env Time 1 4 Pitch Envelope Time 1 4 0 127 P Env Level 0 4 Pitch Envelope Level 0 4 63 63 Parameter Value Filter Type OFF LPF BPF HPF PKG LPF2 LPF3 Cutoff Frequency 0 127 Resonance 0 127 Cutoff V Curve Cutoff Frequency Velocity Curve FIXED 1 7 Cutoff V Sens ...

Page 187: ...d Level 0 127 Tone Chorus Send nonMFX Tone Chorus Send Level 0 127 Tone Reverb Send nonMFX Tone Reverb Send Level 0 127 Parameter Value MFX Group Type Multi Effects Type 00 THROUGH 78 SYMPATHETIC RESONANCE MFX Output Output Level Multi Effects Output Level 0 127 Output Assign Multi Effects Output Assign A B Chorus Send Level Multi Effects Chorus Send Level 0 127 Reverb Send Level Multi Effects Rev...

Page 188: ...Send Level 0 127 Reverb Send Level 0 127 Cutoff Offset 64 63 Resonance Offset 64 63 Attack Time Offset 64 63 Release Time Offset 64 63 Decay Time Offset 64 63 Mono Poly MONO POLY PAT Legato Switch OFF ON PAT Portamento Switch OFF ON PAT Portamento Time 0 127 PATCH Vibrato Rate 64 63 Vibrato Depth 64 63 Vibrato Delay 64 63 Key Fade Lower Keyboard Fade Lower 0 127 Key Range Lower C 1 UPPER Key Range...

Page 189: ...0 60 70 80 90 100 120 FULL Motif UP L UP L H UP _ DOWN L DOWN L H DOWN _ UP DOWN L UP DOWN L H UP DOWN _ RANDOM L RANDOM _ PHRASE Velocity REAL 1 127 Arpeggio Channel 1 16 Parameter Value Chord Switch OFF ON Chord Form U01 U64 P01 P64 Rolled Chord OFF UP DOWN ALT Parameter Value Rhythm Group No Rhythm Group Number U01 32 P01 32 Note C B Mode PTN START PTN STOP Rhythm Pattern Number Rhythm Pattern ...

Page 190: ...l Source 1 4 OFF CC01 31 33 95 PITCH BEND AFTERTOUCH SYS CTRL1 SYS CTRL4 Control 1 4 Dest Multi Effects Control Destination 1 4 OFF DEPTH DAMPER Control 1 4 Sens Multi Effects Control Sens 1 4 63 63 Control Channel Multi Effects Control Channel 1 16 OFF Chorus Type 0 Off 1 Chorus 2 Delay 3 GM2 Chorus Chorus Output Output Level 0 127 Output Assign A B Output Select MAIN REV MAIN REV Reverb Type 0 O...

Page 191: ...ta Transmit Edit Data Switch OFF ON Tx Note Transmit Note Switch OFF ON Rx Program Change Receive Program Change Switch OFF ON Rx Bank Select Receive Bank Select Switch OFF ON Receive Exclusive Receive System Exclusive Switch OFF ON Rx GM System On Receive GM System On Switch OFF ON Rx GN2 System On Receive GM2 System On Switch OFF ON Rx GS Reset Receive GS Reset Switch OFF ON Parameter Value USB ...

Page 192: ...ut Select DIGITAL IN LINE IN L R LINE IN L MICROPHONE Trimming Switch OFF ON Parameter Value Split Freq Low 2000 8000 Hz Split Freq High 200 800 Hz Low Mid High Attack 0 100 ms Low Mid High Release 50 5000 ms Low Mid High Threshold 36 0 dB Low Mid High Ratio 1 00 1 INF 1 INF Infinity Low Mid High Level 0 24 dB Parameter Value Mix In Input Select LINE IN L R LINE IN L MICROPHONE Digital Input Level...

Page 193: ...OLATOR P 194 04 LOW BOOST P 194 05 SUPER FILTER P 195 06 STEP FILTER P 195 07 ENHANCER P 195 08 AUTO WAH P 195 09 HUMANIZER P 196 10 SPEAKER SIMULATOR P 196 MODULATION 12 types 11 PHASER P 196 12 STEP PHASER P 197 13 MLT STAGE PHASER P 197 14 INFINITE PHASER P 197 15 RING MODULATOR P 197 16 STEP RING MOD P 198 17 TREMOLO P 198 18 AUTO PAN P 198 19 STEP PAN P 198 20 SLICER P 199 21 ROTARY P 199 22 ...

Page 194: ... 4 Band EQ L in R in L out R out Spectrum Spectrum Parameter Value Description Boost Cut Low 60 4 dB These boost and cut each of the High Middle and Low frequency ranges At 60 dB the sound becomes inau dible 0 dB is equivalent to the input level of the sound Boost Cut Mid Boost Cut High Anti Phase Low Sw OFF ON Turns the Anti Phase function on and off for the Low frequency ranges When turned on th...

Page 195: ...ed at which the cutoff frequency changes between steps Filter Type LPF BPF HPF NOTCH Filter type Frequency range that will pass through each filter LPF frequencies below the cutoff BPF frequencies in the region of the cutoff HPF frequencies above the cutoff NOTCH frequencies other than the re gion of the cutoff L in R in L out R out Super Filter Super Filter SAW1 SAW2 L in R in L out R out Step Fi...

Page 196: ...Output Level Parameter Value Description Formant 2 Band EQ L in R in Overdrive L out R out Pan R Pan L L in R in L out R out Speaker Speaker Type Cabinet Speaker Micro phone SMALL 1 small open back enclosure 10 dynamic SMALL 2 small open back enclosure 10 dynamic MIDDLE open back enclosure 12 x 1 dynamic JC 120 open back enclosure 12 x 2 dynamic BUILT IN 1 open back enclosure 12 x 2 dynamic BUILT ...

Page 197: ... 4 STAGE 8 STAGE 12 STAGE 16 STAGE 20 STAGE 24 STAGE Number of phaser stages Manual 0 127 Adjusts the basic frequency from which the sound will be modulated Rate 0 05 10 00 Hz note Frequency of modulation Depth 0 127 Depth of modulation Resonance 0 127 Amount of feedback Mix 0 127 Level of the phase shifted sound Pan L64 63R Stereo location of the output sound Low Gain 15 15 dB Gain of the low ran...

Page 198: ...ave TRI triangle wave SQR square wave SIN sine wave SAW1 2 sawtooth wave Rate 0 05 10 00 Hz note Frequency of the change Depth 0 127 Depth to which the effect is ap plied Low Gain 15 15 dB Gain of the low range High Gain 15 15 dB Gain of the high range Level 0 127 Output Level L in R in L out R out Step Ring Mod 2 Band EQ 2 Band EQ Step Ring Mod L in R in L out R out Tremolo 2 Band EQ 2 Band EQ Tr...

Page 199: ... Parameter Value Description Speed SLOW FAST Simultaneously switch the rota tional speed of the low frequency rotor and high frequency rotor SLOW Slows down the rota tion to the Slow Rate FAST Speeds up the rotation to the Fast Rate Wf Slow Speed 0 05 10 00 Hz Slow speed SLOW of the low fre quency rotor L in R in L out R out Slicer Slicer Rotary L out R out L in R in Wf Fast Speed 0 05 10 00 Hz Fa...

Page 200: ... the sound Feedback 98 98 Adjusts the proportion of the flanger sound that is fed back into the effect Negative set tings will invert the phase Low Gain 15 15 dB Gain of the low range High Gain 15 15 dB Gain of the high range Balance D100 0W D0 100W Volume balance between the direct sound D and the flanger sound W Level 0 127 Output Level L in R in Chorus Chorus L out R out 2 Band EQ 2 Band EQ Bal...

Page 201: ...ge Balance D100 0W D0 100W Volume balance between the direct sound D and the cho rus sound W Level 0 127 Output Level Parameter Value Description Tremolo Chorus L in R in L out R out Balance D Balance D Balance W Balance W L in R in Space D Space D L out R out 2 Band EQ 2 Band EQ Balance W Balance W Balance D Balance D Parameter Value Description Filter Type OFF LPF HPF Type of filter OFF no filte...

Page 202: ...hieved if you select SPEAKER when using speakers or PHONES when using head phones Low Gain 15 15 dB Gain of the low range High Gain 15 15 dB Gain of the high range Balance D100 0W D0 100W Volume balance between the di rect sound D and the flanger sound W Level 0 127 Output Level Parameter Value Description L R 3D Step Flanger 2 Band EQ 2 Band EQ R out L out Parameter Range Explanation Split Freq 2...

Page 203: ...tion of the low range flanger sound that is to be re turned to the input negative values invert the phase Low Step Rate 0 10 20 00 Hz note Rate at which the steps will cy cle for the low range flanger sound High Pre Delay 0 0 100 0 ms Delay time from when the origi nal sound is heard to when the high range flanger sound is heard High Rate 0 05 10 00 Hz note Rate at which the high range flanger sou...

Page 204: ...turing the sound of the speaker This can be adjusted in three steps from 1 to 3 with the mic becoming more distant as the value increases Mic Level 0 127 Volume of the microphone Direct Level 0 127 Volume of the direct sound Pan L64 63R Stereo location of the output Level 0 127 Output level Parameter Value Description L in R in L out R out Pan R Pan L Amp Simulator 2 Band EQ Distortion L in R in L...

Page 205: ... 2 Band EQ 2 Band EQ Delay Delay R in R out L in L out Feedback Feedback Balance W Balance D Balance W Balance D 2 Band EQ 2 Band EQ Delay Delay HF Damp 200 8000 Hz BYPASS Adjusts the frequency above which sound fed back to the effect is filtered out If you don t want to filter out any high frequencies set this parameter to BYPASS Low Gain 15 15 dB Gain of the low frequency range High Gain 15 15 d...

Page 206: ...planation R in R out L in L out Feedback Feedback Balance W Balance D Balance W Balance D 2 Band EQ 2 Band EQ Delay Delay Modulation Modulation R in R out L in L out Feedback Feedback Balance W Balance D Balance W Balance D 2 Band EQ 2 Band EQ Delay Delay Modulation Modulation Parameter Value Description Delay Left Right Center 0 2600 ms note Adjusts the time until the delay sound is heard Center ...

Page 207: ... from when sound is input into the tap delay until the delay sound is heard L in R in L out R out Multi Tap Delay Balance W Balance D Balance W Balance D Delay 1 Delay 3 Delay 4 Delay 2 Feed back 2 Band EQ 2 Band EQ Feedback L in R in Rev Delay L out R out 2 Band EQ 2 Band EQ Rev Delay D2 D1 D3 Delay 3 Feed back 98 98 Proportion of the delay sound that is to be returned to the in put of the tap de...

Page 208: ...is parameter to BYPASS Low Gain 15 15 dB Gain of the low frequency range High Gain 15 15 dB Gain of the high frequency range L R 3D Delay L 3D Delay R 3D Delay C Level Feedback 2 Band EQ 2 Band EQ L out R out R in R out L in L out Feedback Feedback Pan L Pan R Time Ctrl Delay Time Ctrl Delay 2 Band EQ 2 Band EQ Balance D100 0W D0 100W Volume balance between the direct sound D and the delay sound W...

Page 209: ...enter frequency of the low pass filter ap plied to the hum noise BYPASS no cut Hum Noise Level 0 127 Volume of the hum noise Low Gain 15 15 dB Gain of the low range High Gain 15 15 dB Gain of the high range Balance D100 0W D0 100W Volume balance between the direct sound D and the effect sound W Level 0 127 Output level Parameter Value Description R in R out L in L out Lo Fi Lo Fi Noise Gen 2 Band ...

Page 210: ... Balance W Balance D Balance D L in R in Pitch Shifter Pitch Shifter L out R out 2 Band EQ 2 Band EQ Parameter Value Description Coarse 1 24 12 semi Adjusts the pitch of the pitch shifted sound in semitone steps Fine 1 100 100 cent Adjusts the pitch of the pitch shifted sound in 2 cent steps Delay Time 0 1300 ms note Adjusts the delay time from the direct sound until the pitch shifted sound is hea...

Page 211: ...d until the reverb sound is heard Time 0 127 Time length of reverberation L in R in Step Pitch Shifter Step Pitch Shifter L out R out 2 Band EQ 2 Band EQ L in R in L out R out Reverb 2 Band EQ Balance W Balance W Balance D Balance D 2 Band EQ HF Damp 200 8000 Hz BYPASS Adjuststhefrequencyabovewhich the reverberant sound will be cut As the frequency is set lower more of the high frequencies will be...

Page 212: ...the phase Fln Balance D100 0W D0 100W Adjusts the volume balance be tween the sound that is sent through the flanger W and the sound that is not sent through the flanger D Level 0 127 Output Level Parameter Value Description Od Drive 0 127 Degree of distortion Also changes the volume Od Pan L64 63R Stereo location of the overdrive sound Delay Time 0 2600 ms note Adjusts the delay time from the dir...

Page 213: ...tones generat ed by the enhancer Delay Time 0 2600 ms note Adjusts the delay time from the direct sound until the delay sound is heard Delay Feedback 98 98 Adjusts the proportion of the delay sound that is fed back into the effect Negative settings will invert the phase Delay HF Damp 200 8000 Hz BYPASS Adjusts the frequency above which sound fed back to the ef fect will be cut If you do not want t...

Page 214: ... Adjusts the proportion of the flanger sound that is fed back into the effect Negative settings will invert the phase Fln Balance D100 0W D0 100W Adjusts the volume balance be tween the sound that is sent through the flanger W and the sound that is not sent through the flanger D Level 0 127 Output Level Feedback Delay L in R in L out R out Balance W Balance W Balance D Balance D Flanger Balance W ...

Page 215: ...3D effect may not appear 30 30 About the STEP RESET function 06 STEP FILTER 16 STEP RING MOD 19 STEP PAN 20 SLICER 63 STEP PCH SHIFTER The above five types contain a sixteen step sequencer For these types you can use a multi effect control to reset the sequence to play from the first step To do this set the multi effect control Destination to Step Reset For example if you are using the modulation ...

Page 216: ...c frequency of the filter Phase 0 180 Spatial spread of the sound Type 2 DELAY Delay Left 0 1000 ms note Adjusts the delay time from the di rect sound until the delay sound is heard Delay Right Delay Center Center Feedback 98 98 Adjusts the proportion of the delay sound that is fed back into the ef fect Negative settings will invert the phase HF Damp 200 8000 Hz BYPASS Adjusts the frequency above ...

Page 217: ...S Density 0 127 Density of reverb Diffusion 0 127 Adjusts the change in the density of the reverb over time The higher the value the more the den sity increases with time The effect of this setting is most pronounced with long reverb times LF Damp Freq 50 4000 Hz Adjusts the frequency below which the low frequency content of the reverb sound will be reduced or damped LF Damp Gain 36 0 dB Adjusts t...

Page 218: ... Please perform the Factory Reset operation If this does not resolve the problem please contact your dealer or the nearest Roland Service Center Memory Full Saving is not possible because there is insufficient space in the user area or memory card Delete unneeded data MIDI Offline There is a problem with the MIDI cable connection Check that the MIDI cable has not been disconnect ed or broken No Mo...

Page 219: ...mplate 002 Seq Pop 1 003 Seq Pop 2 004 Seq Pop 3 005 Seq Pop 4 006 Seq Pop 5 007 Seq Pop 6 008 Seq Pop 7 009 Seq Rock 1 010 Seq Rock 2 011 Seq Fusion 012 Seq Funk 013 Seq Jazz 014 Seq HipHop 1 015 Seq HipHop 2 016 Seq R B 1 017 Seq R B 2 018 Seq BrkBeats 019 Seq Big Beat 020 Seq DnB 021 Seq 2 Step 022 Seq Trance 023 Seq Techno 024 Seq Electro 025 Seq Hardcore 026 Seq House 027 Seq Disco 028 Seq Re...

Page 220: ...25 Comp Picker 2 BASS 126 eXisDance 4 PULSATING 127 Dreaming Box 4 BELL 128 Andes Mood 1 FLUTE 129 Dust Bass 4 SYNTH BASS 130 Survivoz 4 BRIGHT PAD 131 Backing PhEP 2 EL PIANO 132 Tutti 8 HIT STAB 133 ActualAnalog 2 HARD LEAD 134 TrnsSweepPad 6 SOFT PAD 135 Ivan s 4 TECHNO SYNTH 136 Triple X 2 OTHER SYNTH 137 DelicatePizz 4 STRINGS 138 SubOscar 3 SYNTH BASS 139 FS Sitar 1 4 PLUCKED 140 Punker 1 2 ...

Page 221: ...BluNoteStrat 1 EL GUITAR 128 FS Funk Gtr 2 EL GUITAR No Name Voices Category 001 GK Dubguitar 4 EL GUITAR 002 Scratchee 4 EL GUITAR 003 Touch Drive 1 DIST GUITAR 004 FS Chunk 4 DIST GUITAR 005 Trem o Vibe 2 DIST GUITAR 006 Nice Dist Gt 1 DIST GUITAR 007 LP Dist 2 DIST GUITAR 008 Hurting Gtr 3 DIST GUITAR 009 Searing COSM 2 DIST GUITAR 010 FS Loud Gtr 3 DIST GUITAR 011 FS Plugged 1 DIST GUITAR 012 ...

Page 222: ...TH 128 Raven Chord 4 TECHNO SYNTH No Name Voices Category 001 HPF Sweep 2 TECHNO SYNTH 002 Moon Synth 2 TECHNO SYNTH 003 DelyResoSaws 2 TECHNO SYNTH 004 R Trance 7 TECHNO SYNTH 005 Alfa Retro 3 TECHNO SYNTH 006 Nu Hoover 4 TECHNO SYNTH 007 Hoovercraft 4 TECHNO SYNTH 008 Braatz 6 TECHNO SYNTH 009 AllinOneRiff 7 TECHNO SYNTH 010 YZ Again 7 TECHNO SYNTH 011 Flazzy Lead 8 TECHNO SYNTH 012 Coffee Bee 2...

Page 223: ...24 StepLFO Ens 4 BEAT GROOVE 125 Timpani Low 4 PERCUSSION 126 Timpani Roll 2 PERCUSSION 127 Bass Drum 4 PERCUSSION 128 Techno Craft 3 COMBINATION No Name Voices Category 001 ConcertGrand 2 AC PIANO 002 Hall Concert 2 AC PIANO 003 Bright Tune 2 AC PIANO 004 Mellow Tune 2 AC PIANO 005 Back E Grand 2 EL PIANO 006 EP mkI 3 EL PIANO 007 Stage EP 4 EL PIANO 008 MKS20EnsemEP 4 EL PIANO 009 UltimatGrand 2...

Page 224: ...enerator 2 PULSATING 125 ARP x Race 1 PULSATING 126 DSP Chaos 1 PULSATING 127 Phraserblade 2 PULSATING 128 Dancefloor 4 PULSATING No Name Voices Category 001 Minor Thirds 2 PULSATING 002 Strobe X 5 PULSATING 003 Orbiting 3 PULSATING 004 FX World 2 PULSATING 005 Mr Fourier 3 PULSATING 006 Nu Trance X 2 PULSATING 007 eXisDance 4 PULSATING 008 Are U ready 4 PULSATING 009 Minty Fresh 3 PULSATING 010 S...

Page 225: ...a 1 0 59 127 MutedTrumpet 1 0 60 128 MuteTrumpet2 1 1 60 No Name Voice LSB PC 129 French Horns 2 0 61 130 Fr Horn 2 1 1 61 131 Brass 1 4 0 62 132 Brass 2 4 1 62 133 Synth Brass1 3 0 63 134 Pro Brass 3 1 63 135 Oct SynBrass 3 2 63 136 Jump Brass 3 3 63 137 Synth Brass2 3 0 64 138 SynBrass sfz 2 1 64 139 Velo Brass 1 2 2 64 140 Soprano Sax 1 0 65 141 Alto Sax 1 0 66 142 Tenor Sax 2 0 67 143 Baritone...

Page 226: ...002 StandardKit2 003 StandardKit3 004 Rock Kit 1 005 Rock Kit 2 006 Brush Jz Kit 007 Orch Kit 008 909 808 Kit 009 Limiter Kit 010 HipHop Kit 1 011 HipHop Kit 2 012 HipHop Latin 013 Machine Hip 014 R B Kit 015 HiFi R B Kit 016 Machine Kit1 017 4 Kit MIX 018 Kit Euro POP 019 House Kit 020 Nu Technica 021 Machine Kit2 022 ArtificalKit 023 Noise Kit 024 Kick Menu 025 Snare Menu 1 026 Snare Menu 2 027 ...

Page 227: ...eg L Tom Reg CHH 2 Reg M Tom Reg OHH Reg M TomFlm Reg H Tom Crash Cym 1 Reg H TomFlm Rock Ride China Cymbal Splash Cym Tamborine Rock Crash 1 Cowbell Hi Crash Cym 1 Cowbell Low Rock Ride Conga Hi Mt Conga Lo Mt Conga Hi Slp Conga Hi Op Conga Lo Op Timbale Hi Timbale Low Agogo Bell H Agogo Bell L Cabasa Up Maracas Whistle Shrt Whistle Long Guiro Short Guiro Long Claves Wood Block H Wood Block L Cui...

Page 228: ... Snr Planet Clap R B Snare 1 TR808 Tom L Bang CHH TR808 Tom L TR808 CHH 1 TR808 Tom M Reg OHH ff TR808 Tom M TR808 Tom H TR909 Crash TR808 Tom H Jazz Ride Crash Cym 1 Ride Cymbal Lo Bit Snr Lo Bit PHH HipHop OHH TR808 PHH Euro Hit Low Kick 3 HipHop Kick1 R B Rim 2 Jngl pkt Snr Claptail Dirty Snr 6 Scratch 1 HipHop CHH 1 Scratch 1 Urban CHH Scratch 4 Neck OHH Scratch 5 Syn Mtl Atk1 Crash Cym 1 Syn ...

Page 229: ...L Tom1 Urban CHH Sharp M Tom TR909 OHH 2 Sharp M Tom Sharp H Tom TR909 Crash Sharp H Tom TR909 Ride China Cymbal TR707 Ride Tamborine 3 Crash Cym 1 Cowbell Rock Crash 2 Vibraslap TR606 Cym Bongo Lo Bongo Hi Conga Hi Mt Conga Hi Conga Lo Conga Efx Vox Hihat 2 Vox Hihat 3 CR78 Beat Cabasa Cut Shaker 1 Street PHH Scratch 7 Syn Low Atk2 MG Zap 7 Syn Swt Atk1 Syn Swt Atk4 Conga Thumb Triangle 1 Triangl...

Page 230: ...l Kick Reg Snr1 p Reg Snr1 mf Reg Snr1 f Reg Snr1 ff Reg Snr1 Reg Snr2 p Reg Snr2 f Reg Snr2 ff Reg Snr2 Reg Snr Flm Amb Snr1 p Amb Snr1 f Amb Snr1 Amb Snr2 p Amb Snr2 f Piccolo Snr Maple Snr Natural Snr1 Natural Snr2 Dry Snr p Dry Snr f Ballad Snr Light Snr p Light Snr f Light Snr ff Light SnrRim Rock Snr p Rock Snr mf Rock Snr f Rock Snr Rock Rim p Rock Rim mf Rock Rim f Rock Rim Reg SnrGst Rock...

Page 231: ...hat 3 Vox Cymbal Pa Chiki Aah Formant Eeh Formant Iih Formant Ooh Formant Uuh Formant Metal Vox W1 Metal Vox W2 Metal Vox W3 JD Gamelan JD Gamelan JD Gamelan JD Gamelan JD Gamelan JD Gamelan JD Gamelan JD Gamelan JD Gamelan JD Gamelan JD Gamelan JD Gamelan TablaBayam 1 TablaBayam 2 TablaBayam 3 TablaBayam 4 TablaBayam 5 TablaBayam 6 TablaBayam 7 Cajon 1 Cajon 2 Cajon 3 Udo Udu Pot Hi Udu Pot Slp S...

Page 232: ...HH 2 TR909 OHH 2 Mute Tp Ride Cymbal MrchCmp Snr Pick Kick Lo Bit Stk 1 TR909 Snr 3 Claptail Siren TR808 OHH 1 Rk CmpKick TR606 CHH 2 Syn Low Atk1 Low White Nz MG Zap 9 Happy Clap TR808 Snr 7 TR808 Snr 3 TR808 Snr 2 Club CHH 2 CR78 OHH LowDwn CHH Lo Bit OHH 1 TR909 OHH 2 TR606 OHH CR78 OHH 106SubOsc HD TR909 Snr 6 AnalogKick 3 MG Bass 2 TR808 Clap 1 Dist Clap Super Saw MG Zap 7 MaxLow Kick3 Rk Cmp...

Page 233: ...h Timbale Low Timbale Agogo Agogo Cabasa Maracas ShrtWhistle LongWhistle Short Guiro Long Guiro Claves Woodblock Woodblock Mute Cuica Open Cuica MuteTriangl OpenTriangl Shaker Jingle Bell Bell Tree Castanets Mute Surdo Open Surdo High Q Slap ScratchPush ScratchPull Sticks SquareClick Mtrnm Click Mtrnm Bell Mix Kick Elec Kick 1 Side Stick Elec Snare 909 HandClap Elec Snare 2 Synth Drum 2 Close HiHa...

Page 234: ...astanets Mute Surdo Open Surdo Close HiHat2 Pedal HiHat2 Open HiHat2 Ride Cymbal Sticks SquareClick Mtrnm Click Mtrnm Bell Concert BD ConcertBD Mt Side Stick Concert Snr Castanets Concert Snr Timpani Timpani Timpani Timpani Timpani Timpani Timpani Timpani Timpani Timpani Timpani Timpani Timpani Tambourine Splash Cym Cowbell Con Cymbal2 Vibraslap Concert Cym Bongo High Bongo Lo Mute H Conga Conga H...

Page 235: ...r C 0218 Santur A 0219 Santur B 0220 Santur C 0221 Dulcimer A 0222 Dulcimer B 0223 Dulcimer C 0224 Shamisen A 0225 Shamisen B 0226 Shamisen C 0227 Koto A 0228 Koto B 0229 Koto C 0230 Ac Bass A 0231 Ac Bass B 0232 Ac Bass C 0233 FngrCmp Bs A 0234 FngrCmp Bs B 0235 FngrCmp Bs C 0236 Finger Bs A 0237 Finger Bs B 0238 Finger Bs C 0239 Precision Bs 0240 Jz Bs Soft A 0241 Jz Bs Soft B 0242 Jz Bs Soft C ...

Page 236: ...s Nz 2 0674 E Bass Slide 0675 DistGtr Nz 1 0676 DistGtr Nz 2 0677 DistGtr Nz 3 0678 GtrStroke Nz 0679 Gtr Fret Nz1 0680 Gtr Fret Nz2 0681 Gtr Fret Nz3 0682 ClassicHseHt 0683 OrangeHit 1 0684 OrangeHit 2 0685 OrangeHit 3 0686 7th Hit 0687 Brassy Hit 0688 Drive Hit 0689 Filtered Hit 0690 Mild Hit 0691 Narrow Hit 1 0692 Narrow Hit 2 0693 Euro Hit 0694 Dist Hit 0695 Thin Beef 0696 Tao Hit 0697 Smear H...

Page 237: ...H 1058 TR909 PHH 1 1059 TR909 PHH 2 1060 TR808 PHH 1061 TR606 PHH 1 1062 TR606 PHH 2 1063 Lo Bit PHH 1064 Lo Bit OHH 1 1065 Lo Bit OHH 2 1066 Lo Bit OHH 3 1067 Neck OHH 1068 Bang OHH 1069 HipHop OHH 1070 TR909 OHH 1 1071 TR909 OHH 2 1072 TR808 OHH 1 1073 TR808 OHH 2 1074 TR606 OHH 1075 Lite OHH 1076 CR78 OHH 1077 Crash Cym1 p 1078 Crash Cym1 f 1079 Crash Cym 2 1080 Rock Crash 1 No Wave Name 1081 R...

Page 238: ...118 Picked Bs A 0119 Picked Bs B 0120 Picked Bs C 0121 MutePck Bs A 0122 MutePck Bs B 0123 MutePck Bs C 0124 Bs Gls Menu 0125 GlsDown Splt 0126 Bs Gls Down1 0127 Bs Gls Down2 0128 Bs Gls Down3 0129 GlsUpDn Splt 0130 BsGls UpDwn1 0131 BsGls UpDwn2 0132 BsGls UpDwn3 0133 BsGls UpDwn4 0134 Bs Nz Menu 0135 Bs Nz Splt 0136 Bs Rel Nz 1 0137 Bs Rel Nz 2 0138 Bs Rel Nz 3 0139 Bs Squeak 1 0140 Bs Squeak 2 ...

Page 239: ...Trig 126 GraphicPtn1 127 GraphicPtn2 128 GraphicPtn3 Arpeggio Styles are common between Preset Group and User Group Arpeggio Style List USER User Group PRST Preset Group No Chord Name Constituent Notes of Chord Forms when C4 is pressed 001 C C4 E4 G4 002 C 6 C4 E4 G4 A4 003 C Maj 7 C4 E4 G4 B4 004 C Maj 9 C4 E4 G4 B4 D5 005 C 6 9 C4 E4 G4 A4 D5 006 C aug C4 E4 G 4 007 C 5 C4 E4 F 4 008 C 7 C4 E4 G...

Page 240: ... Rock Kit 1 BPM120 061 Rock 1 5 062 Rock 1 6 063 Rock 1 7 064 Rock 1 8 065 Rock 2 1 066 Rock 2 2 067 Rock 2 3 068 Rock 2 4 PRST 004 Rock Kit 1 BPM100 069 Rock 2 5 070 Rock 2 6 071 Rock 2 7 072 Rock 2 8 073 Fusion 1 074 Fusion 2 075 Fusion 3 076 Fusion 4 PRST 001 StandardKit1 BPM112 077 Fusion 5 078 Fusion 6 079 Fusion 7 080 Fusion 8 081 Funk 1 082 Funk 2 083 Funk 3 084 Funk 4 PRST 033 StudioX Kit1...

Page 241: ...t BPM200 189 Hardcore 5 190 Hardcore 6 191 Hardcore 7 192 Hardcore 8 No Pattern Name Recommended Rhythm Set Recommended Tempo BPM 193 House 1 194 House 2 195 House 3 196 House 4 PRST 019 House Kit BPM125 197 House 5 198 House 6 199 House 7 200 House 8 201 Disco 1 202 Disco 2 203 Disco 3 204 Disco 4 PRST 003 StandardKit3 BPM120 205 Disco 5 206 Disco 6 207 Disco 7 208 Disco 8 209 Reggae 1 210 Reggae...

Page 242: ...nded Rhythm Set Recommended Tempo BPM 241 Eurodance 1 242 Eurodance 2 243 Eurodance 3 244 Eurodance 4 USER 031 Eurodance BPM132 245 Eurodance 5 246 Eurodance 6 247 Eurodance 7 248 Eurodance 8 249 Smpl Trig 1 250 Smpl Trig 2 251 Smpl Trig 3 252 Smpl Trig 4 USER 032 Smpl Trig BPM120 253 Smpl Trig 5 254 Smpl Trig 6 255 Smpl Trig 7 256 Smpl Trig 8 Fantom XR_r_e book 242 ページ 2006年4月4日 火曜日 午前10時14分 ...

Page 243: ...20 31 Eurodance USER 031 Eurodance BPM132 32 Smpl Trig USER 032 Smpl Trig BPM120 PRST Preset Group Recommended Recommended No Pattern Name Rhythm Set Tempo BPM 01 Pop 1 PRST 033 StudioX Kit1 BPM112 02 Pop 2 PRST 034 StudioX Kit2 BPM120 03 Pop 3 PRST 002 StandardKit2 BPM121 04 Pop 4 PRST 020 Nu Technica BPM098 05 Pop 5 PRST 004 Rock Kit 1 BPM080 06 Pop 6 PRST 001 StandardKit1 BPM118 07 Pop 7 PRST 0...

Page 244: ... to send Channel 1 and Channel 2 then set sound module A to receive only Channel 1 and sound module B only Channel 2 With this setup you can get an ensemble performance with for example a guitar sound from sound module A and bass from sound module B fig 33 005 e When used as a sound module the Fantom XR can receive on up to sixteen MIDI channels Sound modules like the Fantom XR which can receive m...

Page 245: ...ser Patch 129 256 032 001 128 Card Patch 001 128 033 001 128 Card Patch 129 256 064 001 128 Preset Patch A 001 128 065 001 128 Preset Patch B 001 128 092 000 001 SRX Rhythm 001 093 000 001 SRX Patch 001 120 001 057 GM Rhythm 001 009 121 000 001 128 GM Patch 001 256 Modulation Controller number 1 Status 2nd byte 3rd byte BnH 01H vvH n MIDI channel number 0H FH ch 1 16 vv Modulation depth 00H 7FH 0 ...

Page 246: ...art Attack Time Offset parameter PERFORM PART will change Cutoff Controller number 74 Status 2nd byte 3rd byte BnH 4AH vvH n MIDI channel number 0H FH ch 1 16 vv Cutoff value relative change 00H 40H 7FH 64 0 63 In Performance mode the Part Cutoff Offset parameter PERFORM PART will change Decay Time Controller number 75 Status 2nd byte 3rd byte BnH 4BH vvH n MIDI channel number 0H FH ch 1 16 vv Dec...

Page 247: ...d at the same MIDI channel after that are recognized as changing toward the value of the RPN messages In order not to make any mistakes transmitting RPN Null is recommended after setting parameters you need This device receives the following RPNs RPN Data entry MSB LSB MSB LSB Notes 00H 00H mmH llH Pitch Bend Sensitivity mm 00H 18H 0 24 semitones ll ignored processed as 00H Up to 2 octave can be s...

Page 248: ...r 0H FH ch 1 16 The same processing will be carried out as when All Notes Off is received In Performance mode the Part Mono Poly parameter PERFORM PART will change System Realtime Message Timing Clock Status F8H This is received when Sync Mode parameter SYSTEM SYNC TEMPO is MIDI Active Sensing Status FEH When Active Sensing is received the unit will begin monitoring the intervals of all further me...

Page 249: ...0 00H 7F 7FH 100 0 99 9 cents The Master Tune parameter SYSTEM SOUND will change Master Coarse Tuning Status Data byte Status F0H 7FH 7FH 04H 04H llH mmH F7 Byte Explanation F0H Exclusive status 7FH ID number universal realtime message 7FH Device ID Broadcast 04H Sub ID 1 Device Control 04H Sub ID 2 Master Coarse Tuning llH Master Coarse Tuning LSB mmH Master Coarse Tuning MSB F7H EOX End Of Exclu...

Page 250: ...l 1 to 7 ssH 12 byte tuning offset of 12 semitones from C to B 00H 64 cents 40H 0 cents equal temperament 7FH 63 cents F7H EOX End Of Exclusive Key based Instrument Controllers Status Data byte Status F0H 7FH 7FH 0AH 01H 0nH kkH nnH vvHF7H Byte Explanation F0H Exclusive status 7FH ID number universal realtime message 7FH Device ID Broadcast 0AH Sub ID 1 Key Based Instrument Control 01H Sub ID 2 Co...

Page 251: ...ansmitted Multiple bytes of data are transmitted starting from the address eeH Data sum Checksum F7H EOX End Of Exclusive The amount of data that can be transmitted at one time depends on the type of data and data will be transmitted from the specified starting address and size Refer to the address and size given in Parameter Address Map p 252 Data larger than 256 bytes will be divided into packet...

Page 252: ...hythm Performance Mode Part 16 1E 00 00 00 Temporary Rhythm Pattern 1E 01 00 00 Temporary Arpeggio Performance Mode 1E 02 00 00 Temporary Chord Performance Mode 1E 03 00 00 Temporary Rhythm Group Performance Mode 1E 11 00 00 Temporary Arpeggio Patch Mode 1E 12 00 00 Temporary Chord Patch Mode 1E 13 00 00 Temporary Rhythm Group Patch Mode 1F 00 00 00 Temporary Patch Rhythm Patch Mode System Offset ...

Page 253: ...D 0aaa aaaa Patch Scale Tune for C 0 127 64 63 00 0E 0aaa aaaa Patch Scale Tune for D 0 127 64 63 00 0F 0aaa aaaa Patch Scale Tune for D 0 127 64 63 00 10 0aaa aaaa Patch Scale Tune for E 0 127 64 63 00 11 0aaa aaaa Patch Scale Tune for F 0 127 64 63 00 12 0aaa aaaa Patch Scale Tune for F 0 127 64 63 00 13 0aaa aaaa Patch Scale Tune for G 0 127 64 63 00 14 0aaa aaaa Patch Scale Tune for G 0 127 64...

Page 254: ... 00 0D 000a aaaa MFX1 Control Channel 0 16 1 16 OFF 00 0E 0000 000a reserve 1 0 00 0F 0000 000a reserve 1 0 00 10 0aaa aaaa Voice Reserve 1 0 64 0 63 FULL 00 11 0aaa aaaa Voice Reserve 2 0 64 0 63 FULL 00 12 0aaa aaaa Voice Reserve 3 0 64 0 63 FULL 00 13 0aaa aaaa Voice Reserve 4 0 64 0 63 FULL 00 14 0aaa aaaa Voice Reserve 5 0 64 0 63 FULL 00 15 0aaa aaaa Voice Reserve 6 0 64 0 63 FULL 00 16 0aaa...

Page 255: ...MFX Parameter 28 12768 52768 20000 20000 01 01 0000 aaaa 0000 bbbb 0000 cccc 0000 dddd MFX Parameter 29 12768 52768 20000 20000 01 05 0000 aaaa 0000 bbbb 0000 cccc 0000 dddd MFX Parameter 30 12768 52768 20000 20000 01 09 0000 aaaa 0000 bbbb 0000 cccc 0000 dddd MFX Parameter 31 12768 52768 20000 20000 01 0D 0000 aaaa 0000 bbbb 0000 cccc 0000 dddd MFX Parameter 32 12768 52768 20000 20000 00 00 01 11...

Page 256: ... 16 00 01 0000 000a Receive Switch 0 1 OFF ON 00 02 0000 0000 reserve 1 0 00 03 0000 0000 reserve 1 0 00 04 0aaa aaaa Patch Bank Select MSB CC 0 0 127 00 05 0aaa aaaa Patch Bank Select LSB CC 32 0 127 00 06 0aaa aaaa Patch Program Number PC 0 127 00 07 0aaa aaaa Part Level CC 7 0 127 00 08 0aaa aaaa Part Pan CC 10 0 127 L64 63R 00 09 0aaa aaaa Part Coarse Tune RPN 2 16 112 48 48 00 0A 0aaa aaaa Pa...

Page 257: ...0aaa aaaa Arpeggio Name 7 32 127 00 09 0aaa aaaa Arpeggio Name 8 32 127 00 0A 0aaa aaaa Arpeggio Name 9 32 127 00 0B 0aaa aaaa Arpeggio Name 10 32 127 00 0C 0aaa aaaa Arpeggio Name 11 32 127 00 0D 0aaa aaaa Arpeggio Name 12 32 127 00 0E 0aaa aaaa reserve 00 0F 0aaa aaaa reserve 00 10 0aaa aaaa reserve 00 11 0aaa aaaa reserve 00 00 00 12 Total Size Arpeggio Pattern Offset Address Description 00 00 ...

Page 258: ...ote90 0 1 OFF ON 00 5A 0000 000a Chord Note91 0 1 OFF ON 00 5B 0000 000a Chord Note92 0 1 OFF ON 00 5C 0000 000a Chord Note93 0 1 OFF ON 00 5D 0000 000a Chord Note94 0 1 OFF ON 00 5E 0000 000a Chord Note95 0 1 OFF ON 00 5F 0000 000a Chord Note96 0 1 OFF ON 00 60 0000 000a Chord Note97 0 1 OFF ON 00 61 0000 000a Chord Note98 0 1 OFF ON 00 62 0000 000a Chord Note99 0 1 OFF ON 00 63 0000 000a Chord N...

Page 259: ... 00 5E 0000 000a Note 13 Rhythm Pattern Group 0 1 USER PRESET 00 5F 0000 aaaa 0000 bbbb Note 13 Rhythm Pattern Number 0 255 00 61 0aaa aaaa Note 14 Mode 2 3 PTN START PTN STOP 00 62 0aaa aaaa reserve 00 63 0aaa aaaa Note 14 Rhythm Pattern Velocity 0 127 REAL 1 127 00 64 0000 000a Note 14 Rhythm Pattern Group 0 1 USER PRESET 00 65 0000 aaaa 0000 bbbb Note 14 Rhythm Pattern Number 0 255 00 67 0aaa a...

Page 260: ...VA ATK TVA DCY TVA REL TMT FXM MFX1 MFX2 MFX3 MFX4 TIME 00 43 0aaa aaaa Matrix Control 3 Sens 3 1 127 63 63 00 44 00aa aaaa Matrix Control 3 Destination 4 0 34 OFF PCH CUT RES LEV PAN DRY CHO REV PIT LFO1 PIT LFO2 TVF LFO1 TVF LFO2 TVA LFO1 TVA LFO2 PAN LFO1 PAN LFO2 LFO1 RATE LFO2 RATE PIT ATK PIT DCY PIT REL TVF ATK TVF DCY TVF REL TVA ATK TVA DCY TVA REL TMT FXM MFX1 MFX2 MFX3 MFX4 TIME 00 45 0...

Page 261: ... Size Patch Common Chorus Offset Address Description 00 00 0000 aaaa Chorus Type 0 3 00 01 0aaa aaaa Chorus Level 0 127 00 02 0000 00aa Chorus Output Assign 0 3 A B 00 03 0000 00aa Chorus Output Select 0 2 MAIN REV MAIN REV 00 04 0000 aaaa 0000 bbbb 0000 cccc 0000 dddd Chorus Parameter 1 12768 52768 20000 20000 00 08 0000 aaaa 0000 bbbb 0000 cccc 0000 dddd Chorus Parameter 2 12768 52768 20000 2000...

Page 262: ...27 1 UPPER 00 1D 0aaa aaaa TMT3 Velocity Range Upper 1 127 LOWER 127 00 1E 0aaa aaaa TMT3 Velocity Fade Width Lower 0 127 00 1F 0aaa aaaa TMT3 Velocity Fade Width Upper 0 127 00 20 0000 000a TMT4 Tone Switch 0 1 OFF ON 00 21 0aaa aaaa TMT4 Keyboard Range Lower 0 127 C 1 UPPER 00 22 0aaa aaaa TMT4 Keyboard Range Upper 0 127 LOWER G9 00 23 0aaa aaaa TMT4 Keyboard Fade Width Lower 0 127 00 24 0aaa aa...

Page 263: ... LFO2 Waveform 0 12 SIN TRI SAW UP SAW DW SQR RND BEND UP BEND DW TRP S H CHS VSIN STEP 00 7C 0000 aaaa 0000 bbbb LFO2 Rate 0 149 0 127 MUSICAL NOTES 00 7E 0000 0aaa LFO2 Offset 0 4 100 50 0 50 100 00 7F 0aaa aaaa LFO2 Rate Detune 0 127 01 00 0aaa aaaa LFO2 Delay Time 0 127 01 01 000a aaaa LFO2 Delay Time Keyfollow 54 74 100 100 01 02 0000 00aa LFO2 Fade Mode 0 3 ON IN ON OUT OFF IN OFF OUT 01 03 ...

Page 264: ...0000 cccc 0000 dddd MFX Parameter 29 12768 52768 20000 20000 01 05 0000 aaaa 0000 bbbb 0000 cccc 0000 dddd MFX Parameter 30 12768 52768 20000 20000 01 09 0000 aaaa 0000 bbbb 0000 cccc 0000 dddd MFX Parameter 31 12768 52768 20000 20000 01 0D 0000 aaaa 0000 bbbb 0000 cccc 0000 dddd MFX Parameter 32 12768 52768 20000 20000 00 00 01 11 Total Size Rhythm Common Chorus Offset Address Description 00 00 0...

Page 265: ...aa Tone Pan 0 127 L64 63R 00 13 00aa aaaa Tone Random Pan Depth 0 63 00 14 0aaa aaaa Tone Alternate Pan Depth 1 127 L63 63R 00 15 0000 000a Tone Env Mode 0 1 NO SUS SUSTAIN 00 16 0aaa aaaa Tone Dry Send Level 0 127 00 17 0aaa aaaa Tone Chorus Send Level 0 127 00 18 0aaa aaaa Tone Reverb Send Level 0 127 00 19 0aaa aaaa Tone Chorus Send Level non MFX 0 127 00 1A 0aaa aaaa Tone Reverb Send Level non...

Page 266: ...Env Time 4 Velocity Sens 1 127 63 63 01 2D 0aaa aaaa TVF Env Time 1 0 127 01 2E 0aaa aaaa TVF Env Time 2 0 127 01 2F 0aaa aaaa TVF Env Time 3 0 127 01 30 0aaa aaaa TVF Env Time 4 0 127 01 31 0aaa aaaa TVF Env Level 0 0 127 01 32 0aaa aaaa TVF Env Level 1 0 127 01 33 0aaa aaaa TVF Env Level 2 0 127 01 34 0aaa aaaa TVF Env Level 3 0 127 01 35 0aaa aaaa TVF Env Level 4 0 127 01 36 0000 0aaa TVA Level...

Page 267: ...1 Rate Control 0 127 10 0 10 0 Hz 40 2x 24 0aaa aaaa CAf LFO1 Pitch Control 0 127 0 600 cent 40 2x 25 0aaa aaaa CAf LFO1 TVF Depth 0 127 0 2400 cent 40 2x 26 0aaa aaaa CAf LFO1 TVA Depth 0 127 0 100 0 40 2x 27 0aaa aaaa CAf LFO2 Rate Control 0 127 10 0 10 0 Hz 40 2x 28 0aaa aaaa CAf LFO2 Pitch Control 0 127 0 600 cent 40 2x 29 0aaa aaaa CAf LFO2 TVF Depth 0 127 0 2400 cent 40 2x 2A 0aaa aaaa CAf L...

Page 268: ...CnH is the Program Change status and n is the MIDI channel number Since EH 14 and 49H 73 this is a Program Change message with MIDI CH 15 program number 74 Example 3 EA 00 28 EnH is the Pitch Bend Change status and n is the MIDI channel number The 2nd byte 00H 0 is the LSB and the 3rd byte 28H 40 is the MSB but Pitch Bend Value is a signed number in which 40 00H 64 x 12 80 8192 is 0 so this Pitch ...

Page 269: ...ow Equal Temperament This method of tuning divides the octave into 12 equal parts It is currently the most widely used form of tuning especially in occidental music On the Fantom XR the default settings for the Scale Tune feature produce equal temperament Just Temperament Tonic of C The principal triads resound much more beautifully than with equal temperament but this benefit can only be obtained...

Page 270: ...01 128 87 66 1 128 PR D 001 128 87 67 1 128 PR E 001 128 87 68 1 128 PR F 001 128 87 69 1 128 PR G 001 128 87 70 1 128 PR H 001 128 87 71 1 128 GM 2 001 256 121 0 1 128 XP A SRX 01 SRX 02 001 001 93 93 0 1 1 1 XP B SRX 01 SRX 02 001 001 93 93 0 1 1 1 XP C SRX 01 SRX 02 001 001 93 93 0 1 1 1 XP D SRX 01 SRX 02 001 001 93 93 0 1 1 1 XP E SRX 01 SRX 02 001 001 93 93 0 1 1 1 XP F SRX 01 SRX 02 001 001...

Page 271: ...1 O 1 0 127 O 1 X X X O X O O X O 123 127 O X Bank select Modulation Breath type Foot type Portamento time Data entry Volume Balance Panpot Expression General purpose controller 1 General purpose controller 2 General purpose controller 3 General purpose controller 4 Hold 1 Portamento Sostenuto Soft Legato foot switch Hold 2 Sound variation Resonance Release time Attack time Cutoff Decay time Vibra...

Page 272: ...approx Number of Samples User memory 2 000 maximum total approximately 16 MB Card memory 7 000 PC card Others Arpeggio Preset 128 User 128 Rhythm Pattern Preset 256 32 groups User 256 32 groups Chord Memory Preset 64 User 64 Display Graphic 160 x 48 dots backlit LCD Connectors Headphones Jack A MIX Output Jacks L MONO R 1 4 inch phone type B Output Jacks L R 1 4 inch phone type Input Jacks L MONO ...

Page 273: ... ROM Editor USB MIDI driver PC Card Protector and 2 screws Power Cord Options Wave Expansion Board SRX Series 962a In the interest of product improvement the specifications and or appearance of this unit are subject to change without prior notice Fantom XR_r_e book 273 ページ 2006年4月4日 火曜日 午前10時14分 ...

Page 274: ...ster 1 2 3 4 52 BPM Sample 123 C Card File 153 Format 154 Patch 40 Performance 84 Sample 120 Storage 149 USER 45 Card Format 154 Category 41 49 Chop 130 Chop Type 130 Chord Form 104 Chord Memory 104 Chorus 35 136 142 Chorus Output Assign 136 142 Chorus Output Level 136 142 Chorus Output Select 136 142 Chorus Send Level 89 Mix In 117 Chorus Source 145 Chorus Type 136 142 Coarse Tune 89 Compare func...

Page 275: ... Patch 59 Rhythm Set 79 F Env Level 0 4 Patch 60 Rhythm Set 79 F Env T1 V Sens Patch 59 Rhythm Set 79 F Env T4 V Sens Patch 59 Rhythm Set 79 F Env Time 1 4 Patch 60 Rhythm Set 79 F Env Time KF 60 F Env V Curve Patch 59 Rhythm Set 79 F Env V Sens Patch 59 Rhythm Set 79 File 153 File Copy 154 File Delete 154 File Move 154 File Utility 153 Filter 58 Filter Type Patch 58 Rhythm Set 78 Fine Tune 89 For...

Page 276: ...High Threshold 147 M Master Key Shift 158 Master Level 158 Master Tune 158 Mastering 137 143 146 Mastering Effect 35 137 143 146 Matrix Control 66 Matrix Ctrl1 4 66 Memory 34 170 Memory Card 35 45 174 Patch 40 Performance 84 MFX 135 141 MFX Chorus Send Level 135 141 MFX Control 137 143 MFX Control Channel 144 MFX Output Assign 135 141 MFX Output Level 135 141 MFX Reverb Send Level 135 141 MFX Stru...

Page 277: ...tch Pitch Env 57 Patch Play Screen 40 Patch Priority 49 Patch Remain 158 Patch Scale Tune for C B 160 Patch Step LFO 65 Patch TVA Env 61 Patch TVF 58 Patch TVF Env 59 Patch Type 88 Patch WG 54 Patches 33 PC Card Protector 174 PC card slot 174 P Env Depth Patch 57 Rhythm Set 77 P Env Level 0 4 Patch 57 Rhythm Set 78 P Env T1 V Sens Patch 57 Rhythm Set 77 P Env T4 V Sens Patch 57 Rhythm Set 77 P Env...

Page 278: ...11 Rhythm Accent 110 Rhythm General 73 Rhythm Group Edit 109 Rhythm Groups 107 Rhythm Level 73 Rhythm Out Assign 81 Rhythm Output 81 Rhythm Pattern 107 Rhythm Pattern Edit 111 113 Rhythm Pitch 77 Rhythm Pitch Env 77 Rhythm Set GM 45 USER 45 Wave Expansion Board 45 XP A F 45 Rhythm Set Parameter 73 Rhythm Sets 33 Rhythm Tone Name 73 Rhythm TVA 80 Rhythm TVA Env 80 Rhythm TVF 78 Rhythm TVF Env 79 Rh...

Page 279: ...Time Variant Amplifier 32 Time Variant Filter 32 Times 130 TMT 51 TMT Control Sw 54 TMT Velocity Control 53 Tone Chorus Send Patch 63 Rhythm Set 81 Tone Chorus Send Level 134 Tone Coarse Tune Patch 56 Rhythm Set 77 Tone Delay 56 Tone Delay Mode 55 Tone Delay Time 56 Tone Env Mode Patch 66 Rhythm Set 74 Tone Fine Tune Patch 56 Rhythm Set 77 Tone Level Patch 60 Rhythm Set 80 Tone Out Assign Patch 62...

Page 280: ... Offset 50 Vibrato Delay 91 Vibrato Depth 91 Vibrato Rate 91 Voice Reserve 34 92 W WAV 121 150 153 Wave Alter Pan Sw 76 Wave Bank Patch 54 Rhythm Set 75 Wave Coarse Tune 75 Wave Expansion Board 166 Patch 40 Rhythm Set 45 Wave Fine Tune 76 Wave Gain Patch 54 Rhythm Set 75 Wave Generator 32 Wave Group Patch 54 Rhythm Set 75 Wave Level 76 Wave No L Mono Patch 54 Rhythm Set 75 Wave No R Patch 54 Rhyth...

Page 281: ...281 MEMO Fantom XR_r_e book 281 ページ 2006年4月4日 火曜日 午前10時14分 ...

Page 282: ...huture Saw 7 HARD LEAD 063 Intense Lead 4 HARD LEAD 064 Shining 6 HARD LEAD 065 Fat Eurolead 5 HARD LEAD 066 Wave o Shapo 2 HARD LEAD 067 DC Sidebands 2 HARD LEAD 068 SeeAttic 2 HARD LEAD 069 Retro Mono 2 HARD LEAD 070 Vintage Duck 2 SOFT LEAD No Name Voices Category 071 LivinginSine 2 SOFT LEAD 072 SoloSaber 2 SOFT LEAD 073 Lethargy 4 SOFT LEAD 074 Soul Lead 2 SOFT LEAD 075 Vari D Solo 3 SOFT LEA...

Page 283: ... the point where they exit from the apparatus 11 Only use attachments accessories specified by the manufacturer 12 Unplug this apparatus during lightning storms or when unused for long periods of time 13 Refer all servicing to qualified service personnel Servicing is required when the apparatus has been damaged in any way such as power supply cord or plug is damaged liquid has been spilled or obje...

Page 284: ...ANIA TEL 266 364 609 RUSSIA MuTek Dorozhnaya ul 3 korp 6 117 545 Moscow RUSSIA TEL 095 981 4967 SLOVAKIA DAN Acoustic s r o Povazská 18 SK 940 01 Nové Zámky TEL 035 6424 330 SPAIN Roland Iberia S L Paseo García Faria 33 35 08005 Barcelona SPAIN TEL 93 493 91 00 SWEDEN Roland Scandinavia A S SWEDISH SALES OFFICE Danvik Center 28 2 tr S 131 30 Nacka SWEDEN TEL 0 8 702 00 20 SWITZERLAND Roland Switze...

Reviews: