background image


62


Convenient Functions for Recording


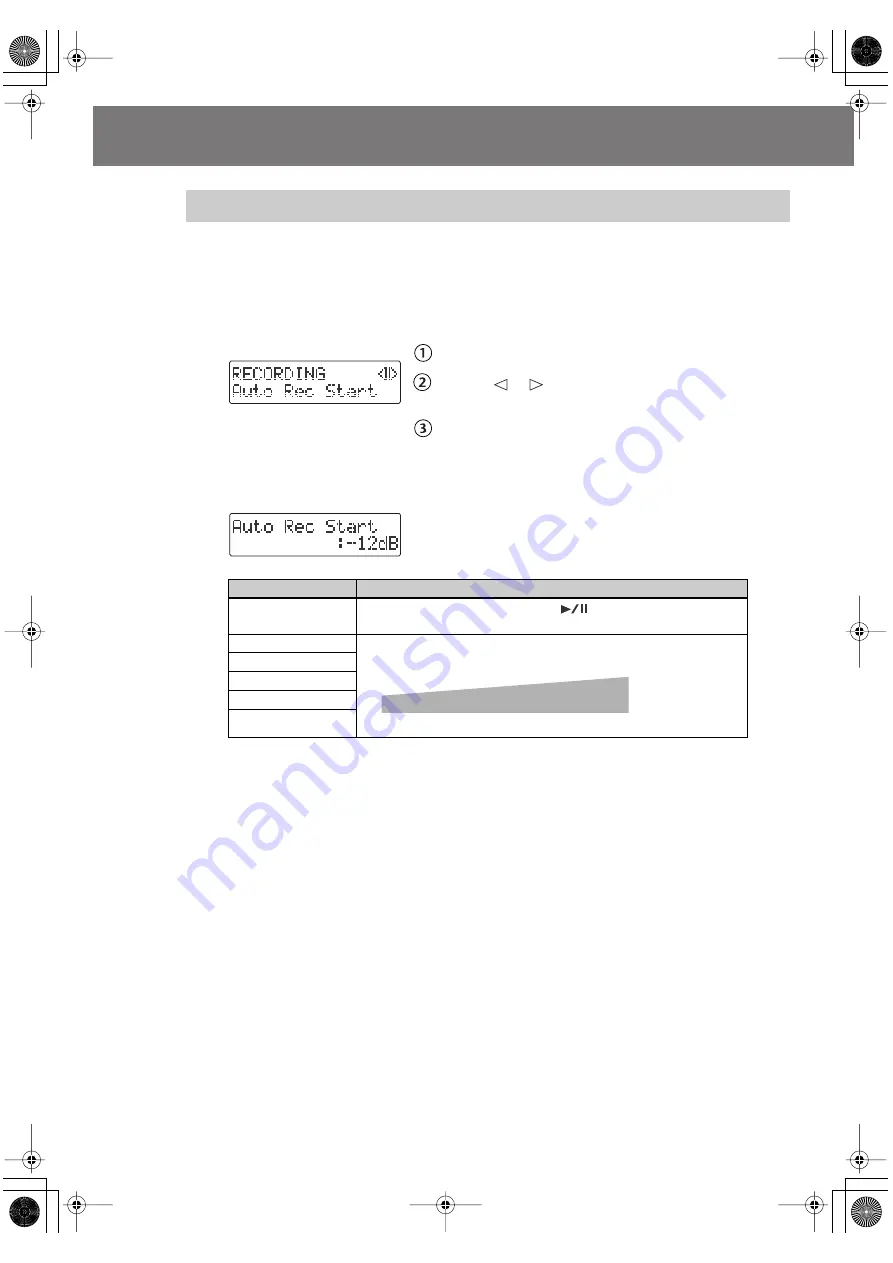
When the CD-2u/SD-2u is in recording-standby mode and it detects audio input that 
exceeds the specified level, recording will start automatically. 


1


Press the [MENU] button to access the menu screen, and choose “Auto 
Rec Start.”


fig.menu-autorec01-e.eps


Press the [MENU] button to access the menu screen.

Use the [

] [

] buttons to choose “Auto Rec 

Start.”

Press the [ENTER] button to confirm your choice.


2


Use the [+] [-] buttons to change the value that specifies the level at which 
recording will begin automatically.


fig.menu-autorec02-e.eps


When you’re setting the input level, it’s a good idea to check how the level meter moves 
at the beginning of the performance. To avoid losing any of the beginning of your 
performance, set this trigger level lower than the level at which the performance begins.


3


Press the [EXIT] button twice.


You’re returned to the audio source screen.

This completes preparations for automatically initiating recording.


Automatically Starting Recording When Audio is Detected


Value

Explanation


Off (factory setting)

Recording will start when you press [

] (Play) during recording 

standby.

-48dB

The minimum level (volume) that will automatically initiate recording.


fig.autorec-level-e.eps


-36dB

-24dB

-12dB

-6dB

High

Low

-48dB

-6dB

Audio that will automatically initiate recording

CD-2u_SD-2u_e.book 62 ページ 2013年1月24日 木曜日 午前11時34分

Summary of Contents for CD-2u

Page 1: ...formation concerning the proper operation of the unit Additionally in order to feel assured that you have gained a good grasp of every feature provided by your new unit read Owner s Manual in its enti...

Page 2: ...rminals in your plug proceed as follows The wire which is coloured BLUE must be connected to the terminal which is marked with the letter N or coloured BLACK The wire which is coloured BROWN must be c...

Page 3: ...of these items have been included with the CD 2u SD 2u If you find that any item is missing contact the nearest authorized Roland distributor in your country CD 2u SD 2u The illustration depicts the C...

Page 4: ...cally Starting Recording When Audio is Detected 62 Assigning Song Numbers While Recording Marker 64 Preventing Loud Sounds from Distorting Limiter 67 Inserting a Count Before Recording Begins Count in...

Page 5: ...ng a Track 104 Joining Songs 106 Maximizing the Volume of a Song 107 Creating a Copy of a Song in a New Key 108 Creating a Copy of a Song in a New Pitch 109 Creating a Copy of a Song at a New Playback...

Page 6: ...semble Page 120 Internal Mics Balance Record without distortion Page 67 Limiter Return a CD RW disc to a recordable state Page 94 Unfinalize Check how much recording time is left Page 112 Remaining Ti...

Page 7: ...ped Page 71 Resume Apply reverb Page 73 Reverb Boost a softly recorded song to maximum volume Page 107 Normalize Creating a CD Make a duplicate of an original music CD you created Page 100 Backup Comp...

Page 8: ...ly with a stand that is recommended by Roland 006a edit Do not place in a location that is unstable When using the unit with a stand recommended by Roland the rack or stand must be carefully placed so...

Page 9: ...or the plug has been damaged or If smoke or unusual odor occurs or Objects have fallen into or liquid has been spilled onto the unit or The unit has been exposed to rain or otherwise has become wet or...

Page 10: ...before moving the unit Before moving the unit disconnect the AC adaptor and all cords coming from external devices 109b Unplug the AC adaptor from the outlet before cleaning Before cleaning the unit...

Page 11: ...supply phantom power to dynamic microphones audio playback devices or other devices that don t require such power Be sure to check the specifications of any microphone you intend to use by referring t...

Page 12: ...inity of such receivers 352b Noise may be produced if wireless communications devices such as cell phones are operated in the vicinity of this unit Such noise could occur when receiving or initiating...

Page 13: ...e device must not get wet Do not disassemble or modify the device 930a edit Never turn off the power or disconnect the SD cards or SDHC cards while the display indicates Processing add All SD cards an...

Page 14: ...lectronic Instrument Page 50 Recording a Cassette or Digital Audio Player Page 52 VOLUME Knob This knob adjusts the volume of the internal speakers and the headphones Listening to a CD Listening to an...

Page 15: ...back speed Slowing Down or Speeding Up Playback Page 77 CENTER CANCEL button This button eliminates or minimizes the sound heard from the center such as the main vocal of the song Enjoying Simple Kara...

Page 16: ...switch the time information that s shown here Viewing the Remaining Recording Playback Time Page 112 Phantom power indicator This indicates the phantom power on off status Symbol Indicators fig unit0...

Page 17: ...23 You can choose the audio signal that will be output from the LINE OUT jack Selecting the Audio Source that s Sent from the LINE OUT Jack Page 124 PHONES jack You can connect a set of headphones to...

Page 18: ...24 Battery Compartment Install batteries here if you want to operate the CD 2u SD 2u on batteries If you re using the dedicated AC adaptor it s not necessary to install batteries Using Batteries Page...

Page 19: ...self does not move when you adjust the volume from the remote control This may cause the actual volume to no longer match the position of the VOLUME knob If you re using headphones use the VOLUME knob...

Page 20: ...properly on the CD 2u SD 2u Unlike conventional music CDs both of these discs allow recording A song recorded on a CD R Compact Disc Recordable disc cannot be erased later You should use CD R discs in...

Page 21: ...recorded on one SD memory card Maximum Recording Times The maximum times given above are approximate The actual time may be slightly less depending on the number of tracks that are recorded You can vi...

Page 22: ...outlet fig ACadaptor e esp 2 Press and hold the POWER switch When the screen appears in the display release the switch fig power on eps0 This unit is equipped with a protection circuit A brief interva...

Page 23: ...utomatically disengage the Auto Off function 1 Press the MENU button to access the menu screen and choose Auto Off fig menu automarker01 e eps Press the MENU button to access the menu screen Use the b...

Page 24: ...en turning the unit upside down take precautions to ensure that the buttons and knobs are protected from damage Also be sure to handle the unit with care so as to avoid dropping it or allowing it to f...

Page 25: ...ower cord from the AC outlet while the unit is turned on or if you connect or disconnect the AC adaptor from the unit When this occurs unsaved data may be lost You must turn off the power before you c...

Page 26: ...the write protect switch on the side of the SD memory card to the LOCK position Unlock write protect to record edit or delete data on the card Inserting an SD Memory Card Displayed screen Status of th...

Page 27: ...ard06 eps The screen will indicate Processing and the card will be formatted When formatting is completed you re returned to the audio source screen You can use the included SD memory card protector t...

Page 28: ...uilt in microphones 05_WINDS_ENS WAV Wind instrument ensemble recorded using condenser microphones connected to the EXT MIC L R jacks Song Title VIVA MEMOCON Composer MASAMICHI AMANO 06_IM_IN_LOVE WAV...

Page 29: ...rded yet Songs have been recorded or written In the case of an already recorded or written CD R RW disc or music CD the total number of songs and the total playback time will be displayed once the CD...

Page 30: ...oving a CD If the screen shows Finalize Are You Sure Finalize Response Yes Press the ENTER button The CD RW disc will be finalized and then ejected No Press the EXIT button The CD R RW disc will be ej...

Page 31: ...teries carefully Use only the specified type model no CR2025 of lithium batteries Be sure to insert it as directed to ensure correct polarity Used lithium batteries must be disposed of in compliance w...

Page 32: ...d of time remove the battery If a spotlight or other strong light is directed at the remote sensor it will be less responsive Using the Remote Control If you want to prevent inadvertent operation of t...

Page 33: ...ome settings that cannot be operated while the unit is operating on batteries or during playback For details on each setting refer to List of Settings on the following page 1 Press the MENU button to...

Page 34: ...that will be output from the LINE OUT jack CD 2u Mix1 Mix2 MIC LINE SD CD Page 124 SD 2u Mix1 Mix2 MIC LINE SD OUTPUT Exchange The recorded song will play back with the left and right audio channels...

Page 35: ...new song 50 100 200 Page 110 Center Cancel Eliminates the audio heard from the center of the song and creates a new song On1 On2 On3 Focus1 Focus2 Page 111 Overdub CD SD Layers a performance or vocal...

Page 36: ...ils Values Battery Playback Reference page METRONOME Sound Specifies the metronome sound Silent Bell Click Voice Page 81 Tempo Specifies the metronome tempo 20 120 250 Page 81 Beat Specifies the timin...

Page 37: ...ns to select the item for which you want to see an operation guide fig menu02 eps For more about the operations covered by Easy Guide refer to Setting Items in Easy Guide Page 38 3 Press the ENTER but...

Page 38: ...you re recording an electronic musical instrument The LINE IN L R jacks will be used Casette Tape Choose this if you re recording from a cassette tape or a MD The LINE IN L R jacks will be used Speec...

Page 39: ...ete your music CD No The disc will not be finalized when writing has been completed 3 Normalize Displayed screen Explanation Select a song If you re sure you want to proceed press the ENTER button Not...

Page 40: ...ternal mics Acoustic Inst Choose this if you re recording an acoustic instrument e g piano guitar string instrument or wind instrument The internal mics will be used Vocal Choose this if you re record...

Page 41: ...ound received by the internal mics will not be heard from the internal speakers You ll need to use headphones if you want to monitor the sound being recorded Use the VOLUME knob to adjust the headphon...

Page 42: ...input level Adjust the level so that the PEAK indicator located above the MIC knob lights briefly at the loudest moments of the performance or vocal you ll be recording When using the MIC knob or LINE...

Page 43: ...right speakers In such cases you can adjust the left right volume balance of the internal mics and record your performance again For details refer to Adjusting the Left Right Volume Balance of the In...

Page 44: ...oices such as a conference or lecture Auto Level is not suitable when recording musical performances for which you want to capture the expressive dynamics of the sound If you re recording music choose...

Page 45: ...and connect a plug in power mic to the PLUG IN POWER MIC jack If you encounter a problem with noise or distortion see The recorded sound is noisy or distorted Page 127 4 Connect your mic to the EXT M...

Page 46: ...ic you won t be able to adjust the level correctly While adjusting the level either turn the VOLUME knob all the way down or turn the speakers off so no sound will be produced Use headphones if you wa...

Page 47: ...ill not be produced from the speakers while in recording standby mode or while recording If you want to listen to the sound that s being recorded you ll need to use headphones Refer to Step 4 on Page...

Page 48: ...external mic sensitivity setting 3 Press the EXIT button twice You re returned to the audio source screen Selecting the External Mic Sensitivity Value Explanation Low Lowers the sensitivity of the ex...

Page 49: ...cting This device s phantom power supply DC 48 V 8 mA max 1 Press the MENU button to access the menu screen and choose Phantom Power fig menu micsens02 eps Press the MENU button to access the menu scr...

Page 50: ...n the LINE knob to adjust the input level Adjust the level so that the PEAK indicator located above the LINE knob lights briefly at the loudest moments of the performance you ll be recording When usin...

Page 51: ...noise when the input level changes but this is not a malfunction When connection cables with resistors are used the volume level of equipment connected to the inputs EXT MIC L R LINE IN may be low If...

Page 52: ...t passages of the song that s being recorded After you ve adjusted the input level rewind your playback device to the beginning of the song that you want to record When using the MIC knob or LINE knob...

Page 53: ...Lit Remote control Remote control Sound will not be produced from the speakers while in recording standby mode or while recording If you want to listen to the sound that s being recorded you ll need...

Page 54: ...N POWER MIC jack located on the CD 2u s side panel fig connect extmic e eps 4 Select the External mics fig menu overdub e eps Press the MENU button to access the menu screen Use the buttons to choose...

Page 55: ...adjust the input level of the external mics As a guideline adjust the level so that the level meter s 3 dB indicator lights briefly when audio from the CD is being produced simultaneously with the sou...

Page 56: ...the CD 2u SD 2u s LINE IN L R jacks to the output jacks of your audio device e g cassette deck fig connect record e eps If Using Accompaniment from a Cassette or Digital Audio Player LINE Input If You...

Page 57: ...ecorded turn the LINE knob to adjust the input level Adjust the level so that the PEAK indicator located above the LINE knob lights briefly during the loudest passages of the song that s being recorde...

Page 58: ...riginal song only during recording When recording ends these settings will return to the values you specified Sound will not be produced from the speakers while in recording standby mode or while reco...

Page 59: ...ps All audio received via the external mics internal mics and LINE IN L R jacks can be overdubbed with a song on the SD memory card Make settings as appropriate for your instruments and your setup 1 T...

Page 60: ...ss the Stop button to stop the SD memory card playback fig overdub SD01 eps 6 Press the MENU button to access the menu screen and choose Overdub SD SD Press the MENU button to access the menu screen U...

Page 61: ...iately after you stop recording fig overdub SD03 eps Lit During recording the upper right of the screen will show SD SD Remote control Remote control Key Page 75 Pitch Page 76 and Speed Page 77 settin...

Page 62: ...you re setting the input level it s a good idea to check how the level meter moves at the beginning of the performance To avoid losing any of the beginning of your performance set this trigger level l...

Page 63: ...cts audio recording will begin automatically In order to avoid losing any audio at the beginning of the performance recording will actually begin up to 0 5 seconds earlier than the point at which audi...

Page 64: ...cord button to assign the song number This page Automatically assign song numbers at fixed intervals Page 65 Assign track numbers when silence is detected Page 66 Press the Record Button to Assign a S...

Page 65: ...Press the EXIT button to return to the menu screen Use the buttons to choose Auto Marker Time Press the ENTER button to confirm your choice Use the buttons to change the value to the interval of time...

Page 66: ...button to return to the menu screen Use the buttons to choose Auto Marker Lvl Press the ENTER button to confirm your choice Use the buttons to specify the audio level that will be considered to be si...

Page 67: ...nd choose Limiter fig menu limiter01 eps Press the MENU button to access the menu screen Use the buttons to choose Limiter Press the ENTER button to confirm your choice 2 Use the buttons to turn the l...

Page 68: ...of Sounding the Metronome Page 81 3 Press the MENU button to access the menu screen and choose Count in Beat fig menu countin01 e eps Press the MENU button to access the menu screen Use the buttons t...

Page 69: ...e specified a count in the procedure for starting to record will be as follows 1 Press the Record button The CD 2u SD 2u will be in recording standby mode fig autorec01 e eps 2 Press the Play button T...

Page 70: ...nce again to resume playback from the point at which you paused Go to the beginning of a track Skip Press the button Each time you press this button you go back by one track If you press this button d...

Page 71: ...to access the menu screen and choose Resume fig menu resume01 e eps Press the MENU button to access the menu screen Use the buttons to choose Resume Press the ENTER button to confirm your choice 2 Us...

Page 72: ...Use the buttons to choose Bass or Treble Press the ENTER button to confirm your choice 2 Use the buttons to change the tone setting fig menu key02 e eps 3 Press the EXIT button twice You re returned...

Page 73: ...g menu key01 e eps Press the MENU button to access the menu screen Use the buttons to choose Reverb Press the ENTER button to confirm your choice 1 Press the REVERB button so it s lit 2 Use the button...

Page 74: ...n to confirm your choice 2 Use the buttons to turn the output exchange on off fig menu limiter02 e eps 3 Press the EXIT button twice You re returned to the audio source screen Muting the Sound of the...

Page 75: ...ss the KEY button to access the menu screen Use the buttons to choose Key 2 Use the buttons to adjust the value changing the key If you press the ENTER button the value will return to 0 fig menu key02...

Page 76: ...Use the buttons to choose Pitch 2 Use the button to adjust the Pitch setting If you press the ENTER button the value will return to 0 fig menu pitch02 e eps If you have a CD that was recorded at a ref...

Page 77: ...he buttons to adjust the playback speed If you press the ENTER button the value will return to 100 fig menu speed02 e eps 3 Press the EXIT button twice You re returned to the audio source screen fig r...

Page 78: ...CEL button to access the menu screen 2 Use the buttons to change the CENTER CANCEL setting fig menu centercancel02 e eps 3 Press the EXIT button You re returned to the audio source screen When you tur...

Page 79: ...epeat02 e eps 3 Press the EXIT button twice You re returned to the audio source screen fig icon repeat e eps The or symbol will disappear if you set the Repeat to Off in Step 2 Value Explanation Off f...

Page 80: ...red and the Point A icon blinks fig ABrepeat01 e eps 2 Press the REPEAT button once again at the point where you want A B Repeat to end The end point B of A B Repeat playback is registered and the A B...

Page 81: ...turn off unlit 2 Setting the sound fig menu metro01 e eps Press the Metronome button to access the menu screen Use the buttons to choose Sound Use the buttons to select the desired metronome sound 3...

Page 82: ...zed 2 Every second beat is emphasized 3 Every third beat is emphasized 4 factory setting Every fourth beat is emphasized 5 Every fifth beat is emphasized 6 Every sixth beat is emphasized 7 Every seven...

Page 83: ...Internal 2 Press the EXIT button twice You re returned to the audio source screen 3 Press the MENU button to access the menu screen and choose Tuner Tone fig menu tuner01 e eps Press the MENU button t...

Page 84: ...A4 note This is the pitch of the middle A note on a piano 1 Press the MENU button to access the menu screen and choose Tuner Tone fig menu tuner01 e eps Press the MENU button to access the menu screen...

Page 85: ...choice 2 While the tuner screen is displayed press the ENTER button The tuner screen and the guide tone screen will alternate each time you press the ENTER button fig menu tuner05 e eps You ll hear th...

Page 86: ...tton Note that the process cannot be interrupted once you ve started it If you decide that you don t want to begin the process press the EXIT button fig SDerase mssg e eps The display will show Proces...

Page 87: ...your choice 3 If you re sure you want to proceed press the ENTER button fig SDeraseall mssg01 e eps 4 If you re still sure you want to proceed press the ENTER button Note that the process cannot be in...

Page 88: ...menu screen Use the buttons to choose Trim In Press the ENTER button to confirm your choice 4 Press the Play button to play back the selected song fig menu trimin02 e eps 5 When you come to the point...

Page 89: ...ed region cannot be recovered Use this operation with caution Note You can t specify Start Point locations that would cause the edited song to be less than four seconds long The Trim In editing proces...

Page 90: ...oose Trim Out Press the ENTER button to confirm your choice 4 Press the Play button to play back the selected song fig menu trimout02 e eps 5 When you come to the point that you want to be the end of...

Page 91: ...region cannot be recovered Use this operation with caution Note You can t specify End Point locations that would cause the edited song to be less than four seconds long The Trim Out editing process wi...

Page 92: ...he process press the EXIT button fig menu RWerase mssg e eps The display will show Processing and the last song will be deleted During this process a timer is displayed counting down the time until th...

Page 93: ...ss the ENTER button fig RWeraseall mssg01 e eps 4 If you re still sure you want to proceed press the ENTER button Note that the process cannot be interrupted once you ve started it If you decide that...

Page 94: ...access the menu screen Use the buttons to choose Unfinalize Press the ENTER button to confirm your choice 3 If you re sure you want to proceed press the ENTER button Note that the process cannot be i...

Page 95: ...l open Verify that this is a disk to which you don t mind writing new data and then reinsert the CD R RW disc 4 The CD 2u SD 2u asks whether you want to write all of the songs fig writeCD mssg02 e eps...

Page 96: ...don t finalize at this point you can still finalize later to complete your music CD Making a CD R RW Disc for Playback on Another CD Player Finalize Page 99 If you selected Finalize Yes If you select...

Page 97: ...D R RW discs music CDs you create may not play correctly Two seconds of silence are automatically inserted between tracks on the CD R RW disc when you create a music CD The time required for writing w...

Page 98: ...discs If you want to automatically divide a large song and write it across multiple discs make the following setting in Step 5 on Page 95 In Step 5 Page 95 specify the large song as the first of the...

Page 99: ...g this process a timer is displayed counting down the time until finalization is completed When finalization is completed the CD R RW disc is ejected Your music CD is now ready Finalization is the pro...

Page 100: ...Backup Press the ENTER button to confirm your choice 3 When you see this screen insert the music CD that you want to back up fig CDbackup mssg01 e eps When the music CD has been detected the display w...

Page 101: ...ed on the SD memory card will be erased It may take a considerable amount of time to complete the erasure If you want to create another identical CD If you are finished backing up Press the ENTER butt...

Page 102: ...dure press the ENTER button If you decide to cancel the procedure press the EXIT button Carefully read the section About the Licenses Agreement Page 13 of the back cover of the owner s manual and if y...

Page 103: ...ct the move destination fig menu move02 e eps Use the buttons to select the move destination song number Press the ENTER button to confirm your choice In the example screen shown here the song will be...

Page 104: ...s the Play button to play back the selected song fig menu divide02 e eps 5 At the approximate location at which you want to divide the song the dividing point press the Record button If the song is lo...

Page 105: ...e a certain amount of time In general the time will be approximately half the playback time of the song For example in order to edit a four minute song it will take approximately two minutes for the e...

Page 106: ...cess press the EXIT button fig combine mssg e eps The display will show Processing and the songs will be joined When the operation is completed you re returned to the audio source screen A B C 1 2 3 J...

Page 107: ...it If you decide that you don t want to begin the process press the EXIT button fig normalize mssg e eps The display will show Processing and the volume of the song will be raised When the operation i...

Page 108: ...ant to proceed press the ENTER button Note that the process cannot be interrupted once you ve started it If you decide that you don t want to begin the process press the EXIT button fig divide mssg e...

Page 109: ...h Pitch Page 76 that value will be applied fig menu divide02 e eps 5 If you re sure you want to proceed press the ENTER button Note that the process cannot be interrupted once you ve started it If you...

Page 110: ...ocess press the EXIT button fig divide mssg e eps The display will show Processing and the operation will be performed When processing has been completed you re returned to the audio source screen and...

Page 111: ...type of Center Cancel and press the ENTER button fig menu divide02 e eps 5 If you re sure you want to proceed press the ENTER button Note that the process cannot be interrupted once you ve started it...

Page 112: ...emain01 e eps fig remain02 e eps During recording or recording standby During playback or while stopped Elapsed recording time Recording time remaining on an entire SD memory card or CD R RW disc Elap...

Page 113: ...and the remaining time for recording 1 Press the MENU button to access the menu screen and choose Card Info fig menu SDinfo01 e eps Press the MENU button to access the menu screen Use the buttons to c...

Page 114: ...s the MENU button to access the menu screen Use the buttons to choose Disc Info Press the ENTER button to confirm your choice 2 View the information fig menu CDinfo02 e eps 3 Press the EXIT button twi...

Page 115: ...ontrast fig menu contrast01 e eps Press the MENU button to access the menu screen Use the buttons to choose Contrast Press the ENTER button to confirm your choice 2 Use the buttons to adjust the contr...

Page 116: ...button to access the menu screen and choose Backlight Timer fig menu backlight01 e eps Press the MENU button to access the menu screen Use the buttons to choose Backlight Timer Press the ENTER button...

Page 117: ...wn the KEY button and turn on the power When the screen appears release the button fig language01 e eps 3 Turn the power off then on again After this the screen display will be in the language you sel...

Page 118: ...ps Press the MENU button to access the menu screen Use the buttons to choose Factory Reset Press the ENTER button to confirm your choice 2 If you re sure you want to proceed press the ENTER button Not...

Page 119: ...e Format Press the ENTER button to confirm your choice 3 If you re sure you want to proceed press the ENTER button fig format mssg01 e eps 4 If you re still sure you want to proceed press the ENTER bu...

Page 120: ...n and choose INT MIC Balance fig menu format e eps Press the MENU button to access the menu screen Use the buttons to choose INT MIC Balance Press the ENTER button to confirm your choice 4 While produ...

Page 121: ...ed toward the performer on stage the orientation of the internal mics will be reversed in comparison to the ears of the listeners causing the recorded sound to be heard with a reversed stereo field In...

Page 122: ...changed for the internal mics fig menu micexchange02 e eps 3 Press the EXIT button twice You re returned to the audio source screen Value Explanation On The left and right channels will be exchanged f...

Page 123: ...external speakers or digital piano fig connect lineout e eps 4 Turn on the power of the CD 2u SD 2u 5 Turn on the power of your external speakers or digital piano 6 Turn the VOLUME knob to adjust the...

Page 124: ...ress the EXIT button twice You re returned to the audio source screen Selecting the Audio Source that s Sent from the LINE OUT Jack Value Explanation Mix1 The audio of all sources is mixed and output...

Page 125: ...econnect the dedicated AC adaptor and power cord 22 Could the remaining battery power be insufficient Once the battery runs low the power may not turn on Install fresh batteries 25 Are the batteries i...

Page 126: ...t output Could the input level be turned down If you ve connected external mics turn the MIC knob to raise the input level If you re inputting audio via the LINE IN L R jacks turn the LINE knob to rai...

Page 127: ...ry card to a CD 95 Adjust the input level so that the PEAK indicator lights briefly when loud sounds are input 42 46 50 52 Could the input level be raised for a jack to which no device is connected Ev...

Page 128: ...he or symbol is not shown 79 Could you be using A B Repeat playback Press the REPEAT button to get the A B Repeat icon to disappear Alternatively press the Stop button to stop playback A B Repeat play...

Page 129: ...es Could you be attempting to record an extremely short performance You can t record for less than four seconds 21 After recording the CD won t play back on a conventional CD player Did you finalize t...

Page 130: ...set to SD Press the SD CARD button to choose SD mode 70 Could you have inserted an SD memory card on which nothing has been recorded Insert a different SD memory card Could you be using repeat playbac...

Page 131: ...ord Is the SD memory card inserted all the way into the slot Make sure that the card is oriented correctly and that it s pushed all the way into the slot 26 Could you be attempting to record an extrem...

Page 132: ...vide Multiple The track will be divided for writing on multiple discs Finalized Disc The disc is an already finalized CD R RW disc or a music CD Use an unfinalized CD R RW disc Improper Disc The disc...

Page 133: ...Failed to read an SD memory card Turn off the power and re insert the SD memory card Please format the SD memory card Page 119 Confirm that the SD memory card can be used Page 20 SD Track Full You ve...

Page 134: ...iature phone type Frequency Response 20 Hz 20 kHz 0 dB 2 dB Nominal Input Level variable EXT MIC L R jacks 51 8 dBu common to XLR type and 1 4 inch phone type PLUG IN POWER MIC jack 51 13 dBu LINE IN...

Page 135: ...115 Count in 68 Count in Beat 68 D Deleting a track 86 all tracks CD RW 93 all tracks SD 87 region at the beginning of the song SD 88 region at the end of the song SD 90 the last track CD RW 92 Trim...

Page 136: ...the input level automatically 44 Maximum recording times 21 Overdubbing 59 Recording a Cassette or MD 52 Recording an electronic instrument 50 Recording karaoke 54 Remaining recording time 112 Using t...

Page 137: ...ng an SD Appendices Convenient Functions Information Display Checking Preparations Track numbers 64 65 66 Trim In 88 Trim Out 90 Tuner 83 Tuner Tone 83 U Unfinalize 94 V Viewing information 113 114 Vo...

Page 138: ...For China For EU Countries CD 2u_SD 2u_e book 138...

Page 139: ...ment has been tested and found to comply with the limits for a Class B digital device pursuant to Part 15 of the FCC Rules These limits are designed to provide reasonable protection against harmful in...

Page 140: ...Information 5 1 0 0 0 3 1 4 2 8 0 2 CD 2u_SD 2u_e book 140...

Reviews: