Chapter 5: Operation • 49
Saving the Instrument List to the Clipboard
1.
Click the
Clipboard
button located just below the
Exit
button. The serial number, model,
station ID, user ID, next bump test date, next calibration date, the calibration interval, and the
data logging interval time for each GX-3R (Pro) in the main program window will be saved to
the clipboard in a table format.
2.
Open a spreadsheet program such as Excel or a word processing program such as Word and
paste the clipboard data into it.
Automatic Procedures
This section briefly describes the automatic procedures that may begin once the GX-3R (Pro) is turned
on and connected to the PC Program.
Automatic Data Download
The PC Program will automatically start a download of the instrument’s logged data if
Down Load
Data Logger
in the
Config
window is
Selected
. The download will begin as soon as the instrument is
connected to the PC Program and the basic parameters are downloaded. An automatic data download
will occur first before any other setup automatic process such as an automatic bump test.
NOTE:
A data download will take approximately 2 minutes to complete.
Automatic Bump Test or Calibration
If
Auto Bump Test
or
Auto Calibration
is selected in the Parameter Tab of the Configuration
Window, the PC Program will automatically bump test or calibrate a connected GX-3R (Pro) as long
as a bump test or calibration is due on that instrument. See “Parameter Tab” on page 30 for a
description of these parameters. The use of this feature allows the user to launch the PC Program, turn
on the GX-3R (Pro) and walk away. No oversight of the bump test or calibration is needed. For this
reason, the calibration cylinders need to already be in place and the
Cylinders
Window needs to be set
up appropriately. The bump test or calibration will begin in the time defined by the
Waiting Time for
Auto Process
parameter in the Parameter Tab of the
Config
Window after the instrument is connected
to the PC Program and the basic parameters have been downloaded.
Performing a Bump Test
Bump test parameters are defined in the
Config
Window. See pg. 30 for a description of the bump test
configuration setup.
1.
Establish a connection between the SDM-3R, GX-3R (Pro) and the PC Program as described
on pg. 43.
NOTE:
The instrument cradle’s yellow lever needs to be up for GX-3Rs and down for GX-
3R Pros.
2.
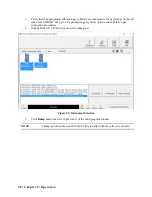
Verify that all of the bump test parameters are set correctly. See pg. 30 for instructions.


