background image

39


INSTALLATION

2.7 

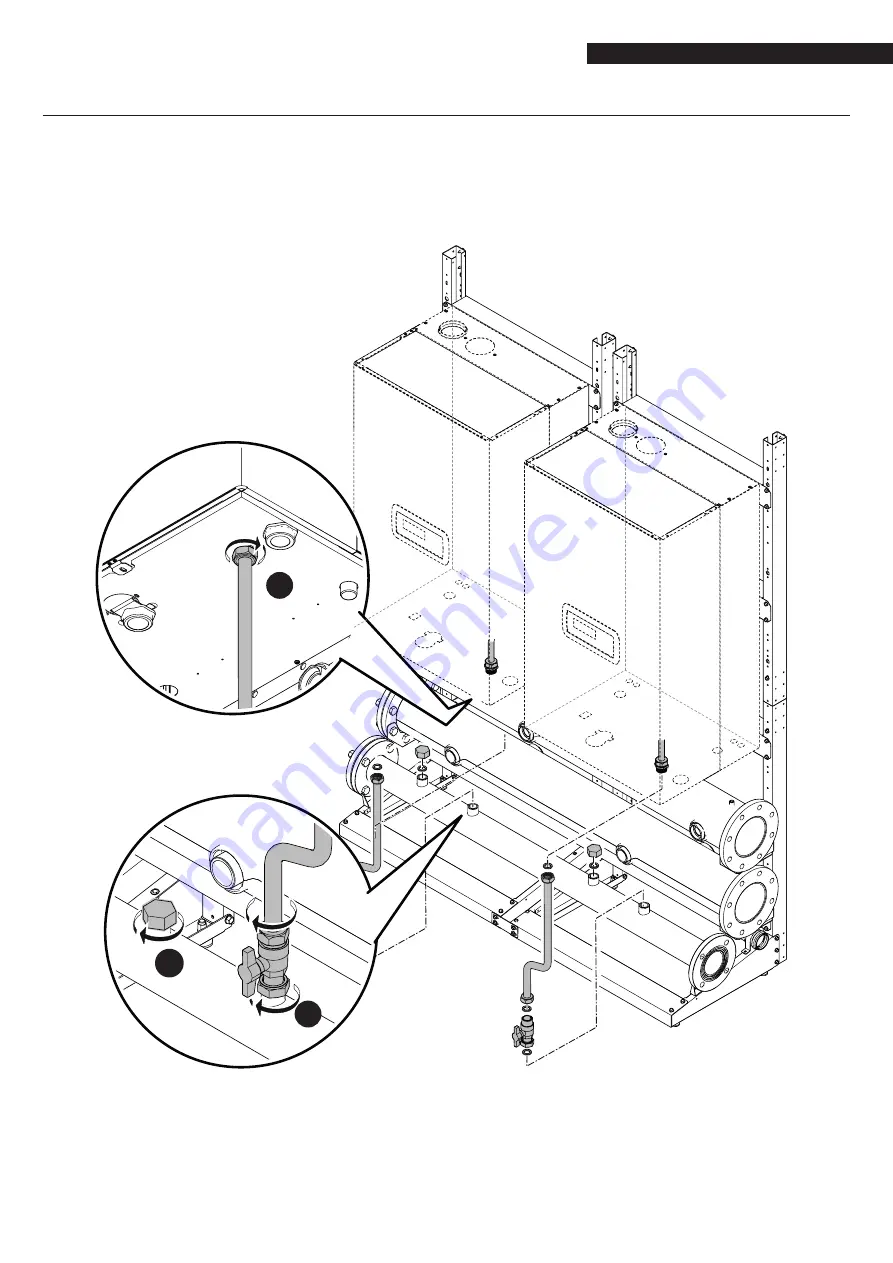
Positioning the GAS PIPES

CASCADE CONFIGURATION IN-LINE

Assembly of the gas pipes. Components included in code 20130658 – 20131121 – 20131122 – 20131123 – 20131124 - 20131125.

Install and seal the gas pipe to the thermal module.

Install and seal the cock to the pipe and the gas manifold.

Fit the plugs onto any unused coupling points ensuring tightness.

1

3

2

Summary of Contents for Condexa PRO 100

Page 1: ...cod 20148493 rev 5 11 2018 Condexa PRO SYSTEM EN INSTALLATION TECHNICAL ASSISTANCE SERVICE AND SYSTEM MANAGEMENT MANUAL...

Page 2: ...ns Block diagram 1 57 3 3 2 Sensor connections Block diagram 1 58 3 3 3 Bus connections Block diagram 1 58 3 4 System parameters Block diagram 1 59 3 5 Block diagram 2 59 3 5 1 Electrical power connec...

Page 3: ...con trols of which communicate via bus In fact each thermal mod ule has been designed to combine with other identical units up to a maximum number of 10 units with the exception of model 135 whereby...

Page 4: ...834 834 834 834 834 mm G 230 230 230 230 230 230 230 230 mm H 735 735 735 735 735 735 735 735 mm J 525 525 525 525 525 525 525 525 mm K 1010 1010 1010 1010 1010 1010 1173 1173 mm L 511 511 511 511 511...

Page 5: ...0 230 230 230 230 230 230 230 mm H 735 735 735 735 735 735 735 735 mm J 525 525 525 525 525 525 525 525 mm K 1010 1010 1010 1010 1010 1010 1173 1173 mm L 511 511 511 511 511 511 511 511 mm M 436 436 4...

Page 6: ...0 230 230 230 230 mm 5 337 337 337 337 337 337 337 337 mm H 3 735 735 735 735 735 735 735 735 mm 5 850 850 850 850 850 850 850 850 mm J 525 525 525 525 525 525 525 525 mm K 1010 1010 1010 1010 1010 10...

Page 7: ...m 5 337 337 337 337 337 337 337 337 mm H 3 735 735 735 735 735 735 735 735 mm 5 850 850 850 850 850 850 850 850 mm J 525 525 525 525 525 525 525 525 mm K 1010 1010 1010 1010 1010 1010 1173 1173 mm L 5...

Page 8: ...37 337 337 337 337 mm H 3 735 735 735 735 735 735 735 735 mm 5 850 850 850 850 850 850 850 850 mm J 525 525 525 525 525 525 525 525 mm K 1010 1010 1010 1010 1010 1010 1173 1173 mm L 511 511 511 511 51...

Page 9: ...mm H 3 735 735 735 735 735 735 735 735 mm 5 850 850 850 850 850 850 850 850 mm J 525 525 525 525 525 525 525 525 mm K 1010 1010 1010 1010 1010 1010 1173 1173 mm L 511 511 511 511 511 511 511 511 mm M...

Page 10: ...525 525 525 525 525 mm K 1010 1010 1010 1010 1010 1010 1173 1173 mm L 511 511 511 511 511 511 511 511 mm M 436 436 436 436 436 436 436 436 mm N 1999 1999 1999 1999 1999 1999 1999 1999 mm O 584 584 58...

Page 11: ...A mm K 1010 1010 1010 1010 1010 1010 1173 N A mm L 511 511 511 511 511 511 511 N A mm M 436 436 436 436 436 436 436 N A mm N 1999 1999 1999 1999 1999 1999 1999 N A mm O 584 584 584 584 584 584 584 N...

Page 12: ...1010 1010 1010 1010 1173 N A mm L 511 511 511 511 511 511 511 N A mm M 436 436 436 436 436 436 436 N A mm N 1999 1999 1999 1999 1999 1999 1999 N A mm O 584 584 584 584 584 584 584 N A mm P 334 334 33...

Page 13: ...834 834 mm G 230 230 230 230 230 230 230 230 mm H 735 735 735 735 735 735 735 735 mm J 969 969 969 969 969 969 969 969 mm K 1010 1010 1010 1010 1010 1010 1173 1173 mm L 942 942 942 942 942 942 942 94...

Page 14: ...94 594 594 mm F 834 834 834 834 834 834 834 834 mm G 3 230 230 230 230 230 230 230 230 mm 5 337 337 337 337 337 337 337 337 mm H 3 735 735 735 735 735 735 735 735 mm 5 850 850 850 850 850 850 850 850...

Page 15: ...4 834 834 834 834 834 834 834 mm G 3 230 230 230 230 230 230 230 230 mm 5 337 337 337 337 337 337 337 337 mm H 3 735 735 735 735 735 735 735 735 mm 5 850 850 850 850 850 850 850 850 mm J 969 969 969 9...

Page 16: ...230 230 230 230 mm 5 337 337 337 337 337 337 337 337 mm H 3 735 735 735 735 735 735 735 735 mm 5 850 850 850 850 850 850 850 850 mm J 969 969 969 969 969 969 969 969 mm K 1010 1010 1010 1010 1010 1010...

Page 17: ...5 525 525 525 525 N A mm K 1010 1010 1010 1010 1010 1010 1173 N A mm L 511 511 511 511 511 511 511 N A mm M 436 436 436 436 436 436 436 N A mm N 1999 1999 1999 1999 1999 1999 1999 N A mm O 584 584 584...

Page 18: ...5 m Space required for back to back layout B2B BACK TO BACK 1 m 1 m 0 5 m 0 5 m 9 9When installing the boiler allow sufficient space around it to access all safety and control devices and to permit ea...

Page 19: ...400 5820 6720 7860 5 4275 4275 4275 5100 6750 7275 8400 9825 6 5130 5130 5130 6120 8100 8730 10080 11790 7 5985 5985 5985 7140 9450 10185 11760 13755 8 6840 6840 6840 8160 10800 11640 13440 15720 9 76...

Page 20: ...frames have slots and must only be secured after having fitted the manifolds 2 if making connections between manifolds tighten the flange to ensure that the seal adheres and reduce the clearance on t...

Page 21: ...insert on both sides For mod 115kW 9 See not Wall mounting 9 Large hole at the front 5x 9 Component without threaded inserts 2x 9 Component without threaded inserts 9 9Follow the installation stages...

Page 22: ...nts included in code 20131664 1 2 3 9 9Follow the installation stages indicated Introduce but do not tighten the screws so any necessary adjustments can be still be made Once installation of the entir...

Page 23: ...also be wall mount ed Proceed as follows trace the fastening points drill a hole and insert suitable dowels not supplied correctly position the frame and introduce but do not tighten the screws so any...

Page 24: ...24 INSTALLATION Adjusting the feet B2B Level 13 Level Level Level check the measurements on the table of the dimensions present in the paragraph System layout...

Page 25: ...priate for the dimensions and weight of the appliance 9 9This operations is to be carried out by more than one person equipped with means which are suitably for the weight and di mensions of the appli...

Page 26: ...26 INSTALLATION Fitting the thermal module support bracket The bracket is supplied together with the thermal module Cascade installation B2B Cascade installation in line...

Page 27: ...TALLATION Fitting the thermal module onto the frame 1 Working together with other people lift the thermal module 2 Correctly position the module on the bracket which was previously fitted onto the fra...

Page 28: ...28 INSTALLATION Removing the front panels 1 Remove the lock screw A and pull the front panel outwards 2 Push the front panel upwards to release it from the points B B B A 1 2...

Page 29: ...20130222 20130223 The figure refers to an installation with 2 modules in line or 3 4 modules B2B 1 Position the seal on the side of the condensate outlet 2 Position the plug on the opposite side of th...

Page 30: ...130221 The figure refers to an installation with 2 modules in line or 3 4 modules B2B 1 Secure the left support bracket 2 Secure the right support bracket 3 Position the RETURN manifold 9 9Make sure t...

Page 31: ...TALLATION 4 Secure the left support bracket 5 Secure the right support bracket 6 Position the DELIVERY manifold 6 4 5 6 0 9 m m Upper SYSTEM DELIVERY manifold identified by the presence of the sensor...

Page 32: ...32 INSTALLATION 7 Position the GAS manifold 8 Secure the GAS manifold to the frame 7 7 8...

Page 33: ...33 INSTALLATION 9 Position the manifold closing plugs from the required side 9 22mm 51mm...

Page 34: ...3 The figure refers to an installation with 2 modules in line or 3 4 modules B2B 1 Secure the left support bracket 2 Secure the right support bracket 3 Position the RETURN manifold 9 9Make sure that t...

Page 35: ...TALLATION 4 Secure the left support bracket 5 Secure the right support bracket 6 Position the DELIVERY manifold 6 4 5 6 0 9 m m Upper SYSTEM DELIVERY manifold identified by the presence of the sensor...

Page 36: ...36 INSTALLATION 7 Position the GAS manifold 8 Secure the GAS manifold to the frame 8 8 7...

Page 37: ...37 INSTALLATION 9 Position the manifold closing plugs from the required side 9 22mm 51mm...

Page 38: ...and secure it using cable ties not supplied 2 Connect the pipes to the other thermal modules working in the same way as described for the first 1 2 350mm Safety valve drain Pipe collar Pipe collar 9...

Page 39: ...f the gas pipes Components included in code 20130658 20131121 20131122 20131123 20131124 20131125 1 Install and seal the gas pipe to the thermal module 2 Install and seal the cock to the pipe and the...

Page 40: ...40 INSTALLATION CASCADE CONFIGURATION B2B BACK TO BACK Assembly of the gas pipes Components included in code 20131787 20131788 20131789 20131790 20131791 20131792 1 Positioning the gas pipe 1 1 1...

Page 41: ...41 INSTALLATION 2 Installing and sealing the gas pipe to the thermal module 3 Install and seal the cock to the pipe and the gas manifold 3 2...

Page 42: ...RN unit selected between the thermal module coupling points A and B the return manifold 2 Keep the insulation parts to one side and only fit them after testing has been completed A A A A A B B Lower S...

Page 43: ...between the thermal module coupling points C and D the return manifold 4 Keep the insulation parts to one side and only fit them after testing has been completed C D Upper SYSTEM DELIVERY manifold ide...

Page 44: ...between the thermal module coupling points E and F the return manifold 6 Keep the insulation parts to one side and only fit them after testing has been completed E F Lower SYSTEM RETURN manifold ident...

Page 45: ...cted between the thermal module coupling points G and H the return manifold 8 Keep the insulation parts to one side and only fit them after testing has been completed G H Upper SYSTEM DELIVERY manifol...

Page 46: ...ection at the delivery manifold 4 Install and seal the selected INAIL section at the separator Proceed to install the safety elements contained in the specific kit 1 2 3 4 9 In the case of thermal mod...

Page 47: ...uct to slope by at least 3 L10 L9 L8 L7 L6 L5 L4 L3 L2 L1 3 1 L1 L2 L3 L4 L5 L6 L7 L8 L9 L10 L1 L2 L3 L4 L5 142 172 202 232 262 mm L6 L7 L8 L9 L10 292 322 352 382 412 mm 9 9A DN80 DN110 adapter is req...

Page 48: ...as outlet duct on the ground Moisten the seals with non corrosive lubricant water based additive with polymers and silicone oil and make sure that they can be adjusted during the final positioning ope...

Page 49: ...flue gas outlet manifold above the thermal modules Check that a slope of at least 3 towards the condensate outlet siphon is guaranteed 4 Connect the siphon outlet to the condensate drainage system 4 3...

Page 50: ...ast 3 L1 L1 back L2 L2 back L3 L3 back L4 L4 back L5 L5 back 3 1 L1 L1 back L2 L2 back L3 L3 back L4 L4 back L5 L5 back L1 L1 back L2 L2 back L3 L3 back L4 L4 back L5 L5 back 172 197 236 275 315 mm 9...

Page 51: ...ct on the ground Moisten the seals with non corrosive lubricant water based additive with polymers and silicone oil and make sure that they can be adjusted during the final positioning operations 2 L1...

Page 52: ...let manifold above the thermal modules Check that a slope of at least 3 towards the condensate outlet siphon is guaranteed 4 Connect the siphon outlet to the condensate drainage system 4 3 L3 L2 L1 L4...

Page 53: ...40 50 60 70 80 90 100 Number of apartments Number of occupants Generator power in kW 0 50 75 35 125 150 175 200 100 Neutralization not required Neutralization required Example 1 Example 2 Example 1 F...

Page 54: ...he Managing thermal module must be connected to the primary sensor SS at least available as an accessory The primary sensor is required in order to manage the cascade setpoint and is essential for man...

Page 55: ...system takes place using a system circulator PI This circulator connected to the modules in cascade allows the transfer of the heat energy to a user circuit to be controlled for example a direct zone...

Page 56: ...one sensor S3 This is required to adjust and control an additional direct zone in combination with an electronic device for zone management ZM and the zone circulator P3 The zone sensor is used to adj...

Page 57: ...sensor V2 Mixer valve zone 2 V3 Mixer valve zone 3 ZM Electronic device for zone management accessory EAF Domestic cold water inlet UAC Domestic hot water outlet 3 3 1 Electrical power connections Bl...

Page 58: ...9 10 11 12 13 14 15 16 17 18 5 6 7 8 SC MO1 S2 S2 Zone 2 sensor ACCESSORY CONNECTIONS FOR ADDITIONAL ZONE SAFETY THERMOSTAT 1 2 3 4 5 6 7 8 9 10 11 12 13 14 15 16 17 ROOM THERMOSTAT FLOW SENSOR S3 BU...

Page 59: ...according to requirements Par 81 adjust according to requirements Par 86 adjust according to requirements Par 87 adjust according to requirements 3 5 Block diagram 2 Circuit with thermal modules with...

Page 60: ...HERMOSTAT 1 2 3 4 5 6 7 8 9 10 11 12 13 14 15 16 17 ROOM THERMOSTAT FLOW SENSOR P3 V3 V3 BUS MIX VALVE PUMP L L L N N L N P3 P3 Zone 3 circulator low temperature 12 13 14 V3 Mixer valve zone 3 9 10 cl...

Page 61: ...g into service and maintenance for a detailed description on parameter operation Essential parameters to be configured for the block diagram 2 Managing Depending S1 OFF OFF Dip switch 1 to ON 2 10 to...

Page 62: ...sory V2 Mixer valve zone 2 V3 Mixer valve zone 3 ZM Electronic device for zone management accessory EAF Domestic cold water inlet UAC Domestic hot water outlet 3 7 1 Electrical power connections Block...

Page 63: ...11 12 13 14 15 16 17 18 5 6 7 8 SS SE SB SS Primary sensor SB Boiler sensor SE Outdoor sensor DEPENDING CONNECTIONS BUS 2 BUS 1 PWM SE SB Modbus DEPENDING 0 10V TA 1 2 3 4 9 10 11 12 13 14 15 16 17 1...

Page 64: ...s Par 80 adjust according to requirements Par 81 adjust according to requirements Par 86 adjust according to requirements Par 87 adjust according to requirements 3 9 Block diagram 4 Circuit with therm...

Page 65: ...culator low temperature 12 13 14 V3 Mixer valve zone 3 9 10 closing 10 11 opening 9 9Some electric connections of the power jig have a double function The hot water tank circulator PB must be connect...

Page 66: ...ription on parameter operation Essential parameters to be configured for the block diagram 4 Managing Depending S1 OFF OFF Dip switch 1 to ON 2 10 to ON Par 73 Managing Dependent Par 147 no of dependi...

Page 67: ...nfiguration of the individual thermal module refer to the following table Key Dip switch ON Dip switch OFF Setting the Dip switch Thermal Module Configuration 1 ON DIP 2 3 4 5 6 7 8 Stand alone module...

Page 68: ...4 3 Communication with Mixed Zone Controller The mixed zone controller connected to the system must be set with a specific number of recognition actions so that the elec tronic board of the thermal mo...

Page 69: ...3 14 15 16 17 18 5 6 7 8 1 2 3 4 9 10 11 12 13 14 15 16 17 18 5 6 7 8 ACCESSORY MIXED ZONE BUS 2 BUS 2 BUS 2 SAFETY THERMOSTAT 1 2 3 4 5 6 7 8 9 10 11 12 13 14 15 16 17 ROOM THERMOSTAT FLOW SENSOR BUS...

Page 70: ...one is selected confirm with the key The zone parameters are the following Description Standard value that is set Range Explanation UM Post circ Zone Pump 120 0 255 Establishes the time in seconds of...

Page 71: ...Des SupplyT Des SupplyT FlowTemperature FlowTemperature Mixing Valve Max Op Cl time Mixing Valve Max Op Cl time Bas SupplyT Bas SupplyT Valve Valve Mixing Valve Max Steps Mixing Valve Max Steps WWShu...

Page 72: ...setpoint Off Comfort Eco Anti Fr Reduced Level 0 Level 2 Level 3 Level 4 Level 5 Level 6 Level 7 Level 1 Sub menu user parameters access without password Sub menu Installer Manufacturer parameters acc...

Page 73: ...down Temp Max Heating Set Min Heating Set 5 3 Programming the zone By default the schedule timer is disabled In fact to start a request from the zone just close the contact of the zone request In this...

Page 74: ...tifreeze the ambient setpoint is set at 5 C thereby obtaining a reduction with respect to the comfort set point of 30 degrees Off in this case the delivery of heat is interrupted Comfort the setpoint...

Page 75: ...and then secure using the designated screw A B B A 1 2 6 2 Putting the system into service The first time the Condexa PRO is used the following checks and operations must be carried out Check that the...

Page 76: ...ecreasing nu meric values 4 enter 5 supports selecting menus or parameters or increasing nu meric values 6 supports moving to the RH LH area of the display Livello 0 Livello 1 Livello 2 Livello 3 Live...

Page 77: ...the stand by time in seconds to switch off the last cascade module on in Quick Stop mode 5 255 15 Sec I Cascade M2 77 Hyst Down Start Module Defines by how many degrees the tem perature measured by t...

Page 78: ...ion Interval It defines the time interval in days after which modules are rotated 0 30 1 Days I Cascade M2 149 First Module to Start Establishes the number of the next mod ule to be rotated this value...

Page 79: ...Cascade M3 171 Start Mod Delay Fact Defines the time in minutes from the moment the request is triggered until the activation of the set point increases or decreases provided for by Par 169 e 170 0 60...

Page 80: ...97 must be set to 1 if system 1 or 2 is being used characterised by the use of the thermal module circulator while it must be set to 2 if system 3 4 is being used character ised by the use of the two...

Page 81: ...hort time interval which even in this case can differ between start up and shutdown The shutdown band is between the values of parameters 146 and 145 while the start up band is below the value defined...

Page 82: ...all the active thermal modules is greater than the product between the number of the active depend ing modules increased by one and the minimum power value Par 152 increased by a hysteresis value defi...

Page 83: ...83 COMMISSIONING AND MAINTENANCE...

Page 84: ...lo 7 37045 Legnago VR www riello com The manufacturer strives to continuously improve all products Appearance dimensions technical specifications standard equipment and accessories are therefore liabl...

Reviews: