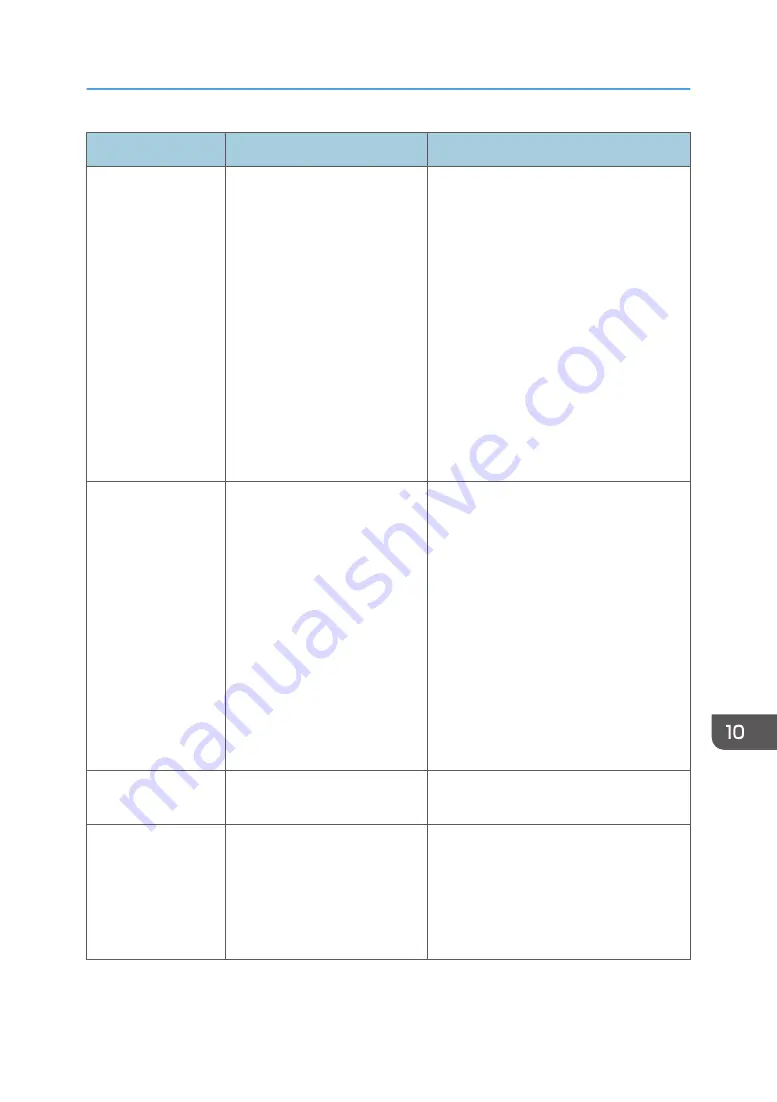
Message
Causes
Solutions
Memory Overflow
1: TX 2: Cancel
• If this occurs on the first
page:
The machine's memory
reached capacity while
storing a fax in memory
before transmission.
• If this occurs on the second
or a later page:
Memory has reached
capacity while scanning
the second or later pages
of the original when trying
to send a fax in Memory
Transmission mode.
• If this occurs on the first page:
Resend the fax in parts as several
smaller individual faxes, or send at a
lower resolution.
• If this occurs on the second or a later
page:
Press the [1] key (TX) to send only the
pages that have been scanned in
memory, or press the [2] key
(Cancel) to cancel.
RX Memory
Overflow
The memory has become full or
the maximum number of
receivable files has been
reached during fax reception.
• The received fax was too large. Ask
the sender to resend the document in
parts as several smaller individual
faxes, or to send at a lower
resolution.
• If an error has occurred because of a
problem such as lack of paper, paper
jamming, or toner running out, correct
the problem, and then finish printing
the outstanding files.
• If there is a file waiting to be sent,
complete the transmission or delete
the file.
Memory Data Lost
Data in the memory was deleted
due to a memory fault.
The machine prints Power Failure Report
and recovers from the error automatically.
Cancel Printing
I/O Timeout
The timeout period set in [I/O
Timeout] expires when printing
is frequently interrupted by data
from other ports, or when the
print job is large and takes time
for processing.
Set [I/O Timeout] to a larger value than
the current setting. For details, see
page 119 "Printer Features Settings".
Error and Status Indicate on the Control Panel
167
Summary of Contents for SP 200S
Page 2: ......
Page 6: ...4...
Page 16: ...Bypass Tray 1 sheets 70 g m2 19 lb 2 Loading Paper 14...
Page 28: ...2 Loading Paper 26...
Page 32: ...Canceling a print job while printing 1 Press the key CTT083 3 Printing Documents 30...
Page 42: ...4 Copying Originals 40...
Page 54: ...7 Maintaining the Machine 52...
Page 62: ...7 Close the rear cover CTT044 8 Troubleshooting 60...
Page 81: ...MEMO 79...
Page 82: ...MEMO 80 EN CN M134 8630...
Page 83: ......
Page 84: ...EN CN M134 8630 2012...
Page 86: ......
Page 92: ...6...
Page 106: ...1 Guide to the Machine 20...
Page 108: ...Bypass Tray 1 sheets 70 g m2 19 lb 2 Loading Paper 22...
Page 130: ...3 Printing Documents 44...
Page 158: ...5 Scanning Originals 72...
Page 184: ...6 Sending and Receiving a Fax 98...
Page 194: ...Do not Auto Print 7 Configuring the Machine Using the Control Panel 108...
Page 208: ...7 Configuring the Machine Using the Control Panel 122...
Page 226: ...8 Configuring the Machine Using Utilities 140...
Page 260: ...10 Troubleshooting 174...
Page 273: ...MEMO 187...
Page 274: ...MEMO 188 EN CN M135 8698...
Page 275: ......
Page 276: ...EN CN M135 8698 2013...
Page 278: ......
Page 288: ...Bypass Tray 1 sheets 70 g m2 19 lb 2 Loading Paper 10...
Page 300: ...3 Printing Documents 22...
Page 316: ...7 Close the rear cover CTT044 6 Troubleshooting 38...
Page 326: ...Printer language DDST 7 Appendix 48...
Page 330: ...MEMO 52 EN CN M133 8620...
Page 331: ......
Page 332: ...EN CN M133 8620 2012...
Page 354: ...19...
Page 355: ...2013 EN CN M133 8699 20...


