background image

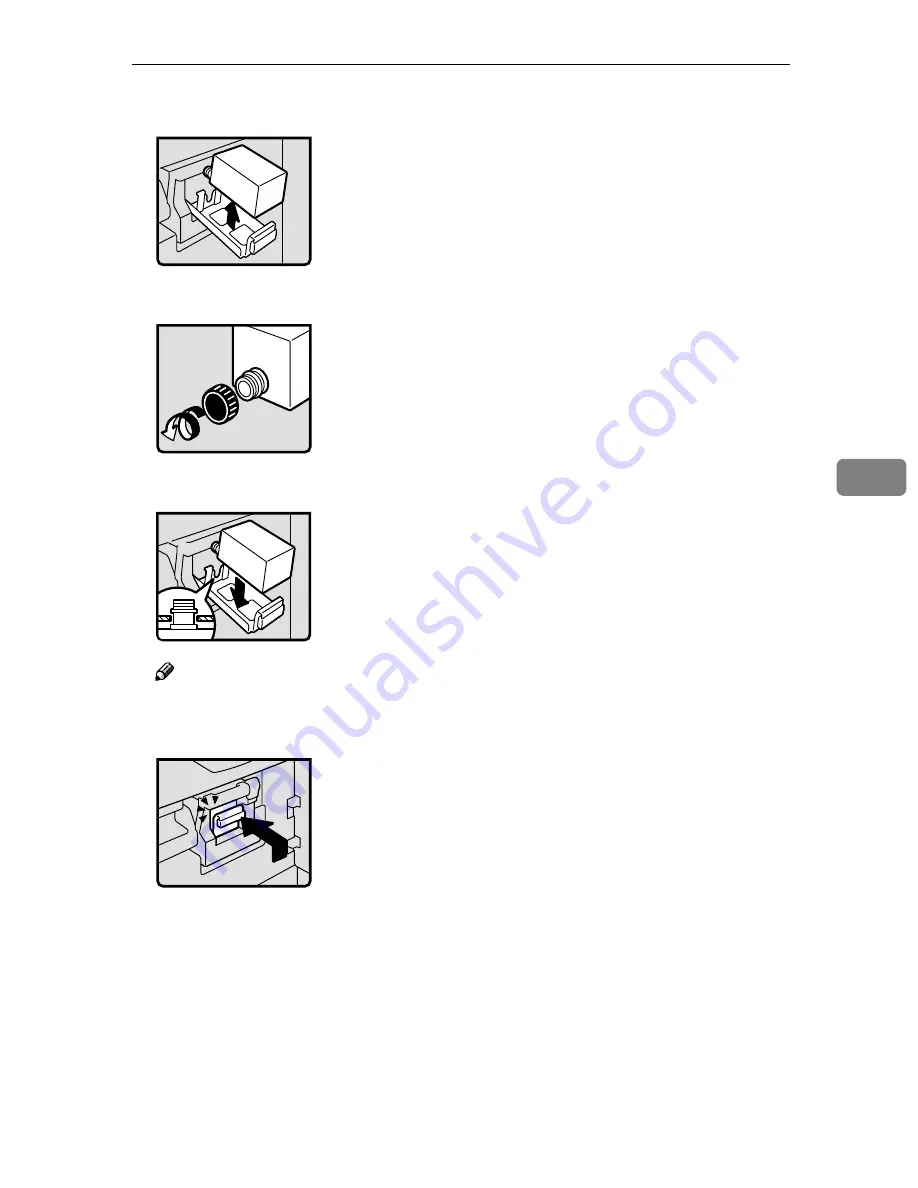
When the Add Ink Indicator (

j

) Lights

187

5

CCCC

Remove the used ink cartridge.

DDDD

Remove the cap of the new ink cartridge.

EEEE

Insert the new cartridge into the ink holder.

Note

Always supply ink of the same color.

FFFF

Return the ink holder to its original position until it clicks.

GGGG

Close the front door.

The machine will start idling to supply ink to the drum.

Summary of Contents for Priport JP8000

Page 1: ...JP8000 Operating Instructions ZDCH040E 1 eps Read this manual carefully before you use this product and keep it handy for future reference For safety please follow the instructions in this manual...

Page 2: ...0 8261 4000 Germany RICOH DEUTSCHLAND GmbH Mergenthalerallee 38 40 65760 Eschborn Phone 49 0 6196 9060 France RICOH FRANCE S A 383 Avenue du G n ral de Gaulle BP 307 92143 Clamart Cedex Phone 33 0 1 4...

Page 3: ...strations might be slightly different from your machine Certain options might not be available in some countries For details please contact your local dealer Two kinds of size notation are employed in...

Page 4: ...the following measures Reorient or relocate the receiving antenna Increase the separation between the equipment and receiver Connect the equipment into an outlet on a circuit different from that to w...

Page 5: ...lt in minor or moderate injury or damage to property Connect the power cord directly into a wall outlet and never use an ex tension cord Disconnect the power plug by pulling the plug not the cable if...

Page 6: ...clips staples or other small metallic objects to fall inside the equipment For environmental reasons do not dispose of the equipment or expended supply waste at household waste collection points Disp...

Page 7: ...ructions under this symbol Be sure to read the instructions all of which are described in the Safety Information section The statements above are notes for your safety Important If this instruction is...

Page 8: ...s in one of the following two ways Placing originals on the exposure glass A Place a single page face down Inserting originals in the optional document feeder A Insert a stack of originals face up B P...

Page 9: ...key P 24 Ad justing the Image Density of Prints D Enter the desired number of prints with the number keys E Press the Print key When the print job has finished press the Clear Modes Energy Sav er key...

Page 10: ...nt Image Position P 23 Adjusting the Position of Printed Images Paper feed direction Adjusting the Print Image Density P 24 Adjusting the Image Density of Prints Tint Mode P 25 Tint Mode Changing the...

Page 11: ...40 Edge Erase Printing on Various Kinds of Paper P 41 Printing onto Various Kinds of Paper Selecting Original Modes P 44 Selecting Original Modes Economy Mode P 48 Economy Mode Auto Cycle P 49 Auto C...

Page 12: ...P 73 Security Mode Quality Start Mode P 74 Quality Start Mode Job Separation P 76 Job Separation Conserving the Master P 78 Conserving the Master On Line Printing P 79 On Line Printing Making Color P...

Page 13: ...BCDE ABCDE ABCDEABCDE ABCDE ABCDE ABCDE ABCDEABCDE ABCDE ABCDE ABCDE ABCDEABCDE ABCDE ABCDE ABCDE ABCDEABCDE ABCDE ABCDE ABCDE ABCDEABCDE ABCDE ABCDE ABCDE ABCDEABCDE ABCDE ABCDE ABCDE ABCDEABCDE ABCD...

Page 14: ...ABCDE ABCDE ABCDE ABCDEABCDE ABCDE ABCDE ABCDE ABCDEABCDE ABCDE ABCDE ABCDE ABCDEABCDE ABCDE ABCDE ABCDE ABCDEABCDE ABCDE ABCDE ABCDE ABCDEABCDE ABCDE ABCDE ABCDE ABCDEABCDE ABCDE ABCDE ABCDE ABCDEABC...

Page 15: ...1 Energy Saver Mode 22 Adjusting the Position of Printed Images 23 Adjusting the Image Density of Prints 24 Before Making a Master 24 After Making a Master 24 Tint Mode 25 Changing the Printing Speed...

Page 16: ...lass Mode 59 Combine Originals 61 Auto Combine Mode 66 Skip Feed Printing 68 Programs 70 Storing a Program 70 Protecting a Program 71 Removing Program Protection 71 Recalling a Program 72 Security Mod...

Page 17: ...riginals onto one Single sided Print 115 Repeat 119 2 Optional Functions Optional Document Feeder 123 Originals 123 Placing Originals in the Document Feeder 124 Combine Printing with the Document Feed...

Page 18: ...Del User Code 162 5 Troubleshooting If Your Machine does not Operate as You Want 165 If You Cannot Make Prints as You Want 167 Combine Originals Mode 167 Loading Paper 168 x Clearing Misfeeds 169 x A...

Page 19: ...ize 186 Poor Printing 187 Dirty Background 187 Black Lines Stained Prints 190 Faint Prints 190 6 Remarks Do s and Don ts 191 Where to Put Your Machine 193 Environment 193 Power Connection 194 Machine...

Page 20: ...xvi...

Page 21: ...nel 4 Master tray Open this unit when installing the mas ter 5 Paper feed tray down key Press to lower the Paper feed tray 6 Paper feed side plates Prevent paper being fed skewed 7 Paper feed tray Set...

Page 22: ...ate This plate aligns the leading edge of prints 4 Paper delivery end plate knob Use to move the end plate 5 Paper delivery tray Completed prints are delivered here 6 Paper delivery side plates These...

Page 23: ...the drum unit 11 Drum unit The master is wrapped around this unit 12 Exposure glass Position originals here face down for printing 13 Platen cover or document feeder option Lower this cover over an or...

Page 24: ...4 Options Document feeder 1 Document Feeder Note Other options Color Drums A3 11 17 drum Color Drums A4 81 2 11 drum Key Counter PC Controller Twin color press roller printing system TC II ZDCH040E 3...

Page 25: ...the Image Overlay mode P 104 Image Overlay 8 Edge Erase key Press to select Edge Erase mode P 40 Edge Erase 9 Image Density key Press to make prints darker or lighter P 24 Adjusting the Image Density...

Page 26: ...Adjusting the Position of Printed Images Also use to highlight items you wish to select on the panel display 19 Program key Press to enter or recall programs P 70 Programs 20 Number keys Press to ent...

Page 27: ...s You Want 3 A3 11 17 drum indicator Lights when the A3 11 17 drum unit is installed P 132 Changing the Drum Size 4 A4 81 2 11 drum indicator Lights when the A4 81 2 11 drum unit is installed P 132 Ch...

Page 28: ...of about 30N or more to the panel dis play or it could be damaged Note When you select an item on the panel display it is highlighted e g Items shown grayed out e g cannot be selected Common panel dis...

Page 29: ...and easily Sample display when selecting the Original key 1 Machine status or message 2 Available functions 3 Illustrations of displays in this manual show the next key to be pressed whitened out E g...

Page 30: ...10...

Page 31: ...grain paper Thin paper that has low stiffness Paper that is prone to generate a lot of paper dust Grained paper loaded with the direction of the grain perpendicular to the feed direction Certain type...

Page 32: ...the maximum print areas are as follows Metric version 290 409mm 11 4 16 1 Inch version 290 419mm 11 4 16 4 When you use A3 11 17 and 209 3g m2 55 6 lb paper slow the printing speed down to setting 1...

Page 33: ...se originals that have bold letters or solid images at the leading edges you might get prints with dirty edges In this case place the original face down with the widest margin toward the paper deliver...

Page 34: ...Operation 14 1 a 8mm 0 32 Original Print a...

Page 35: ...is released and then grasp the paper feed side plates knob and adjust the paper feed side plates to match the paper size Important Always adjust the position with the lock lever for the paper feed sid...

Page 36: ...ay correspond with the actual paper size and direction set on the paper feed tray Setting Up The Paper Delivery Tray A Raise the paper delivery tray slightly and then gently lower it with your hand B...

Page 37: ...ent wings when B5L prints are curled When you use 81 4 g m2 21 6 lb or thicker paper A Lower the paper alignment wings When you use 81 4 g m2 21 6 lb or thinner and B5 or smaller paper A Lower the pap...

Page 38: ...Set User Code and Reg User Code P 148 6 Adminis trator Mode When user codes are turned on the machine will prompt you for your user code when you turn on the main switch or after the ma chine has been...

Page 39: ...e that there are no previ ous settings remaining Note To clear any previous settings press the Clear Modes Energy Saver key D Lift the platen cover Note Be sure to lift the platen cover more than 30cm...

Page 40: ...k or light adjust the image density using the W W W W V V V V keys P 24 Adjusting the Image Density of Prints J Enter the number of prints re quired with the number keys Note To change the number ente...

Page 41: ...ving Prints A Pull the front paper delivery side plate down towards you to open it Note You cannot open the rear paper delivery side plate B Remove the prints from the paper delivery tray and close th...

Page 42: ...es less electricity See Energy Saving P 137 1 System Note You can change the setting so that the machine does not enter Quality Stand by mode P 22 Energy Saver Mode Quality Standby mode lasts for a fe...

Page 43: ...ns to the de fault A Press the Image key Note You can skip step A and adjust the image position directly by pressing the and keys B Adjust image position using the and keys Note When you shift the ima...

Page 44: ...adjust the image density B Press the Start key After Making a Master A To increase the image density press the W W W W key To reduce the image density press the V V V V key Note The faster the printi...

Page 45: ...Tint Mode 25 1 Tint Mode Use this function to make halftone prints A Press the Original key B Select the Tint with the or keys C Press the Start key GRTINT0E...

Page 46: ...e W W W W key to re duce the speed Note The following speeds are avail able Setting 1 60 sheets minute Setting 2 75 sheets minute Setting 3 default 90 sheets minute Setting 4 105 sheets minute Setting...

Page 47: ...nal C Enter the number of prints and press the Start key Changing the Number of Prints Entered and Checking Completed Prints A Press the Clear Stop key B Change the number of prints or check the compl...

Page 48: ...of an original or printing paper With some ratios parts of the image might not be printed or margins will appear on prints You can change the preset repro duction ratios with the user tools See Reprod...

Page 49: ...the original and the print paper are the correct size E Place your original on the expo sure glass or in the optional docu ment feeder F Press the Start key G Check the image position of the trial or...

Page 50: ...ombinations of original and paper size Metric version 1 The machine automatically rotates the original image by 90 to match the paper direction and selects an appropriate reproduction ratio P 81 Image...

Page 51: ...itable reproduction ratio might not be able to be selected P 13 Originals and P 123 Originals A Place your original on the exposure glass or in the optional document feed er B Press the Ratio key C Se...

Page 52: ...E Press the Start key F Check the image position of the trial or proof print Note If the image position is not correct adjust it using the Image keys P 23 Adjusting the Position of Printed Images G Ma...

Page 53: ...elect Mag with the or key Note To select a custom ratio select the closest ratio with the or keys Then press the or key and go to step F C Press the OK key D Make sure that Zoom is selected E Press th...

Page 54: ...iginal and the print paper are the correct size I Place your original on the expo sure glass or in the optional docu ment feeder J Press the Start key K Check the image position of the trial or proof...

Page 55: ...g with the or key C Press the OK key D Select Direct Mag with the or key E Press the OK key F Enter the vertical and horizontal ratio Note To change the value entered press the Clear Stop key and ente...

Page 56: ...size I Place your original on the expo sure glass or in the optional docu ment feeder J Press the Start key K Check the image position of the trial or proof print Note If the image position is not cor...

Page 57: ...Note You can enter the sizes within the following ranges The range of ratios from which the machine can select depends on where you place the original On the exposure glass 50 200 If the calculated r...

Page 58: ...press the q q q q key I Enter the horizontal print size with the number keys J Press the OK key The machine will select appropri ate reproduction ratios for the ver tical and horizontal directions K M...

Page 59: ...erased completely Note If your originals have solid images at the edges the machine might recognize the solid images as shad ows and not copy them In this case use Edge Erase mode so that only the sha...

Page 60: ...ith the user tools The de fault is 2mm 0 1 P 152 3 11 Margin Erase Area A Press the Edge Erase key B Select the size and direction of the original with the or keys C Press the OK key D Place your orig...

Page 61: ...aper If you wish to print onto thick 128 to 209 3g m2 34 to 55 6 lb or heavier paper perform the following steps A Press the Ppr Type key B Select Thick with the or key C Press the OK key Printing ont...

Page 62: ...b or enough to load a stack up to 105mm 4 1 high E If your envelopes do not feed in well lift the paper feed tray a lit tle and then lower it so that it slants up slightly Printing onto Special Kinds...

Page 63: ...Press the OK key If paper misfeeds occur frequently in the paper exit section even if you use standard or thin paper and select the Std do the following A Set the wing guide to the Down position with...

Page 64: ...Select when you want to make halftone printing Note You can adjust the sharpness of text in Letter mode with the user tools see Adjusting sharpness of letters P 142 4 Mode Setting When using Photo mod...

Page 65: ...l on the expo sure glass or in the optional docu ment feeder G Press the Start key H Check the image position of the trial or proof print Note If the image position is not cor rect adjust it using the...

Page 66: ...are available Setting 1 clearest Setting 2 clearer than setting 3 Setting 3 clearer than setting 4 Setting 4 clearer than the stan dard setting E Press the OK key F Place your original on the expo sur...

Page 67: ...s the Original key B Select Pencil with the or key C Press the OK key D Place your original on the expo sure glass E Press the Start key F Check the image position of the trial or proof print Note If...

Page 68: ...ional docu ment feeder C Press the Start key D Check the image position of the trial or proof print Note If the image position is not cor rect adjust it using the Image key P 23 Adjusting the Position...

Page 69: ...50 originals into the optional document feeder B Enter the number of prints re quired with the number keys C Press the Start key D Check the image position of the trial or proof print Note If the ima...

Page 70: ...ch class into the machine memory beforehand with the user tools Whenever you need to make print sets for all the classes place your original select ALL and press the Start key Print sets will be made...

Page 71: ...1 E Press the Start key F Check the image position of the trial or proof print Note If the image position is not cor rect adjust it using the Image key P 23 Adjusting the Position of Printed Images G...

Page 72: ...in each class into the ma chine memory beforehand with the user tools Then whenever you need to make print sets for several classes place your original select the classes who need prints and press the...

Page 73: ...e lect the unnecessary classes with the Cancel key C Press the key Now you can select classes for the 2nd grade D Select the desired class for the 2nd grade with the or key E Press the Select key Note...

Page 74: ...ass or in the optional docu ment feeder G Press the Start key H Check the image position of the trial or proof print Note If the image position is not cor rect adjust it using the Image key P 23 Adjus...

Page 75: ...he job sep arator pulls the top sheet of each set delivered to the paper delivery tray to mark the end of each print ed set The next cycle begins auto matically P 76 Job Separation To stop Job Separat...

Page 76: ...maximum number of sets that can be made is 20 H Press the OK key I Place one original on the expo sure glass or in the optional docu ment feeder J Press the Start key K Check the image position of the...

Page 77: ...e top sheet of the each set delivered to the paper delivery tray to mark the end of each print ed set The next cycle begins auto matically P 76 Job Separation You can suspend Job Separation mode whene...

Page 78: ...ace down on the exposure glass J Press the Start key K Check the image position of the trial or proof print Note If the image position is not cor rect adjust it using the Image keys P 23 Adjusting the...

Page 79: ...each set delivered to the paper delivery tray to mark the end of each printed set The next cycle begins automatically P 76 Job Separation You can suspend Job Separation mode whenever you set the Clas...

Page 80: ...original G Press the OK key H Place one original on the expo sure glass or in the optional docu ment feeder I Press the Start key J Check the image position is the trial or proof print Note If the ima...

Page 81: ...first original will not be printed Any image closer than 4mm 0 16 to the leading edge of the second original will also not be printed When the image is too close to the leading edge use copies of the...

Page 82: ...87 100 122 141 173 A4L 71 82 100 115 141 B5L 61 71 87 100 122 A5L 50 58 71 82 100 Original Size 81 2 11 K 51 2 81 2 K Paper Size 11 17 L 100 129 81 2 14 L 77 100 81 2 11 L 65 100 51 2 81 2 L 50 65 Or...

Page 83: ...right Reference When you use the optional document feeder with this function P 125 Combine Printing with the Document Feeder A Place the first original face down Note When you place original sideways...

Page 84: ...e reproduction ratio Note To have the machine choose a suitable ratio automatically use Auto Mag nification mode P 30 Auto Magnification D Press the Combine key E Select Combine 2 or Quadruple with th...

Page 85: ...been stored Place the second original face down I Press the Start key J Check the image position of the trial or proof print Note If the image position is not correct adjust it using the Image key P...

Page 86: ...1 single sided print of 4 images The original image is duplicated four times on one print Reference P 61 Combine Originals for de tails A Place your original on the expo sure glass or in the optional...

Page 87: ...ss the OK key G Press the Start key H Check the image position of the trial or proof print Note If the image position is not cor rect adjust it using the Image key P 23 Adjusting the Position of Print...

Page 88: ...ode is 460mm 18 1 When you use paper longer than 432mm 17 0 prints will not be de livered to the paper delivery tray properly so lower the paper deliv ery end plate and take the prints by hand A Place...

Page 89: ...tion of the trial or proof print Note If the image position is not cor rect adjust it using the Image key P 23 Adjusting the Position of Printed Images G Make your prints Note After printing is comple...

Page 90: ...he OK key Note The program numbers 1 to 9 will be displayed in the panel display If a user program has been pro tected that program number will not appear in the panel dis play To change a protected u...

Page 91: ...number you want to protect with the or keys Note Already protected program numbers are shown with a black background e g A You can also select the program number with the number keys E Press the Sele...

Page 92: ...ogram A Press the Program key B Make sure that Recall is selected C Press the OK key Note Programs that have been stored beforehand are represented by a number D Select the program number you want to...

Page 93: ...ity key C Press the Yes key Note If you set Security Mode you cannot make prints after finish ing one job even you press the Proof key or the Print key Press the Exit key You cannot cancel Security mo...

Page 94: ...Quality Start mode is on You can turn it off with the user tools See Setting Q start P 142 4 Mode Setting You can set whether Auto Quality Start mode is used for Before print and After print by select...

Page 95: ...original on the expo sure glass or in the optional docu ment feeder C Press the Start key The drum unit idles D Make your prints Skip Feed Edge Erase Over lay Make Up Stamp Image Density Lighter Dark...

Page 96: ...use Job Separation mode When you do not use Job Separation mode you can select the machine con dition after each print set is fed out to the paper delivery tray with the user tools See Auto Class P 1...

Page 97: ...fed out to the paper delivery tray the job separator pulls the last sheet of each group in Job Separation mode The next Job separation begins Skip Feed Edge Erase Over lay Make Up Stamp Image Density...

Page 98: ...nd ink Limitation The optional document feeder is required Note This function is turned on when you use A4K 81 2 11 K or B5K paper and you set 2 or more originals in the optional document feeder This...

Page 99: ...Kinds of Paper A Press the On Line key When a print job has not finished printing while in online mode If print job has not finished print ing and the job is interrupted the machine cannot receive dat...

Page 100: ...ine on or off If the Auto On Line indi cator is lit Auto On Line is ac tive If the indicator is off Auto On Line is inactive When the Auto On Line indica tor is lit Auto On Line has pri ority when dat...

Page 101: ...e optional document feeder Inch version The machine automatically rotates the original image by 90 to match the pa per direction Place these originals in the optional document feeder Note If you selec...

Page 102: ...an original By combining Make up modes and printing with different color drums you can create a variety of print ing effects Make up Modes for Designated Areas Mode Sample Designated Area Command shee...

Page 103: ...ode 6 Solid mode Image Pattern mode 7 All Page Pattern mode Area Pattern mode 8 All Outline Image Out line and Area Pattern mode Mode Sample Designated Area Command sheet Original Closed area method P...

Page 104: ...etter mode 2 Photo mode The area out side designated areas is printed in Photo mode 3 Save Area mode The area outside the designated ar eas is deleted 4 Outline mode The area outside the designated ar...

Page 105: ...40 patterns similar to the basic patterns but with patterns elements at 4 times the size 90 rotations of all the basic and enlarged patterns 4 registered user patterns Paper Feed Direction Note The b...

Page 106: ...n 5 mm 0 2 from the top Note Poor quality paper such as newsprint recycled paper etc should not be used for command sheets because any dark spots or streaks will be read as designated areas Do not use...

Page 107: ...can designate on a single com mand sheet If designated areas on two or more command sheets overlap the last com mand sheet will apply for the overlapping portion If you use Outline mode for letter ima...

Page 108: ...Make a space of at least 2mm 0 08 in front of the area surround ed by 3 sides relative to the feed direction 1 2 2mm 0 08 Double line pattern Only the outer line is recognized Make a gap of at least...

Page 109: ...on top of the original B Draw a line using a felt tip pen black red or blue with a thickness of at least 1mm Note Make sure there is no break in the line The diagonal line can be drawn from left to r...

Page 110: ...image a b c 2mm 0 08 Closed area method Note The line designating the area must be a closed loop A Put the command sheet on top of the original B Using a black red or blue felt tip pen draw a line aro...

Page 111: ...e so that the whole image can be recognized a Line marking the designated area b 2mm 0 08 c Image within the designated area The line marking the designated area should be more than 2mm 0 08 from any...

Page 112: ...nal line The diagonal line method is easy to use for designating rectangular areas It is also more precise but it is difficult to use for designating complex areas Drawing a command sheet using a clos...

Page 113: ...d sheet with the or keys F Press the OK key G If necessary select the pattern for the first command sheet with the or key Then press the OK key H If necessary select the size and direction of the patt...

Page 114: ...e or keys L Press the OK key Note When you select Photo mode for both inside and outside ar eas you cannot select different dot patterns and contrast When you want to confirm your settings press the M...

Page 115: ...Repeat step O for the other com mand sheets P Place the original face down on the exposure glass or face up into the document feeder and press the Start key Note If a command sheet or original misfee...

Page 116: ...Operation 96 1 Make up Samples Sample 1 A Command Sheet No 1 Frame shape Designated area Delete Area mode B Outside area Letter mode C Print 1 Original 2 Command sheet No 1 3 Print 1 2 3 ZM 50...

Page 117: ...mand Sheet No 1 Frame shape Designated area All Outline No 30 B Command Sheet No 2 Frame shape Designated area All page pattern No 17 C Outside area Fn1 D Print 1 Original 2 Command sheet No 1 3 Comma...

Page 118: ...rint the original as it is B Change the drum unit for color printing C Command Sheet No 1 Frame shape Designated area All page pattern No 39 D Outside area Letter mode E Print 1 Original 2 Command she...

Page 119: ...achine remembers Origi nal Storage settings even after the power to the machine has been switched off or the Clear Modes Energy Saver key has been pressed to clear Storing Original Store the print ima...

Page 120: ...e images press the Yes key To keep the images press the No key If you select overwrite the doc ument stored in memory will be erased unless it is write protect ed Non standard size originals A If you...

Page 121: ...of originals stored in machine memory do the following Protecting Original A Press the Original Storage key B Select Protect with the or key C Press the OK key D Select the number of the protect ing w...

Page 122: ...re the images once they have been deleted A Press the Original Storage key B Select Delete with the or key C Select the desired number to de lete with the or keys Skip Feed Edge Erase Over lay Make Up...

Page 123: ...Original Storage 103 1 D Select the Yes or No key Note Press the No key if you do not wish to delete the Stored Origi nal TPES580E...

Page 124: ...ABCDE ABCDE ABCDE ABCDEABCDE ABCDE ABCDE ABCDE ABCDEABCDE ABCDE ABCDE ABCDE ABCDEABCDE ABCDE ABCDE ABCDE ABCDEABCDE ABCDE ABCDE ABCDE ABCDEABCDE ABCDE ABCDE ABCDE ABCDEABCDE ABCDE ABCDE ABCDE ABCDEAB...

Page 125: ...f the original and the PC image should be identical Overlay Format A Press the Overlay key B Select one of Image Overlay modes with the or keys C Press the OK key Skip Feed Edge Erase Over lay Make Up...

Page 126: ...e the next original for the template and press the Start key C Place the next original on the exposure glass D Press the Start key Note When you select Format in step B repeat steps C and D Placing or...

Page 127: ...gether the last stamp di rection selected takes priority Note The default format of Date Stamp is Month Day Year You can change this setting with the user tools See Date Style Set P 146 5 Stamp You ca...

Page 128: ...unctions G Place your original and then press the Start key Placing your original K on the exposure glass A Place your original as shown in the illustration Placing your originals K in the optional do...

Page 129: ...age You can edit the preset page num bering position with the user tools P 158 5 10 Position Page P1 P2 P5 is the default format You can change this default setting with the user tools See Type Page P...

Page 130: ...eys Note You can also enter the page number with the number keys To change the value entered press the Clear Stop key and enter the new value B Press the OK key C Enter the first page number with the...

Page 131: ...on the exposure glass A Place the first original as shown in the illustration Note Repeat step I for the other originals Placing your originals K in the optional document feeder A Place your originals...

Page 132: ...DENTIAL is selected as a default You can change this setting with the user tools See Type P 146 5 Stamp A Press the Stamp key B Select Stamp with the or keys C Press the OK key D Select the desired me...

Page 133: ...you wish to set the other Stamp modes K Place your original and press the Start key Placing your original K on the exposure glass contact glass A Set your original as shown in the illustration Placing...

Page 134: ...sided print of 8 images 8 one sided pages are printed onto 1 one sided sheet 8 original images on one side 16 single sided originals 1 single sided print of 16 images 16 one sided pages are printed o...

Page 135: ...d originals 1 single sided print of 4 images 8 single sided originals 1 single sided print of 8 images 16 single sided originals 1 single sided print of 16 images GRMCOM0E 4 3 1 2 2 3 1 4 GRMCOM1E 2 1...

Page 136: ...chine to cancel Memory Combine mode after finishing your print job with the user tools See Cancel Comb P 142 4 Mode Set ting Refer to the following table when you select the original and paper sizes P...

Page 137: ...ing originals on the exposure glass inch version 1 You can use these original and paper sizes in Combine 4 8 Originals mode 2 You can use these original and paper sizes in Combine 4 Originals mode A P...

Page 138: ...ce your originals Placing your original K on the exposure glass A Place your original as shown in the illustration Placing your originals K in the optional document feeder A Place your originals as sh...

Page 139: ...a time in the optional document feeder repeat steps F and G After placing the last orig inal press the q key and then the Start key Repeat Limitation Part of the repeated image might not be printed d...

Page 140: ...onto 11 17 L L L L paper Example copying A5L L L L originals placed in the optional document feeder onto A4K K K K paper The number of repeated im ages Reproduction ratio Print image 4 71 Number of re...

Page 141: ...Press the Combine key B Select Memory Combine with the or key C Press the OK key D Select Repeat with the or key E Press the OK key F Select the reproduction ratio Reference P 28 Reducing and Enlargi...

Page 142: ...ng your original K on the exposure glass A Place your original as shown in the illustration Placing your originals K in the optional document feeder A Place your originals as shown in the illustration...

Page 143: ...e on them Pasted originals Originals written in pencil Thin originals that are a little stiff Originals with index tabs Transparent originals such as OHP transparencies or translucent pa per The follo...

Page 144: ...e document feeder The first top original will be fed first Note To avoid a multi sheet feed shuffle the originals before plac ing them in the document feed er The guides must fit snugly against both s...

Page 145: ...printed on the left side of the paper B Enter the number of prints with the number keys C Check the print paper size and the reproduction ratio Note To have the machine choose a suitable ratio automa...

Page 146: ...ter the first original has been scanned in Place the second original and any print settings you require Then press the Start key Manual Class Mode with Two or More Originals Using the Document Feeder...

Page 147: ...stack Make sure that the originals are placed in the correct sequence with the first original on the top J Press the Start key K Check the image position of the trial or proof print Note If the image...

Page 148: ...ints A Make sure that the color drum in dicator is lit B Press the Start key C Check the image position of the trial or proof print Note If the image position is not cor rect adjust it using the Image...

Page 149: ...while holding the drum unit handle B2 and the upper drum stay B3 Important Be careful not to let the drum unit fall E Make sure the optional color drum lock is securely set F Insert the color drum uni...

Page 150: ...again If the prints are not dry the paper feed roller might become dirty In this case wipe the roller with a cloth You cannot print in two colors at one time A Prepare the two originals Place the fir...

Page 151: ...the paper delivery tray and place them on the paper feed tray again as shown in the illustration G Change the drum unit P 128 Changing the Color Drum Unit H Place the second original and press the St...

Page 152: ...c version Inch version Master Cut Length A3 drum 320mm 530mm 12 5 20 9 255 masters roll 11 17 drum 320 540mm 12 5 21 3 245 masters roll Optional A4 81 2 11 drum 320mm 325mm 12 5 12 8 410 masters roll...

Page 153: ...one sheet Combine Originals 4 Images on one sheet Memory Combine mode 4 Originals Memory Combine mode 8 Originals Memory Combine mode 16 Originals Edge Erase All Class mode Auto Class mode Manual Clas...

Page 154: ...iginal Storage 2 2 2 2 2 2 2 2 2 2 2 2 2 2 2 2 2 2 1 Skip Feed On Line 2 2 2 2 2 2 2 2 2 2 2 2 2 2 2 2 2 2 2 2 2 2 2 2 2 Image Rotation X X X X X X X X X X X X X X X Function chosen second Letter Phot...

Page 155: ...he or key Note Next Press to go to the next page Prev Press to go back to the previous page B Press the OK key C Search for the desired user tool number of each function with the or key D Press the OK...

Page 156: ...value Cancel Press to return to the previous menu without chang ing any data D Press the User Tools key to re turn to the standby display Note The settings are not canceled even if the main switch is...

Page 157: ...o the paper delivery tray after press ing the Start key will not be counted 3 Reset R Counter Choose whether the total number of masters and prints is reset Note Default Not clear 4 mm inch Choose the...

Page 158: ...of prints made how many times paper misfeeds occur and so on Reset Counters Number of prints and master made under each user code Store Class Registered number of students in each class 8 Energy Savi...

Page 159: ...of prints made Up or the number of prints left to be made Down Note Default Down 5 Panel Beeper Turns the beeper on or off Note Default STD standard Available settings ALL OFF The beeper does not soun...

Page 160: ...atios P 150 3 4 Reproduction Ratio 3 4 Re production ratio 5 Class Enter No Before using All Class or Auto Class mode register the number of students in each class with this function Note You can stor...

Page 161: ...e in Photo mode when you press the Original key Note Default Standard 10 Eco Mode ON OFF Specifies whether Economy Mode is set to On or Off when the power is switched on or after mode settings are cle...

Page 162: ...ot detect the original size Note Default Not to ignore 5 No Orig Size When you place originals of non standard sizes on the exposure glass set original detection to Ignore The machine will not de tect...

Page 163: ...o of Skip Feed Specifies the number of drum rotations in Skip Feed mode at power on You can also select whether you can change the num ber of drum rotations temporarily when you press the Skip Feed ke...

Page 164: ...the number of idle spins P 154 4 14 No of Q start 15 Deflector Angle You can change the angle of the wing guide depending on the pa per type you use Note Default Auto Available settings Up Select thi...

Page 165: ...paper misfeeds occur frequently you can reg ister its paper type in User1 or User2 Reference For registering a special paper type P 155 4 19 Type of Pa per 20 Auto Rotation When the direction in whic...

Page 166: ...osition Note Default P 156 5 4 Stamp Position Available settings P 156 5 4 Stamp Position Reference For adjusting the stamp position P 156 5 4 Stamp Position 5 Date Style Set You can select the style...

Page 167: ...per Right When you select 1 2 with the Type Page user tool Down Center 10 Position Page You can edit the page numbering position Note Default P 158 5 10 Position Page Available settings P 158 5 10 Pos...

Page 168: ...l user code counters Note Default Single Reference For clearing the number of masters and copies P 161 6 2 Reset Counters 3 Set User Code Selects User Code mode For details about User Code mode P 148...

Page 169: ...Counter mode contact your service representative If Key Counter mode is on Restricted Access is turned on To use automatically If you turn Re stricted Access off Not to use you can make prints without...

Page 170: ...ear with the number keys E Press the q q q q key F Enter the month with the number keys G Press the q q q q key Note Follow steps F and G for the date hour minute and second H Press the OK key 3 4 Rep...

Page 171: ...ter the desired ratio with the or keys Note You can also enter the ratio with the number keys G Press the OK key twice 3 5 Class Enter No A Press the User Tools key B Enter 3 with the number keys and...

Page 172: ...ugh H until you have finished registering the number of students in each class for the each grades I Press the OK key 3 11 Margin Erase Area A Press the User Tools key B Enter 3 with the number keys a...

Page 173: ...ertical length with the number keys D Press the q q q q key E Enter the horizontal width with the number keys F Press the q q q q key G Press the OK key twice 4 11 No of Skip Feed The following proced...

Page 174: ...8 30 C 82 4 86 F A Press the User Tools key B Enter 4 with the number keys and then press the OK or q q q q key C Enter 14 with the number keys and then press the OK or q q q q key D Select the temper...

Page 175: ...a tions with the or keys I Press the OK key 4 19 Type of Paper A Press the User Tools key B Enter 4 with the number keys and then press the OK or q q q q key C Enter 19 with the number keys and then p...

Page 176: ...5 76 a 24mm 0 96 b 24mm 0 96 a 8 104mm 0 32 4 16 b 8 144mm 0 32 5 76 a b GPSPOS0E a b c GRSPOS1E a b GRSPOS2E a b GRSPOS3E a 24mm 0 96 b 0mm 0 c center line a 8 104mm 0 32 4 16 b 72 72mm 2 88 2 88 a 2...

Page 177: ...ecreases in 4mm 0 16 steps G Adjust the vertical stamp position with the or key H Press the OK key twice 5 7 Position Date Note The default position and available settings of each date stamp are as fo...

Page 178: ...value increases or decreases in 4mm 0 16 steps G Adjust the vertical date stamp po sition with the or key H Press the OK key twice 5 10 Position Page Note The default position and available settings...

Page 179: ...r key and then press the key Note The value increases or decreases in 4mm 0 16 steps G Adjust the vertical page number ing position with the or key Note You need not follow step G when you select 1 as...

Page 180: ...e q key To remove a dot press the Clear Stop key Repeat steps F and G until you have finished editing the pat tern H Press the OK key twice 6 1 Check Counter A Press the User Tools key B Enter 6 with...

Page 181: ...er keys and then press the OK or q q q q key C Enter 2 with the number keys and then press the OK or q q q q key D Select Single or All with the or keys E Press the OK key If you selected Single A Kee...

Page 182: ...e E Press the OK key F Enter the new user code with the number keys G Press the OK key 6 6 Del User Code A Press the User Tools key B Enter 6 with the number keys and then press the OK or q q q q key...

Page 183: ...User Tool Menus in Detail 163 4 D Keep pressing the or key to display your user code E Press the OK key F Press the Yes key...

Page 184: ...User Tools 164 4...

Page 185: ...nts that can be made in one operation with the user tools See Max Quantity P 139 2 Set Operat n Mode Min quantity The number of prints does not exceed the minimum print quantity You can change the min...

Page 186: ...service representative Note If a service code appears on the panel display after you turn the main switch off and on a few times do not continue turning it on and off Leave the ma chine off When you m...

Page 187: ...e not set correctly Make sure that the paper feed side plates touch the paper lightly and the proper paper size is displayed in the panel display 2nd printing with another drum is unsatisfactory The 1...

Page 188: ...nt Paper A Raise the lock lever for the paper feed side plates to release the lock B Load the paper in the paper feed tray Note Correct any paper curl before loading the paper C Adjust the paper feed...

Page 189: ...ly please contact your service repre sentative x x x x A Paper Misfeeds in the Paper Feed Section A Remove the misfed paper To prevent paper misfeeds Check the following before restarting the printing...

Page 190: ...the paper feed side plates are prop erly adjusted When you load pa per on the paper feed tray make sure that the paper edge touches the back fence and paper is placed on the proper paper size scale O...

Page 191: ...x x B Paper or Master Wrapped around the Drum When the master is wrapped around the drum A Open the front door B Lower drum unit lock lever B1 C Take out the drum Note For taking out the drum unit P...

Page 192: ...from the drum E If you cannot find misfed paper in step D D D D remove misfed paper from the pressure cylinder F Set the drum unit and close the front door Note For setting the drum unit P 128 Changin...

Page 193: ...rect the curl as shown When the leading edge margin of the original is less than 8mm 0 32 or there is a solid image on the leading edge insert the original with the widest margin first or make a leadi...

Page 194: ...l 1 Note The master roll must be posi tioned as shown in the illustra tion in step F F Close the master tray cover 2 G Insert the paper edge of the mas ter roll as shown in the illustra tion until the...

Page 195: ...close the front door Note For setting the drum unit P 128 Changing the Color Drum Unit x x x x B E Master Misfeed in the Master Eject Section A Open the front door B Lower drum unit lock lever B1 C T...

Page 196: ...sfeeds in the Master Eject Section A Open the front door B Grasp handle E1 and pull out the master eject unit until it stops C Check where the misfed master is Remove the misfed master D Return the ma...

Page 197: ...Misfeeds Occur When Using the Optional Document Feeder A Open the document feeder ADF cover B Pull out the misfed original gen tly C If you cannot remove misfed orig inal in step B B B B open the doc...

Page 198: ...with any kind of coating such as thermal fax paper art pa per aluminum foil carbon paper or conductive paper Bound originals such as books Damaged originals Originals with glue on them Pasted original...

Page 199: ...the Open Cover Unit Indicator M Lights MMake sure that the following doors covers are closed Front door Close the front door completely Optional document feeder ADF cov er Close the document feeder A...

Page 200: ...nditions Do not store ink where it will be exposed to heat or direct sunlight Store on a flat surface A Open the front door B Pull out the ink holder If ink comes into contact with your eyes rinse imm...

Page 201: ...D Remove the cap of the new ink cartridge E Insert the new cartridge into the ink holder Note Always supply ink of the same color F Return the ink holder to its original position until it clicks G Clo...

Page 202: ...er feed unit cover 1 D Remove the used master roll 2 Note When the Master End indicator is lit it is necessary to replace the master roll even if some master remains on the old roll E The new master r...

Page 203: ...End Indicator C Lights 183 5 G Insert the paper edge of the master roll as shown in the illustration until the master edge reaches the arrow mark H Close the master guide I Push in the master feed uni...

Page 204: ...trash box B Open the front door C Grasp handle E1 and pull out the master eject unit until it stops D Pull up handle E2 and pull out the master eject unit completely E Grasp the master eject unit upp...

Page 205: ...set Insert the key counter Metric version Inch version Color drum unit is installed Metric version Inch version A3 11 17 drum unit is set Metric version Inch version A4 81 2 11 drum unit is set TPES2...

Page 206: ...he paper feed side plates to release the lock B Re adjust the paper feed side plates so that there is no space be tween the paper feed side plates and paper and then lock the side plates in position N...

Page 207: ...ting onto paper that does not absorb ink well like postcards the background of prints might get dirty In this case lower the printing speed or use Skip Feed mode to dry the ink on the prints A Turn of...

Page 208: ...Drum Unit C While pressing the drum lock turn the drum until you can see the trailing edge of the master D With a dry soft cloth remove any ink that has accumulated on the trailing edge of the drum un...

Page 209: ...189 5 E Turn the drum unit and lock it after cleaning it F Insert the drum unit until it locks in position and then lower the drum unit lock lever G Close the front door H Turn on the main switch TPEH...

Page 210: ...196 Cleaning the Sheet Note When black lines or stains still appear on prints even if you clean the above please contact your service representative Faint Prints If the machine is not used for a long...

Page 211: ...ge touches the image of prints on the paper delivery tray Print ink on the paper delivery tray might stick to the back side of the next print Press the Proof key to perform a test print as the image d...

Page 212: ...ther protective covering Shadowing may occur if the printed image at the rear edge of the paper is a solid color when the printing speed is set to 1 If this occurs print the image with the printing sp...

Page 213: ...directly exposed to cool air from an air conditioner or heated air from a heater sudden temperature changes might cause condensation within the machine Places where the machine might be subjected to...

Page 214: ...e front cover of this manual Connect the power cord directly into a wall outlet and do not use an extension cord Do not damage break or make any modifications to the power cord Do not place heavy obje...

Page 215: ...in this manual Such parts should be cleaned by your service representative Cleaning the Main Frame Cleaning the exposure glass A Lift the platen cover or document feeder B Clean A A A A and B B B B Cl...

Page 216: ...g the Optional Document Feeder Cleaning the Sheet A Lift the document feeder B Clean the sheet with a damp cloth and wipe it with a dry cloth Note If you do not clean the sheet marks on the sheet will...

Page 217: ...300mm 432mm 11 9 17 0 Pixel Density 600dpi Image Mode Photo mode Letter mode Letter Photo mode Pencil mode Tint mode Reduction Ratios Inch version 93 77 74 65 Metric version 93 87 82 71 Enlargement Ra...

Page 218: ...209 3g m2 12 5 55 6 lb Print Speed 60 120rpm 5 steps First Copy Time Master Process Time Less than 31 seconds A3 11 17 L Less than 25 seconds A4 81 2 11 K Second Copy Time First Print Time Less than...

Page 219: ...Depth Height Stored 625mm 24 6 650mm 25 6 575mm 22 Stored with docu ment feeder 625mm 24 6 650mm 25 6 684mm 26 9 Set up 1 405mm 55 4 650mm 25 6 575mm 22 Set up with cabinet 1 405mm 55 4 650mm 25 6 1...

Page 220: ...nsumption Making a master Less than 0 26kW Printing Less than 0 25kW Optional Equipment Drum unit Color Drums A3 11 17 A4 81 2 11 Key Counter Document Feeder PC Controller Note Specifications are subj...

Page 221: ...4 lb Original Size Max 297mm 420mm 11 6 16 5 Min 149mm 210mm 5 9 8 3 First Copy Time Master Process Time Less than 34 seconds A3 11 17 Less than 28 5 seconds A4 81 2 11 Second Copy Time First Print Ti...

Page 222: ...9 55 6 lb Print Speed 90 120cpm 3 steps Color Printing Drum unit replacement system Paper Size and Paper Capacity 1 000 sheets 80g m2 20 lb Paper Delivery Tray Capacity 1 000 sheets 80g m2 20 lb Dimen...

Page 223: ...masters can be made per roll Ink Black 1 000ml pack Environmental conditions 5 to 40 C 10 95 RH Ink Red 1 000ml pack Ink Blue Ink Green Ink Brown Ink Purple Ink Yellow Ink Navy Ink Maroon Ink Teal Ink...

Page 224: ...42 Auto Magnification 30 Auto On Line key 5 Auto Quality Start 74 Auto Reset 137 Auto Rotation 145 Auto Separate 145 B Background ON OFF 142 background patterns 85 black line stain 190 C Cancel 8 Canc...

Page 225: ...r 168 Load Paper indicator B 168 Longer Paper 142 LT Photo Contrast 140 LT Photo Priority 140 M machine clearance 194 machine exterior 1 machine interior 2 main switch 2 maintaining your machine 195 M...

Page 226: ...42 43 140 PC controller 79 105 Pencil mode printing 47 Photo Contrast 141 Photo mode printing 45 Photo Screen 141 platen cover 3 poor printing 187 Position Date 146 Position Page 147 power connection...

Page 227: ...i print run 27 Storage Overlay 104 storing a program 70 System 137 T thick paper 41 Time Setting 137 150 Tint Mode 25 trailing edge guides 3 troubleshooting 165 Type 146 Type of Paper 145 155 Type Pag...

Page 228: ...208 UE USA C235 MEMO...

Page 229: ...Operating Instructions For safety please read this manual carefully before you use this product and keep it handy for future reference...

Page 230: ...Operating Instructions Type for 5499 LDD 180 JP8500 3460DNP Printed in Japan UE USA C244 8697A...

Page 231: ...t be available in some countries For details please contact your local dealer Two kinds of size notation are employed in this manual With this machine refer to the inch version For good print quality...

Page 232: ...equipment off and on the user is encouraged to try to correct the interference by one more of the following measures Reorient or relocate the receiving antenna Increase the separation between the equi...

Page 233: ...lt in minor or moderate injury or damage to property Connect the power cord directly into a wall outlet and never use an ex tension cord Disconnect the power plug by pulling the plug not the cable if...

Page 234: ...allow paper clips staples or other small metallic objects to fall inside the machine For environmental reasons do not dispose of the machine or expended supply waste at household waste collection poin...

Page 235: ...ructions under this symbol Be sure to read the instructions all of which are described in the Safety Information section The statements above are notes for your safety Important If this instruction is...

Page 236: ...als on the exposure glass A Place a single page face down Inserting originals in the optional document feeder A Insert a stack of originals face up Note To avoid jamming fan the originals before placi...

Page 237: ...p 25 Ad justing the Image Density of Prints D D D D Enter the desired number of prints with the number keys E E E E Press the Print key When the print job has finished press the Clear Modes Energy Sa...

Page 238: ...Position See p 24 Adjusting the Position of Printed Images Paper feed direction Adjusting the Print Image Density See p 25 Adjusting the Image Density of Prints Tint Mode See p 26 Tint Mode Changing t...

Page 239: ...dge Erase Printing on Various Kinds of Paper See p 43 Printing onto Various Kinds of Paper Selecting Original Modes See p 46 Selecting Original Modes Economy Mode See p 50 Economy Mode Auto Cycle See...

Page 240: ...nting See p 71 Skip Feed Printing Programs See p 73 Programs Security Mode See p 76 Security Mode Quality Start Mode See p 77 Quality Start Mode Job Separation See p 79 Job Separation Conserving the M...

Page 241: ...BCDE ABCDE ABCDE ABCDE ABCDEABCDE ABCDE ABCDE ABCDE ABCDEABCDE ABCDE ABCDE ABCDE ABCDEABCDE ABCDE ABCDE ABCDE ABCDEABCDE ABCDE ABCDE ABCDE ABCDEABCDE ABCDE ABCDE ABCDE ABCDEABCDE ABCDE ABCDE ABCDE ABC...

Page 242: ...DE ABCDE ABCDE ABCDE ABCDEABCDE ABCDE ABCDE ABCDE ABCDEABCDE ABCDE ABCDE ABCDE ABCDEABCDE ABCDE ABCDE ABCDE ABCDEABCDE ABCDE ABCDE ABCDE ABCDEABCDE ABCDE ABCDE ABCDE ABCDEABCDE ABCDE ABCDE ABCDE ABCDE...

Page 243: ...y Saver Mode 22 Auto Reset 23 Adjusting the Position of Printed Images 24 Adjusting the Image Density of Prints 25 Before Making a Master 25 After Making a Master 25 Tint Mode 26 Changing the Printing...

Page 244: ...Mode with two or More Originals 59 Class Mode 62 Combine Originals 64 Auto Combine Mode 69 Skip Feed Printing 71 Programs 73 Storing a Program 73 Protecting a Program 74 Removing Program Protection 7...

Page 245: ...ay 109 Overlay Format 109 Date Stamp 111 Page Stamp 113 Stamp 116 Memory Combine 118 Combining onto a Single sided Print 118 Repeat 123 2 Optional Functions Optional Document Feeder 127 Originals 127...

Page 246: ...et Counters 167 6 5 Chg User Code 168 6 6 Del User Code 168 5 Troubleshooting If Your Machine Does Not Operate as You Want 171 If You Cannot Make Prints as You Want 173 Combine Originals Mode 173 Load...

Page 247: ...int Prints 196 6 Remarks Do s and Don ts 197 Where to Put Your Machine 199 Environment 199 Power Connection 200 Machine Clearance 200 Maintaining Your Machine 201 Cleaning the Main Frame 201 Cleaning...

Page 248: ...xvi...

Page 249: ...5 Operation Panel 4 Master tray Open this unit when installing the mas ter 5 Paper feed tray down key Press to lower the paper feed tray 6 Paper feed side plates Prevent paper skewing 7 Paper feed tr...

Page 250: ...ate This plate aligns the leading edge of prints 4 Paper delivery end plate knob Use to move the end plate 5 Paper delivery tray Completed prints are delivered here 6 Paper delivery side plates These...

Page 251: ...rum unit 11 Drum unit The master is wrapped around this unit 12 Exposure glass Position originals here face down for printing 13 Exposure glass cover or docu ment feeder option Lower this cover over a...

Page 252: ...e Other options Color Drum Type 80 L A3 11 17 Color Drum Type 80 S A4 81 2 11 Exposure Glass Cover Printer Unit Type 80 RCP80 Interface Cable Type 85 Editing Function Type 85 Key Counter PC Controller...

Page 253: ...Overlay mode See p 108 Image Overlay 8 Edge Erase key Press to select Edge Erase mode See p 41 Edge Erase 9 Image Density key Press to make prints darker or lighter See p 25 Adjusting the Image Densi...

Page 254: ...left See p 24 Adjusting the Position of Printed Images Also use to highlight items you wish to select on the panel display 19 Program key Press to enter or recall programs See p 73 Programs 20 Number...

Page 255: ...unit is installed See p 136 Changing the Drum Size 5 Color drum indicator Lights when the color drum unit is in stalled See p 132 Color Printing Using the Optional Color Drum 6 Counter Displays the nu...

Page 256: ...sure exceeding 30N will damage the panel display Note When you select an item on the panel display it is highlighted e g Items shown grayed out e g cannot be selected Common panel display items ZBZX17...

Page 257: ...hine s features quickly and easily Sample display when selecting the Original key 1 Machine status or message 2 Available functions 3 Illustrations of displays in this manual show the next key to be p...

Page 258: ...10...

Page 259: ...n Short grain paper Thin paper that has low stiffness Paper that may create a lot of dust Grained paper with the direction of the grain running opposite to the feed di rection Certain types of long th...

Page 260: ...e the maximum print areas are as follows Metric version 290 409mm 11 4 16 1 Inch version 290 419mm 11 4 16 4 When you use A3 11 17 and 209 3g m2 55 6 lb paper slow the printing speed down to setting 1...

Page 261: ...s that have bold letters or solid images at the leading edges you might get prints with dirty edges In this case place the original face down with the widest margin toward the paper delivery tray or r...

Page 262: ...Operation 14 1 a 8mm 0 32 Original Print a...

Page 263: ...lock is released and then grasp the paper feed side plates knob and adjust the paper feed side plates to match the paper size Important Always adjust the position with the lock lever for the paper fee...

Page 264: ...correspond with the actual paper size and direction set on the paper feed tray Setting Up The Paper Delivery Tray A A A A Raise the paper delivery tray slightly and then gently lower it with your han...

Page 265: ...ment wings if B5L prints are curled When you use 81 4 g m2 21 6 lb or thicker paper A Lower the paper alignment wings When you use 81 4 g m2 21 6 lb or thinner and B5 or smaller paper A Lower the pape...

Page 266: ...and Reg User Code on p 153 6 Adminis trator Mode When user codes are turned on the machine will prompt you for your user code when you turn on the main switch or after the ma chine has been reset A A...

Page 267: ...ning Note To clear any previous settings press the Clear Modes Energy Saver key D D D D Lift the exposure glass cover Note Be sure to lift the exposure glass cover more than 30cm 12 E E E E Place the...

Page 268: ...p 25 Adjusting the Image Density of Prints J J J J Enter the number of prints re quired with the number keys Note To change the number entered press the Clear Stop key and enter the new number K K K K...

Page 269: ...Standard Printing 21 1 B B B B Remove the prints from the paper delivery tray and close the paper delivery side plate...

Page 270: ...setting so that the machine does not enter Idling for pre printing function See Setting Q start on p 146 4 Mode Setting Idling for pre printing function lasts for a few seconds You can change the time...

Page 271: ...Auto Reset in the following cases If there is no ink If originals or paper are jammed If the machine is making master or printing If the machine is printing the second page of a combined print job If...

Page 272: ...Press the Image key Note You can skip step A and adjust the image position directly by pressing the and keys B B B B Adjust image position using the and keys Note When you shift the image for ward lea...

Page 273: ...sity key to adjust the image density B B B B Press the Start key After Making a Master A A A A To increase the image density press the W W W W key To reduce the image density press the V V V V key Not...

Page 274: ...Operation 26 1 Tint Mode Use this function to make halftone prints A A A A Press the Original key B B B B Select the Tint with the or keys C C C C Press the Start key GRTINT0E...

Page 275: ...and press the W W W W key to re duce the speed Note The following speeds are avail able Setting 1 60 sheets minute Setting 2 75 sheets minute Setting 3 default 90 sheets minute Setting 4 105 sheets mi...

Page 276: ...er the number of prints and press the Start key Changing the Number of Prints Entered and Checking Completed Prints A A A A Press the Clear Stop key B B B B Change the number of prints or check the co...

Page 277: ...ss of the size of an original or printing paper With some ratios parts of the image might not be printed or margins will appear on prints You can change the preset repro duction ratios with the user t...

Page 278: ...he print paper are the correct size E E E E Place your original on the expo sure glass or in the optional docu ment feeder F F F F Press the Start key G G G G Check the image position on the trial or...

Page 279: ...inations of original and paper size Metric version 1 The machine automatically rotates the original image by 90 to match the paper direction and selects an appropriate reproduction ratio See p 85 Imag...

Page 280: ...on ratio might not be able to be selected See p 13 Originals and see p 127 Originals A A A A Place your original on the exposure glass or in the optional document feed er B B B B Press the Ratio key C...

Page 281: ...E Press the Start key F F F F Check the image position on the trial or proof print Note If the image position is not correct adjust it using the Image keys See p 24 Adjusting the Position of Printed I...

Page 282: ...ct Mag with the or key Note To select a custom ratio select the closest ratio with the or keys Then press the or key and go to step F C C C C Press the OK key D D D D Make sure that Zoom is selected E...

Page 283: ...the print paper are the correct size I I I I Place your original on the expo sure glass or in the optional docu ment feeder J J J J Press the Start key K K K K Check the image position on the trial or...

Page 284: ...ey B B B B Select Mag with the or key C C C C Press the OK key D D D D Select Direct Mag with the or key E E E E Press the OK key F F F F Enter the vertical and horizontal ratio Note To change the val...

Page 285: ...and the print paper are the correct size I I I I Place your original on the expo sure glass or in the optional docu ment feeder J J J J Press the Start key K K K K Check the image position on the tri...

Page 286: ...izes within the fol lowing ranges The range of ratios which the ma chine can select depends on where you place the original On the exposure glass 50 200 If the calculated ratio is over the maximum or...

Page 287: ...s the q q q q key I I I I Enter the horizontal print size with the number keys J J J J Press the OK key The machine will select appropri ate reproduction ratios for the ver tical and horizontal direct...

Page 288: ...ginals have solid images at the edges the machine might recognize the solid images as shad ows and not copy them In this case use Edge Erase mode so that only the shadows are not copied See p 41 Edge...

Page 289: ...o be printed might be also erased Note You can adjust the size of the mar gins with the user tools The de fault is 2mm 0 1 See p 158 3 11 Margin Erase Area A A A A Press the Edge Erase key B B B B Sel...

Page 290: ...1 F F F F Check the image position on the trial or proof print Note If the image position is not cor rect adjust it using the Image key See p 24 Adjusting the Position of Printed Images G G G G Make...

Page 291: ...hick Paper If you wish to print onto thick 128 to 209 3g m2 34 to 55 6 lb or heavier paper perform the following steps A A A A Press the Ppr Type key B B B B Select Thick with the or key C C C C Press...

Page 292: ...150 sheets 85g m2 22 lb or enough to load a stack up to 105mm 4 1 high E E E E If your envelopes do not feed in well lift the paper feed tray a lit tle and then lower it so that it slants up slightly...

Page 293: ...the OK key If paper misfeeds occur frequently in the paper exit section even if you are using standard or thin paper and have selected Std do the following A Set the wing guide to the Down position wi...

Page 294: ...you want to make halftone printing Note You can adjust the sharpness of text in Letter mode with the user tools See Adjusting sharpness of letters on p 146 4 Mode Set ting When using Photo mode to pr...

Page 295: ...o sure glass or in the optional docu ment feeder G G G G Press the Start key H H H H Check the image position on the trial or proof print Note If the image position is not cor rect adjust it using the...

Page 296: ...learer than setting 4 Setting 4 clearer than the standard setting E E E E Press the OK key F F F F Place your original on the expo sure glass or in the optional docu ment feeder G G G G Press the Star...

Page 297: ...ey D D D D Place your original on the expo sure glass E E E E Press the Start key F F F F Check the image position on the trial or proof print Note If the image position is not cor rect adjust it usin...

Page 298: ...docu ment feeder C C C C Press the Start key D D D D Check the image position on the trial or proof print Note If the image position is not cor rect adjust it using the Image key See p 24 Adjusting t...

Page 299: ...Cycle 51 1 Auto Cycle Use the Auto Cycle key to process masters and make prints in a single operation A A A A If the indicator of Auto Cycle key is off press the Auto Cycle key B B B B Press the Start...

Page 300: ...the machine memory beforehand with the user tools Whenever you need to make print sets for all the classes place your original select ALL and press the Start key Print sets will be made containing the...

Page 301: ...Press the Start key F F F F Check the image position on the trial or proof print Note If the image position is not cor rect adjust it using the Image key See p 24 Adjusting the Position of Printed Ima...

Page 302: ...into the ma chine memory beforehand with the user tools Then whenever you need to make print sets for several classes place your original select the classes that need prints and press the Start key P...

Page 303: ...ect the unnecessary classes with the Cancel key C Press the key Now you can select classes for the 2nd grade D Select the desired class for the 2nd grade with the or key E Press the Select key Note Re...

Page 304: ...n the optional docu ment feeder G G G G Press the Start key H H H H Check the image position on the trial or proof print Note If the image position is not cor rect adjust it using the Image key See p...

Page 305: ...pulls the top sheet of each set delivered to the paper delivery tray to mark the end of each printed set The next cycle begins automatical ly See p 79 Job Separation To stop Job Separation mode from a...

Page 306: ...ber of sets that can be made is 20 H H H H Press the OK key I I I I Place one original on the expo sure glass or in the optional docu ment feeder J J J J Press the Start key K K K K Check the image po...

Page 307: ...tor pulls the top sheet of each set de livered to the paper delivery tray to mark the end of each printed set The next cycle begins automatical ly See p 79 Job Separation You can suspend Job Separatio...

Page 308: ...riginal Up to 20 classes can be set H H H H Press the OK key I I I I Place the first original face down on the exposure glass J J J J Press the Start key K K K K Check the image position on the trial...

Page 309: ...ss Mode with two or More Originals 61 1 N N N N After the first set is completed place the second original on the exposure glass and then press the Start key Note Repeat step N until you have finished...

Page 310: ...to the paper delivery tray to mark the end of each printed set The next cycle begins automatically See p 79 Job Separation You can suspend Job Separation mode whenever you set the Class mode with the...

Page 311: ...G Press the OK key H H H H Place one original on the expo sure glass or in the optional docu ment feeder I I I I Press the Start key J J J J Check the image position on the trial or proof print Note...

Page 312: ...first original will not be printed Any image closer than 4mm 0 16 to the leading edge of the second original will also not be printed When the image is too close to the leading edge use copies of the...

Page 313: ...B4L 87 100 122 141 173 A4L 71 82 100 115 141 B5L 61 71 87 100 122 A5L 50 58 71 82 100 Original Size 81 2 11 K 51 2 81 2 K Paper Size 11 17 L 100 129 81 2 14 L 77 100 81 2 11 L 65 100 51 2 81 2 L 50 6...

Page 314: ...right Reference When you use the optional document feeder with this function see p 129 Combine Printing A A A A Place the first original face down Note When you place an original sideways K the top sh...

Page 315: ...duction ratio Note To have the machine choose a suitable ratio automatically use Auto Mag nification mode See p 31 Auto Magnification D D D D Press the Combine key E E E E Select Combine 2 or Quadrupl...

Page 316: ...Place the second original face down I I I I Press the Start key J J J J Check the image position on the trial or proof print Note If the image position is not correct adjust it using the Image key Se...

Page 317: ...d print of 4 images The original image is duplicated four times on one print Reference See p 64 Combine Originals for details A A A A Place your original on the expo sure glass or in the optional docu...

Page 318: ...y G G G G Press the Start key H H H H Check the image position on the trial or proof print Note If the image position is not cor rect adjust it using the Image key See p 24 Adjusting the Position of P...

Page 319: ...use paper longer than 432mm 17 0 prints will not be de livered to the paper delivery tray properly so lower the paper deliv ery end plate and take out the prints by hand A A A A Place your original on...

Page 320: ...the trial or proof print Note If the image position is not cor rect adjust it using the Image key See p 24 Adjusting the Position of Printed Images G G G G Make your prints Note After printing is comp...

Page 321: ...ss the OK key Note The program numbers 1 to 9 will be displayed in the panel display If a user program has been pro tected that program number will not appear in the panel dis play To change a protect...

Page 322: ...the OK key D D D D Select the program number you want to protect with the or keys Note Already protected program num bers are shown with a black back ground e g A You can also select the program numbe...

Page 323: ...ss the OK key Recalling a Program A A A A Press the Program key B B B B Make sure that Recall is selected C C C C Press the OK key Note Programs that have been stored beforehand are represented by a n...

Page 324: ...Security key C C C C Press the Yes key Note If you set Security Mode you cannot make prints after finish ing one job even if you press the Proof key or Print key Press the Exit key You cannot cancel...

Page 325: ...Before print and After print by selecting Yes or No in Auto Quality Start mode with the user tools See p 146 4 Mode Setting If Before print is selected for Auto Quality Start mode the machine carries...

Page 326: ...Operation 78 1 C C C C Press the Start key The drum unit idles D D D D Make your prints...

Page 327: ...o use Job Separation mode When you do not use Job Separation mode you can select the machine con dition after each print set is fed out to the paper delivery tray with the user tools See Auto Class on...

Page 328: ...is fed out to the paper delivery tray the job separator pulls the last sheet of each group in Job Separation mode The next job separation begins Skip Feed Edge Erase Over lay Make Up Stamp Image Densi...

Page 329: ...mitation The optional document feeder is required Note This function is turned on when you use A4K 81 2 11 K or B5K paper and you set 2 or more originals in the optional document feeder This function...

Page 330: ...ouble letter Whena DoubleFeedisDetected When a double feed is detected the machine stops and a warning mes sage appears on the panel display A A A A Check the output and press Exit key Note When the m...

Page 331: ...job has not finished printing while in online mode If a print job has not finished print ing and the job is interrupted the machine cannot receive data from the PC To print the next job from the PC ca...

Page 332: ...e is ac tive If the indicator is off Auto On Line is inactive When the Auto On Line indica tor is lit Auto On Line has pri ority when data is received from a PC If you want to pre vent the machine fro...

Page 333: ...e optional document feeder Inch version The machine automatically rotates the original image by 90 to match the pa per direction Place these originals in the optional document feeder Note If you use Z...

Page 334: ...Make up modes and printing with different color drums you can create a variety of print ing effects Make up Modes for Designated Areas Mode Sample Designated Area Command sheet Original Closed area m...

Page 335: ...mode Image Pattern mode 7 All Page Pattern mode Area Pattern mode 8 All Outline Image Out line and Area Pattern mode Mode Sample Designated Area Command sheet Original Closed area method Print BALLET...

Page 336: ...etter mode 2 Photo mode The area out side designated areas is printed in Photo mode 3 Save Area mode The area outside the designated ar eas is deleted 4 Outline mode The area outside the designated ar...

Page 337: ...similar to the basic patterns but with patterns elements at 4 times the size 80 variants based on 90 rotations of all the basic and enlarged patterns 4 registered user patterns Paper Feed Direction No...

Page 338: ...n 5 mm 0 2 from the top Note Poor quality paper such as newsprint recycled paper etc should not be used for command sheets because any dark spots or streaks will be read as designated areas Do not use...

Page 339: ...the print image might come out as expected Notes The image might differ depending on how the designated area is drawn so re member the following when making the command sheet Designated area Area rec...

Page 340: ...n top of the original The designated area is sur rounded by 3 sides of another designated area Make a space of at least 2mm 0 08 in front of the area surrounded by 3 sides relative to the feeding di r...

Page 341: ...here is no break in the line The diagonal line can be drawn from left to right or vice versa Draw the line at least 2mm 0 08 away from the image so that the whole image can be recognized a b c d 2mm 0...

Page 342: ...a black red or blue felt tip pen draw a line around the area to des ignate The line should have a thickness of at least 1mm Note Make sure there is no break in the line Draw the line at least 2mm 0 0...

Page 343: ...designated area d Image within the designated area Command Sheets and Finished Prints The following illustrations will help you understand how to draw a command sheet Drawing a command sheet using a d...

Page 344: ...96 1 Drawing a command sheet using a closed line The closed line method is easier to use for complex areas but it is less precise It also takes longer to draw a command sheet with the closed line met...

Page 345: ...om mand sheet with the or keys F F F F Press the OK key G G G G If necessary select the pattern for the first command sheet with the or key Then press the OK key H H H H If necessary select the size a...

Page 346: ...area with the or keys L L L L Press the OK key Note When you select Photo mode for both inside and outside ar eas you cannot select different dot patterns and contrast When you want to confirm your s...

Page 347: ...scanned Note Repeat step O for the other com mand sheets P P P P Place the original face down on the exposure glass or face up into the document feeder and press the Start key Note If a command sheet...

Page 348: ...Operation 100 1 Make up Samples Sample 1 A Command Sheet No 1 Frame shape Designated area Delete Area mode B Outside area Letter mode C Print 1 Original 2 Command sheet No 1 3 Print 1 2 3 ZM 50...

Page 349: ...mand Sheet No 1 Frame shape Designated area All Outline No 30 B Command Sheet No 2 Frame shape Designated area All page pattern No 17 C Outside area Fn1 D Print 1 Original 2 Command sheet No 1 3 Comma...

Page 350: ...rint the original as it is B Change the drum unit for color printing C Command Sheet No 1 Frame shape Designated area All page pattern No 39 D Outside area Letter mode E Print 1 Original 2 Command she...

Page 351: ...ings even after the power to the machine has been switched off or the Clear Modes Energy Saver key has been pressed to clear Storing Originals Store the print images of the originals you want to use f...

Page 352: ...ey To keep the images press the No key If you select overwrite the doc ument stored in memory will be erased unless it is write protect ed Non standard size originals A If you place non standard size...

Page 353: ...images of originals stored in machine memory do the following Protecting Originals A A A A Press the Original Storage key B B B B Select Protect with the or key C C C C Press the OK key D D D D Select...

Page 354: ...nnot restore the images once they have been deleted A A A A Press the Original Storage key B B B B Select Delete with the or key C C C C Select the number of the original to be deleted with the or key...

Page 355: ...Original Storage 107 1 D D D D Select the Yes or No key Note Press the No key if you do not wish to delete the Stored Origi nal TPES580E...

Page 356: ...EABCDE ABCDE ABCDE ABCDE ABCDEABCDE ABCDE ABCDE ABCDE ABCDEABCDE ABCDE ABCDE ABCDE ABCDEABCDE ABCDE ABCDE ABCDE ABCDEABCDE ABCDE ABCDE ABCDE ABCDEABCDE ABCDE ABCDE ABCDE ABCDEABCDE ABCDE ABCDE ABCDE A...

Page 357: ...he size of the original and the PC image should be identical Overlay Format A A A A Press the Overlay key B B B B Select one of Image Overlay modes with the or keys C C C C Press the OK key Skip Feed...

Page 358: ...the Start key C Place the next original on the exposure glass D Press the Start key Note When you select Format in step B repeat steps C and D Placing originals in the optional document feeder A Plac...

Page 359: ...d takes priority Note The default format of Date Stamp is Month Day Year You can change this setting with the user tools See Date Style Set on p 151 5 Stamp You can edit the Date Stamp posi tion See p...

Page 360: ...f you wish to set the other Stamp functions G G G G Place your original and then press the Start key Placing your original K on the exposure glass A Place your original as shown in the illustration Pl...

Page 361: ...he preset page num bering position with the user tools See p 164 5 10 Position Page P1 P2 P5 is the default format You can change this default setting with the user tools See Type Page on p 151 5 Stam...

Page 362: ...te You can also enter the page number with the number keys To change the value entered press the Clear Stop key and enter the new value B Press the OK key C Enter the first page number with the or key...

Page 363: ...ginal as shown in the illustration Note Repeat step I for the other originals Placing your originals K in the optional document feeder A Place your originals as shown in the illustration Note The firs...

Page 364: ...s a default You can change this setting with the user tools See Type on p 151 5 Stamp A A A A Press the Stamp key B B B B Select Stamp with the or keys C C C C Press the OK key D D D D Select the desi...

Page 365: ...K Place your original and press the Start key Placing your original K on the exposure glass contact glass A Set your original as shown in the illustration Placing your originals K in the optional doc...

Page 366: ...one sided sheet 8 original images on one side 16 single sided originals 1 single sided print of 16 images 16 one sided pages are printed onto 1 one sided sheet 16 original images on one side Repeatin...

Page 367: ...f the im age might not be copied The machine cannot copy originals different in size and direction Note The number of originals printed combined can be 4 8 or 16 In this mode the machine selects the r...

Page 368: ...n the optional document feeder inch version 1 You can use these original and paper sizes in Combine 4 8 16 Originals mode 2 You can use these original and paper sizes in Combine 4 8 Originals mode 3 Y...

Page 369: ...nals mode 2 You can use these original and paper sizes in Combine 4 Originals mode A A A A Press the Combine key B B B B Select Memory Combine with the or key C C C C Press the OK key D D D D Select y...

Page 370: ...r original as shown in the illustration Placing your originals K in the optional document feeder A Place your originals as shown in the illustration Note The first original should be on the top To avo...

Page 371: ...at a time in the optional document feeder repeat steps F and G After placing the last orig inal press the q q q q key and then the Start key Repeat Limitation Part of the repeated image might not be...

Page 372: ...onto 11 17 L L L L paper Example copying A5L L L L originals placed in the optional document feeder onto A4K K K K paper The number of repeated im ages Reproduction ratio Print image 4 71 Number of re...

Page 373: ...bine key B B B B Select Memory Combine with the or key C C C C Press the OK key D D D D Select Repeat with the or key E E E E Press the OK key F F F F Select the reproduction ratio Reference See p 29...

Page 374: ...your original as shown in the illustration Placing your originals K in the optional document feeder A Place your originals as shown in the illustration Note To avoid originals misfeeding fan the orig...

Page 375: ...ue on them Pasted originals Originals written in pencil Thin originals that are a little stiff Originals with index tabs Transparent originals such as OHP transparencies or translucent pa per The foll...

Page 376: ...80g m2 21 lb can be inserted at one time in the document feeder The first top original will be fed first Note To avoid jamming fan the orig inals before placing them in the document feeder The guides...

Page 377: ...k the print paper size and the reproduction ratio Note To have the machine choose a suitable ratio automatically use Auto Magnification mode See p 31 Auto Magnification D D D D Press the Combine key E...

Page 378: ...Originals A A A A Press the Class key B B B B Select Manual with the or key C C C C Press the OK key D D D D Enter the desired number of prints for the first original with the number keys E E E E Pre...

Page 379: ...ed in the correct sequence with the first on the top J J J J Press the Start key K K K K Check the image position on the trial or proof print Note If the image position is not cor rect adjust it using...

Page 380: ...sure that the color drum in dicator is lit B B B B Press the Start key C C C C Check the image position on the trial or proof print Note If the image position is not cor rect adjust it using the Image...

Page 381: ...the drum unit while holding the drum unit handle B2 and the upper drum stay B3 Important Be careful not to let the drum unit fall E E E E Make sure the optional color drum lock is securely set F F F F...

Page 382: ...rinting on them again If the prints are not dry the paper feed roller might become dirty In this case wipe the roller with a cloth You cannot print in two colors at one time A A A A Prepare the two or...

Page 383: ...rom the paper delivery tray and place them on the paper feed tray again as shown in the illustration G G G G Change the drum unit See p 132 Changing the Color Drum Unit H H H H Place the second origin...

Page 384: ...version Inch version Master Cut Length A3 drum 320mm 530mm 12 5 20 9 255 masters roll 11 17 drum 320 540mm 12 5 21 3 245 masters roll Optional A4 81 2 11 drum 320mm 325mm 12 5 12 8 410 masters roll No...

Page 385: ...Reduce Enlarge Zoom Auto Magnification Selection Directional Magnification Directional Magnification size Combine Originals 2 Images on one sheet Combine Originals 4 Images on one sheet Memory Combine...

Page 386: ...2 1 Edge Erase 1 1 All Class mode 1 1 1 1 Manual Class mode 1 1 1 1 Function chosen second Letter Photo Letter Photo Pencil Tint mode Economy mode Auto Cycle Preset Reduce Enlarge Zoom Auto Magnifica...

Page 387: ...2 2 2 2 2 2 2 2 2 2 2 2 2 2 Image Rota tion X X X X X X X X X X X X X X X Function chosen second Letter Photo Letter Photo Pencil Tint mode Economy mode Auto Cycle Preset Reduce Enlarge Zoom Auto Mag...

Page 388: ...Combination Chart 140 3...

Page 389: ...7 with the or key Note Next Press to go to the next page Prev Press to go back to the previous page B Press the OK key C Search for the desired user tool number of each function with the or key D Pres...

Page 390: ...value Cancel Press to return to the previous menu without chang ing any data D D D D Press the User Tools key to re turn to the standby display Note The settings are not canceled even if the main swi...

Page 391: ...o the paper delivery tray after press ing the Start key will not be counted 3 Reset R Counter Choose whether the total number of masters and prints is reset Note Default Not clear 4 mm inch Choose the...

Page 392: ...print runs of less than 20 prints will not be accepted Note Default 0 2 Max Quantity The maximum print quantity can be set between 0 and 9999 Note Default 9999 3 CopyCount Dis play The counter can be...

Page 393: ...tios see p 156 3 4 Reproduction Ratio 3 4 Reproduction ratio 5 Class Enter No Before using All Class or Auto Class mode register the number of students in each class with this function Note You can st...

Page 394: ...can set the primary ratio on the display when you press the Ratio key No Mode Description 1 Auto Cycle ON OFF Specifies whether Auto Cycle mode is selected at power on Note Default ON 2 Class Manual S...

Page 395: ...of your prints Note Default W O back correction off 7 Longer Paper Use paper longer than 432mm 17 0 Note Default Not to use 8 Combine If you select Automatic Auto Combine mode you can make two or fou...

Page 396: ...it idles Note Default 7 13 Setting Q start If the machine is not used for a long period of time the ink on the drum might dry causing image quality to deteriorate The Auto Quality Start mode automatic...

Page 397: ...op After the last page of each printing set is fed out to the paper delivery tray the machine stops If you press the Print key the next cycle begins 17 Auto Separate Specifies whether Job Separation m...

Page 398: ...ording to the num ber of originals placed in the optional document feeder and the paper sizes If you wish to use A3 11 17 master regardless of the number of originals set and the paper sizes select A3...

Page 399: ...e Default See p 162 5 4 Stamp Position Available settings See p 162 5 4 Stamp Position Reference For adjusting the stamp position see p 162 5 4 Stamp Posi tion 5 Date Style Set You can select the form...

Page 400: ...hen you select 1 2 with the Type Page user tool Down Center 10 Position Page You can edit the page numbering position Note Default See p 164 5 10 Position Page Available settings See p 164 5 10 Positi...

Page 401: ...and copies see p 166 6 1 Check Counter 2 Reset Counters You can clear each or all user code counters Note Default Single Reference For clearing the number of masters and copies see p 167 6 2 Reset Co...

Page 402: ...tact your service representative If Key Counter mode is on Restricted Access is turned on To use automatically If you turn Re stricted Access off Not to use you can make prints without inserting the k...

Page 403: ...ace after data stops being re ceived When the time set here is exceeded it will be possible to receive data from the other interface Important If the set time is too short a time out might occur while...

Page 404: ...with the number keys E E E E Press the q q q q key F F F F Enter the month with the number keys G G G G Press the q q q q key Note Follow steps F and G for the date hour minute and second H H H H Pre...

Page 405: ...the desired ratio with the or keys Note You can also enter the ratio with the number keys G G G G Press the OK key twice 3 5 Class Enter No A A A A Press the User Tools key B B B B Enter 3 with the n...

Page 406: ...til you have finished registering the number of students in each class for the each grades I I I I Press the OK key 3 11 Margin Erase Area A A A A Press the User Tools key B B B B Enter 3 with the num...

Page 407: ...ength with the number keys D Press the q q q q key E Enter the horizontal width with the number keys F Press the q q q q key G G G G Press the OK key twice 4 11 No of Skip Feed The following procedure...

Page 408: ...4 86 F A A A A Press the User Tools key B B B B Enter 4 with the number keys and then press the OK or q q q q key C C C C Enter 14 with the number keys and then press the OK or q q q q key D D D D Se...

Page 409: ...the User Tools key B B B B Enter 4 with the number keys and then press the OK or q q q q key C C C C Enter 19 with the number keys and then press the OK or q q q q key D D D D Select User1 or User2 w...

Page 410: ...0 96 b 24mm 0 96 a 8 104mm 0 32 4 16 b 8 144mm 0 32 5 76 a 24mm 0 96 b 0mm 0 c center line a 8 104mm 0 32 4 16 b 72 72mm 2 88 2 88 a 24mm 0 96 b 24mm 0 96 a 8 104mm 0 32 4 16 b 8 144mm 0 32 5 76 a b G...

Page 411: ...djust the vertical stamp position with the or key H H H H Press the OK key twice 5 7 Position Date Note The default position and available settings of each date stamp are as follows A A A A Press the...

Page 412: ...Note The value increases or decreases in 4mm 0 16 steps G G G G Adjust the vertical date stamp po sition with the or key H H H H Press the OK key twice 5 10 Position Page Note The default position and...

Page 413: ...e or key and then press the key Note The value increases or decreases in 4mm 0 16 increments G G G G Adjust the vertical page number ing position with the or key Note You need not follow step G when y...

Page 414: ...e q q q q key To remove a dot press the Clear Stop key Repeat steps F and G until you have finished editing the pat tern H H H H Press the OK key twice 6 1 Check Counter A A A A Press the User Tools k...

Page 415: ...umber keys and then press the OK or q q q q key C C C C Enter 2 with the number keys and then press the OK or q q q q key D D D D Select Single or All with the or keys E E E E Press the OK key If you...

Page 416: ...E E Press the OK key F F F F Enter the new user code with the number keys G G G G Press the OK key 6 6 Del User Code A A A A Press the User Tools key B B B B Enter 6 with the number keys and then pres...

Page 417: ...User Tool Menus in Detail 169 4 D D D D Keep pressing the or key to display your user code E E E E Press the OK key F F F F Press the Yes key...

Page 418: ...User Tools 170 4...

Page 419: ...ke sure that you have changed the original on the exposure glass before pressing the Start key Max quantity The number of prints exceeds the maximum print quantity You can change the maximum number of...

Page 420: ...continuously using originals with solid images SC 03 03 tends to appear on the panel display In this case turn off the main switch and wait for a while Then turn on the main switch Print image is larg...

Page 421: ...er lightly and the proper paper size is displayed in the panel display 2nd printing with another drum is unsatisfactory The 1st print image is still wet Wait until the 1st image be comes dry An uneven...

Page 422: ...r A A A A Raise the lock lever for the paper feed side plates to release the lock B B B B Load the paper in the paper feed tray Note Correct any paper curl before loading the paper C C C C Adjust the...

Page 423: ...your service repre sentative x x x x A Paper Misfeeds in the Paper Feed Section A A A A Remove the misfed paper To prevent paper misfeeds Check the following before restarting the printing run Did you...

Page 424: ...re properly adjusted When you load paper on the paper feed tray make sure that the paper edge touches the back fence and paper is placed on the proper paper size scale Only use paper where the leading...

Page 425: ...When the master is wrapped around the drum A A A A Open the front door B B B B Lower drum unit lock lever B1 C C C C Take out the drum Note For taking out the drum unit see p 132 Changing the Color Dr...

Page 426: ...ed paper F F F F Set the drum unit and close the front door Note For setting the drum unit see p 132 Changing the Color Drum Unit When paper is misfed inside the machine A A A A Open the front cover B...

Page 427: ...widest margin first or make a leading edge margin by making a copy Less than 8mm 0 32 x x x x C Paper Misfeeds in the Paper Exit Section A A A A Slowly but firmly pull out the misfed paper To prevent...

Page 428: ...er roll so that the edge reaches the interior of the master holder H H H H Close the master guide I I I I Push in the master tray until it stops x x x x D B Master Misfeeds in the Master Feed Section...

Page 429: ...k lever B1 C C C C Take out the drum Note For taking out the drum unit see p 132 Changing the Color Drum Unit D D D D Grasp handle E1 and pull out the master eject unit until it stops E E E E Pull out...

Page 430: ...original position and close the front door If master misfeeds occur often If the master misfeeds often frag ments of the master might be left in the bottom of the master tray Re move the fragments A A...

Page 431: ...it clicks in position and if necessary close the docu ment feeder To prevent originals misfeeding Placing the following kinds of origi nals on the exposure glass may cause misfeeds Originals heavier t...

Page 432: ...ls with index tabs Transparent originals such as OHP transparencies or translucent pa per Note Do not mix different sizes of origi nals in the optional document feeder Remove staples or paperclips fro...

Page 433: ...en the Open Cover Unit Indicator M M M M Lights MMake sure that the following doors covers are closed Front door Close the front door completely Optional document feeder ADF cov er Close the document...

Page 434: ...midity conditions Do not store ink where it will be exposed to heat or direct sunlight Store on a flat surface A A A A Open the front door B B B B Pull out the ink holder If ink comes into contact wit...

Page 435: ...emove the cap of the new ink cartridge E E E E Insert the new cartridge into the ink holder Note Always supply ink of the same color F F F F Return the ink holder to its original position until it cli...

Page 436: ...e master tray cover 1 D D D D Remove the used master roll 2 Note When the Master End indicator is lit it is necessary to replace the master roll even if some master remains on the old roll E E E E The...

Page 437: ...aster End Indicator C Lights 189 5 G G G G Position the master roll so that the edge reaches the interior of the master holder H H H H Close the master guide I I I I Push in the master feed unit until...

Page 438: ...used master B B B B Open the front door C C C C Use handle E1 to pull out the master eject unit until it stops D D D D Pull up handle E2 and pull out the master eject unit completely E E E E Hold the...

Page 439: ...set Insert the key counter Metric version Inch version Color drum unit is installed Metric version Inch version A3 11 17 drum unit is set Metric version Inch version A4 81 2 11 drum unit is set TPES2...

Page 440: ...ver for the paper feed side plates to release the lock B B B B Re adjust the paper feed side plates so that there is no space be tween the side plates and the pa per and then lock the side plates in p...

Page 441: ...When printing onto paper that does not absorb ink well like postcards the background of prints might be dirty In this case lower the printing speed or use Skip Feed mode to dry the ink on the prints...

Page 442: ...rum Unit C C C C While pressing the drum lock turn the drum until you can see the trailing edge of the master D D D D With a dry soft cloth remove any ink that has accumulated on the trailing edge of...

Page 443: ...E Turn the drum unit and lock it after cleaning F F F F Insert the drum unit until it locks into position and then lower the drum unit lock lever G G G G Close the front door H H H H Turn on the main...

Page 444: ...Cleaning the Sheet Note If black lines or stains still appear on prints even following the cleaning pro cedures above please contact your service representative Faint Prints If the machine is not use...

Page 445: ...d if the edge touches the image of prints on the paper delivery tray Print ink on the paper delivery tray might stick to the back side of the next print Press the Proof key to perform a test print as...

Page 446: ...at once you can select whether the warning message is displayed or not Set to On of the Double Feed Warng with the user tools See p 82 Double Feed When two or more sheets of paper feed at once set pap...

Page 447: ...Locations directly exposed to cool air from an air conditioner or heated air from a heater sudden temperature changes might cause condensation within the machine Places where the machine might be subj...

Page 448: ...side front cover of this manual Connect the power cord directly into a wall outlet and do not use an extension cord Do not damage break or make any modifications to the power cord Do not place heavy o...

Page 449: ...manual Such parts should be cleaned by your service representative Cleaning the Main Frame Cleaning the exposure glass A A A A Lift the platen cover or document feeder B B B B Clean A A A A and B B B...

Page 450: ...Optional Document Feeder Cleaning the Sheet A A A A Lift the document feeder B B B B Clean the sheet with a damp cloth and wipe it with a dry cloth Note If you do not clean the sheet marks on the shee...

Page 451: ...305mm 432mm 12 0 17 0 Pixel Density 600dpi Image Mode Photo mode Letter mode Letter Photo mode Pencil mode Tint mode Reduction Ratios Inch version 93 77 74 65 Metric version 93 87 82 71 Enlargement Ra...

Page 452: ...int Paper Weight 47 1 209 3g m2 12 5 55 6 lb Print Speed 60 120rpm 5 steps First Copy Time Master Process Time Less than 31 seconds A3 11 17 L Less than 25 seconds A4 81 2 11 K Second Copy Time First...

Page 453: ...of the operator Power Consumption Making a master Less than 0 26kW Printing Less than 0 25kW Width Depth Height Stored 730mm 28 8 700mm 27 6 585mm 23 Stored with docu ment feeder 730mm 28 8 700mm 27...

Page 454: ...Specifications 206 7 Optional Equipment Drum unit Color Drums Type 80 L A3 11 17 Type 80 S A4 81 2 11 Key Counter Document Feeder PC Controller Note Specifications are subject to change without notice...

Page 455: ...Master Process Time Less than 34 seconds A3 11 17 Less than 28 5 seconds A4 81 2 11 Second Copy Time First Print Time Less than 35 seconds A3 11 17 Less than 30 seconds A4 81 2 11 Original Capacity 50...

Page 456: ...Specifications 208 7 Editing Function Type 85 Option PC Controller Option Key Counter Option...

Page 457: ...52 3 209 3g m2 13 9 55 6 lb Print Speed 90 120cpm 3 steps Color Printing Drum unit replacement system Paper Size and Paper Capacity 1 000 sheets 80g m2 20 lb Paper Delivery Tray Capacity 1 000 sheets...

Page 458: ...masters can be made per roll Ink Black 1 000ml pack Environmental conditions 5 to 40 C 10 95 RH Ink Red 1 000ml pack Ink Blue Ink Green Ink Brown Ink Purple Ink Yellow Ink Navy Ink Maroon Ink Teal In...

Page 459: ...ication 31 Auto On Line key 5 Auto Quality Start 77 Auto Reset 143 Auto Rotation 150 Auto Separate 149 B Background ON OFF 147 background patterns 89 black line stain 196 C Cancel 8 Cancel Comb 148 ch...

Page 460: ...LCD Contrast 144 Letter mode 46 Letter Photo mode printing 46 List Test Print 154 Loading Paper 15 loading paper 174 Load Paper indicator B 174 Longer Paper 147 LT Photo Contrast 145 LT Photo Priority...

Page 461: ...aper Type 43 44 45 145 PC controller 83 109 Pencil mode printing 48 Photo Contrast 146 Photo mode printing 47 Photo Screen 146 poor printing 193 Position Date 151 Position Page 152 power connection 20...

Page 462: ...verlay 108 storing a program 73 System 143 T thick paper 43 Time Setting 143 156 Tint Mode 26 trailing edge guides 3 troubleshooting 171 Type 151 Type of Paper 149 161 Type Page 152 U user code 18 153...

Page 463: ...215 MEMO...

Page 464: ...216 UE USA C244 MEMO...

Reviews: