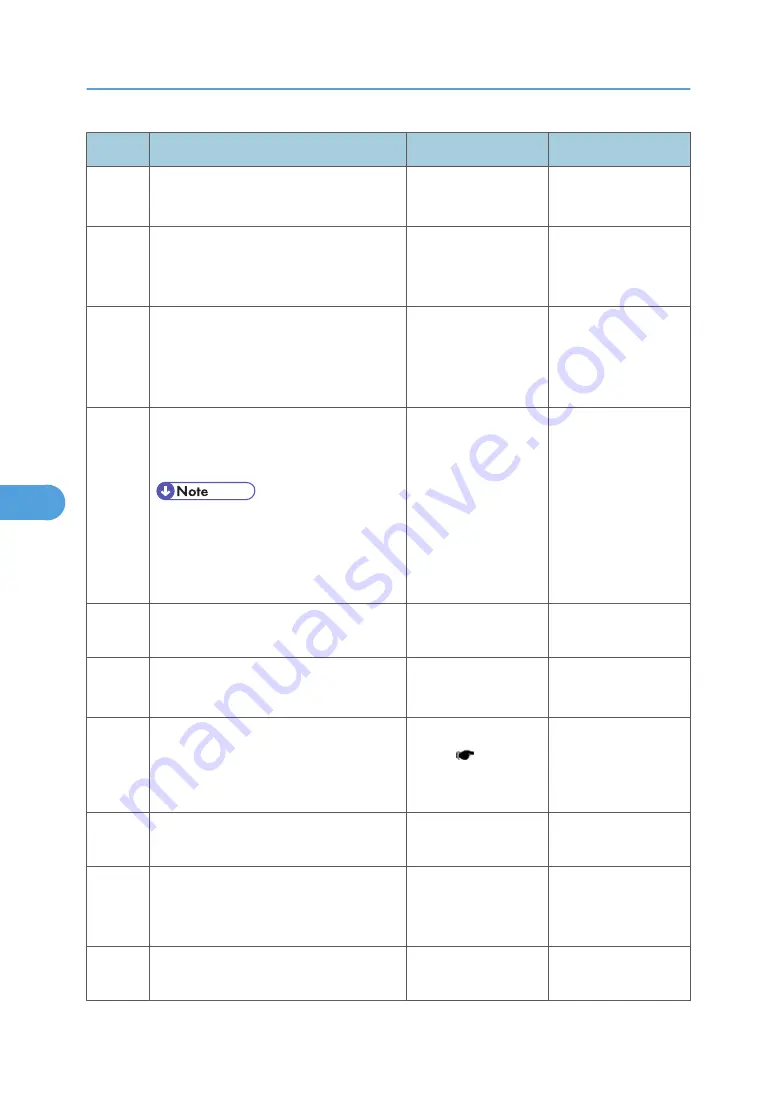
Step
Questions / actions
Yes
No
8
POR the machine.
Is the problem resolved?
Problem resolved
Go to step 10.
9
Reset the address on the machine to
match the IP address on the driver.
Did this resolve the issue?
Problem fixed.
Go to step 10.
10
Have the network admin verify that the
machine and PC’s IP address have
identical subnet addresses.
Are the subnet addresses the same?
Go to step 12.
Go to step 11.
11
Using the subnet address supplied by the
network admin, assign a unique IP
address to the machine.
• The machine IP address should
match the IP address on the printer
driver.
Did this fix the problem?
Problem resolved.
Go to step 12.
12
Is the device physically connected
(ethernet cable) to the network?
Go to step 13.
Go to step15.
13
Try using a different ethernet cable.
Did this remedy the situation?
Problem resolved
Go to step 14.
14
Have the network administrator check the
network drop for activity.
Is the drop functioning properly?
Replace the controller
board ( p.44
"Controller Board
Removal").
Contact the network
administrator.
15
Is the machine on the same wireless
network as the other devices?
Go to step 17.
Go to step 16.
16
Assign the correct wireless network to the
machine.
Did this fix the problem?
Problem resolved
Go to step 17.
17
Are the other devices on the wireless
network communicating properly?
Go to step 18.
Contact the network
administrator.
6. Troubleshooting
244
6
Summary of Contents for LI-MF1 M126
Page 1: ...Model LI MF1 Machine Codes M126 M127 M128 Field Service Manual 26 August 2011 ...
Page 2: ......
Page 3: ...Safety Notices The following laser notice labels may be attached to this machine 1 ...
Page 4: ...2 ...
Page 5: ...3 ...
Page 6: ...4 ...
Page 7: ...5 ...
Page 8: ...6 ...
Page 9: ...7 ...
Page 10: ...8 ...
Page 17: ...XPS XML Paper Specification 15 ...
Page 29: ...M Auto compensator Overview 27 1 ...
Page 30: ...Main Boards Controller Board 1 Product Information 28 1 ...
Page 37: ...2 Installation Installation Refer to the User s Guide 35 2 ...
Page 38: ...2 Installation 36 2 ...
Page 51: ...2 Remove the three screws B securing the top of the controller shield Removal Procedures 49 4 ...
Page 59: ...6 Remove the screw D from the gear E 7 Remove the plastic bushing F Removal Procedures 57 4 ...
Page 142: ...4 Replacement and Adjustment 140 4 ...
Page 192: ...5 System Maintenance 190 5 ...
Page 198: ...Symptom Action Fax reception fails p 276 Fax Reception Service Check 6 Troubleshooting 196 6 ...
Page 298: ...6 Troubleshooting 296 6 ...
Page 302: ...7 Energy Saving 300 7 ...
Page 303: ...Model LI MF1 Machine Codes M126 M127 M128 Appendices 12 October 2011 ...
Page 304: ......
Page 306: ...2 ...
Page 322: ...1 Appendix Specifications 18 1 ...
Page 324: ...MEMO 20 EN ...


