Ricoh FT5035 User Manual Download Page 46

Having The Copier Choose The Paper Size (Auto
Paper Select) 

The copier selects a suitable size of
copy paper based on the original size
and the reproduction ratio.

If you use translucent or transparent originals or originals with tags, the original
size might not be detected correctly.

When placing the original on the exposure glass directly, make sure that the
platen cover or optional document feeder is lowered before pressing the Start
key. If not, the original size might not be detected correctly.

Regarding functions that cannot be used together with this function, 

 see page

94.

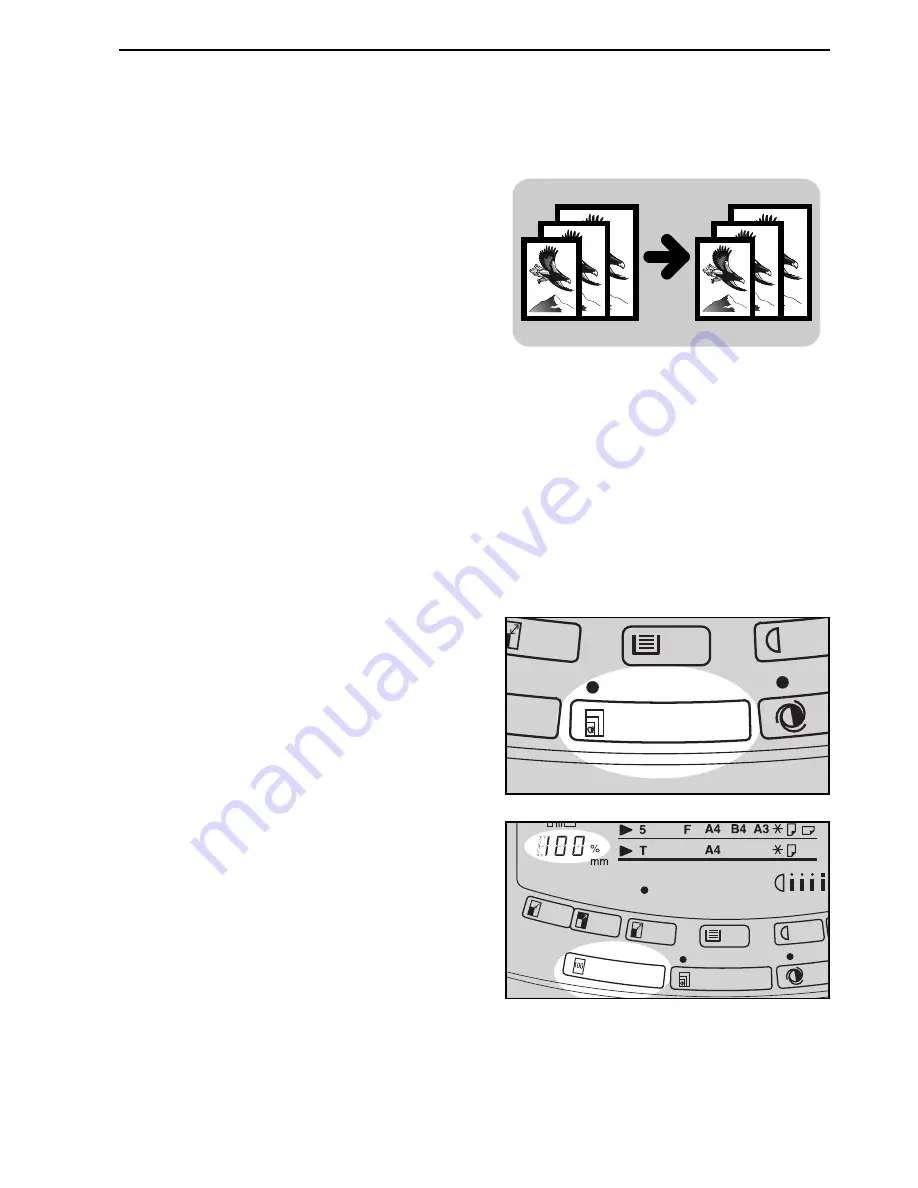
Example 1: When making full size copies

1

Make sure that the Auto Paper
Select
 indicator is lit. If not, press
the Auto Paper Select key.

2

Make sure that the magnification
ratio is set to 100%. If not, press
the Full Size key. 

3

Set your original on the exposure
glass or in the optional document
feeder. 

 See page 31, 32 or 34.

4

Press the Start key.
The copier selects paper of the
same format and orientation as
the original.

e-eu-5

FREQUENTLY USED FUNCTIONS  

43

Summary of Contents for FT5035

Page 1: ...OBLEMS SAFETY INFORMATION When using your copier the following safety precautions should always be followed Safety During Operation In this manual the following important symbols are used R WARNING Ig...

Page 2: ...aser systems direct or indi rect reflected eye contact with the laser beam may cause serious eyes damage When the copier needs to be checked adjusted or repaired contact your service representative Do...

Page 3: ...ing fire or electric shock m Keep the copier away from humidity and dust A fire or an electric shock might occur Do not place the copier on an unstable or tilted surface If it topples over it could ca...

Page 4: ...WHERE IS IT WHAT IS IT 1...

Page 5: ...y With 1000 sheet large capacity tray and unit for two sided copying A 500 sheet tray A 1000 sheet large capacity tray A unit for two sided copying 500 sheet tray 500 sheet tray 500 sheet tray 1000 sh...

Page 6: ...ns Other options Platen cover in some areas key counter Document feeder 1500 sheet tray unit three 500 sheet trays 20 bin sorter 20 bin sorter stapler 10 bin sorter stapler 1000 sheet tray unit two 50...

Page 7: ...COPIER EXTERIOR AND INTERIOR 4 6 7 2 1 3 5 12 13 8 9 10 11 14 15 COPIER EXTERIOR AND INTERIOR 4...

Page 8: ...er Open to access the inside of the copier 9 500 sheet tray This tray can hold 500 sheets of copy paper 10 500 sheet tray This tray can hold 500 sheets of copy paper The model with a unit for two side...

Page 9: ...rations below and on the next page Then when you find paper tray s name ex 1st tray in this manual confirm which paper tray is pointed in the case of your copier With optional 1000 sheet tray unit Bas...

Page 10: ...nd tray 5th tray With large capac ity tray and unit for two sided copying LCT 1st tray unit for two sided copying With large capac ity tray unit for two sided copying and optional 1000 sheet tray unit...

Page 11: ...key Press to start copying Use to set the Auto Start See page 56 6 Clear Stop key Press to cancel the copy num ber entered While copying press to stop copying This key is also used to clear data 7 Num...

Page 12: ...53 20 Zoom Down key Reduces in 1 steps See page 53 21 Size Magnification key Copier sets the magnification for your paper and original sizes See page 54 or 10 Key Zoom key See page 53 22 Bypass Feed...

Page 13: ...er Indicates the number of cop ies Data display See pages 99 and 127 5 Max indicator See page 101 6 Halftone indicator See page 42 7 Manual Image Density indi cator See pages 41 and 101 8 Auto Reduce...

Page 14: ...er indicator See pages 98 and 106 15 Check Paper Path indicator See pages 98 and 109 16 Paper Size indicators Show the selected feed sta tion copy paper size and di rection 17 Bypass Feed indicator Se...

Page 15: ...de 5 Start key Press to start copying Use to set the Auto Start See page 56 6 Clear Stop key Press to cancel the copy num ber entered While copying press to stop copying This key is also used to clear...

Page 16: ...key Reduces in 1 steps See page 53 21 Size Magnification key Copier sets the magnification for your paper and original sizes See page 54 or 10 Key Zoom key See page 53 22 Bypass Feed key See page 49...

Page 17: ...92 4 Copy Counter Indicates the number of cop ies Data display See pages 99 and 127 5 Max indicator See page 101 6 Halftone indicator See page 42 7 Manual Image Density indi cator See pages 41 and 10...

Page 18: ...ndicator See page 47 14 Guidance Display 15 Check Paper Size indicator See page 100 16 Misfeed Location display See page 109 17 Add Staple indicator See pages 98 and 107 18 Load Paper indicator See pa...

Page 19: ...OPERATION PANEL 16...

Page 20: ...WHAT YOU CAN DO WITH THIS COPIER 17...

Page 21: ...opier choose the paper size Having the copier choose the reproduction ratios Copying originals of different sizes in the optional docu ment feeder Copying from the bypass feed table See page 43 See pa...

Page 22: ...d enlarging Entering copy job settings during the warm up period See page 52 Reducing and enlarging using preset ratios See page 56 Reducing and enlarging with the Zoom Up and Zoom Down keys Reducing...

Page 23: ...ng one sided copies from various originals See page 57 From 2 one sided originals to 1 one sided copy From 1 two sided original to 2 one sided copies From 2 facing pages to 2 one sided copies FUNCTION...

Page 24: ...front and back covers of the originals Adding a front cover sheet Adding front and back cover sheets Inserting copied slip sheets between OHP transparencies Copying the front cover of original and ad...

Page 25: ...of the copy image See page 72 Erasing the center margin of the original image Erasing the surrounding area of the original image Erasing the center margin and surround ing area of the original image...

Page 26: ...Adding margins for binding Storing your copy settings in memory See page 74 Margin for one sided copying Margin for two sided copying See page 76 FUNCTIONS 23...

Page 27: ...Making two sided copies See page 80 From an even number of one sided originals From an odd number of one sided originals From two sided originals From facing pages FUNCTIONS 24...

Page 28: ...Finishing See page 84 Sorting into sets 123 123 123 Stapling copies Stacking together all copies of a page 111 222 333 FUNCTIONS 25...

Page 29: ...your material for your clients you ll use the 20 bin multi position or 10 bin 20 bin sorter stapler options If you make copies following the procedure below sheets will be inserted between OHP sheets...

Page 30: ...sent from your classes for two days and you could not take notes you have to ask your friend to lend you his notebook to make copies of it Making 2 one sided copies from 2 facing pages Erasing the sur...

Page 31: ...ies Your copier has a large capacity tray and a unit for two sided copying and a 20 bin sorter Making two sided copies from an odd number of one sided originals Sorting into sets 123 123 123 Because y...

Page 32: ...SETTING ORIGINALS 29...

Page 33: ...riginals between 40 and 52 g m2 the document feeder must be set to Thin Original mode See page 139 Originals larger than A3 Originals smaller than B6 Originals smaller than B6 when you use Combine Ori...

Page 34: ...laten cover or the op tional document feeder 2 Set the original face down on the exposure glass The original should be aligned to the rear left corner 3 Lower the platen cover or the op tional documen...

Page 35: ...e 46 1 Correct any curl fold or crease in the originals before setting 2 Confirm that the Insert Original indicator is lit before setting the originals 3 Confirm that no previous originals remain on t...

Page 36: ...Do not stack originals above the limit mark SETTING A STACK OF ORIGINALS IN THE OPTIONAL DOCUMENT FEEDER 33...

Page 37: ...ator is lit before setting the originals 3 Confirm that no previous originals remain on the exposure glass 4 Adjust the guide to the original size 5 Set the original face up into the document feeder u...

Page 38: ...ext original The original is auto matically fed and copied If you have set two or more originals the Auto Feed indicator is not lit after the last original is fed In this case press the Start key agai...

Page 39: ...SETTING ONE ORIGINAL AT A TIME IN THE OPTIONAL DOCUMENT FEEDER 36...

Page 40: ...COPYING 37...

Page 41: ...In The Stand by Position 1 Turn on the main switch 2 Wait for the copier to warm up During the warm up period less than 250 seconds the u Wait indicator is on 3 After the warm up the v Ready indicato...

Page 42: ...document feeder Opening any covers Setting originals in the optional document feeder Opening or closing the bypass feed table Setting copy paper in the bypass feed table Pressing any key except the S...

Page 43: ...f copies re quired using the Number keys To change the number entered press the Clear Stop key then enter the new number 3 Confirm that the Auto Paper Se lect indicator is on If not press the Auto Pap...

Page 44: ...mage density If the Auto Image Density indi cator is lit the copier automat ically controls the image density If the indicator is not lit press the Auto Image Density key Regarding functions that cann...

Page 45: ...ion is suitable for copying photographic originals Regarding functions that cannot be used together with this function see page 94 1 Press the Halftone key 2 Adjust the image density using the Lighter...

Page 46: ...efore pressing the Start key If not the original size might not be detected correctly Regarding functions that cannot be used together with this function see page 94 Example 1 When making full size co...

Page 47: ...at the Auto Paper Select indicator is lit If not press the Auto Paper Select key 2 Select 71 using the Reduce key 3 Set your original on the exposure glass or in the optional document feeder See page...

Page 48: ...rectly make sure that the platen cover or optional document feeder is lowered before pressing the Start key If not the original size might not be detected correctly Regarding functions that cannot be...

Page 49: ...t the copier in this mode the copying speed becomes slower in some modes Regarding functions that cannot be used together with this function see page 94 The original guide must be adjusted to the larg...

Page 50: ...sheets before load ing Translucent paper should be fed from the bypass feed table Translucent paper should be fed so that the paper grain is oriented with the paper path Postcards should be fed from t...

Page 51: ...er guides to the pa per width and if necessary swing out the extender to support large size copy paper 5 Insert the copy paper into the by pass feed table Approximately 40 sheets of copy pa per 80 g m...

Page 52: ...ure glass lower the platen cover or optional document feeder before press ing the Start key Regarding functions that cannot be used together with this function see page 94 1 Follow the steps 1 to 5 on...

Page 53: ...e cop ier will stop the copy run and store the present settings in the memory The copier will return to the ready condition 2 Remove the previous original Set your original for interrupt copying on th...

Page 54: ...off the original table 4 Make your copies 5 After interrupt copying is com pleted press the Interrupt key The copier will recall the previous copy settings 6 Some originals in the exit stack step 2 w...

Page 55: ...enlarging using preset ratios Reducing Press the Reduce key to select the preset reducing ratios The reducing ratio will change as follows 93 82 75 71 65 50 Enlarging Press the Enlarge key to select...

Page 56: ...larging with the number keys 10 key Zoom Note Before using the 10 Key Zoom you have to change copier s default settings with the user tools See page 136 If you select the 10 Key Zoom the Size Magnific...

Page 57: ...e Recall Enter key Fitting the original to a copy of a different size Size Magnification Note If you select the 10 Key Zoom using the user tool you cannot use Size Magnification See page 53 The suitab...

Page 58: ...sing the Number keys Up to 999 mm can be entered To change the number entered press the Clear Stop key and enter the new number 3 Press the Recall Enter key 4 Enter the copy size using the Number keys...

Page 59: ...the Start key during the warm up period the v Ready indicator will blink then the copier will start copying after the warm up period Set your copy settings during warm up period then press the Start k...

Page 60: ...d be a multiple of two If not add a blank sheet to your originals Original sizes only that can be used are as follows A4 A5 B5 B6 Please refer to the following table when you select the copy paper siz...

Page 61: ...be placed upside down as shown in the illustration to make copies that read from left to right If you want to make copies that read from right to left set your originals as usual 3 Select the copy pap...

Page 62: ...l document feeder Regarding functions that cannot be used together with this function see page 94 1 Press the Single Copies key to light the 2 Sided Original indica tor 2 Set your originals in the opt...

Page 63: ...used together with this function see page 94 1 Press the Single Copies key to light the Book Original indicator 2 Start with the last page of your book original and work your way to the beginning Plac...

Page 64: ...ng original in the optional document feeder See page 32 or 34 3 Select the copy paper size using the Paper Selection key 4 Press the Start key 1 2 3 4 MAKING ONE SIDED COPIES FROM VARIOUS ORIGINALS Si...

Page 65: ...opy the back cover of the originals Set the copier with the user tools See page 135 If you do see page 63 Regarding functions that cannot be used together with this function see page 94 When you use t...

Page 66: ...nal document feeder See page 32 5 Press the Start key Copying The Front And Back Covers Of The Originals Note This function can be used only when your copier is equipped with the op tional document fe...

Page 67: ...Set paper for cover sheets in the bypass feed table Make sure to set paper that is identical in size and direction with the paper to which you are copy ing step 3 3 Select copy paper using the Pa per...

Page 68: ...Regarding functions that cannot be used together with this function see page 94 1 Press the Cover Slip Sheet key to light the Blank Cover indica tor 2 Set paper for cover sheets in the bypass feed tab...

Page 69: ...e user tools See page 135 If you do not select this setting only the front cover is added See page 65 Regarding functions that cannot be used together with this function see page 94 1 Press the Cover...

Page 70: ...unction can be used only when your copier is equipped with the op tional document feeder Note You can select this setting with the user tools See page 135 If you do not select this setting only the fi...

Page 71: ...e to set paper that is identical in size and direction with the paper to which you are copy ing step 3 3 Select copy paper using the Pa per Selection key You cannot select the large capacity tray 4 Se...

Page 72: ...ee page 94 1 Set the slip sheets in the 500 sheet paper tray Do not set the slip sheets in the large capacity tray 2 Set the OHP transparencies in the bypass feed table You can set ten sheets at a tim...

Page 73: ...eets Between OHP Transparencies OHP Blank Slip Sheet Note You can select this setting with the user tools See page 140 If you do not select this setting original images are copied onto slip sheets See...

Page 74: ...nned to get air between the sheets before loading 3 Press the Cover Slip Sheet key to light the OHP Slip Sheet indi cator 4 Using the Paper Selection key select the paper tray where you have set the s...

Page 75: ...ent key See page 136 In this case this function cannot be used Erasing The Center Margin Of The Original Image Erase Center Erasing The Surrounding Area Of The Original Image Erase Border Erasing The...

Page 76: ...ing functions that cannot be used together with this function see page 94 1 Press the Erase key once to se lect the Erase Center twice to select the Erase Border or three times to select both of them...

Page 77: ...cting Margin Adjustment put the sticker key name sheet for Margin Adjustment on the operation panel The sticker is enclosed as an accessory The width of the margin can be changed with the user tools S...

Page 78: ...from left to right 1 Press the Duplex key to set the copier to make two sided copies See pages 80 83 2 Press the Margin Adjustment Erase key once to set the left margin for the front side and the rig...

Page 79: ...ogram key again 3 While pressing the Recall Enter key press the Number key 1 2 3 4 or 5 that you want to store settings in PE will be displayed on the copy counter while holding the Recall En ter key...

Page 80: ...key press the Number 0 key Deleting Your Protected Settings You can delete the settings that are stored in the protected program number 1 Press the Program key 2 Hold down the Recall Enter key and pr...

Page 81: ...If you enter a program number not registered EP will be displayed on the copy counter while holding the Number key If you recall a protected program number P1 P2 P3 P4 or P5 is dis played on the copy...

Page 82: ...e protection from press the Clear Stop key While holding the Number key the program number P1 P2 P3 P4 or P5 to be unprotected appeared in the copy counter The settings remain as they were but are no...

Page 83: ...105 g m2 Up to 50 copies 64 80 g m2 paper can be made at one time If you use A3 81 105 g m2 paper 30 copies can be made at one time Regarding functions that cannot be used together with this function...

Page 84: ...3 Press the Start key From An Odd Number Of One Sided Originals 1 Sided Originals odd A right margin of 5 mm is set on the back side automatically If you select the Odd Number setting when you have a...

Page 85: ...als 3 Press the Start key From Two Sided Originals 2 Sided Original Note It is recommended to use this function with the optional document feeder 1 Press the Duplex key to light the 2 Sided Original i...

Page 86: ...l indicator 2 Start with the last page of your book original and work your way to the beginning Place the original face down on the exposure glass and align the last page with the left scale Or set th...

Page 87: ...um paper size B5 A5 B5 A5 B5 A5 B5 A5 Maximum paper weight 157 g m2 157 g m2 157 g m2 90 g m2 Minimum paper weight 52 g m2 52 g m2 52 g m2 52 g m2 Maximum capacity of bins 50 copies A4 or smaller 30 c...

Page 88: ...on can be used only when your copier is equipped with the op tional 10 bin sorter stapler 20 bin sorter stapler or 20 bin multi position sorter stapler If you select Stapling Sorting is automatically...

Page 89: ...d orientation 20 bin multi position sorter stapler only Original setting in the optional document feeder Copies 20 bin sorter stapler Original setting in the optional document feeder Copies R R R R R...

Page 90: ...hen your copier is equipped with the 20 bin multi position sorter stapler you can also change the staple position using the Staple Position key See pages 88 and 89 For Stapling the following limitatio...

Page 91: ...s equipped with the 20 bin multi position sorter stapler select the staple position using the Staple Position key 3 Set originals in the optional docu ment feeder See page 32 4 Press the Start key Sta...

Page 92: ...cator stops blinking 5 After copying is completed press the Sorter key before the Staple indicator stops blinking The Staple indicator blinks for about 20 seconds You can change this time using the us...

Page 93: ...4 A3 A4 A3 A4 Minimum paper size B5 A5 B5 A5 B5 A5 B5 A5 Maximum paper weight 157 g m2 157 g m2 157 g m2 90 g m2 Minimum paper weight 52 g m2 52 g m2 52 g m2 52 g m2 Maximum capacity of bins 50 copies...

Page 94: ...ke your copies 3 To prevent from others from mak ing copies using your user code press the Clear Stop and Clear Modes Energy Saver key simul taneously after copying Regarding user codes see page 142 T...

Page 95: ...pages 133 and 134 Your service representative can select one of two levels for the saving ratio See page 149 The greater the saving ratio the more time the copier will need to return to the ready con...

Page 96: ...SAVING ENERGY 93...

Page 97: ...10 Key Zoom 10 From Even One sided Originals 11 From Two sided Originals 12 From Book Original 13 From Odd One sided Originals 14 From Two sided Original 15 From Book Original 16 From 2 One sided Ori...

Page 98: ...hers 14 15 16 17 18 19 20 21 22 23 24 25 26 27 28 29 30 1 2 3 4 5 6 7 8 9 10 11 12 13 14 15 16 17 18 19 20 21 22 23 24 25 26 27 28 29 30 Erase Reduce Enlarge Two sided copies Finishing Cover Slip Shee...

Page 99: ...COMBINATION CHART 96...

Page 100: ...WHAT TO DO IF SOMETHING GOES WRONG 97...

Page 101: ...o not come out at all After loading a new staple cartridge staples might not be ejected the first few times you try to use the stapler There are jammed staples in the stapler Remove the jammed staples...

Page 102: ...the copier s side cover or large capacity tray U code is displayed on the copy counter U2 The copier is set for user codes Enter your user code 3 digits Insert the optional key counter U6 Set the fus...

Page 103: ...You cannot select the copy paper for the book originals Select copy paper You cannot select Auto Reduce Enlarge You cannot select Cover mode You cannot select Auto Paper Select When adding cover or sl...

Page 104: ...d correctly Use originals of a standard size If you use translucent or transparent originals or originals with tags the original size might not be detected correctly Do not use such originals Max indi...

Page 105: ...t is dirty Clean them See pages 154 and 155 The reverse side of an original image is copied The image density is too dark Adjust the image density See page 41 Copies are too light The original has a l...

Page 106: ...d paper with the copy side down in the 500 sheet trays and with the copy side up in the large capacity tray If copies are curled try turning the copy paper over in the tray If there is no improvement...

Page 107: ...n The 500 sheet Tray 1 Pull out the paper tray until it stops 2 Load paper in the paper tray Do not stack paper above the limit mark inside the paper tray 3 Push the tray in until it stops d IS LIT LO...

Page 108: ...ottom plate The key will blink while the bottom plate is moving down If the key is lit or blinking proceed to step 2 2 After the Down key stops blinking and lights open the cover 3 Load paper into the...

Page 109: ...of the used toner containers according to local regulations for plastics NOTE When adding toner do not turn off the main switch If you do your copy settings are cleared NOTE Before setting the new ton...

Page 110: ...cartridge inside the front door as shown in the illustration 3 Add the new staple cartridge fol lowing the instructions on the sticker If Your Copier Is Equipped With The 20 bin Sorter Stapler If any...

Page 111: ...rter Stapler If any staples extend from the mouth of the new staple cartridge after removing the plastic clip from the cartridge push them back into the cartridge 1 Open the front cover of the sorter...

Page 112: ...ch If you do your copy settings are cleared NOTE After clearing misfeeds make sure that all units and levers are returned to their original positions and all covers are closed NOTE Do not touch origin...

Page 113: ...heet or 1500 sheet tray unit 2 You can find a sticker with Y at the top explaining how to re move misfed paper inside the front cover as shown in the illus tration 3 Remove misfed paper following the...

Page 114: ...th Y at the top explaining how to re move misfed paper on the cover of the sorter stapler as shown in the illustration 2 Remove the misfed paper follow ing the instructions on the sticker If your copi...

Page 115: ...of the sorter 2 You can find a sticker with Y at the top explaining how to re move misfed paper on the back side of the cover of the sorter as shown in the illustration 3 Remove the misfed paper foll...

Page 116: ...r on the optional document feeder as shown in the illustration 2 Remove the misfed original refer ring to the sticker 3 The number of originals that should be reset is displayed in the Three Digit ind...

Page 117: ...er 2 You can find a sticker with at the top explaining how to re move jammed staples inside the front door as shown in the illus tration 3 Remove the jammed staples fol lowing the instructions on the...

Page 118: ...e instructions on the sticker If Your Copier Is Equipped With The 10 bin Sorter Stapler 1 Open the front cover of the sorter stapler 2 You can find a sticker with on the tab explaining how to re move...

Page 119: ...REMOVING JAMMED STAPLES 116...

Page 120: ...CHANGING THE COPIER S SETTINGS 117...

Page 121: ...come upon the paper tray s name e g 1st tray as used for example in the user tools section of this manual check the instructions to see which paper tray is applicable to your copier The trays for the...

Page 122: ...th large capacity tray and unit for two sided copying LCT 1st tray unit for two sided copying With large capacity tray and optional 1500 sheet tray unit LCT 3rd tray 4th tray 1st tray 2nd tray With la...

Page 123: ...arge capacity tray You can select paper of the following size A3 B4 A4 B5 A5 81 2 x 11 11 x 17 81 2 x 13 The 1st tray can accept sizes other than those above Contact your service repre sentative For d...

Page 124: ...t stack paper over the limit mark 6 While pressing the release lever on the front guide slide the front and rear guides to the paper size you want to use 7 Select the paper size by adjusting the paper...

Page 125: ...Setting Paper size you can set 3rd tray 1 A3 4th tray 3 A4 5th tray 3 A4 Bypass feed table 0 Paper size the copier detects With 1000 sheet large capacity tray and unit for two sided copying Paper fee...

Page 126: ...8 x 13 9 81 2 x 13 10 81 4 x 13 11 81 2 x 11 12 81 2 x 11 13 267 x 390 mm 14 195 x 267 mm 15 195 x 267 mm Bypass feed table The bypass feed table can be set to only one size Setting Paper size you ca...

Page 127: ...12 when you change the paper size of the optional paper tray 1 Pull the paper tray out until it stops 2 Remove the copy paper 3 Remove the left guide as shown in the illustration 4 Set the left guide...

Page 128: ...on the front guide slide the front and rear guides to the paper size you want to use 7 Press the Clear Modes Energy Saver key 8 Press the Clear Stop key until the copy counter blinks 9 Confirm that 1...

Page 129: ...or will be lit B Enter the required setting paper size using the Number keys and press the Recall Enter key See page 123 for the settings pa per size Example Paper size Setting A3 1 A4 3 A4 4 C To exi...

Page 130: ...the Clear Stop key until the copy counter blinks 3 Enter the required user tool s number using the Number keys For the user tool s number refer to pages 130 to 148 Example 1 Paper size set If you inpu...

Page 131: ...unter 2 The default setting will blink in the Three Digit indicator Enter the required setting using the Num ber keys For the settings refer to pages 130 to 148 If you input a wrong number press the C...

Page 132: ...4 To exit the user tools press the Clear Modes Energy Saver key twice 2 3 C USER TOOLS 129...

Page 133: ...witch or auto reset is turned on or after pressing the Clear Modes Energy Saver key You can cancel this setting and select another tray For how to change the paper tray see page 128 Basic Default 1st...

Page 134: ...rity selection As a default setting Auto Paper Select is on You can cancel this setting For how to change modes see page 128 Default Yes APS priority is selected Setting 1 Setting Mode 0 No APS priori...

Page 135: ...Yes Auto tray shift is selected Setting 1 Setting Definition 0 No Auto tray shift is not selected 1 Yes Auto tray shift is selected 6 Counter up down The copy counter can be set to show the number of...

Page 136: ...e unit for two sided copying There are originals in the optional document feeder When the copier detects anyone operating it While waiting for Auto Start While accessing the user tools When the u Wait...

Page 137: ...ey is pressed or since the copier detects anyone who operates the copier As a default setting this function is turned off To turn it on contact your service representative To exit the Auto Off see pag...

Page 138: ...ted to lighter or darker For how to change settings see page 128 Default Normal Setting 2 Setting Definition 0 Darker 1 Dark 2 Normal 3 Light 4 Lighter 13 Cover mode selection You can select to have a...

Page 139: ...128 Default Erase Setting 1 Setting Mode 1 Erase 2 Shift Margin Adjustment 15 10 key zoom size magnification You can switch to the 10 Key Zoom function instead of the Size Magnifica tion function For...

Page 140: ...ecall Enter key 2 You will find 1 blinking in the copy counter Select the required number see below using the Zoom Up or Zoom Down keys No Mode 1 When making a left margin on front side of copies 2 Wh...

Page 141: ...can adjust the center margin width in Erase Center mode The erased center margin changes a little depending on the paper size you use For how to change settings see page 128 Default 20 mm Setting 20 S...

Page 142: ...page 128 Default 5 seconds Setting 5 Setting Definition 1 1 second 99 99 seconds 22 Thick Thin original mode selection In thin original mode thin originals lighter than 52 g m2 are not damaged when be...

Page 143: ...he language used for the guidance display messages can be selected from the following This function can be used only when you have a model with the large capacity tray and unit for two sided copying T...

Page 144: ...nal copy is made after the last time any key is pressed or after the copier last detects anyone who operates the copier If a 60 second reset time is not appropri ate you can change this time For detai...

Page 145: ...Energy Saver key simultaneously after copy ing 23 User code counter check You can check the number of copies made using each user code How to check the copy count 1 Access user tool 23 See page 127 2...

Page 146: ...the total copy quantity made under this user code are displayed in the Three Digit indi cator Example when 123456 copies are made under one user code 456 is displayed in the Three Digit indicator whi...

Page 147: ...page 127 2 Confirm that 1 blinks on the copy counter If you find 2 is blinking press the Zoom Down key 1 will blink on the copy counter 3 Enter the user code for which you want to reset the counter I...

Page 148: ...How to reset all user code counters 1 Access user tool 24 See page 127 2 Press the Zoom Up key to display 2 on the copy counter 3 Press the Recall Enter key j Max 0 R USER TOOLS 145...

Page 149: ...o 50 user codes can be registered How to register user codes 1 Access user tool 25 See page 127 2 Enter the user code with the Number keys If you input the wrong code press the Clear Stop key Then inp...

Page 150: ...2 Confirm that 1 blinks on the copy counter If 2 blinks press the Zoom Down key 1 will appear on the indica tor 3 Enter the user code you want to delete If you input the wrong code press the Clear Sto...

Page 151: ...all the user codes 1 Access user tool 26 See page 127 2 Press the Zoom Up key to display 2 on the copy counter 3 Press the Recall Enter key The counters for all user codes are also deleted j Max 0 R U...

Page 152: ...n APS A5 detection Your service representative can set the copier to detect the original size that is set on the exposure glass as A5 whenever the copier cannot detect it with Auto Paper Select APS si...

Page 153: ...ded originals Your service representative can cancel this setting If you use the Margin Adjustment function this setting does not come in effect Auto off mode With this function all input modes are re...

Page 154: ...h a default setting the first page of your copies will be delivered with one side blank when making two sided copies in the following conditions When you set odd number of originals in the optional do...

Page 155: ...25 sheets of paper when you have 20 bin sorter stapler or 10 bin sorter stapler regardless of paper size Staple position adjustment When your copier is equipped with the optional 20 bin multi positio...

Page 156: ...MAINTAINING YOUR COPIER DO S AND DON TS WHERE TO PUT YOUR COPIER REMARKS USE AND STORAGE OF SUPPLIES 153...

Page 157: ...following parts and units regularly Copier Exposure glass Clean the exposure glass with a damp cloth and wipe it with a dry cloth Platen cover option in some areas Clean the platen cover with a damp...

Page 158: ...eed in unit Clean the original table and origi nal guide with a damp cloth and wipe it with a dry cloth Belt Lift the document feeder Clean the belt with a damp cloth and wipe it with a dry cloth MAIN...

Page 159: ...ighing more than 10 kg on the exposure glass Do not place tools or other hard objects on the exposure glass Keep corrosive liquids such as acid off the machine When adding toner When adding toner do n...

Page 160: ...ter Stapler and 10 bin Sorter Stapler Option Do not touch moving bins Do not remove copies from the bins while stapling 20 bin Multi position Sorter Stapler Option Do not remove copies from the bins w...

Page 161: ...within the cop ier Places where the copier might be subjected to frequent strong vibration Dusty areas Areas with corrosive gases Power connection Make sure the plug is firmly inserted in the outlet V...

Page 162: ...with the copy side up in the large capacity tray If copies are curled try turning the copy paper over in the tray If there is no improvement change to copy paper with less curl Leading and side edges...

Page 163: ...no improvement change to copy paper with less curl If you stack translucent paper or 52 g m2 paper in the proof tray not in Sort or Stack mode we recommend that the paper grain be oriented with the p...

Page 164: ...HP transparencies should be fanned to get air between the sheets before load ing Translucent paper should be fed from the bypass feed table Translucent paper should be fed so that the paper grain is o...

Page 165: ...emperature and low humidity conditions store paper in a vinyl bag Do not store paper where it will be exposed to heat Store on a flat surface Use older stock first Do not lay heavy objects on paper Ke...

Page 166: ...SPECIFICATIONS 163...

Page 167: ...500 sheet trays less than 53 mm for a tray One large capacity tray 1 000 sheets or less than 120 mm Bypass feed table 40 sheets or less than 4 mm With large capacity tray unit for two sided copy ing O...

Page 168: ...Full system Warm up 1 21 kW 1 23 kW Stand by 0 18 kW 0 20 kW Copying 1 15 kW 1 21 kW Maximum 1 35 kW 1 4 kW Full system Copier with document feeder 20 bin multi position sorter stapler and 1500 sheet...

Page 169: ...606 mm With document feeder and 20 bin multi position sorter stapler 1414 mm 655 mm 978 mm With document feeder and 20 bin sorter stapler 1278 mm 655 mm 692 mm With document feeder and 10 bin sorter...

Page 170: ...64 81 105 128 Maximum number of originals to be set 50 50 50 50 50 30 25 A3 A4 A5 B4 B5 B6 ARDF 2 sided originals ADF 1 sided originals SADF Single copies mode ARDF ADF SADF ADF SADF Single copies mo...

Page 171: ...ge 87 Proof tray capacity 250 sheets 80 g m2 Number of bins 20 bins proof tray Stapling position Staple replenishment Cartridge exchange 5 000 pieces cartridge Power source DC 24 V 10 from copier Powe...

Page 172: ...e page 87 Proof tray capacity 100 sheets 80 g m2 Number of bins 20 bins proof tray Stapling position Staple replenishment Cartridge exchange 2 000 pieces cartridge Power source DC 24V from copier Powe...

Page 173: ...acity 100 sheets 52 80 g m2 50 sheets 81 128 g m2 30 sheets 129 157 g m2 Number of bins 10 bins proof tray Stapling position Staple replenishment Cartridge exchange 2 000 pieces cartridge Power source...

Page 174: ...g See page 90 Bin capacity Sorting See page 84 Stacking See page 90 Proof tray capacity 100 sheets Number of bins 20 bins proof tray Power source DC 24V 5V from copier Power consumption Average 24VA W...

Page 175: ...20 x 632 x 390 mm Specifications are subject to change without notice 1500 SHEET TRAY UNIT OPTION Paper size See pages 122 and 123 Paper weight 52 105 g m2 Paper capacity 1 500 sheets 500 sheets 80 g...

Page 176: ...Path indicator 98 Check Paper Size indicator 100 Check Paper Size Direction indicator 101 Combine Originals 57 COPIER EXTERIOR AND INTERIOR 4 5 copies enlarged 52 copies reduced 52 copies two sided 24...

Page 177: ...Environment 157 Power Connection 158 Interrupt Copying 19 50 K keys Basic 8 With 1000 sheet LCT 8 With 1000 sheet LCT unit for 2 sided copy 12 L LCT 1000 sheet large capacity tray 5 Load Paper indica...

Page 178: ...INAL AT A TIME IN THE DF 34 36 SETTING ORIGINALS 29 SETTING ORIGINALS ON THE EXPOSURE GLASS 31 Single Copies 20 57 61 from 1 two sided original 59 from 2 facing pages book original 60 from 2 one sided...

Page 179: ...ode 39 User code number set 146 user codes 39 91 142 user tool menu 130 user tools 127 148 user tools accessing 127 user tools changing values 128 W WARNING i WARNINGS ii With 1000 sheet large capacit...

Reviews: