


A-6
Safety Information
When Installing and Relocating the Printer
Power Specifications
Power Cords
Ensure that the plug connection is free of dust. In a damp environment, a contaminated
connector can draw a non-negligible amount of current that can generate heat and
eventually cause a fire over an extended period of time.
To prevent the risk of electric shocks and personal injury, fire, and printer damage:
Always use the power cord provided with your printer. When an extension power
cord is required, always use a properly rated cord.
If the power cord is not provided, use the following types of power cords:
For North America:
3 wires, Type SJT 3x16 AWG (3x1.33 mm
2
) or thicker
Rated min. 250V/10A (with grounding plug, NEMA 6-15P).
For Europe
3 wires, min. 3x1.5 mm
2
Harmonized (<HAR>), Rated min. 250V/10A (with grounding plug).
Do not attempt to rework, pull, bend, chafe, or otherwise damage the power cord.
Do not place a heavy object on the cord.
Never touch a power cord with wet hands.
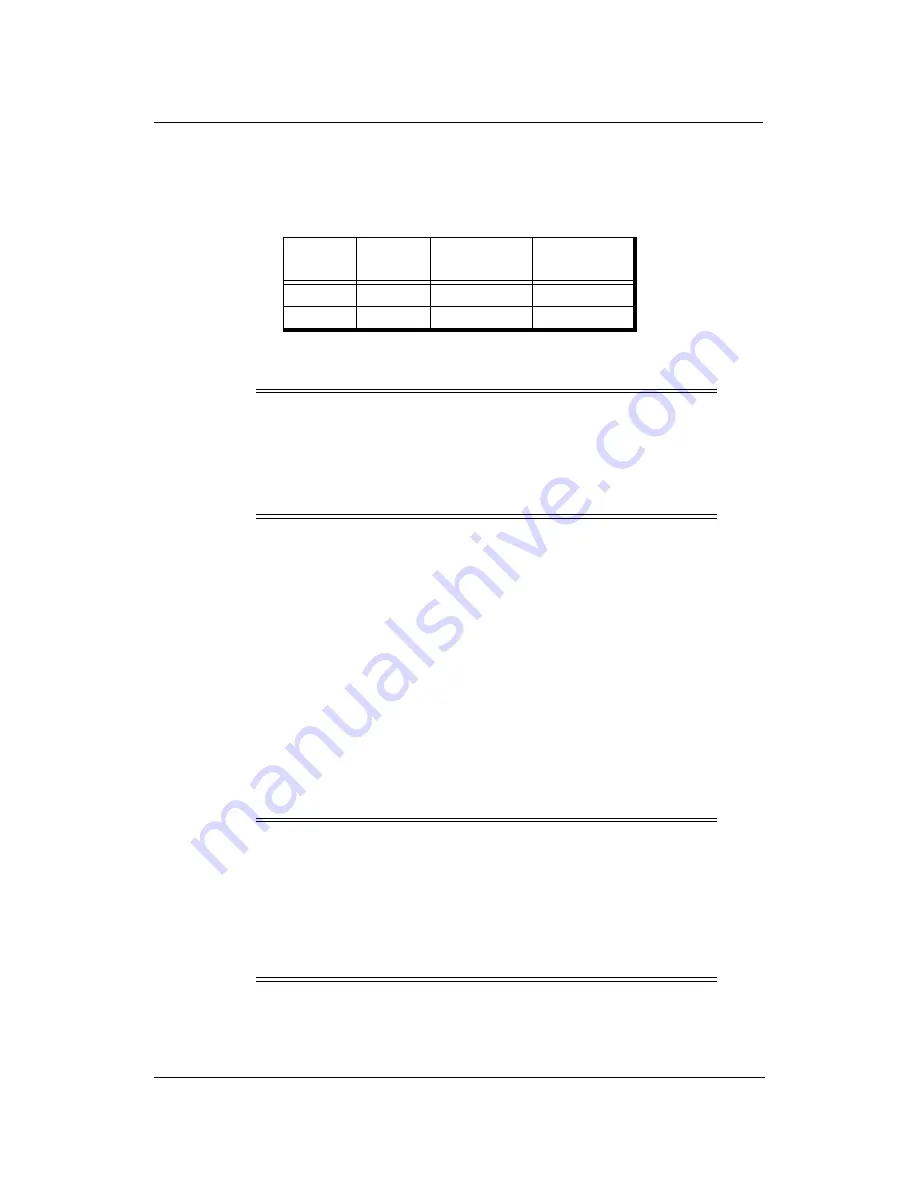
Printer
Model
Rated
Voltage
Rated
Frequency
Rated Current
70 ppm
200-240V
50/60 Hz
10A
92 ppm
200-240
50/60
12A
WARNING!
Connect the power plug only to a properly rated power outlet. Otherwise,
a fire or shock hazard may result.
Never use multi-plug adaptors to plug multiple power plugs into the same
power source. Be sure to operate the printer on a sole-use receptacle.
Multiple connectors can cause overheating and a fire could result.
WARNING!
The printer must be connected to the grounding power outlet for safe and
proper operation.
Apparatet må kun tilkoples jordet stikkontakt.
Apparaten skall ansulatas till jordat uttag när den ansluts till ett nätverk.
Für einen sicheren und ordnungsgemäßen Betrieb muß der Drucker an
eine geerdete Steckdose angeschlossen werden.
Summary of Contents for DDP70E-92
Page 46: ...3 10 Paper Handling 3 Push down the paper tray 4 Set the paper onto the tray...
Page 56: ...3 20 Paper Handling...
Page 88: ...4 32 Care and Maintenance...
Page 112: ...A 2 Safety Information...
Page 124: ...B 4 Printer Specifications...
Page 144: ...C 20 Paper Specifications...