Ricoh Aficio 2105 Operating Instructions Manual Download Page 51

Procedure for Sending E-mail

45

4

Procedure for Sending E-mail

Data is sent after specifying scan set-
tings and the destination.
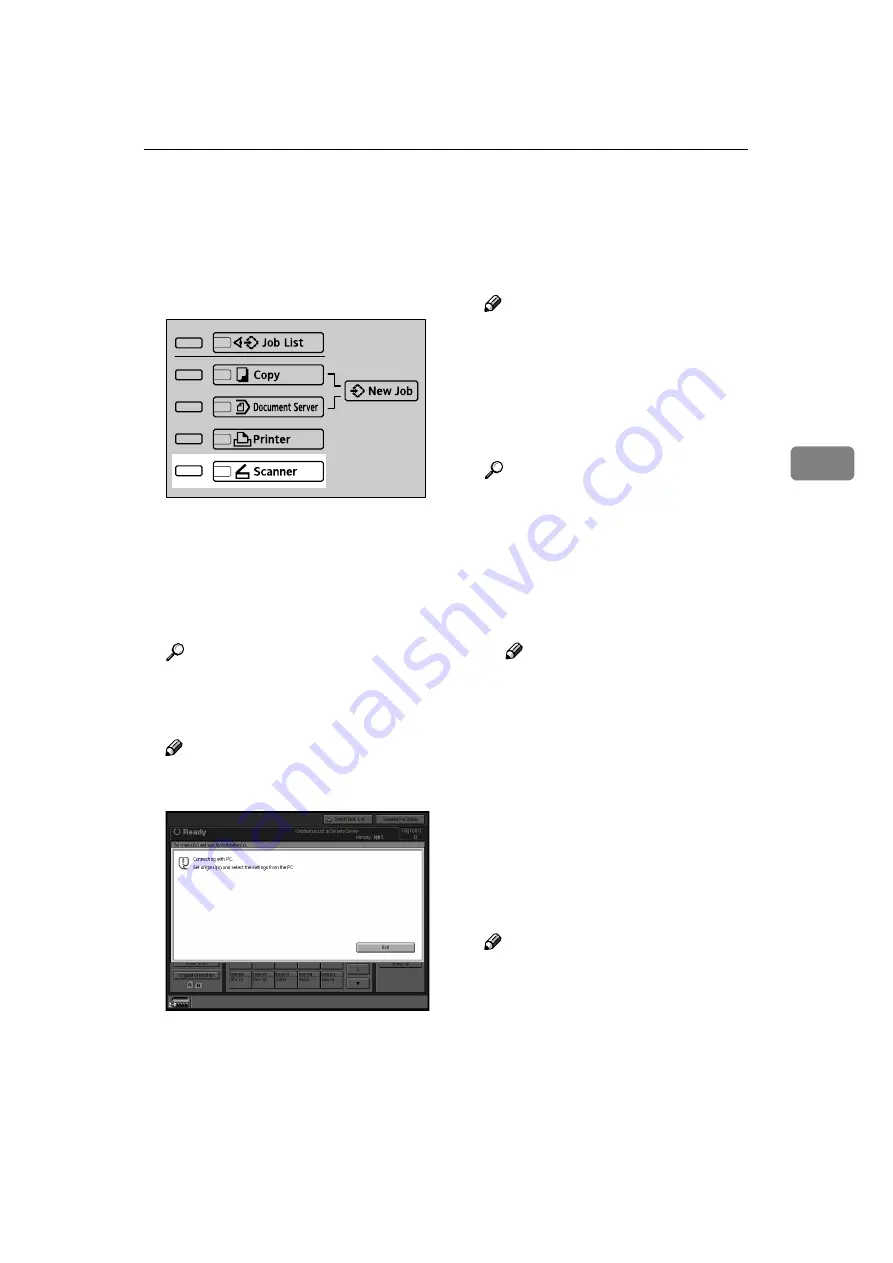
AAAA

Press the 

{{{{

Scanner

}}}}

 key.

BBBB

If user codes are set, enter a user
code with the number keys, and
then press the 

{{{{

#

}}}}

 key.

The Scanner Function screen ap-
pears.

Reference

For information about user
c odes, see 

Gene ral Settings

Guide

.

Note

If the Network TWAIN Scanner
screen appears, press 

[

Cancel

]

.

CCCC

Make sure that no previous set-
tings remain.

Note

If a previous setting remains,
press the 

{{{{

Clear Modes

}}}}

 key.

DDDD

Place the original in the machine,
and then adjust the settings for
original size and orientation if re-
quired.

Reference

p.33 “Setting Originals”

EEEE

If the network delivery scanner
screen appears, switch to the
screen for sending e-mail.

A

Press 

[

Switch Dest. List

]

.

The E-mail screen appears.

Note

If the destination or the send-
er name is specified, the net-
work delivery scanner screen
cannot be switched to the
screen for sending e-mail.

FFFF

Select the destination.

There are four ways to select a des-
tination: selecting it from the list,
selecting it by specifying a short ID
number, entering the e-mail ad-
dress directly, or searching for the
destination and selecting it.

Note

Before selecting the destination,
be sure to select 

[

To

]

. When nec-

essary, select 

[

Cc

]

 or 

[

Bcc

]

 and

the respective destinations.

You can select up to 500 destina-
tions at once.

ZJDS342N

Summary of Contents for Aficio 2105

Page 1: ...sure to read the Safety Information in the General Settings Guide before you use it Network Scanner Preparations for Use as a Network Scanner Setting Originals Sending Stored Scan Data by E mail Using...

Page 2: ...rated Ethernet is a registered trademark of Fuji Xerox Corporation Pentium is a registered trademark of Intel Corporation MS Microsoft and Windows are registered trademarks of Microsoft Corporation Ot...

Page 3: ...er function Printer Reference 1 Describes system settings and operations for the machine s printer function Printer Reference 2 PDF file CD ROM1 Describes operations functions and troubleshooting for...

Page 4: ...ile CD ROM2 Describes the installation of ScanRouter V2 Lite settings and the operating environment for ScanRouter V2 Lite in detail This guide can be displayed from the Setup dialog box when ScanRout...

Page 5: ...3 Software for Using a Network TWAIN Scanner 25 Software for Using the Network Delivery Scanner Function 26 DeskTopBinder V2 Lite 27 Software Supplied on CD ROM 28 3 Setting Originals Placing Original...

Page 6: ...Information 82 7 Using the Network TWAIN Scanner Function Preparation for Using the Network TWAIN Scanner 85 Scanning Originals 86 Functions of the TWAIN Driver 88 8 Appendix Relationship between Reso...

Page 7: ...red before op erating Note This symbol indicates precautions for operation or actions to take after misoper ation Limitation This symbol indicates numerical limits functions that cannot be used togeth...

Page 8: ...r Scanner Unit Type 2105 printer scanner controller The following software products are referred to using a general name DeskTopBinder V2 Lite and DeskTopBinder V2 Professional DeskTop Binder V2 Lite...

Page 9: ...tored Scan Data by E mail 1 This machine A scanned image that is attached to an e mail can be delivered to an e mail server In combination with the document stor age function scanned images and docu m...

Page 10: ...be stored and then delivered 2 Delivery server ScanRouter V2 Lite Professional is in stalled in this computer which is used as a delivery server Received data is delivered to the in tray of the specif...

Page 11: ...using the user name or the document name Also others can be kept from viewing a document by setting a password for the document Reference p 69 Using the Document Server Function 1 This machine The dat...

Page 12: ...less LAN Originals can be scanned with the same operation used for SCSI and USB connected scanners Reference p 85 Using the Network TWAIN Scanner Function 1 This machine The scanning function of the m...

Page 13: ...ey Press to check the current settings 3 Energy Saver key Press this key for about one second to be gin warm up Pressing this key again while in warm up mode cancels warm up Note This key is inactive...

Page 14: ...ey Use to change default or operation pa rameters according to the operating con ditions 14 Display panel Displays the operation status and mes sages Display Contents This section describes the normal...

Page 15: ...etwork TWAIN Scanner screen appears press Cancel Reference For information about Destination List Priority see p 17 Scanner Settings Using e mail Press the Scanner key to display the E mail screen whe...

Page 16: ...Network Scanner 10 1...

Page 17: ...k Guide Initial Scanner Setup This section explains all required settings and procedures for using the machine as a network scanner Default Settings The settings for using the network scanner function...

Page 18: ...Priority Delivery Server Select Title Title 1 Sender s Name Default No Max E mail Size 2048KB Divide Send E mail Yes per Max Size E mail Informa tion Language American English File Type Priority Multi...

Page 19: ...alue Gray Scale For originals containing photo graphs and other pictures multi value Note An image is scanned in black white with Photo and in gray scale with Gray Scale As a gen eral rule scanning fo...

Page 20: ...t tings E E E E Enter the name and then press OK Reference For information about entering characters see General Settings Guide The screen for the basic settings appears F F F F Select a value for eac...

Page 21: ...r the scan size on the Basic Settings tab B B B B Enter the original size with the number keys Select and enter values for X1 and Y1 C C C C Enter the scan starting point in re lation to the standard...

Page 22: ...3 and Y3 is shown in the Custom Size field and then press OK G G G G Press Exit H H H H Press Exit The main menu reappears Deleting programed scan settings A A A A Press the User Tools key B B B B Pre...

Page 23: ...ork TWAIN scanner function When Immediate is selected the machine will switch to the net work TWAIN scanner function at once When Set Time is selected you can enter the delay time with the number keys...

Page 24: ...ts the size match that setting Divide Send E mail This function is effective only when On is selected for Max E mail Size Select whether or not an image ex ceeding the size specified in Max E mail Siz...

Page 25: ...original is inserted or the key is pressed If On is selected enter the number of seconds 3 900 for the Job Reset Time in Adding Original with the number keys When an original is placed within this ti...

Page 26: ...ect the default for original placement orientation When orig inals are always positioned the same way select that orientation as the default to make operation easier Reference p 37 Original Orientatio...

Page 27: ...ail If you often send files with similar con tent storing subject names will allow you to easily select a subject for deliv ery The subject can be up to 20 characters long Up to 21 subjects can be sto...

Page 28: ...y B B B B Press Scanner Features C C C C Press the Subject Settings tab D D D D Press Delete E E E E Select the subject you want to de lete A confirmation message appears F F F F Press Yes G G G G To...

Page 29: ...in Windows 95 98 Me Windows XP Windows 2000 or Windows NT 4 0 the installer starts automati cally Auto Run to install the TWAIN driver and various software Note Auto Run might not automatically work w...

Page 30: ...CD ROM Installation Sequence The installer starts up The installation complete message is displayed Select thesoftware Insert the CD ROM Restart your PC TWAIN Driver TWAIN Driver Ver 3 ScanRouter V2...

Page 31: ...eled Scanner Driver Document Management Utilities into the CD ROM drive of the client com puter The Choose Setup Language screen appears Reference If the installer does not start au tomatically see p...

Page 32: ...the supplied CD ROM labeled Scanner Driver Document Management Utilities into the CD ROM drive of the client computer The Choose Setup Language screen appears B B B B Select a setup language and then...

Page 33: ...s into the CD ROM drive of the client computer The Choose Setup Language screen appears B B B B Select a language and then click OK The CD ROM Launcher screen appears C C C C Click DeskTopBinder V2 Li...

Page 34: ...his driver is not available CPU Pentium or faster Pentium 150 MHz or faster recommended Operating system Microsoft Windows 95 Microsoft Windows 98 Microsoft Windows Millennium Edition Microsoft Window...

Page 35: ...e viewed Reference See the manuals for DeskTopBinder V2 Lite or DeskTopBinder V2 Lite Help File storage folder The files are stored in the following folder on the CD ROM provided with this machine UTI...

Page 36: ...omputers on the same network Reference See the manuals for ScanRouter V2 Lite or ScanRouter V2 Lite Help File storage folder The files are stored in the following folder on the CD ROM provided with th...

Page 37: ...dition to the space required for installation the hard disk should have at least 500 MB of free space for files Network protocol TCP IP Software installed with ScanRouter V2 Lite ScanRouter V2 Adminis...

Page 38: ...Preparations for Use as a Network Scanner 32 2...

Page 39: ...combination of original orientation and the orien tation specified on the control panel or scanner driver does not change Specifying Original Orientation and Setting Originals An original to be scanne...

Page 40: ...he original on the exposure glass with the side to be scanned facing down Align the original with the back left corner mark such as the following illustration Reference p 33 Placing Originals When pla...

Page 41: ...nd cannot be placed in the ADF see Copy Reference Attempting to use unsuitable orig inals in the ADF can lead to a mis feed and damage to the originals Place such originals directly on the exposure gl...

Page 42: ...acement Note Originals with different sizes can be placed at the same time Place the originals as shown in the figure below Originals are scanned in the in serted order starting with the topmost page...

Page 43: ...ion screen make settings for one sided two sided combination original feed type original orientation and mixed original sizes Note The defaults can be changed us ing the initial scanner settings Origi...

Page 44: ...check that SADF or Batch is selected Note Select SADF for adding orig inals one by one or select Batch for adding the origi nals in batches Select whether SADF or Batch is displayed using the initial...

Page 45: ...current settings are dis played with characters and icons For a Network TWAIN Scanner A A A A Open the Scanner Properties dia log box Reference p 86 Scanning Originals B B B B Select the position from...

Page 46: ...p 33 Placing Originals C C C C Make settings for original feed type and original orientation Reference p 37 Original Orientation and Scan Area Note When placing originals on the exposure glass if On...

Page 47: ...G G G G Repeat from step F F F F until all origi nals are scanned H H H H If there are no more originals press the key Note Originals are scanned in order Place them from the first page When SADF is...

Page 48: ...Setting Originals 42 3...

Page 49: ...rver to be used and the software to be installed To send an e mail the preparation described below is required Connect the machine to the network with an Ethernet cable or IEEE 1394 optional cable or...

Page 50: ...tination that is not listed press Manual Input and then enter the destination with the soft keyboard 5 Switch Dest List Press to switch a destination from the de livery server list to the destination...

Page 51: ...ettings for original size and orientation if re quired Reference p 33 Setting Originals E E E E If the network delivery scanner screen appears switch to the screen for sending e mail A Press Switch De...

Page 52: ...the destination field and then press the Clear key Using a short ID number to select a destination A Press Registration No B Use the number keys to enter the five digit short ID number that has been a...

Page 53: ...stination in the destination field and then press the Clear key Searching for a destination to select There are two ways to search a destination searching it by desti nation name or index or searching...

Page 54: ...on the control panel lets you check the list of selected destinations G G G G Make the basic settings To make the basic settings recall stored settings or make the settings individually Reference p 13...

Page 55: ...ed the sender name is automatically placed in the From field of the e mail so that the sender can be identified when the e mail is re ceived To prevent misuse of a sender name we recommend you set up...

Page 56: ...alid D Press OK Using a short ID number to specify a sender name A Press Attach Sender s Name B Use the number keys to enter the five digit short ID number that has been assigned to a sender If the en...

Page 57: ...searching it by e mail address A Press Attach Sender s Name B Press Search C Press Destination Name To search using e mail address es press E mail Address The soft keyboard is displayed for entering...

Page 58: ...ng that the e mail has been read by the destination party is sent to the sender selected here Howev er if the mailing software used by the destination party does not support MDN Message Disposition No...

Page 59: ...of the divide e mail size setting it is not possible to send e mail containing a docu ment over 725 3MB It is also not possible to send a document with more than 2 000 pages Simultaneous Storage and...

Page 60: ...estination C C C C Make the scan settings D D D D Specify the sender scan data de livery source E E E E If required select a file format and a subject F F F F Press Store File G G G G Make sure Send S...

Page 61: ...tandby or has been sus pended A A A A Press Scanned File Status on the screen for sending e mail B B B B Check the displayed records Note One screen shows the records for 10 delivery operations Use U...

Page 62: ...Sending Stored Scan Data by E mail 56 4...

Page 63: ...th an Ethernet cable IEEE 1394 optional cable or connect to a wireless LAN op tional See Network Guide Check the network settings in System Settings and change if re quired See Network Guide Make sett...

Page 64: ...ng a destination that is not listed press Manual Input and then enter the destination with the soft keyboard that is displayed For information about sending e mail from the delivery server see the man...

Page 65: ...ns press the Clear Modes key D D D D Place the original in the machine and then adjust the settings for original size and orientation if re quired Reference p 33 Setting Originals E E E E If the E mai...

Page 66: ...ations re peat step B B B B Note To deselect a destination press the destination once more or press U U U UPrevious or T T T TNext to display the desti nation in the destination field and then press t...

Page 67: ...eference For information about how to enter characters see Gener al Settings Guide D Press OK E Select a destination F Press Exit Manual entry of a destination Note When using ScanRouter V2 Pro fessio...

Page 68: ...nations A Use the destination field at the top of the screen to check which destinations are select ed Note When multiple destinations are selected the selected des tinations are displayed in the orde...

Page 69: ...ect a sender selecting the sender from the list entering the five digit short ID number of the sender with the number keys and searching for the sender and selecting it Note When a sender has been spe...

Page 70: ...r name A Press Attach Sender s Name B Use the number keys to enter the five digit short ID number that has been assigned to a sender Example To enter 00006 Press the 6 key and then press the key Note...

Page 71: ...n about how to enter characters see Gener al Settings Guide E Press OK F Select a sender G Press Exit H Press OK I I I I If required select a subject Select a subject from the registered ones See p 21...

Page 72: ...ter the others have been scanned See p 40 Scanning Originals in Several Times Simultaneous Delivery and Storage You can use the network delivery scanner function with the Document Server Scanned data...

Page 73: ...E Press Store File F F F F Make sure Send Store is select ed G G G G If required specify a user name file name and password for the file to be stored Reference p 71 Specifying file informa tion H H H...

Page 74: ...tandby or has been sus pended A A A A Press Scanned File Status on the Network Delivery Scanner screen B B B B Check the displayed records Note One screen shows the records for 10 delivery operations...

Page 75: ...ommend the use of Desk TopBinder V2 Lite or DeskTopBinder V2 Professional optional For more in formation please contact your local dealer Note When a delivery server is added to the network data store...

Page 76: ...s press Cancel C C C C Make sure that no previous set tings remain Note If a previous setting remains press the Clear Modes key D D D D Place the original in the machine and then adjust the settings f...

Page 77: ...single destination is selected G G G G If required specify a user name file name and password for the file to be stored Reference For more information about how to specify file information see p 71 Sp...

Page 78: ...n A Press Store File The Store File screen appears B B B B Specify file information Specifying a user name A Press User Name Note If no user name is programed on the Key Operator Tools tab in System S...

Page 79: ...r the file name Reference For information about how to enter characters see Gener al Settings Guide C Press OK Specifying a password When a password is specified only a person who knows the pass word...

Page 80: ...ow the list of stored files perform the following steps A A A A Press the Scanner key B B B B If user codes are set enter a user code using the number keys and then press the key The Scanner Function...

Page 81: ...Viewing a List of Stored Files 75 6 Viewing the List The list of stored files has the following elements When Manage Delete File is selected When Send is selected...

Page 82: ...ed file 5 Keys for sorting files user name file name date and time Sorts the files using the selected item Select the same item once more for a reverse sort 6 Keys for changing file informa tion Use f...

Page 83: ...the connected device are displayed on the desk tree divided into User name and All Users folders 2 User name Only the files stored with the same user name specified in the connected device properties...

Page 84: ...The soft keyboard is displayed for searching by file name C C C C Enter the file name to search for Reference For information about how to enter characters see General Set tings Guide D D D D Press OK...

Page 85: ...to the delivery server Note This section explains how to select files to be sent or delivered For more information about sending by e mail see p 45 Procedure for Sending E mail For more infor mation...

Page 86: ...one operation If you select multiple files the files will be sent or delivered in the order they were selected If you press Order the selected files will be shown in the order of delivery E E E E Pres...

Page 87: ...right cor ner of the displayed screen Deleting Files You can delete files that are no longer needed Limitation Files waiting for delivery cannot be deleted Reference Using a Web browser See General Se...

Page 88: ...uide or DeskTopBinder V2 Lite See DeskTopBinder V2 Lite Help from a client computer you can change the information of files stored in the Document Serv er A A A A Display the list of stored files by p...

Page 89: ...ter a user name not shown here press Non pro grammed Name and then en ter the user name C Press OK Changing the file name A Press Change File Name The soft keyboard is displayed for changing the file...

Page 90: ...84 6 B Enter a new four digit pass word C Press OK Important Do not forget the password If you forget it consult the system administrator of the machine E E E E Make sure that the file informa tion wa...

Page 91: ...a network TWAIN scanner the preparation described be low is required Connect the machine to the network with an Ethernet cable IEEE 1394 optional cable or use a wireless LAN optional See Network Guid...

Page 92: ...operates the scanner appears This dialog box is called the Scanner Properties dialog box Note The name of the scanner cur rently being used is shown on the title bar of the dialog box When multiple m...

Page 93: ...r or a corner When reconfiguring the area click and drag one corner of the area towards or away from its opposite corner Note Depending on the scanning resolution the area to be scanned may be subject...

Page 94: ...trings that were scanned slanted Printing to the Image This function allows you to im print dates page numbers or your favorite characters on a scanned image You can also change the fonts of the impri...

Page 95: ...nel of the machine Specify the scan size and resolution again Limitation Depending on the image compression level the maximum image size will be limited When Using for E mail or as a Network Delivery...

Page 96: ...river Help When Binary or Halftone is selected as the Colors Gradations The originals can be scanned using combinations marked with in the table 1 The scanning size must be manually entered 100 dpi 20...

Page 97: ...ons The originals can be scanned using combinations marked with in the table 1 The scanning size must be manually entered 100 dpi 200 dpi 300 dpi 400 dpi 500 dpi 600 dpi 700 dpi 800 dpi 900 dpi 1000 d...

Page 98: ...igh or Low is selected for Compression Gray Scale in Scanner Settings and TIFF when Off is selected Note Stored documents are saved in single page style When sending stored docu ments by e mail you ca...

Page 99: ...out of position The original was moved during scanning Do not move the original during scanning The original was not pressed flat against the exposure glass Make sure that the original is pressed flat...

Page 100: ...s fol lows The delivery server is not run ning or has not started delivery service The delivery server IP address is not set correctly in System Set tings The delivery server does not rec ognize the c...

Page 101: ...times Exceeded max data capacity Check the scanning reso lution then press Start again Specify the scan size and resolution again Note that it may not be possi ble to scan very large originals at a hi...

Page 102: ...s Wait for a while and then retry the scan operation Reduce the scan area or scanning resolution Delete unneeded stored files Memory is full Delete unnecessary stored files Note These messages appear...

Page 103: ...nder s name Sending the data has been cancelled The selected file s contain some deleted file s Try again after checking the stored file s After the files were selected some files were deleted with De...

Page 104: ...d The data will be sent later A network error has occurred and a file was not sent correctly to the SMTP server Wait until delivery is retried automatically after the preset interval If the delivery f...

Page 105: ...der V2 Lite Professional or that is waiting for delivery cannot be changed Try the operation again after editing is finished or delivery is canceled The specified group contains some invalid destina t...

Page 106: ...placing an original directly on the exposure glass the lifting lowering ac tion of the ADF triggers the automatic original size detection process Lift the ADF by more than 30 degrees Cannot find the s...

Page 107: ...chine during printing scanning cannot be performed In this case after the mis fed paper has been removed proceed with scanning No response from the scanner Check whether the machine is connect ed to...

Page 108: ...l function of the client computers Scanner is not ready Check the scanner and the op tions Check whether the ADF cover is closed The name is already in use Check the registered names You tried to regi...

Page 109: ...ireless LAN optional Maximum scan size A3 297 432 mm 11 17 inches Scan density 600 dpi Variable range of scan resolution When used as a network TWAIN scanner Setting range 100 dpi 1200 dpi When used a...

Page 110: ...eys 8 Function status indicators 8 I Image density 13 Indicators 8 Initial scanner setup 11 Installing software 23 J Job Reset Time in Adding Original 19 L List displays Stored Files 75 M Max E mail S...

Page 111: ...itle 18 Sender s Name Default 18 Send Store Connection timeout 17 Software supplied on CD ROM 28 Start key 7 Status indicator 7 Stop key 7 Stored files Searching 78 Storing data 69 T Troubleshooting 9...

Page 112: ...106 EN USA B580 8707A...

Page 113: ...s not expressly approved by the party responsible for compliance could void the user s authority to operate the equipment Note to users in Canada Warning This Class B digital apparatus meets all requi...

Page 114: ...Printer Scanner Unit Type 2105 Operating Instructions Scanner Reference EN USA B580 8707A...

Reviews: