RENA XPS-80/90
User Guide
5-45
Print Options
The “
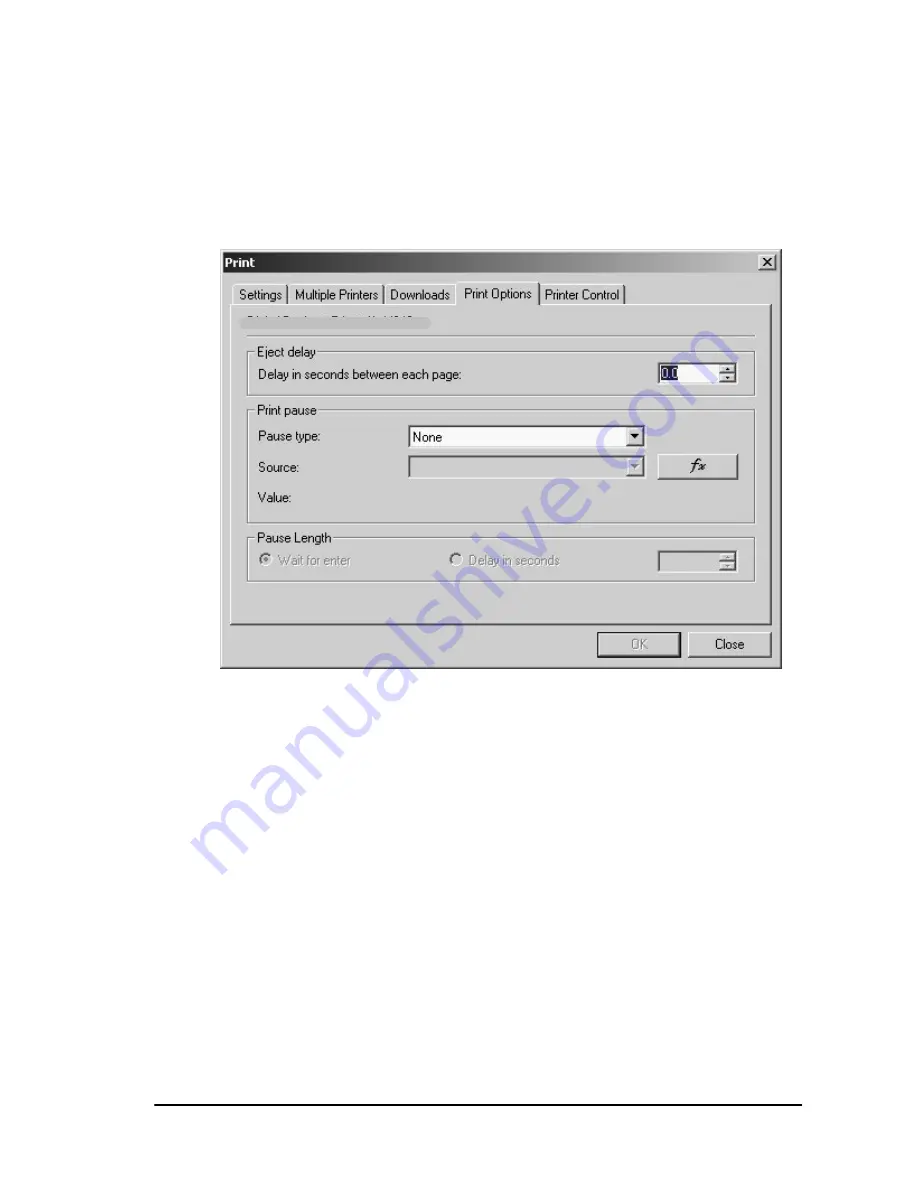
“ dialog area lets you stop or pause the print
process when a pre-set event occurs. Thus printing can be inter-rupted when the content of a specific database field changes its value.
Page 1: ...M 3301 June 12 2003 RENA XPS 80 90 Tabletop Console Printer User Guide...
Page 2: ...idental damages incurred as a result of acting on information contained in this manual Technical specifications may change due to design advances The data stated are nominal values only Copyright 2003...
Page 3: ...XPS 80 90 4 1 4 1 Description of the function 4 1 4 2 Applications 4 2 4 3 Operation with a PC 4 2 4 4 Overview of the printer 4 3 4 5 Overview of the external terminals 4 4 5 Installation and operat...
Page 4: ...4 Resetting the address printer 5 55 6 Programming mode 6 1 6 1 General points and operating mode 6 1 6 2 Menu overview 6 4 6 3 Description of the main menu 6 5 6 4 Special function submenus 6 14 6 5...
Page 5: ...nstallation and operating guide including the notes on safety before installing it and putting it into operation Be sure to observe all warning and information labels attached to the printer All perso...
Page 6: ...e ready to use condition This is followed by the operating and programming instructions and finally the technical information If you are unfamiliar with the equipment you are best advised to read the...
Page 7: ...to check the information on the type plate before connecting it to ver ify that the correct fuses type and rating are installed for your voltage source The power plug must be connected to a grounded...
Page 8: ...rts or its housing is damaged If the printer shows marked discrepancies from nor mal operation Do not dismantle the printer beyond the level described in this manual Unauthorized persons must not open...
Page 9: ...printer is set up on four pan legs which can compensate uneven sur faces within certain limits Select a placement location which protects all parts of the printer from extreme temperature and humidity...
Page 10: ...under normal conditions i e at temperatures between 5 C and 60 C and relative air humidity of up to 80 Impermissible con ditions may lead to damage which is not externally visible The printer is fixe...
Page 11: ...t of the XPS 80 90 Main XPS 80 90 printer with two print units User Guide Additional components AF635 automatic synchronized feeder optional Plug Print connection cable optional Stand for AF635 option...
Page 12: ...80 90 printer you may skip Section 3 3 2 3 3 1 INSTALLING THE XPS 80 90 When installing the XPS 80 90 make sure that there is suffi cient room behind it to allow access to the interface ports and term...
Page 13: ...right height Position the AF635 so that the ejection roller is on the same side as the positioning fingers of the stand See diagram be low Run the two connectors of the AF635 through the hole in the...
Page 14: ...er and Plug Print sockets Secure the connections by screwing the connectors in place The AF635 is supplied with power via the Ext Power socket The XPS 80 90 and AF635 can communicate intelligently via...
Page 15: ...ices are switched off Do not connect or disconnect the interface cable during operation as this can lead to the destruction of electronic parts The printer should be powered on before the computer is...
Page 16: ...RENA XPS 80 90 User Guide 3 7 3 3 4 POSITIONING THE PRINT MEDIA Normally the AF635 is aligned so it feeds the print media cen tered to the transport system at position A shown below...
Page 17: ...osition B as shown below This reduces the risks of raised media cor ners causing paper jams To do this the stand of the AF635 is shifted to its forward position i e inserted into the two forward slits...
Page 18: ...sted via the printer or FlexMail offset Otherwise the position of the printed image will not match the print position you have selected via the software When moving the AF635 from position A to positi...
Page 19: ...n the safety flap Feed a piece of print media from the feeder by pressing PAP momentarily so it is positioned under the safety flap Then read off the back value of the print media edge The following d...
Page 20: ...0 90 User Guide 3 11 The following diagram shows a 10 envelope that was fed at position B and runs centrally to the second belt The value on the ruler is 16 8 cm 168 mm Use this value as the offset in...
Page 21: ...TS XPS 80 ONLY In the XPS 80 the positions of the print units are adjusted manually by hand When not in use the print units are normally parked in their capping station This prevents the ink nozzles f...
Page 22: ...1 Push the lever R down to unlock the print unit 2 Move the print unit forward to the desired print position To secure the print unit at the desired print position turn the clamp lever shown below clo...
Page 23: ...conds When the print job has been finished return the print units as quickly as possible to their capping stations parked position Doing so will help reduce the chance of inkjet nozzles becoming clogg...
Page 24: ...print area position of print unit U1 using the right scale The upper and lower limits of the print area can be read off the scale through the exposed section of the print area indicator as shown below...
Page 25: ...ou will need to use both print units Use the internal print area indicators to achieve the correct vertical alignment between the print areas of both print units to create a justified linked print are...
Page 26: ...n the positions of the print units The print units are moved manually in the XPS 80 and automatically in the XPS 90 The horizontal position of the address is normally set via the application program s...
Page 27: ...nits Its main application is to print addresses graphics and postal elements onto mass dispatch items However it is by no means limited to these applications The printer can be used in either standalo...
Page 28: ...the printer 5 Media thickness dial Graduated wheel for adjusting the car riage height for the print media thickness 6 Emergency stop switch 7 Print units 8 Paper sensor location 9 Scale for positionin...
Page 29: ...ee below and Section 3 3 3 for location Multifunctional interface kit option The following terminals are available with the addition of the op tional multifunctional interface kit Part RO630 5 900 Ple...
Page 30: ...cartridge manufacturer Remove each cartridge from its packaging and carefully re move the protective tape from the cartridge Fully release the restraining levers before inserting cartridges To avoid...
Page 31: ...the other with the print noz zles facing downwards do not press them toward the re straining lever Close the restraining lever in the direction of the arrow The cartridge then slides into its final p...
Page 32: ...re inserted into both print units all six pen stalls Tip You will find it is easier to install the cartridges in the following order C3 C2 C1 right to left You will find it easier to grasp and remove...
Page 33: ...that you can fulfill all of the initial settings Switch the XPS 80 90 on via the power switch located on the power input module See Section 3 3 1 for location The following messages will appear in bri...
Page 34: ...r at initializa tion a This means that no cartridges have been inserted in print unit U2 You can nevertheless switch to on line mode with the start key b This means that cartridge 1 of print unit U2 i...
Page 35: ...ed font The counter status of the printed data sets Second line The amount of ink still remaining in the cartridge with the low est ink level E g U1C1 93 means that cartridge 1 C1 in print unit 1 U1 i...
Page 36: ...ground as well as the key on the far right last key shown below apply The individual keys have the following functions Switch the printer ONLINE OFFLINE Manual start stop of paper transport Quit menu...
Page 37: ...355mm 13 97 Width measured in the direction of transport 420mm 16 53 The transport area can handle up to a maximum height of 355mm as shown in the diagram below If the print media is larger or if it i...
Page 38: ...djust the spacing between the surface of the cartridge nozzles and the print media and also enter the position of the media OFFS PAP Print spacing The ideal spacing between the surface of the print me...
Page 39: ...bers on the dial represent millimeters their subdivisions tenths of millimeters Use the scale as an ini tial reference but set a slightly higher value 2 mm larger than the measured thickness of the me...
Page 40: ...om drying out Entering the position of the print media XPS 90 only The position of the print media on the transport band provides the XPS 90 with important information In the XPS 90 the print units ar...
Page 41: ...he paper offset value OFFS PAP from the scale see graphic above The offset value can be entered in two ways a For entering the offset in the FlexMail application program see Section 5 10 b Enter the o...
Page 42: ...ine Press the A key the orientation will be switched over to Rev Note on the orientation switch over If this key is pressed only briefly the new orientation can be overwritten by the PC If the A key i...
Page 43: ...ocal locked and cannot be overwritten by the PC application program Press the The XPS 80 90 will feed the print media and briefly display the measured width Read the displayed value of the measured wi...
Page 44: ...cessary You will also need the test print to calibrate the print units The advantage of a test print is that it allows you to check and ad just the print out independently of the PC and application pr...
Page 45: ...RENA XPS 80 90 User Guide 5 16 Satisfactory test print shown below Unsatisfactory test print shown below...
Page 46: ...leaned XPS 90 The test print does not start as expected at the paper edge Was the media width set and local locked Was the correct media width measured by the printer The solid black line printed at t...
Page 47: ...ard to unlock the print unit While continuing to pull the lever L2 forward swing the front of the print unit upwards Clean the nozzle surfaces with the microfiber ling free cloth by wiping them transv...
Page 48: ...RENA XPS 80 90 User Guide 5 19 When cleaning be particularly careful with the pinwheels X A bent pinwheel can cause paper jams Clean X X X X X...
Page 49: ...cartridge should require cleaning you can remove the ink cartridges from their cradles pen stalls and clean them outside the printer Then return them to their cra dles pen stalls If the cartridges do...
Page 50: ...main stationary during printing The cartridges must therefore be exactly set calibrated with respect to each other to ensure a print image with no mis alignments or distortions Depending on any deviat...
Page 51: ...erte The need for calibration becomes evident when the test print shows a gap or an overlap between two bars belonging to differ ent print units as shown above Press the start key to go to off line mo...
Page 52: ...alignment test pattern shown below size greatly reduced If the alignment is not correct repeat the two previous steps until the vertical misalignment between print units has disap peared Press the en...
Page 53: ...for calibration becomes evident when the bar to the left of the test print shows a misalignment B and or a misalignment C Press the start key to go to off line mode if you are on line Press the prog k...
Page 54: ...m 1 300 Positive values shift the print image of a cartridge to the left negative values to the right Start with small corrections Press pap to perform an alignment test pattern shown below size great...
Page 55: ...er key to select this menu feature Set the correct value as required with the prev or next key Value range 48 to 48 one increment 0 08mm 1 300 Positive values shift the print image of a print unit 2 t...
Page 56: ...program found on this CD Please keep this CD and jacket in a safe place You will need them in the event you ever need to re install the printer drivers 5 9 Printing addresses Addresses are printed in...
Page 57: ...described in the preceding Sections 5 1 to 5 8 and adjusted to the print media Note The paper size media width and height must always be accurately set and local locked before printing can begin Corre...
Page 58: ...s included with your printer FlexMail must be loaded using the InstallLauch exe program found on this CD Please keep this CD and jacket in a safe place You will need them in the event you ever need to...
Page 59: ...By default FlexMail opens with a new project window If a previous project is already open you can open a new pro ject via the New Project icon or by opening the File menu and selecting New Linking to...
Page 60: ...ill be displayed on the data sheet Switching to the designer Click onto the Designer tab located at the lower left edge of the display window The designer appears It does not yet contain any data Prin...
Page 61: ...orientation should always be set for the XPS 80 90 Note The width and height should be selected via paper format or by entering the relevant values to comply with the way that the print media actuall...
Page 62: ...tation Landscape In this orientation the printer will not print correctly because the print fields are vertical Otherwise set up your page in your accustomed way The next step is to look at the XPS 80...
Page 63: ...tions In this dialog box the position of the paper within the printer and the positions of the print units are defined Changes are then re flected in the graphical preview of the Designer window Open...
Page 64: ...media must be transferred to the XPS 80 90 by the feeder AF635 or other Press the start key printer control panel to go to off line mode if you are on line Press the pap key A single piece of print me...
Page 65: ...its modules Use the Linking check box to join the print fields of the two print units to create a single seamless print field The print areas of the two units are then shown justified linked The botto...
Page 66: ...ocation Click and drag vertically using the white area of the ruler located at the left side of your screen Set the position of the print units to correspond to the way that you would like the print o...
Page 67: ...RENA XPS 80 90 User Guide 5 38 Alternatively you can enter the print areas directly with a number Cancel Cancel...
Page 68: ...is prevents a misalignment from occurring within the let tering even if the cartridges are not calibrated optimally Barcodes should be printed by only one cartridge thus avoiding a misalignment of the...
Page 69: ...e a text or graphics element without any spacing to the upper margin of a mode see the il lustration on the next page An exactly justified position reduces the time re quired to process the print job...
Page 70: ...RENA XPS 80 90 User Guide 5 41 Cancel...
Page 71: ...en you enter the print command by clicking on the printer icon or by opening the File menu and selecting Print the print dia log box appears A number of printer specific settings will now be described...
Page 72: ...speed depends on the print quality You may lower the transport speed but if you set a higher speed than is permitted by the print quality the maximum print speed will be automatically selected The Tra...
Page 73: ...s after which the printer automatically cleans the cartridges only XPS 90 Head warming unit 1or 2 The pre warming of the cartridges can also be set here This is required only if the printer is located...
Page 74: ...uide 5 45 Print Options The Print Options dialog area lets you stop or pause the print process when a pre set event occurs Thus printing can be inter rupted when the content of a specific database fie...
Page 75: ...mouse click to select or dese lect multiple objects Multiple Printers The Multiple Printers tab allows you to share split data be tween two printers This can be a useful feature to owners of mul tipl...
Page 76: ...set reset address counter and ink counter values and load an update of the firm ware Head correction Allows the user to calibrate the horizontal alignment between ink cartridges for each print unit A...
Page 77: ...s saved Counting printed addresses The printed addresses are counted and displayed in on line mode The counted total increases with every additional printed address and is retained until the printer i...
Page 78: ...accomplish this label the ink cartridge positions before removing them 3 The menu item Ink Consumpt found under Special Funct must be set to exac exact Note Even if the above rules are strictly adher...
Page 79: ...always shows the cartridge with the lowest ink level E g U2C3 0 means that car tridge 3 C3 of print unit 2 U2 has an ink level of 0 All other cartridges have a higher ink level contain more ink Reset...
Page 80: ...ction options all all cartridges of the selected print unit together Crt1 Crt2 or Crt3 Abort the procedure with no Press the enter key the consumption value of the selected cartridge s is reset to 100...
Page 81: ...plate is replaced if the wipers become worn or the felt pads become badly soiled Replacement is recommended after about 10 000 cleaning cycles are performed by the printer As the number of cleaning c...
Page 82: ...se a lint free material cloth and distilled water to clean the rubber wipers removing all ink deposits from them Carefully scrape the excess ink mound of ink from the felt pad Do not use any liquids t...
Page 83: ...RENA XPS 80 90 User Guide 5 54 Slide the carrier plate 2 with the axle into its locking position Close the top cover Power the printer on Wipers...
Page 84: ...tings Switch the printer off Keep the prog key pressed and switch the printer on again The display shows that the procedure was successful Release the key With loss of alignment configurations Default...
Page 85: ...u items Therefore with exception to setting and local locking the paper size the default settings of the menu parameters are optimized for this purpose and do not normally need to be manually changed...
Page 86: ...y pressing the start key Press the prog key The following display appears for a few seconds followed by the first main menu item The activated changeable part of the menu blinks This is the menu desig...
Page 87: ...menu option field becomes inactive again the menu item designation blinks again or a sub menu appears You may go to the next menu item with the next key even without making any changes to the current...
Page 88: ...RENA XPS 80 90 User Guide 6 4 6 2 Menu overview...
Page 89: ...lected setting numbers The settings made may be locked to printer instructions This is done by pressing the key whereupon SETTING LOCKED appears You may use the same to key to choose between yes and n...
Page 90: ...Quality The print quality is specified in Dots per Inch DPI The display above shows a print quality of 300x600dpi The print qualities are encoded via the following designations 150D 200D 300D 400D 450...
Page 91: ...e Zip USA barcode co39 co39 barcode Bpo4 United Kingdom barcode co93 co93 barcode Kix Netherlands barcode c128 c128 barcode Cana Canada barcode ean EAN barcode 2 5i 2 5 interleaved barcode off No barc...
Page 92: ...manually set the paper length Maximum value 508 mm 20 inches L indicates that the setting is local locked 8 Character set Setting the country specific character set PC8 Rom8 P850 ECMA P8DN ICEL P852 P...
Page 93: ...1 9 inch s 6 914 mm s 35 9 inch s 7 1016 mm s 40 0 inch s 8 1422 mm s 55 9 inch s 9 1828 mm s 71 9 inch s max 2032 mm s 80 0 inch s The print density setting has precedence over this setting If a prin...
Page 94: ...s print unit U1 U2 Selects print unit U2 no abort selection Set Cartridge all Selects all cartridges in the previously selected print unit Crt1 Selects cartridge 1 Crt2 Selects cartridge 2 Crt3 Select...
Page 95: ...poses and were crated for use by qualified service personnel Rev Display of Flashware internal software revision number Font Displays the currently loaded font package i e DDP Ram Displays the amount...
Page 96: ...cartridge C1 b 2 No connection on contact 16 on cartridge C3 c These nozzles are soiled Possible corrections Open and close the lever that secures the cartridge into the pen stall This may help to pro...
Page 97: ...INPD Input Dump All 96 kBytes of the receive buffer are printed out with PC8 symbols Prints out data that has been stored in the receive buffer The entire print out requires approximately 80 sheets of...
Page 98: ...ers 1x 2x to 6x Up to a max of 48 points 16 3 Character width Width of the characters 1x 2x to 6x 16 4 Line spacing Line spacing 1 6 10 dots per inch dpi 16 5 Hex to ASCII on off When set to on a symb...
Page 99: ...arming the print nozzles off on pre Note The reasoning behind this menu item is that warmer ink flows better However the choices on and pre may initially im prove print quality darkness of image but c...
Page 100: ...ge is printed on the first piece 1st A head recovery image large black bars is automati cally printed on the first piece before the beginning of every print job This helps spray the cartridges nozzles...
Page 101: ...un are counted This number is multiplied by the number of previous re cords printed in the run and the approximate ink level is calcu lated and displayed This option can be used to improve perform anc...
Page 102: ...ial communication path for receiving print data and transferring status information when the menu item Serial Interface is set to PC 17 1 Handshake Handshake XON DTR both 17 2 Baudrate Baud rate 9600...
Page 103: ...ule XC5210 ERROR LCA2 Ready U CALL SERVICE The number after LCA shows which module caused the error ERROR LCA3 Ready U CALL SERVICE WRONG LCA REVIS U PLEASE UPDATE LCA LCA firmware faulty Load new LCA...
Page 104: ...etting prog key CHECKSUM ERROR U SETTING RESET Error in buffered RAM of unit U Default setting prog key TEST MACRO TOO LONG The self addressed test address is too long Do not exceed maximum length BUF...
Page 105: ...module or FET transistor Replace CPU board Switch printer off UART TIMEOUT RESET THE PRINTER Error in UART module or FET transistor Replace CPU board Switch printer off DISPLAY TIMEOUT RESET THE PRIN...
Page 106: ...artridge no of print unit is not inserted Insert missing cartridge s Font Loading ERROR TIMEOUT Error in download font Check download font Font Loading ERROR HEADER SB Error in download font Check dow...
Page 107: ...font Check download font MACRO LOADING ERROR RAM MEMORY IS FULL Error in loading the macro insuf ficient RAM Macro too large for the RAM ERROR FEEDER Error reported in RENA feeder ERROR FEEDER BOARD S...
Page 108: ...lease Park Print Units to prevent clogging cartridges START to Continue After end of printing the print units have not moved to their parking position Move print units to their parking position FIFO E...
Page 109: ...the printer Printer was switched off and the PC sends residual data Warning Non Existent Macro Selected Selected macro does not exist in the printer After completed job the addresses can no longer be...
Page 110: ...uce Left Margin Paper length or address position not OK Check paper length Reduce left margin in PC program Macro Too Large Or Wrong Hor Position Macro too wide Note maximum width For self created mac...
Page 111: ...25 max thickness printer 12 7 mm 0 5 for suitable media up to 18mm 0 71 Note For transparent media the paper light barrier may be unable to detect the media correctly Dimensions of print area for each...
Page 112: ...th ZIP barcode Print qualities 150x300 150x600 300x300 300x500 300x600 500x500 500x600 600x600 max stack height is determined by the feeder max weight of stack is determined by the feeder with AF635 4...
Page 113: ...adable fonts unlimited except by the printer RAM Range of supply voltage 100 240 VAC 50 60Hz Ambient conditions 10 31 C 20 80 rel air humidity non condensing Noise The emission value referred to the w...
Page 114: ...the following functions Non Mechanical reset Default reset All settings are reset to their default values Hex Dump all received characters are immedi ately printed out as HEX code Initiate download of...
Page 115: ...per sensor area NoD blinks The last data addresses are incomplete FormFeed is missing Wait blinks Printing is stopped because the control character EOT was sent Printing may be resumed by pressing the...