ENGLISH
18
25. Reloop/Exit Button
By pressing the Reloop/Exit button during loop playback, normal playback will be continued after reaching the loop-out point. If no loop is active,
the player returns to the last played loop.
SHIFT:
If Quantize is active, the current loop will be set on the analysed beat grid.
26. Save Button
The RMP-4 offers the possibility to save up to 8 hot cue points and 8 loops per track for playback. All hot cue points and loops are stored inside
the RMP-4‘s memory.
There are two different ways for saving:
Temporary Saving:
You can save hot cue points and loops temporarily. This way they will not be stored internally but will be loaded automatically
when loading the corresponding track. It is not necessary to press the Save Button. The temporary data is only stored for as long as the RMP-4
is supplied with power.
Permanent Saving:
Press the Save Button to permanentely store your hot cue points and loops inside the internal storage.
27. Call Button
By pressing the Call Button you can load internally saved hot cue points and loops by loading the corresponding track.
SHIFT:
Deletes all existing hot cue points and loops of the currently active track.
28. Beat Loop Buttons
Press one of the Beat Loop Buttons to set an auto loop that is based on the set BPM. You can select 7 different bar lengths (1/8 – 8/1). To manually
determine the BPM, use the Tap Button -8-. To exit the loop press the Reloop/Exit Button -25-.
29. Shift Button
By holding the Shift Button it is possible to call up a second function of a control element.
30. Back Button
By pressing you will go one step back in folder view. In USB mode, hold the button for 2 seconds and you will enter playlist settings.
31. Info
By pressing repeatedly you can switch between the various ID3 Tags, such as album, artist, title or genre. By pressing and holding this button you
will go back to the top folder level.
32. Sync Button
Via smart link tempo and beat position can be automatically transmitted or retrieved to/from another RMP-4. All titles have to be analysed with
the Database Builder tool first to be able to use the sync function. Please note that only data media (USB media) support this function.
a) Play a track that has been analyzed with the Dbuilder and sorted by Title/Artist/Album on both RMP-4 players.
b) Smart link both RMP-4 players, press the Sync Button on one of the two players and the tempo (BPM) and beat positions of the current track will
be synchronized on the other RMP-4. When the Sync button is pressed again, the Sync function turns off. To restore the currently playing track’s
tempo (BPM) to its original tempo after turning the Sync function off:
First move the Pitch Fader to the position to which the tempo (BPM) was synchronized, the Tempo indicator turns off (move Fader up when indicator
is red and when yellow move the Fader down). Then move the Pitch Fader back to the center position.
33. Eject Button:
To insert a CD, slide the CD with the label facing upwards carefully into the slot -1-. The CD is automatically pulled in. The Status LED above the
drive flashes while the CD is being loaded. As soon as the CD has been read and recognised, the Status LED goes on. When playing CDs with a
diameter of less than 12 cm, use any conventional adapter. Press the Eject Button -33- to eject the CD.
SHIFT:
The USB device will be disconnected. Do not disconnect the USB deivce during operation to avoid loss of data.
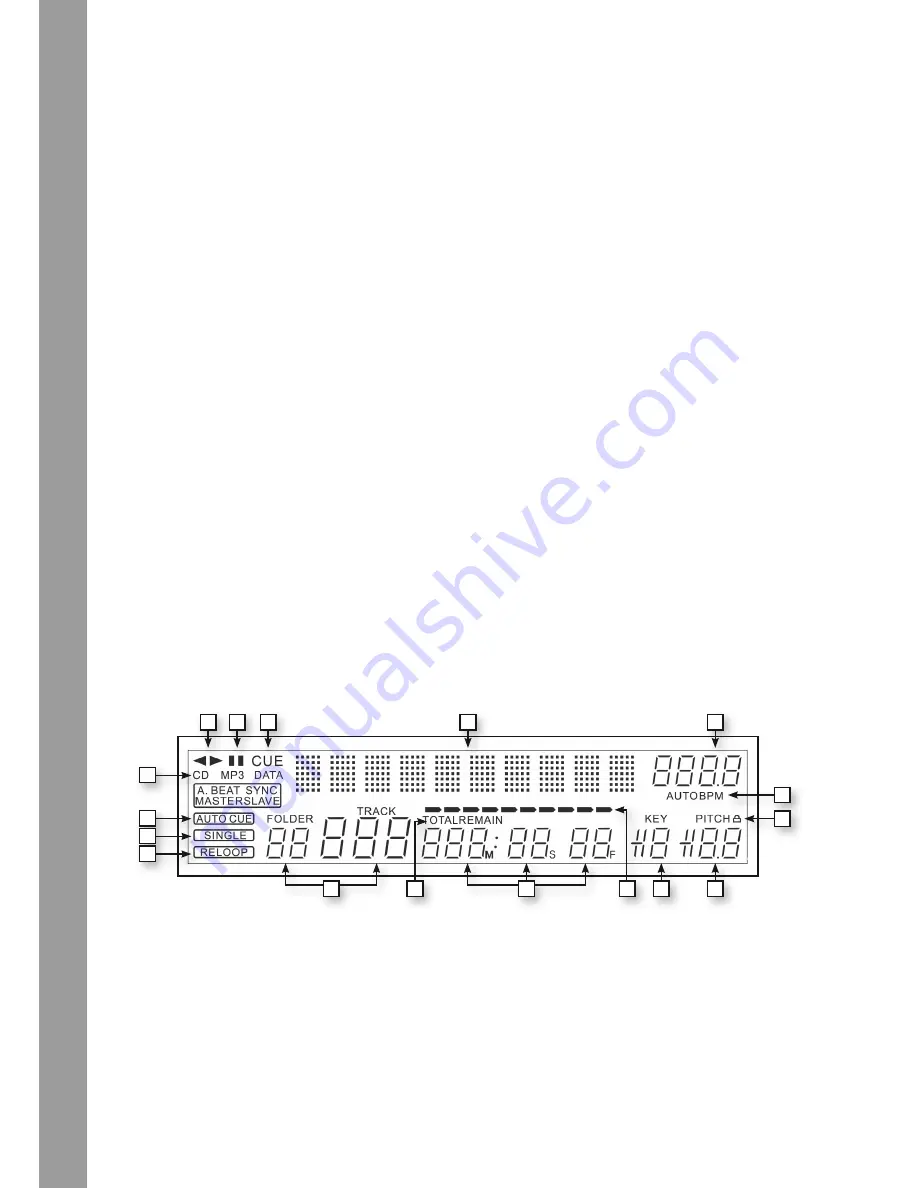
34. Display
The Display -34- indicates all important functions of the player:
A) Track/Folder
Indicates the number of the current track or folder (folder for MP3-CD).
B) Time Mode
Indicates if the player shows the elapsed time of a track (nothing on display), the remaining time of a track (the display reads „Remain“) or the
remaining time of the entire CD (the display reads „Total Remain“). Use the Time Button -7- to switch between these modes.
C) Time Display
Indicates the time in the chosen Time mode in minutes, seconds and frames (1/75 min.).
D) Playing Address
Visualises the time display and increases or decreases, depending on the Time mode. Shortly before a track ends, the entire bar flashes.
A
C
E
F
I
J
K
L
M
N
O
P
Q
G
H
B
D
Summary of Contents for RMP4
Page 13: ...13 DEUTSCH...
Page 25: ...25 ENGLISH...
Page 37: ...37 FRAN AIS...
Page 38: ...NOTES...
Page 39: ...NOTES...


