background image

GB

Page 25 of 32

INSTRUCTION, USE AND

MAINTENANCE MANUAL

G1150.30MAGIC - G1150.30MAGICIT

RAVAGLIOLI S.p.A.

7107-M001-0_R

Fig. 51

Fig. 50

• Periodically, with a frequency of at least once a month,

lubricate the arms of the bead breaking roller and of
the tools.

13.0 ROUTINE MAINTENANCE

To guarantee the efficiency and correct functioning of the
machine, it is essential to carry out daily or weekly clean-
ing and weekly routine maintenance, as described be-
low.
Cleaning and routine maintenance must be conducted
by authorized personnel and according to the instruc-
tions given below.
• Disconnect the mains power supply before starting

any cleaning or routine maintenance operations.

• Remove deposits of tyre powder and other waste ma-

terials with a vacuum cleaner.

DO NOT BLOW IT WITH COMPRESSED AIR

.

• Do not use solvents to clean the pressure regulator.
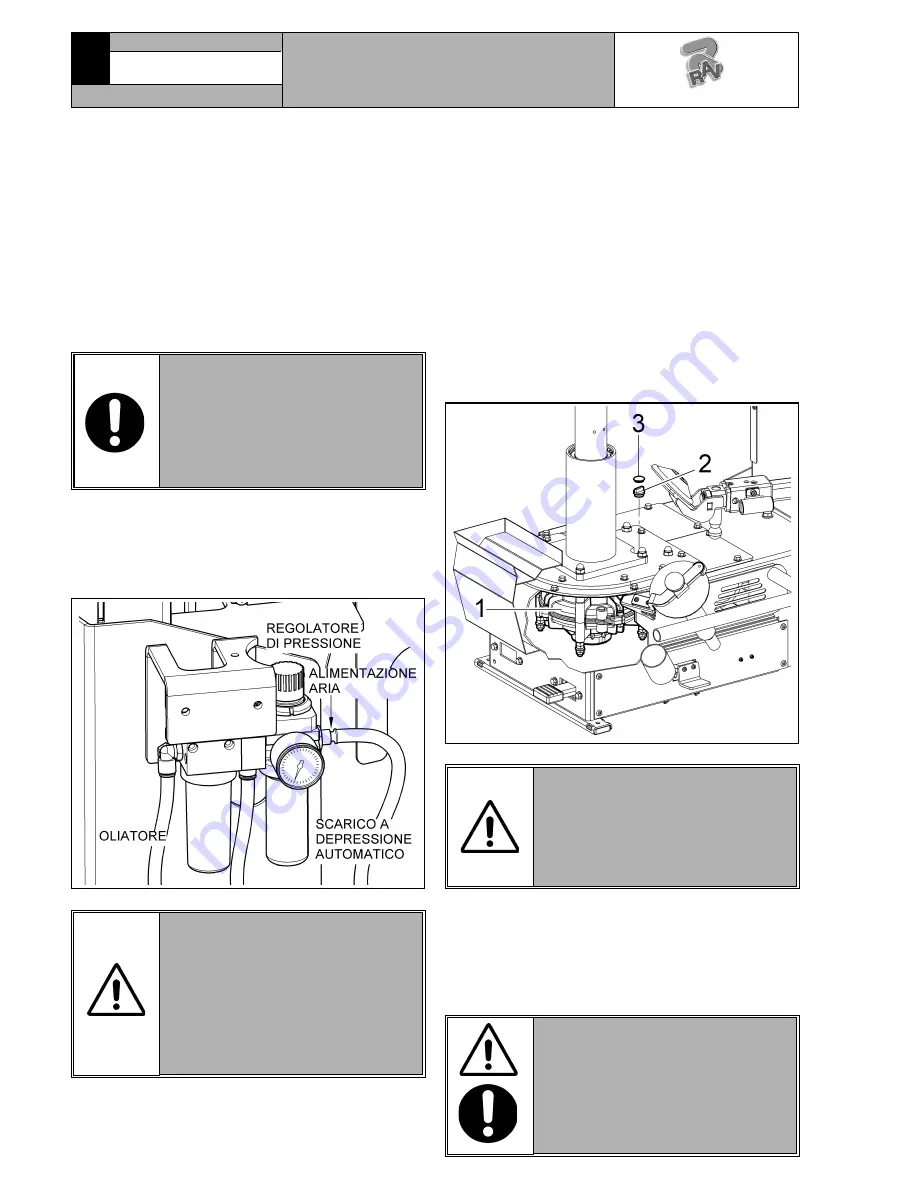
• The conditioning unit is equipped with an automatic

vacuum-operated drain therefore it requires no manual
intervention by the operator (see 

Fig. 50

).

IN ORDER TO ALLOW A LONGER

LIFE OF THE FILTER AND OF ALL

MOVING PNEUMATIC DEVICES,

YOU HAVE TO MAKE SURE  THAT

THE SUPPLIED AIR IS:

• EXEMPT FROM THE LUBRICATING

OIL OF THE COMPRESSOR;

• EXEMPT FROM HUMIDITY;

• EXEMPT FROM IMPURITY.

THE MANUFACTURER DOES NOT

ACCEPT ANY DAMAGE RESULTING

FROM THE FRAILURE TO OBSERVE

THE ABOVE INSTRUCTION, AND

SUCH FAILURE COULD INVALIDATE

THE WARRANTY!!

BEFORE CARRYING OUT ANY MAIN-

TENANCE OPERATIONS, MAKE

SURE THERE ARE NO WHEELS

CLAMPED ON THE CHUCKING TA-

BLE AND THAT ALL SUPPLIES TO

THE MACHINE HAVE BEEN DIS-

CONNECTED.

13.1 Lubricants

Special lubricant for spindle movement control gearbox.
Use 

ESSO GEAR OIL GX140

.

Lubricate slides, screws/nut screws or racks and pin-
ion with a soft brush using lubricant of 

ESSO GP 

type.

ANY DAMAGE TO THE MACHINE

DEVICES RESULTING FROM THE

USE OF LUBRICANTS OTHER THAN

THOSE RECOMMENDED IN THIS

MANUAL WILL RELEASE THE

MANUFACTURER FROM ANY LI-

ABILITY.

• Immediately replace worn parts, bead breaking roller,

assembly tools.

• Every 

week

 and/or when necessary, top up the oil tank

using the filler hole provided closed by a cap or screw
on the lubricator filter.

N.B: This operation should not be carried out by

unscrewing the cup of the lubricator filter.

• The use of synthetic oil might damage the pressure

regulator filter.

• At regular intervals, (at least every 100 working hours)

check reduction gear (

Fig. 51 pos. 1

) lubricating oil

level. Such operation must be effectuated removing the
plug (

Fig. 51 pos. 3

), positioned on the provided hole

prearranged on the frame, and removing the plug po-
sitioned on reduction gear (

Fig. 51 pos. 2

).

Summary of Contents for G1150.30MAGIC

Page 1: ...ase contact your local dealer or call GB TRANSLATION FROM THE ORIGINAL INSTRUCTIONS Technical services RAVAGLIOLI S p A Via 1 Maggio 3 40037 Pontecchio Marconi Bologna Italy Phone 39 051 6781511 Telex...

Page 2: ...evice________________________ 14 11 2 Pedalboard see Fig 14 ______________ 14 12 0 USING THE MACHINE ____________ 15 12 1 Precaution measures during tyre removal and fitting __________________ 15 12 2...

Page 3: ...movement cylinder 14 Inflation pedalboard 15 Roll for matching on demand 16 Handle with release of bead breaker adjustment KEY 1 Chuck 2 Tool 3 Bead breaking 4 Handle with tool adjustment release 5 C...

Page 4: ...Wear work shoes Wear safety earcaps Shock hazard Danger Be particulary careful Move with fork lift truck or transpallet Lift from above Burst danger Mandril rotation direction Wear safety goggles Dang...

Page 5: ...ation to wear protective clothing plate Tyre explosion plate Maximum inflation pressure indication Inflation pedal plate Rotary parts danger plate Electricity danger plate Rotation direction plate Ser...

Page 6: ...as possible in relation with tech nology and product functionality This manual stresses possible residual risks also higlighted in pictograms and adhesive warning signals placed on the machine their...

Page 7: ...cts and that there is no oil since this could damage the tyres Oil on the floor is also a potential danger for the operator IN CASE OF A CHANCE SUPPLY FAILURE MOVE THE CONTROLS TO THE NEUTRAL POSITION...

Page 8: ...e box and open it like a fan It is also possible to un nail the cardboard box from the pallet it is fixed to After removing the packing and in the case of the ma chine packed fully assembled check tha...

Page 9: ...NMENT CONDI TIONS The machine must be operated under proper conditions as follows temperature 0 55 C relative humidity 30 95 dew free atmospheric pressure 860 1060 hPa mbar The use of the machine in a...

Page 10: ...2 provided screws already present on machine body Fig 7 pos 2 The holes in the solid floor must be about 10 cm deep with a diameter of 8 mm The bolts Fig 6 pos 1 must be inserted in the holes and full...

Page 11: ...ing the union placed on filter unit of the machine The pressurized pipe see Fig 8 coming from the mains must have a section of 10x19 Fig 8 Fig 9 Fig 10 Only for IT version 3 Assemble Gonfiatubeless u...

Page 12: ...achine is preset to operate at a voltage of 200 265 V 50 60 Hz monophase EVEN THE TINIEST PROCEDURE OF AN ELECTRICAL NATURE MUST BE CARRIED OUT BY PROFESSION ALLY QUALIFIED STAFF BEFORE CONNECTING THE...

Page 13: ...ft ing device Fig 12 pos 7 5 To lock the base three screws Fig 12 pos 3 with a couple of 80 Nm 6 To place six screws Fig 12 pos 5 previously re moved and to lock them on the base side with a cou ple o...

Page 14: ...ing roll Fig 13 pos 4 forward movement Lever A for the tool setting on the wheel diameter through a thrust and return movement and together with B unlocking push button Lever C for bead breaker roller...

Page 15: ...nger even during inflation adequately lubricate the contact surface of rim and tyre bead Use specific tyre lubricants only replace the inner tube valve with a new valve If the tyre tube has a metal va...

Page 16: ...o lock a rim proceed as follows 1 Extract the central locking shaft and its cone Fig 16 pos 1 through the proper handle Fig 16 pos 2 and if necessary turn it to make easy the extraction 12 3 Wheel loc...

Page 17: ...INGS 6 Lifting the shaft Fig 21 pos 1 through the proper handle Fig 21 pos 2 turn the ring nut Fig 21 pos 3 until the complete cone clamping Fig 21 pos 4 on the wheel Fig 21 pos 5 7 For wheels with al...

Page 18: ...h the but ton Fig 13 Pos 4 keeping it pressed until the bead breaking roller is inserted in the rim Keep on with the wheel rotation until the operation is completed see Fig 27 Fig 25 ALWAYS VERIFY THA...

Page 19: ...VOID POSSIBLE HANDS CRUSHINGS Fig 30 Fig 31 7 Now rotate the wheel in clockwise sense see Fig 30 pressing the pedal Fig 14 Pos A and at the same time activate the pushbutton Fig 13 Pos 4 keeping it pr...

Page 20: ...OSI TIONING THE TOOL CARRIER ARM TO AVOID CRUSHING HANDS AL WAYS MAKE SURE THAT THE ARM ISPROPERLYHOOKEDTOTHECAR RIER ALWAYS MAKE SURE THAT THE ARM IS CORRECTLY HOOKED TO THE CARRIER 3 Press the pedal...

Page 21: ...hen the tool reaches a vertical position re lated to the rim Fig 37 Pos 1 rotate the chuck so that the tyre enters the rim groove Keep on lifting the tool until the bead is on the rim edge see Fig 36...

Page 22: ...in clockwise sense until the tyre is completely disassembled Fig 40 Demounting the lower bead To disassemble the lower tyre the bead breaking roller can be used alternatively Lift the tool and go away...

Page 23: ...3 WHEN THE BEADS COME OUT OF THE RIM THE TYRE MIGHT FALL CARRY OUT VERY CAREFULLY THESE OPERATIONS 2 Position the tool Fig 44 Pos 1 on the rim edge USE ONLY TYRE LUBRICANTS SUIT ABLE LUBRICANTS CONTAI...

Page 24: ...er roll Fig 49 pos 1 and the the upper additional roll Fig 49 pos 2 Turn the motor anti clockwise until the reference point on the tyre coincides with the reference point on the rim usually the valve...

Page 25: ...IDITY EXEMPT FROM IMPURITY THE MANUFACTURER DOES NOT ACCEPT ANY DAMAGE RESULTING FROM THE FRAILURE TO OBSERVE THE ABOVE INSTRUCTION AND SUCH FAILURE COULD INVALIDATE THE WARRANTY BEFORE CARRYING OUT A...

Page 26: ...nical resistance of the gearmotor system has increased Shorten the lenght of a possible ma chine extension cable or increase the conductors section disconnect and connect again Lift the motor pedal an...

Page 27: ...nvemotor speed 15 rpm Invemotor power 1 5 kW Recommended electric supply monofase 200 265V 50 60 Hz Maximum wheel diameter 41 43 45 Wheel max width 15 15 2 Dimensions Rim locking diameter 10 26 12 28...

Page 28: ...te from electric and elec tronic equipment in italian RAEE according to legislative decree 151 05 RAEE may not be disposed of as urban waste These kinds of waste must be collected separately and taken...

Page 29: ...T 7107 M001 0_R LISTA DEI COMPONENTI LIST OF COMPONENTS TEILELISTE LISTE DES PIECES DETACHEES LISTA DE PIEZAS SCHEMA ELETTRICO ELECTRIC WIRING DIAGRAM ELEKTROSCHEMA SCHEMA LECTRIQUE ESQUEMA ELECTRICO...

Page 30: ...DES PIECES DETACHEES LISTA DE PIEZAS Descrizione Description Beschreibung Potenziometro comando motore Motor control potentiometer Potenziometer f r Motorstevevng SCHEMA ELETTRICO ELECTRIC WIRING DIA...

Page 31: ...7107 M001 0_R LISTA DEI COMPONENTI LIST OF COMPONENTS TEILELISTE LISTE DES PIECES DETACHEES LISTA DE PIEZAS SCHEMA PNEUMATICO PNEUMATIC DIAGRAM PNEUMATISCHER SCHEMA SCHEMA PNEUMATIQUE ESQUEMA NEUM TIC...

Page 32: ...1 0_R LISTA DEI COMPONENTI LIST OF COMPONENTS TEILELISTE LISTE DES PIECES DETACHEES LISTA DE PIEZAS SCHEMA PNEUMATICO IT IT PNEUMATIC DIAGRAM IT PNEUMATISCHER SCHEMA SCHEMA PNEUMATIQUE IT ESQUEMA NEUM...

Reviews: