Rational iCombi Pro XS 6-2/3 Operating Instructions Manual Download Page 51

10 | iProductionManager

Operating instructions

51 / 112

3. Press the button 

>

The program is sent to the iProductionManager and displayed on the ticket board.

4. To send a shopping cart to the iProductionManager, press the desired shopping cart.

>

The shopping cart is sent to the iProduction Manager. All programs are displayed in the ticket board.

10.2.3

Ticket board editor

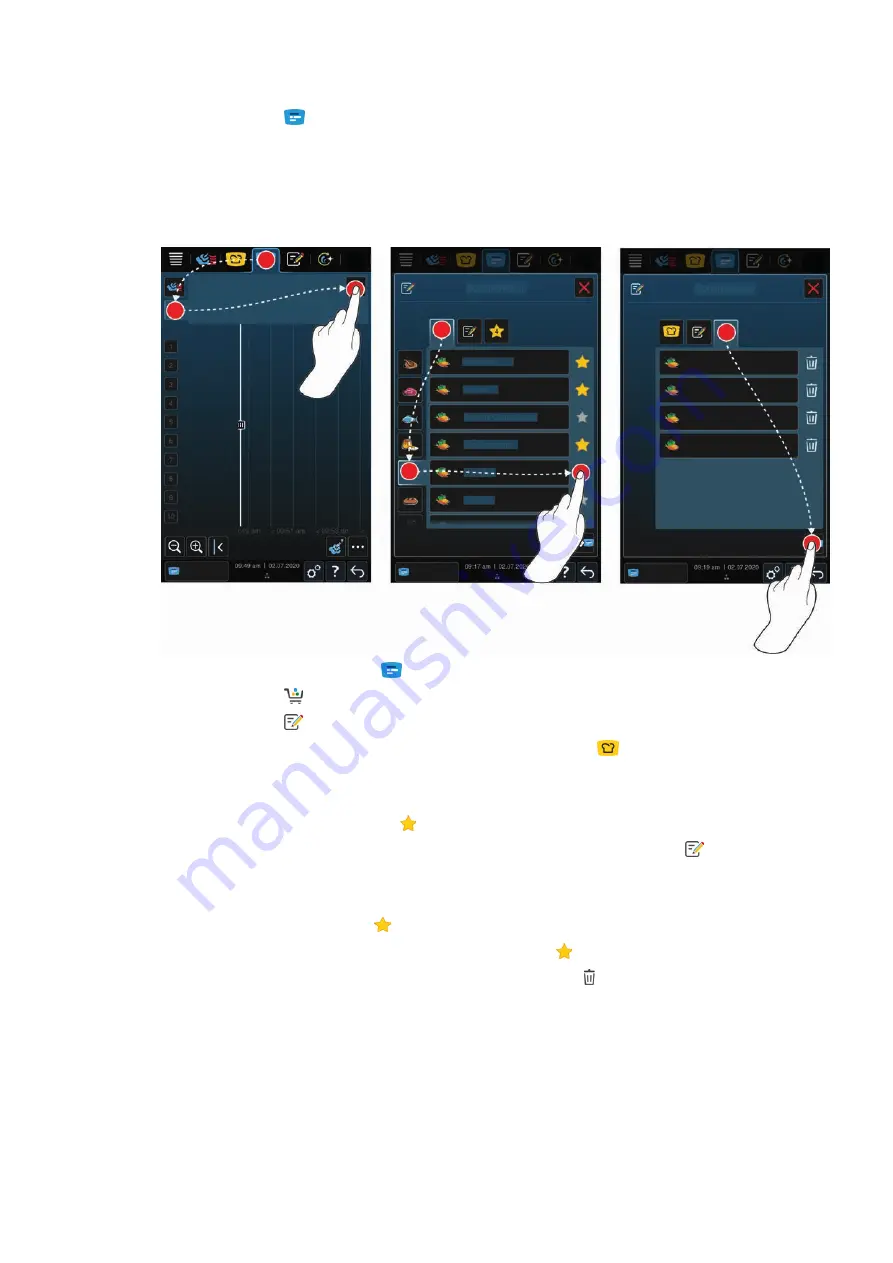
1. Press the button in the menu bar: 

2. Press the button 

3. Press the button 

4. To add intelligent cooking paths to the shopping cart, press the button:

>

All intelligent cooking paths are displayed.

5. Scroll through the list or select a cooking mode and then press the desired cooking path.

>

The cooking path is highlighted with 

and added to the ticket board.

6. To add programs from the programming mode to the shopping cart, press the button:

>

All saved programmes are displayed. If you have not yet created any programs, this field will be empty.

7. Scroll through the list or select manual or intelligent programs and then press the desired program.

>

The program is highlighted with 

 and added to the ticket board.

8. To check the configuration of the ticket board, press the button:

9. To delete an intelligent cooking path or a program, press the button:

10. To update the ticket board, press the button: [NEW ICON]

>>

The intelligent cooking paths or tickets are displayed on the ticket board. You can now place the ticket [

}

 52].

10.3

Timer

Even if the combination check [

}

 53] prevents the placement of a ticket, you can place a timer. The timer is a time

ticket assigned with 5 minutes as standard. The timer does not have its own climate, this means that a climate is
not created when only placing a timer or that this does not affect the climate. You can adjust the duration of the
timer as required and place it either at the current time or in the future.

Summary of Contents for iCombi Pro XS 6-2/3

Page 1: ...iCombi Pro Operating instructions...

Page 2: ......

Page 3: ...tart up 14 4 2 Switching the unit on and off 14 4 3 Start screen 15 4 3 1 Favourite 16 4 3 2 Date time status 16 4 3 3 Help displayed on the unit 17 4 4 Interacting with the unit 17 4 4 1 Moves 17 4 4...

Page 4: ...42 6 2 1 Cooking climate and temperature range 42 6 2 2 Cook food in steam 42 6 3 Combination of steam and convection heat 43 6 3 1 Cooking climate and temperature range 43 6 3 2 Cooking the food in...

Page 5: ...66 13 2 2 Date and time 66 13 2 3 Temperature format 67 13 2 4 Programme view 67 13 3 Light 67 13 3 1 Display brightness 68 13 4 Sound 68 13 4 1 Master volume 68 13 4 2 Loading calls for action 68 13...

Page 6: ...10 4 Edit screen 80 13 10 5 Create new screen 80 13 11 Service 80 13 11 1 Software update info 81 13 11 2 Installed software version 81 13 12 ConnectedCooking 81 14 Kitchen management 83 14 1 Hygiene...

Page 7: ...oking 97 17 3 2 Retrieving service data 97 17 4 Problem resolution 97 17 4 1 Error messages heating steam generator 98 17 4 2 Error messages for gas units 98 17 4 3 Error messages heating hot air 99 1...

Page 8: ...ns and warranty services on this page RATIONAL assumes no liability for damage caused by unauthorised technical changes 1 3 Target group This document is intended for staff working in large and commer...

Page 9: ...ions DANGER If you see the signal word DANGER you are being warned about situations that lead to serious injury or death WARNING If you see the signal word WARNING you are being warned about situation...

Page 10: ...2 The iCombi Pro 10 112 Operating instructions 2 The iCombi Pro Control panel Display Central dial Air filter Cooking cabinet Cooking cabinet door Door handle USB port Care drawer Hand shower...

Page 11: ...combustible substances near the unit n Only use the unit at an ambient temperature of 10 C to 40 C n Avoid having heat sources e g grill plates or deep fat fryers near the unit n During operation ensu...

Page 12: ...not to be added to the unit for rethermalization while hot food is being held This will prevent injuries when working with transport trolleys and mobile oven racks n Carefully push transport trolleys...

Page 13: ...r phones This may cause sparks and increase the risk of an explosion Open the windows and doors and ventilate the room with fresh air Do not switch on any exhaust hoods or ventilators to ventilate the...

Page 14: ...4 2 Switching the unit on and off Switch on the unit 1 To switch on the unit press and hold the button until the LED lights green The unit will start The start screen 15 will appear Operation without...

Page 15: ...t screen n Manual operating modes 40 n Favourites 16 n Intelligent cooking modes 23 If you press one of these buttons all intelligent cooking paths categorised as intelligent modes will be displayed n...

Page 16: ...s as well as the status of the following ports and connections USB flash drive connected This symbol shows that you have connected a USB flash drive or a USB accessory to the unit Network connection T...

Page 17: ...ains detailed information on individual cooking paths and provides you with a wealth of practical application examples tried and tested by RATIONAL with valuable tips 4 4 Interacting with the unit NOT...

Page 18: ...out of the cooking cabinet The fan wheel is slowed down Closing the cooking cabinet door 1 Press the cooking cabinet door firmly 4 7 Loading the unit 1 Open the cabinet door The brakes on the fan whe...

Page 19: ...ot core probe without protective gloves 1 Always wear protective gloves when working with the hot core probe 2 If necessary cool down the core probe using the hand shower CAUTION Sharp core probe You...

Page 20: ...ntil the core probe is full with food from the tip to the handle Food of different sizes 1 First insert the core probe into the smallest piece of the food 2 Once the desired core temperature has been...

Page 21: ...do this use the optional positioning aid Core temperature probe not recognised a The symbol will be displayed 1 Place the core probe as described in the manual into the product 2 Confirm the correcti...

Page 22: ...cooking cabinet with the hand shower this could damage the cooking cabinet air baffle or the glass panels of the cooking cabinet door 1 Only cool down the cooking cabinet using the cool down function...

Page 23: ...While the cooking path is running all the important cooking settings such as the cooking cabinet temperature climate air speed and cooking time will be regularly adjusted so that your desired result...

Page 24: ...prepare whole chickens poussins or larger pieces of poultry n If you would like to prepare small pieces of poultry select the cooking path Pan fry n If you need short post production times for grille...

Page 25: ...ooking process if you want to cook large pieces of meat with crackling Braised pork Select this cooking path if you would like to braise pork Chinese style in soya sauce Broth boil Select this cooking...

Page 26: ...ooking path if you want to cook meat which would typically be fried in the pan or thinly diced meat Meatloaf Select this cooking process if you would like to prepare meatloaf Lomo saltado Select this...

Page 27: ...d is first fried and then filled with liquid Nizakana Choose this cooking process if you want to poach fish such as mackerel or herring Japanese style in dashi Octopus Select this cooking path if you...

Page 28: ...tamago Scrambled eggs Select this cooking process if you want to cook scrambled eggs Fried eggs Select this cooking process if you want to cook fried eggs 5 2 5 Vegetables and side dishes Sear Select...

Page 29: ...cooking process if you would like to deep fry vegetables and side dishes Grilling Select this cooking process if you want to prepare vegetables and side dishes with a grill pattern Lentils and pulses...

Page 30: ...ike to bake fresh or partly baked bread Bread rolls Select this cooking path if you would like to bake fresh or partly baked bread rolls Cheesecake Select this cooking path if you would like to bake N...

Page 31: ...g path if you want to prepare pizza filled dough or yeast dough on the grill and pizza plate Samosas Select this cooking path if you would like to prepare Indian dumplings filled with curry Soft rolls...

Page 32: ...ooking method e g grilling n Select the desired cooking mode and cooking method Once you have selected these the corresponding intelligent cooking paths will be displayed Programming mode 1 Press the...

Page 33: ...ooking result does not yet meet your requirements continue the cooking process with one of the suggested options 5 3 3 Pre program start time With the pre programmed start time you can set the start t...

Page 34: ...t that have already been seared NOTICE There are cooking paths where even the lowest level is a searing level such as Meat large roast The without searing option is not available here If you need to c...

Page 35: ...ng parameter you can set how high the core temperature or the cooking level of the food should be Please adhere to the applicable hygiene regulations for the relevant food in your country when setting...

Page 36: ...on your rolls and optimal oven operation The cooking cabinet temperature must be between 30 260 C 1 Press and hold the button The moistening nozzles will spray water onto the fan wheel for as long as...

Page 37: ...held for a certain time If you select this option the food will be held at the preset cooking cabinet temperature or the core temperature for up to 24 hours This prevents overcooking To keep cooking l...

Page 38: ...ting will be applied automatically after just a few seconds If you switch from the cockpit back to the cooking parameters the overview is greyed out You cannot change the cooking parameters Once the t...

Page 39: ...he cooking step is completed the next cooking step is automatically displayed 5 6 Abort intelligent cooking path 1 Press and hold the button The cooking path is cancelled The start screen will appear...

Page 40: ...ity and cooking cabinet temperature as follows 1 Press and hold the button After 10 seconds the current cooking cabinet temperature will be displayed 2 To revert to the set parameter values release th...

Page 41: ...product the cooking cabinet temperature is automatically regulated via the difference between the set delta temperature until the end of the set cooking time Create climate With this function the cook...

Page 42: ...t n Steam n Stew n Blanch n Heat through n Soak n Sous vide cooking 46 n Defrost n Preserve 100 30 130 C 6 2 2 Cook food in steam 1 Press the button in the menu bar 2 Press the button The unit is heat...

Page 43: ...on within these 30 minutes such as opening the cooking cabinet door then the cooking cabinet temperature will be held at 260 C for another 30 minutes 6 3 2 Cooking the food in the combination of steam...

Page 44: ...then the cooking cabinet temperature will be held at 260 C for another 30 minutes 6 4 2 Cook food in convection heat 1 Press the button in the menu bar 2 Press the button The unit is heating up 3 Set...

Page 45: ...6 Manual cooking Operating instructions 45 112 6 5 Abort manual cooking 1 Press and hold the button The cooking process is cancelled The start screen will appear...

Page 46: ...according to the final dish Sous vide cooking is particularly suitable for the following uses n Cook and chill Produce your dishes centrally in a production kitchen and then deliver the dishes to sat...

Page 47: ...the afternoon or in non service periods This means you can make full use of your unit for up to 24 hours a day And if you cook food overnight you can also save energy by using night tariffs TIP If th...

Page 48: ...he same time e g at conferences weddings or other catering events n Finishing in industry catering Container Finishing is ideal when you need to offer a wide variety of food in large quantities 9 1 Ad...

Page 49: ...r of the dishes For you this means that you always have everything under control without checking or monitoring therefore achieving high efficiency in your food production Timeline axis Trays Ticket b...

Page 50: ...can now place the ticket 52 10 2 Ticket board You can add the desired intelligent cooking path or any program or shopping cart you want to the ticket board If you do not save the ticket board as a sh...

Page 51: ...on All saved programmes are displayed If you have not yet created any programs this field will be empty 7 Scroll through the list or select manual or intelligent programs and then press the desired pr...

Page 52: ...eated manual tickets 49 shopping carts 50 or a ticket board 51 1 Drag a ticket to the desired rack level For best orientation the rack level where you want to place the ticket is highlighted in blue A...

Page 53: ...whether the cooking chamber humidity levels match Both manual operating modes and intelligent cooking paths are tested for their compatibility You can only combine cooking paths that are cooked in th...

Page 54: ...n the tickets are closed The positioning of the tickets with regard to one another are maintained The positioning of the tickets can be moved on the time axis 10 4 4 Time optimisation You can have tic...

Page 55: ...you have already placed in iProductionManager automatically optimised by your iCombi Pro so that the dishes are optimally cooked in terms of energy The device utilisation can therefore be optimised an...

Page 56: ...ger so that cooking of meals starts at the same time or meals are cooked at the same time You can carry out this planning not only at the current time but also in the future To do this place tickets i...

Page 57: ...in the menu bar 2 Press the button in the menu bar 3 Press the button New planning 4 Press the button The positioning aid slides on the left edge of the display The scaling of the time axis changes f...

Page 58: ...a The iProductionManager is not currently processing any tickets When tickets are processed a message appears informing you that all tickets must be cancelled before planning starts 1 Press the butto...

Page 59: ...Manual operating modes Intelligent cooking modes Shopping cart Planning Favourites Sort alphabetically 11 1 Create manual programme 1 Press the button in the menu bar 2 Press the button New element 3...

Page 60: ...tions Preheat n Cabinet temperature n Air speed Steam n Cabinet temperature n Delta T cooking n Air speed Combination of steam and hot air n Cooking cabinet humidity n Cabinet temperature n Cooking ti...

Page 61: ...oint will be marked Resolve the error before saving the program 11 2 Create an intelligent program If you program an intelligent cooking process you can only adjust the cooking parameters to your requ...

Page 62: ...yed again Pre program start time and program image a You have imported images 75 1 To assign a pre programmed start time to the profile press the button 2 Press the button Pre program start time 3 Pre...

Page 63: ...a cooking mode and then press the desired cooking path The cooking path is marked and added to the shopping basket 6 To add programs that are already saved to the shopping basket press the button All...

Page 64: ...ms and shopping baskets Manual programs 1 To start a manual program press the desired program The program starts immediately All cooking steps are displayed 2 To send a manual programme to the iProduc...

Page 65: ...the manual cooking mode 2 NOTICE The action cannot be reversed Press the button The cooking parameters of the ticket are accepted and displayed in the manual operating mode Convert an intelligent coo...

Page 66: ...ch can be changed using simple gestures 17 or the central dial 17 13 1 Favourites All settings that you have marked as favourites are displayed in favourites 1 Choose a setting 2 Press the button The...

Page 67: ...ime with ConnectedCooking 1 Press the button 2 Press the button ConnectedCooking 3 Next to Automatic time synchronisation press the button ON 13 2 3 Temperature format Here you can set whether the tem...

Page 68: ...tivate screensaver after x min 1 Press the button Activate screensaver after x min You can now set after how many minutes the screen saver should be activated 13 4 Sound 1 Press the button 2 Press the...

Page 69: ...ill be active 8 Set the duration on a 0 180 second scale 9 To apply the setting press the following button in the icon bar You will return to the overview 13 4 4 End of cooking time Here you can set w...

Page 70: ...N and OFF If demo mode is activated the cooking system will restart The symbol appears in the footer 13 5 3 Power Steam Here you can set that a constant uninterrupted fresh steam supply is guaranteed...

Page 71: ...cooking systems are connected to each other with a network cableConnected units to a network 83 1 Press the button Unit name 2 Enter a unique unit name and press the Enter key on the keyboard Your en...

Page 72: ...uenced by the primary country cuisine 71 13 6 3 la carte plate weight Before you start the finishing set how heavy an empty plate is With the help of this information your iCombi Prowill adjust the co...

Page 73: ...e button Climate retention time 2 Select the desired value on the scale The retention time is immediately adjusted NOTICE Save energy with a shorter retention time 13 6 9 iProductionManager 3D Here yo...

Page 74: ...76 13 8 1 Export all data a You have connected a USB flash drive to the unit 1 Press the button Export all data You can now export all data to a USB flash drive 13 8 2 Cooking programs Here you can e...

Page 75: ...nfirm that all own profiles have been deleted 13 8 4 User images Here you can import and export all images you want to assign to programs and shopping carts Images must meet the following criteria n F...

Page 76: ...the unit to a USB flash drive You can also have the HACCP data automatically transferred to ConnectedCooking a You have connected a USB flash drive to the unit 1 Press the button HACCP data Export all...

Page 77: ...ssistance with the network settings You can be assisted either with the WiFi connection or with the LAN connection 2 Press the button DHCP active OFF to edit the following network settings n IP addres...

Page 78: ...y the following settings n Change profile name n Change profile password n Change language n Change profile type NOTICE The profile type can only be changed by the main user n Change primary country c...

Page 79: ...Core temperature can be shown or hidden n Cockpit header can be shown or hidden iProductionManager 1 Press the button iProductionManager You can now apply the following settings n Inject steam can be...

Page 80: ...eck the functional scope of the screen press the button 3 To remove a function from the screen menu press the button 4 To give the screen menu a name press the button 5 Assign a name 6 To save the scr...

Page 81: ...tedCooking 1 Press the button 2 Press the button ConnectedCooking You can find out how to connect your cooking system to ConnectedCooking and which functions are available here ConnectedCooking 85 If...

Page 82: ...the cooking system automatically transfers the HACCP data to ConnectedCooking Remote access 1 Press the button ON or OFF Remote access is not available when you press OFF If you press ON it will be po...

Page 83: ...ata 76 A longer period is available if the corresponding period of use is shorter 14 1 3 Transfer HACCP data automatically to ConnectedCooking If you have connected your unit with ConnectedCooking you...

Page 84: ...etwork V 8 To disconnect press this button in the connection details Disconnect 9 In the icon bar press on to return to the overview of network settings The name of the WiFi network will be displayed...

Page 85: ...with at a glance The following features are also available n Push notifications Whether it s a loading ready to eat or service message you will receive all the information you need in real time no ma...

Page 86: ...ime the unit will show that the unit is connected with the ConnectedCooking server The symbol appears in the footer The unit will be displayed in the unit overview of ConnectedCooking You will receive...

Page 87: ...age to the eyes Wear tight fitting protective glasses and chemical safe protective gloves while cleaning the unit n Keep the cooking cabinet door closed during the automatic clean Corrosive cleaning a...

Page 88: ...grams are available Programme Mode Description Care product Light Eco Normal Suitable for removing light dirt and scale resulting from use of the unit at up to 200 C n Active Green cleaner tabs n care...

Page 89: ...inet too hot 2 Start the cool down function 41 to reduce the cooking cabinet temperature 3 Select the desired cleaning programme 88 4 Open the cabinet door 5 Remove all containers racks and trays from...

Page 90: ...You cannot work with the unit again until the cleaning has been performed 1 Press the button 2 Press the button Cleaning 3 Press the button Forced cleaning 4 To activate the forced cleaning process pr...

Page 91: ...the icon bar to return to the overview of the cleaning time schedule 9 Select the day on which a clean is to be performed 10 Press the button ON 11 Set the time when the clean is to be performed 12 Pr...

Page 92: ...the automatic clean turn off the unit from the power supply n Spray the chemical reservoir with either the hand shower or any kind of liquid n Clean your unit daily even if you only use the manual st...

Page 93: ...es of the cooking cabinet door open one after the other 4 Clean the glass panes of the cooking cabinet door with lukewarm water a mild hand dishwashing detergent and a soft cloth 5 Let the glass panes...

Page 94: ...le protection when handling descaler Place the steaming nozzle in descaler B 6 Leave the steaming nozzle in the descaler until the scale is dissolved 7 Remove the descaled steaming nozzle from the des...

Page 95: ...face below it with a soft cloth 3 Replace the central dial If your unit is equipped with a lockable control panel you have to unlock the lockable control panel and open the cover before cleaning the c...

Page 96: ...16 Care 96 112 Operating instructions 3 In case of stubborn dirt soak the accessories in lukewarm water and then remove the dirt with a soft cloth...

Page 97: ...ts are reliable and have a long service life Should customers ever encounter technical issues our RATIONAL Service Partners will provide fast efficient assistance Guaranteed spare parts supply and a w...

Page 98: ...ective Only the convection mode is available at the moment Service 28 4 The temperature limit of the cooking cabinet has been exceeded Only the convection mode is available at the moment Service 42 1...

Page 99: ...enerator has been exceeded No Service 28 2 The temperature limit of the cooking cabinet has been exceeded No Service 34 1 The internal data communication is faulty No Service 34 2 The internal data co...

Page 100: ...ity of care liquid required by the iCareSystem is too low Yes Service 42 4 The water supply is faulty Yes Service 43 4 The internal water supply is not closing Only the convection mode is available at...

Page 101: ...p Operating instructions 101 112 Error report Cause Cooking possible Service 52 2 The cooking cabinet lighting is not working correctly Yes Service 72 The activation temperature of a temperature probe...

Page 102: ...rectly mounted Protection from water jets from all directions is only assured with a correctly mounted air filter 1 slide the air filter into the unit until it locks into place NOTICE Only use dry air...

Page 103: ...or 2 Pull the cooking cabinet door gasket out from the groove and dispose of it 3 Moisten the retaining lips of the new gasket with soapy water 4 First press the corners of the gasket into the corners...

Page 104: ...d injure you 1 Carefully move units over thresholds and inclinations CAUTION Units and Combi Duos on castors can tip over when transported or moved If your unit is on castors or your Combi Duo is on a...

Page 105: ...the unit forwards slightly when cleaning the kitchen release the parking brakes of the mobile stand or the castors 4 Carefully pull the unit forwards 5 Once you are finished with cleaning the kitchen...

Page 106: ...missioning and disposal 20 1 Decommissioning Contact your RATIONAL Service Partner if you would like to decommission the unit 20 2 Disposal Old units contain recyclable materials Dispose of old units...

Page 107: ...e LMxxxA iCombi Pro XS 6 2 3 21 3 Conformity 21 3 1 Units with an electrical connection This unit meets the following EU directives n Directive 2014 53 EU on the harmonisation of the laws of the Membe...

Page 108: ...e limits for a Class A digital device pursuant to part 15 of the FCC Rules These limits are designed to provide reasonable protection against harmful interference when the equipment is operated in a c...

Page 109: ...with smartphone 86 Continuous operation 35 Control panel Clean central dial 95 Cleaning 95 Cooking cabinet climate Combination of steam and hot air 43 Convection 44 Steam 42 Cooking cabinet door Clea...

Page 110: ...Central dial 17 Moves 17 P Performing maintenance yourself 102 Pierce 37 Preheat 37 R Replace gasket 103 Replacing air filter 102 Reset core probe 36 Residual time 37 Rinse 88 Cleaning programs 88 Roa...

Page 111: ......

Page 112: ...RATIONAL UK Limited Siegfried Meister Stra e 1 86899 Landsberg am Lech Tel 49 0 8191 3270 Fax 49 0 8191 21735 info rational online com rational online com 20006 V 10 MDS heju 04 22 EN GB RATIONAL AG...

Reviews: