96
4.
There are two methods to take snapshot. In
“/ Volume configuration / Virtual
disk”
, check the gray button next to the VD number; click
“Take snapshot”
. Or in
“/ Volume configuration / Snapshot”
, click
“Take snapshot”
.
5.
Enter a snapshot name, and then click
“OK”
. A snapshot VD is created.
6.
Select
“/ Volume configuration / Snapshot”
to display all snapshot VDs taken
from the VD.
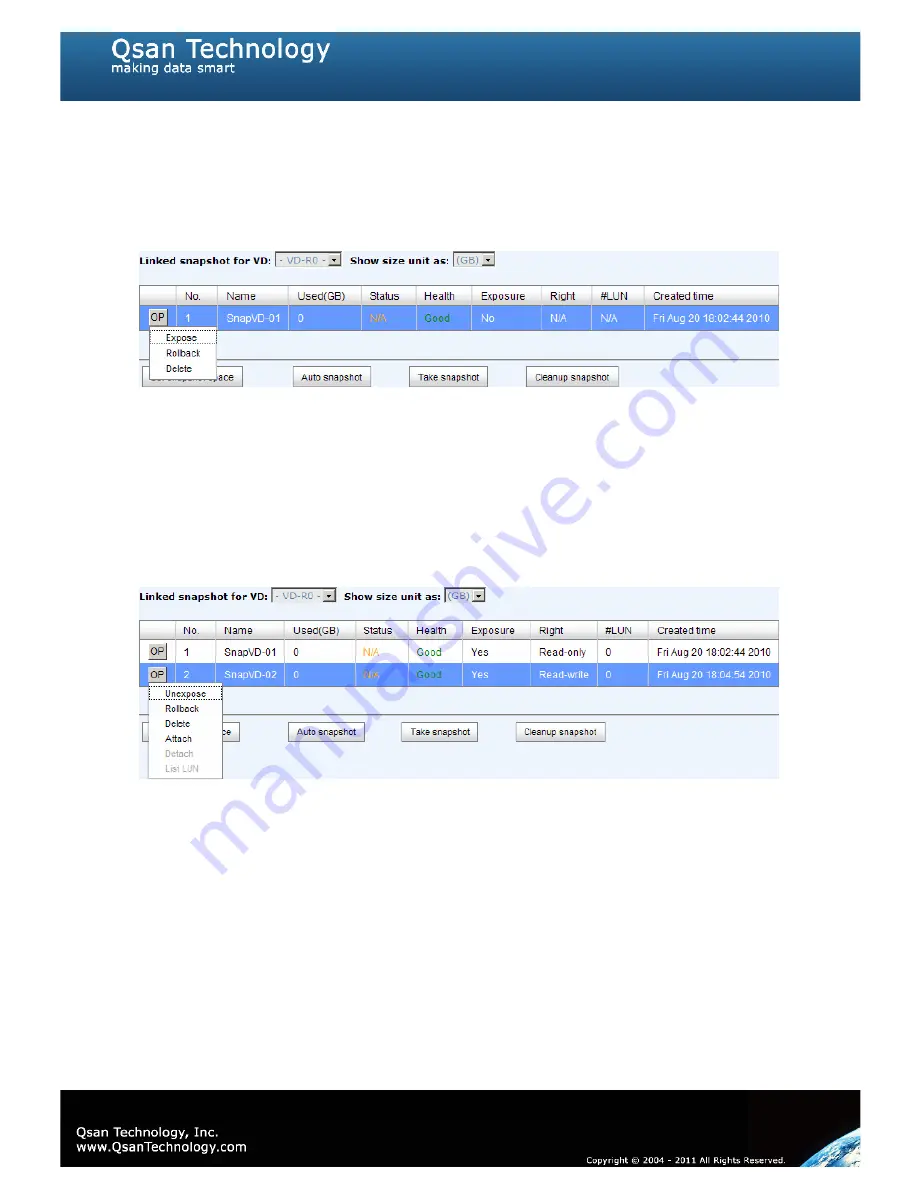
Figure 5.4.1.1
7.
Check the gray button next to the Snapshot VD number; click
“Expose”
. Enter a
capacity for snapshot VD. If size is zero, the exposed snapshot VD is read only.
Otherwise, the exposed snapshot VD can be read / written, and the size is the
maximum capacity for writing.
8.
Attach a LUN to the snapshot VD. Please refer to the previous chapter for attaching a
LUN.
9.
Done. It can be used as a disk.
Figure 5.4.1.2
(Figure 5.4.1.2: This is the snapshot list of “VD-01”. There are two snapshots. Snapshot VD
“SnapVD-01” is exposed as read-only, “SnapVD-02” is exposed as read-write.)
1.
There are two methods to clean all snapshots. In
“/ Volume configuration /
Virtual disk”
, check the gray button next to the VD number; click
“Cleanup
snapshot”
. Or in
“/ Volume configuration / Snapshot”
, click
“Cleanup”
.
2.
“Cleanup snapshot”
will delete all snapshots of the VD and release snapshot space.
5.4.2
Auto snapshot
The snapshot copies can be taken manually or by schedule such as hourly or daily. Please
follow the procedures.
Summary of Contents for P300H61
Page 79: ...79 ...
Page 110: ...110 Figure 5 7 1 2 ...
Page 145: ...145 This form can be got from QSAN ftp ftp ftp qsan com tw QSAN_Support_Form doc ...
Page 148: ...148 Figure B 1 3 Click Done Figure B 2 Figure B 3 ...
Page 151: ...151 Figure B 8 Figure B 9 15 Click Add 16 Click Advanced ...
Page 153: ...153 Figure B 14 22 Done the iSCSI device disconnect successfully ...
Page 154: ...154 System information P300H61 P300H71 SW version 2 0 1 ...


