background image

Chapter 2: Installation  

••••

  18 

Stratum Installation and Maintenance Guide 

Step 2. Terminating


and Connecting the Cables to the ODU


Power Cable Connection 

One Power Cable Termination Kit is packed with each ODU at the factory.  

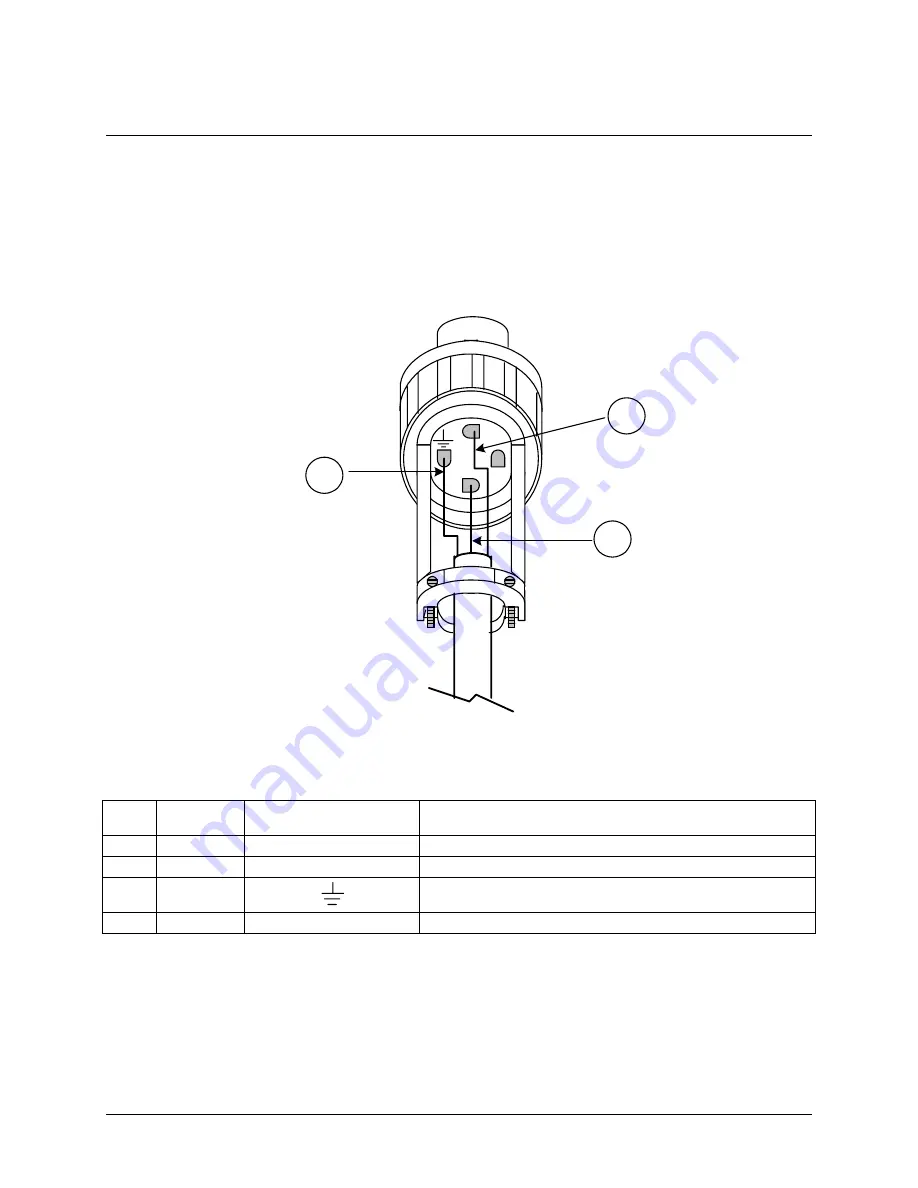
Terminate the power cable as shown in Figure 8 below and then connect to the ODU. 


Figure 8 

Terminating the ODU Power Cable at the ODU


Item 


ODU Connector Pin 

Number 

Description 


Positive DC Voltage (+36V to +48V) 

B  

Ground 


Drain 


Not 

Used 

C

A

B

1

2

3

Summary of Contents for Stratum

Page 1: ...Stratum Wireless Ethernet Bridge and T1 Transport Installation and Maintenance Guide Part 7360 0124 Rev D ...

Page 2: ... trademarks are the property of their respective owners Disclaimer This publication and the information herein are furnished AS IS are subject to change without notice and should not be construed as a commitment by Proxim Inc Proxim Inc assumes no responsibility or liability for any errors or inaccuracies makes no warranty of any kind express implied or statutory with respect to this publication a...

Page 3: ...comply with FCC rules for UNII devices 1 The equipment must be installed in accordance with CFR 47 Section 15 407 a 3 which states The operator of the U NII device or if the equipment is professionally installed the installer is responsible for ensuring that systems employing high gain directional antennas are used exclusively for fixed point to point operations 2 The installer must ensure that th...

Page 4: ... 1 0 MHz band The maximum EIRP shall not exceed 1 0 watt or 17 10 Log B dBm whichever power is less B is the 99 power bandwidth in MHz The Stratum ODU A transmits between 5250 5350 MHz The transmit power is 1 dBm The integral flat panel antenna gain is 26 dBi The EIRP is 27 dBm and complies with the requirement above 5725 5825 MHz Fixed point to point devices for this band are permitted up to 200 ...

Page 5: ...adio frequency exposure outlined in CFR 47 Section 1 1307 b 1 preventing excess exposure to all persons The installed radiating device should be inaccessible to unauthorized personnel The installed unit should be positioned to guarantee no direct continuous exposure to people within 5 feet of the antenna During installation use caution to avoid excess exposures to directed antenna radiation within...

Page 6: ...an estimate of the cost of repairs and or replacement will be submitted to Buyer for approval before the work is started If returned products are found to be in compliance with the specifications and requirements referenced above Proxim may make a nominal charge for the evaluation which may include reasonable travel and expenses if applicable LIMITATIONS OF WARRANTY This warranty does not apply to...

Page 7: ... equipment in a residential area is likely to cause harmful interference in which case users will be required to correct such interference at their own expense All costs of installation including costs associated with avoiding interference of any kind shall be borne by the Buyer EXCEPT AS SPECIFIED HEREIN PROXIM MAKES NO OTHER WARRANTIES WITH RESPECT TO PRODUCTS MANUFACTURED BY PROXIM AND DISCLAIM...

Page 8: ......

Page 9: ...ion 10 Installation Preparation The Path Survey Cable Installation 10 Assembling Tools and Cables Before You Begin 10 For Installing the IDUs and ODUs 10 For the Cabling Between Each IDU and the Associated ODU 11 Step 1 Installing and Mounting the ODUs 12 Setting Antenna Polarization 13 Attaching the Antenna Mount 14 Antenna Mast Requirements 14 Attaching the Mount on the Mast 15 Grounding the ODU...

Page 10: ... Main Menu 37 Clearing Old Alarms and Events 37 Checking that Packets Are Transmitting 38 Step 7 Setting up the T1 Port 40 Connecting T1 Devices 40 Configuring the T1 Port 41 Reviewing T1 Performance and Error Reports 42 Chapter 3 Maintaining the Stratum 43 Understanding the Normal Appearance of the LEDs on the Front Panel 43 Connecting to the Stratum 45 Using the Console Port 45 Using Telnet and ...

Page 11: ...rstanding the Different Alarm and Event Messages 71 Running Diagnostics 72 Running Diagnostic Tests 72 Checking Software Versions and Configuration 74 Restoring Factory Defaults 75 Updating the Software 76 Contacting Technical Support 77 Through Your Reseller or Dealer 77 Through Proxim 77 Appendix A Specifications 78 System 78 LAN Interfaces 78 DSX 1 Interfaces 78 Network Management 78 Security 7...

Page 12: ... iv Stratum Installation and Maintenance Guide ...

Page 13: ... various points in this manual we assume basic knowledge of SNMP Spanning Tree Ethernet network security and network management How This Manual Is Organized This manual is organized into the following sections Chapter 1 Introduction describes the features and functions of the Stratum Chapter 2 Installation gives a detailed description of how to install the hardware and software components Chapter ...

Page 14: ...e two interfaces the following borders are used throughout this manual To specify the VT 100 interface screen shots are shown with the following text border VT 100 To specify the Web Browser HTML interface screen shots are shown with the following text border Web Browser HTML Note The initial configuration must be performed using the console port and the VT 100 interface Typeface Usage Bold Field ...

Page 15: ...nd operation allows fast deployment and is immune to weather fades Fiber class performance Fully SNMP managed using industry standard platforms such as HP OpenView Product Overview Proxim s Stratum is the first product operating in the U NII bands to merge high capacity voice and data with ease of installation and operation Stratum incorporates a MAC layer Ethernet bridge for high capacity bridgin...

Page 16: ...ty available for LAN traffic Stratum incorporates two DSX 1 interfaces for point to point transport of T1 traffic such as digital voice Each T1 operates at full speed and does not share bandwidth with the LAN traffic so all data streams receive the maximum throughput with the lowest latency Stratum s broadband capabilities make it the ideal choice for bandwidth hungry applications like multi Megab...

Page 17: ...ir Figure 1 shows a typical link bridging network traffic between two buildings The two ODUs in the diagram are mounted on the roofs of two adjacent buildings and the associated IDUs are located inside these buildings Indoor Unit IDU Outdoor Unit ODU mounted on pole Indoor Unit IDU Outdoor Unit ODU mounted on pole power and multi mode fiber cables Figure 1 Sample Stratum Installation The standard ...

Page 18: ...erform a path survey is beyond the scope of this manual If you have questions about or problems with the path survey contact your reseller or Proxim Technical Support Assembling Tools and Cables Before You Begin The following tools are needed during installation For Installing the IDUs and ODUs 1 2 socket wrench 1 8 slotted screwdriver Assorted hand tools 2 Phillips screwdriver Digital multi meter...

Page 19: ...able for data transmission the subunit diameter outer diameter of the fiber should be 2 7 to 3 mm Two fibers are required for each IDU ODU pair See step 2 for cable specifications Fiber inspection scope Multi mode fiber light loss test set ST termination kit Fiber cleaning materials Shielded 2 conductor 18 gauge AWG cable with drain wire for DC power connection ...

Page 20: ...e all packing materials in case you need them later Using the foam packing material to protect the painted surfaces of the antenna carefully place the ODU on the packing foam with the antenna facing down Set aside the accessory kit Use this hardware to attach the antenna mount to the ODU and to attach the complete ODU to a supporting mast Note The ODU and antenna are factory weather sealed DO NOT ...

Page 21: ...pany logo appears in the top left corner of the unit when viewed from the front To change to horizontal polarity follow the steps below The following steps should be done in a clean setting to avoid getting any particles into the heat seal 1 Remove the 4 bolts holding the sunscreen and remove the sunscreen 2 Remove the 4 spacers 4 nuts and lockwashers holding the heat sink in place 3 Rotate the he...

Page 22: ... in the installation process Note Avoid scratching the painted surfaces of the ODU during the installation of the antenna mount Antenna Mast Requirements The ODU must be mounted on a tubular steel mast 1 9 to 3 5 inches outside diameter using the remaining hardware supplied in the antenna mount accessory kit The mast must be stable not able to bend or rotate under extreme weather conditions and mu...

Page 23: ...ed to hold the weight of the Outdoor Unit during installation and antenna alignment 3 The bolts and hardware supplied will accommodate masts from 1 9 to 3 5 inches in outside diameter 4 Use a safety rope or second person to hold the ODU in position on the mast resting on the rubber collar Install the top clamping yoke first Install the bottom yoke last Note Be careful not to drop the ODU The weath...

Page 24: ...system ground and there is a voltage difference between the ground points It is important that the Stratum IDUs and ODUs are grounded to an earth ground that does not create a voltage difference between the IDUs and ODUs Lightning Protection Damage to Stratum IDUs or ODUs caused directly or indirectly by lightning is not covered under the manufacturer s warranty In addition to providing proper gro...

Page 25: ...is identical to the mounting procedure for a standard ODU except polarization is established by the rotation of the antenna feed horn not by the position of the ODU Check instructions packed with the parabolic antenna for polarization setting LMR 600 type cable is recommended for connecting the ODU B EXT to a parabolic antenna in order to minimize cable insertion loss Figure 7 Top View of ODU B EX...

Page 26: ...le Connection One Power Cable Termination Kit is packed with each ODU at the factory Terminate the power cable as shown in Figure 8 below and then connect to the ODU Figure 8 Terminating the ODU Power Cable at the ODU Item ODU Connector Pin Number Description A 1 Positive DC Voltage 36V to 48V B 3 Ground C Drain 2 Not Used C A B 1 2 3 ...

Page 27: ...t use some other means of weatherproofing the ST interface For example you can also use heat shrink tubing over the entire connector with silicone rubber to seal both ends of the heat shrink tubing and keep moisture out of the ST interface Any FDDI grade fiber may be used which meets the following requirements 1 62 5 125 multi mode fiber with a bandwidth of at least 160 Mbps 2 Kevlar strength memb...

Page 28: ...Maintenance Guide A cover encloses the FTB and protects the sub cables Figure 9 below shows the FTB with its cover in place Figure 10 shows the FTB without the cover Figure 9 Fiber Termination Box with cover Figure 10 Fiber Termination Box without cover ...

Page 29: ...items shown in Figure 11 below ST Connector Crimping Ferrule Rubber Boot Rubber Sleeve Figure 11 Fiber Termination Kit Components Terminate and connect each fiber cable as described below 1 Position a rubber sleeve boot and crimping ferrule on each fiber 2 Strip the fiber according to the dimensions shown in Figure 12 below Figure 12 Stripping the Fiber Cable 3 Clean the fiber 4 Resin the connecto...

Page 30: ...rimping tool 11 Connect each ST connector to its respective connector on the ODU Note that Tx connects to Rx and Rx connects to Tx 12 Slide each rubber boot over the connector 13 Slide the rubber sleeve over the crimp so that the sleeve rests against the boot Note Always inspect and clean fiber connectors prior to connecting to the equipment Dirty connectors can contaminate equipment s optical int...

Page 31: ...s is required for ventilation Be sure that the ventilating perforations on the sides and rear near the connectors are not blocked by cables or other equipment Better ventilation resulting from air space around the IDU improves equipment reliability Unpacking and Installing the Hardware 1 Remove the IDU from its shipping carton 2 Locate and set aside the accessory kit with cables and mounting hardw...

Page 32: ...equipment The maximum ambient temperature for the Stratum IDU is 50º C When installed in a rack whether closed or open the ambient temperature within the rack should not exceed 50º C Stratum IDUs have fans and ventilation holes to ensure proper air flow and maintain correct internal temperature Do not block the fans or ventilation holes When mounting any equipment in a rack you must consider the m...

Page 33: ...alling the unit on a tabletop attach the 4 self adhesive rubber feet to the bottom of the unit near the corners Do not attach the rubber feet if you are rack mounting the IDU Figure 14 Back View of IDU AC Power Grounding Lug ODU Power RS 232 ports DSX 1 ports IDU ODU Fiber connectors RJ 45 port LAN MII port LAN ...

Page 34: ...ure 15 below Figure 15 Terminating the ODU Power Cable at the IDU Item IDU Connector Pin Number Description A 1 Positive DC Voltage 36V to 48V B 2 Ground C 3 Drain Not Used Attaching the AC Power Cables Make sure the ON OFF switch is OFF or set to 0 Attach the AC power cord to the rear of the IDU and plug the other end into a grounded AC outlet Do not turn the power on until the management console...

Page 35: ...u may use a VT 100 terminal to setup the Stratum If you use a PC running a VT 100 terminal emulator make sure that the emulator uses the arrows for VT 100 commands not for Windows operation If the arrow keys do not work properly use the Tab key to move between fields Also some terminal emulators like HyperTerminal default to auto emulation You may need to manually configure the session to use VT 1...

Page 36: ...n screen is shown below Stratum Wireless Broadband Communication System Software Version 01 01e Copyright c 1996 1999 Access Level Password The Main Menu Once you have successfully logged in to the management program the Main Menu screen will appear as shown below Stratum Main Menu System Status STBY NOT CONNECTED ALARM NEW Alarms Events System Date Time 1999 04 30 11 06 18 0 Local Remote Device N...

Page 37: ...y OK Cancel First set the correct date and time You should configure the Stratum with the correct time since it will use a time stamp when logging events and alarms The following describes the other configuration options available within the System Administration menu The System Administrator field is a text string that contains the name of the administrator responsible for this Stratum unit The D...

Page 38: ...gs If you intend to use the RJ 45 port Auto Negotiation can be set to Enabled or Disabled If Enabled the speed and duplex of the Ethernet port will be automatically negotiated between the Stratum IDU and the connecting Ethernet device If Disabled the speed and duplex of the Ethernet port can be set by the user If you intend to use the MII port with a Fiberoptic transceiver Auto Negotiation should ...

Page 39: ... to standard sized Ethernet packets the Stratum can support larger VLAN and Cisco interswitch link ISL packets If you have a virtual LAN configured on your network configure the Tag Bridging parameter to Enabled and configure the Stratum to use your network s VLAN ID Spanning Tree State setting To enable the spanning tree features of the Stratum configure the Spanning Tree State parameter to Enabl...

Page 40: ...ield A valid Link ID is one to ten alphanumeric characters The Link ID is case sensitive Note that spaces commas periods etc are not valid characters to use within a Link ID The Stratum uses the Link ID with the Challenge Handshake Authentication Protocol CHAP For any given Stratum link both IDUs must have the same Link ID Each Stratum link should be given a unique Link ID Next set the Antenna Aim...

Page 41: ...enter of Peak Signal Slowly over about 5 seconds sweep the ODU in azimuth side to side covering a 90 degree arc Use the ODU s BNC connector and a digital multi meter DMM to aim the antenna The ODU s BNC connector provides an aiming voltage 0 5 VDC that allows you to estimate the strength of the received signal Use the digital multi meter DMM to determine the antenna s position that corresponds to ...

Page 42: ...d as the antenna sweeps from side to side The LED is a guide back to the correct peak value Proxim recommends that two people assist with aiming one positioned at each antenna and that they use cell phones to coordinate their efforts Note that if you follow this procedure take care to move only one antenna at a time Alternately aim one antenna and then go to the other site and aim the second anten...

Page 43: ...e Stratum System Uptime 1999 04 30 09 19 04 0 IDU Temperature 35 ODU Temperature 37 RSSI 54 8 Demod Status Locked PLL Lock Status Locked T1 Channel 1 Status T1 Channel 2 Status LAN Status Session Status RF Link Status Cancel A properly installed link will have an RSSI value that closely matches the value specified by the path survey Exiting Antenna Aiming Mode In the Link Setup screen use the down...

Page 44: ...ss Enter to view to the Diagnostics menu Diagnostics System Status OPERATE CONNECTED OK NEW Alarms Events Ping Test Target IP Addr 0 0 0 0 Target Timeout seconds 0 Count 0 Start_Ping Stop_Ping Loopback Tests System Errors Test T1 Ch 1 DISABLE Time 0 T1 Ch 2 DISABLE Errors 0 System DISABLE Rate 0 Apply_Loopback Start_SYS Stop_SYS BER Tests Channel T1_Ch1 Test Mark Time 0 Errors 0 Rate 0 Start_BER S...

Page 45: ...he down arrow to select Alarms Events Press Enter to view the Alarms Event Log shown below Alarms Event Log System Status OPERATE CONNECTED ALARM Time Stamp Description Type 1999 03 11 13 35 07 0 ODU Link Failure A 1999 03 11 13 35 03 0 Warm Start E 1999 03 11 08 32 43 0 System Diagnostic Ended E 1999 03 11 08 20 04 0 System Diagnostic Started E 1999 03 11 08 19 58 0 System Diagnostic Ended E 1999...

Page 46: ... the down arrow to select RF Link Status Press Enter to display the RF Link Status screen shown below RF Link Status System Status OPERATE CONNECTED OK Alarms Events Local Remote Tx Pkt Count 8392 5657 Tx Byte Count 70978 50869 Rx Pkt Count 5657 8392 Rx Byte Count 50869 70978 Rx Bcast 10 13 Rx Mcast 0 0 Rx Corrupt Packets 1 0 Rx Overruns 0 0 RF Pkt Interval RF Error Interval Start Time 2000 04 18 ...

Page 47: ...t 0 0 Rx Mcast 0 0 Tx Discarded Pkt 0 0 Tx Deferred 0 0 Tx Errored 1 0 Tx Frames Lost 0 0 Collisions 1 0 Rx Discarded Pkt 0 0 Rx Bad CRC 0 0 Rx Oversize 0 0 Rx Jabber 0 0 Rx Alignment Errors 0 0 Link ACTIVE Auto Neg ENABLED Speed 100 MB Duplex FULL DUPLEX LAN Pkt Intvls Tx Error Intvls Rx Error Intvls 1999 04 30 09 19 11 0 Update Clear Cancel The Rx counter shows the number of packets that were re...

Page 48: ...o the device at the far end Stratum s T1s are clear channel i e they are transparent to data voice and signaling contained within T1 frames Connecting T1 Devices To connect the Stratum s T1 ports to a cross connect block you need to make or locate a cable that is properly terminated with an RJ 45 plug on one end with lead pairs corresponding to transmit or receive identified at the other end when ...

Page 49: ...ort and activate the interface If you do not intend to use the T1 interface on your Stratum units do not enable the T1 port as this will generate false alarms for the system Select T1 Config within the System Administration menu and press Enter to view the T1 Configuration menu shown below To enable a T1 port use the down arrow to select the Channel 1 Enable or Channel 2 Enable field and use the s...

Page 50: ...nel 1 is shown below T1 Channel 1 Status System Status OPERATE CONNECTED OK NEW Alarms Events Channel 1 Alarm Status NO ALARM Local Remote Errored Seconds 1 1 Severely Errored Seconds 1 1 Severely Errored Framing Seconds 1 1 Unavailable Seconds 0 0 Line Errored Seconds 1 1 Burst Errored Seconds 0 0 Degraded Minutes 0 0 AS 100 100 EFS 100 100 ES 0 0 SES 0 0 DM 0 0 BES 0 0 T1 Channel 1 Intervals T1 ...

Page 51: ... Normal Appearance of the LEDs on the Front Panel LEDs on the front panel of the Stratum provide a quick verification that the unit is operating correctly Figure 17 Back View of IDU The significance of each LED is shown in the table below The LEDs are also discussed in more detail in the Troubleshooting section beginning on page 67 ...

Page 52: ...I adapter for status LEDs LAN Tx blinking green Blinking indicates packets sent to the Ethernet Applies to RJ 45 link only if using MII check the MII adapter for status LEDs LAN Rx blinking green Blinking indicates packets received from the Ethernet Applies to RJ 45 link only if using MII check the MII adapter for status LEDs Dx On solid green Full duplex on the Ethernet interface Off Half duplex ...

Page 53: ... for the console terminal must be 9600 baud 8 bits No parity 1 stop bit No flow control VT 100 emulation Alternately you may use a VT 100 terminal Note that some terminal emulators like HyperTerminal default to auto emulation You may need to manually configure the session to use VT 100 as the emulation type within the Settings tab of the session s Properties screen Once the PC is attached to the c...

Page 54: ...Status OPERATE CONNECTED OK NEW Alarms Events System Date Time 1999 02 19 11 06 18 0 Local Remote Device Name Stratum Stratum 2 Device Location Lower Support ODU B Upper Support ODU A Link Description Phil B to 237 237 A to Phil IDU Serial Number 15001 15013 ODU Serial Number 10009 10014 Ethernet Address 00 60 c1 00 02 3e 00 60 c1 00 02 3d IP Address 192 168 1 246 192 168 1 247 Alarms DISABLED DIS...

Page 55: ...nly take effect if you apply them Type Ctrl O or OK to apply changes and exit to the previous screen Some changes in the Link Setup screen will automatically reboot the system when they are applied in these cases a prompt will appear to notify you that a reboot is required Exit to Previous Screen Type Ctrl C to exit the current screen and go back to the previous screen Any changes you made will no...

Page 56: ...you are using a browser from Netscape ensure that the Java Script is enabled on the browser or the login attempt will fail Click the Login button and you will be prompted to enter your access level and password Once you have logged in to the Stratum the Main Menu will appear as shown below ...

Page 57: ...ettings and then OK to return to the previous screen On the HTML interface simply click Apply to save changes Accessing a Remote Stratum From a Local Stratum Through the Wireless Link When connected to a Stratum s VT 100 interface you can access the interface of the remote unit if the wireless link is up and operational Note that you can only access a remote Stratum via the console port You cannot...

Page 58: ...lled SNMP can be used to manage and monitor it To enable traps by your SNMP manager first access the Stratum through some other method e g through the console port and configure SNMP access as described below The Stratum supports MIB II RFC 1213 RFC 1406 and the Stratum MIB Once SNMP access has been configured any standard SNMP management tool can be used to monitor performance Configuring SNMP Ma...

Page 59: ...tenance Guide Chapter 3 Maintaining the Stratum 51 Web Browser HTML To enable SNMP management click Configuration and then choose SNMP from the submenu to view the SNMP Configuration screen as shown in the partial screen shot below ...

Page 60: ...um will accept SNMP GET and SET requests from these IP addresses only These values will be ignored if the IP Screening field is set to Disabled SNMP Agent If this field is set to Disabled then all SNMP management functions are disabled IP Screening If this field is set to Disabled then IP address screening is disabled If this field is set to Enabled then only the five IP addresses in the IP Addr S...

Page 61: ...message refer to the information below to determine its significance Current Mode Operate means the RF link is up STBY means the RF link is currently down Aiming means the RF link is down and Antenna Aiming Mode is Enabled Connection Status Connected means the local and remote IDUs are connected to each other Not Connected means the link is not connected Connecting means the local IDU is trying to...

Page 62: ...ent Log System Status OPERATE CONNECTED ALARM Time Stamp Description Type 1999 03 11 13 35 07 0 ODU Link Failure A 1999 03 11 13 35 03 0 Warm Start E 1999 03 11 08 32 43 0 System Diagnostic Ended E 1999 03 11 08 20 04 0 System Diagnostic Started E 1999 03 11 08 19 58 0 System Diagnostic Ended E 1999 03 11 08 19 16 0 System Diagnostic Started E 1999 03 11 08 19 13 0 System Diagnostic Ended E 1999 0...

Page 63: ...g the Stratum 55 Web Browser HTML To check alarms click Alarms Events located on the left hand side of the browser window to view the Alarms Events screen as shown in the following partial screen shot To clear old alarms or events click Clear Alarms or Clear Events ...

Page 64: ...6 intervals of 15 minutes Reports show completed intervals only VT 100 From the Main Menu use the down arrow to select Reports Press Enter to display the Reports menu Reports System Status OPERATE CONNECTED OK NEW Alarms Events System Name Phil B to 237 System Uptime 1999 04 30 09 19 04 0 IDU Temperature 35 ODU Temperature 37 RSSI 54 8 Demod Status Locked PLL Lock Status Locked T1 Channel 1 Status...

Page 65: ...are being transmitted the Tx Packet Count and the Rx Packet Count fields will increase as data is transmitted across the wireless link To verify that these counts are increasing wait for a few seconds and then press Ctrl U VT 100 or click the Update button HTML to update the counters Within the VT 100 session choosing RF Pkt Interval will display a screen that shows packet intervals Choosing RF Er...

Page 66: ... ENABLED Speed 100 MB Duplex FULL DUPLEX LAN Pkt Intvls Tx Error Intvls Rx Error Intvls 1999 04 30 09 19 11 0 Update Clear Cancel Select LAN Pkt Intvls to view the number of packets sent and received between the Stratum and the Ethernet network broken down into 15 minute intervals as shown below LAN Pkt Intervals System Status OPERATE CONNECTED OK NEW Alarms Events Local Remote TxPkt RxPkt Brdcast...

Page 67: ...Interval Reports on the left hand side of the web browser screen to view reports on LAN activity broken down into 15 minute intervals as shown in the partial screen shot below Checking the Status of the T1 Link The T1 Channel 1 Status and T1 Channel 2 Status reports show the status of the T1 line connected to another T1 generating device Note the use of the following abbreviations in the report AS...

Page 68: ... 0 0 T1 Channel 1 Intervals T1 Channel 1 Statistics Select T1 Channel Intervals or T1 Channel Statistics to view additional information about the performance of a specific T1 Channel A sample T1 Channel Statistics screen is shown below T1 Channel 1 Statistics System Status OPERATE CONNECTED OK NEW Alarms Events Local Remote AS EFS ES SES DM BES AS EFS ES SES DM BES 00 00 100 100 0 0 0 0 100 100 0 ...

Page 69: ...eb Browser HTML Click T1 Channel Status under the Status Report heading The T1 Channel 1 Status report is shown in the partial screen shot below Click Interval Reports on the left hand side of the web browser screen to view reports on T1 activity broken down into 15 minute intervals ...

Page 70: ...tions like a user login name and provide different access privileges Each access level can be controlled via a password When logging in to the system enter an access level and the corresponding password VT 100 Stratum System Passwords System Status OPERATE CONNECTED OK Alarms Events User ID Password SuperUser wavespan Maintenance Operator wavespan User wavespan Apply OK Cancel To set the password ...

Page 71: ...word for an access level click Configuration on the left hand side of the browser screen and select Passwords From this screen shown above specify passwords for each access level and choose Apply to save changes If passwords are lost contact Proxim Technical Support for assistance in gaining access to the Stratum ...

Page 72: ... Port Parameters Baud Rate 9600 Stop Bits 1 Parity None Handshake None Data Bits 8 Auto Logout min 30 Apply OK Cancel To change the automatic logout time enter a new value into the Auto Logout min field The maximum time allowed is 90 minutes To specify that the user should NEVER be logged out due to inactivity set this field to zero Note that this will mean that if a user disconnects their termina...

Page 73: ...on Status from the Reports menu Web Browser HTML Note that on the HTML interface if you are logged in as the superuser you can terminate other connections by clicking the Delete Connection button VT 100 Sessions System Status OPERATE CONNECTED OK Alarms Events Connection Type Client IP Address Access Level Login Time RS 232 N A SUPERUSER 1999 03 15 15 09 25 0 Cancel ...

Page 74: ...ngs for the console port select System Admin from the Main Menu and choose Console Port VT 100 Console Port Configuration System Status OPERATE CONNECTED OK Alarms Events Port Parameters Baud Rate 9600 Stop Bits 1 Parity None Handshake None Data Bits 8 Auto Logout min 30 Apply OK Cancel Note that you cannot change the console port parameters from within the Web browser interface Set the communicat...

Page 75: ...Chapter 4 Troubleshooting 67 Chapter 4 Troubleshooting Diagnosing Problems Using the LEDs on the Front Panel On the front panel of the Stratum are LEDs that provide important status information The table below describes how to interpret the LEDs ...

Page 76: ...d on the RJ 45 connector LAN Tx blinking green Each blink indicates a packet received from the RF link and sent to the Ethernet Applies to RJ 45 link only if using MII check the MII adapter for status LEDs off No data is being transmitted to the Ethernet LAN Rx blinking green Each blink indicates a packet received from the Ethernet Applies to RJ 45 link only if using MII check the MII adapter for ...

Page 77: ...6 0 System Diagnostic Started E 1999 03 11 08 19 13 0 System Diagnostic Ended E 1999 03 11 08 18 58 0 System Diagnostic Started E 1999 03 11 08 18 51 0 System Diagnostic Ended E 1999 03 11 08 18 39 0 System Diagnostic Started E 1999 03 11 08 18 37 0 System Diagnostic Ended E 1999 03 11 08 18 11 0 System Diagnostic Started E 1999 03 11 08 18 04 0 System Diagnostic Ended E 1999 03 11 08 17 47 0 Syst...

Page 78: ...tenance Guide Web Browser HTML To check alarms click the Alarms Events entry on the left hand side of the browser window to display the Alarms Events screen shown in the partial screen shot below To clear old alarms or events click Clear Alarms or Clear Events ...

Page 79: ...ture Alarm A The ODU temperature has exceeded 75 degrees Celsius 167 F which can cause catastrophic equipment failure At this temperature the unit should be shut down IDU Temperature Alarm A The IDU temperature has exceeded 75 degrees Celsius 167 F which can cause catastrophic equipment failure At this temperature the unit should be shut down RF Link Down Manual E This event occurs when someone ha...

Page 80: ...t to Mark the Parity bit is asserted in each line sent When set to Space the parity bit is unasserted These two test methods should yield similar results The T1 test sends a test pattern from one Stratum T1 to another radio s T1 across the wireless link The test runs without impacting user data and is unidirectional so you can run the test from both ends simultaneously or from one end at a time to...

Page 81: ...ount 0 Start_Ping Stop_Ping Loopback Tests System Errors Test T1 Ch 1 DISABLE Time 0 T1 Ch 2 DISABLE Errors 0 System DISABLE Rate 0 Apply_Loopback Start_SYS Stop_SYS BER Tests Channel T1_Ch1 Test Mark Time 0 Errors 0 Rate 0 Start_BER Stop_BER Reset_Counters Other Tests View Power On Self Test Results Cancel Web Browser HTML From the browser click the Diagnostics entry and then choose the type of d...

Page 82: ...us OPERATE CONNECTED OK NEW Alarms Events Local Remote ODU Version Boot ROM 01 01a 01 01a Firmware 01 01e 01 01e Hardware 0xA3 0xA3 IDU Version SCNM Boot ROM 01 01i 01 01i SCNM Software 01 01f 01 01f DP Boot ROM 00 20 00 20 DP Software 00 21 00 21 Framer 33 33 Hardware X13B X13B Update Restore Defaults Device Reset Cancel Web Browser HTML To check on the version of the software installed on the St...

Page 83: ...ramer 33 33 Hardware X13B X13B Update Restore Defaults Device Reset Cancel Choose Restore Defaults and then choose Device Reset to restart the Stratum unit Web Browser HTML To restore factory default settings click the Utilities entry on the left hand side of the browser screen and choose Restore Defaults Then choose Device Reset to restart the Stratum unit Do NOT use the Restore Defaults option w...

Page 84: ...M Boot ROM 01 01i 01 01i SCNM Software 01 01f 01 01f DP Boot ROM 00 20 00 20 DP Software 00 21 00 21 Framer 33 33 Hardware X13B X13B Update Restore Defaults Device Reset Cancel Select Update to begin the update procedure Contact Proxim Technical Support for additional information and access codes to obtain a software update Web Browser HTML To update the software used by the Stratum to a new versi...

Page 85: ... through a reseller or dealer contact your reseller or dealer directly for support Through Proxim If problems continue after consulting this manual contact Proxim by voice fax e mail or mail Tel 800 477 6946 or 408 731 2640 Fax 408 731 3676 Web http www proxim com E Mail support proxim com Proxim Inc Attn Technical Support 510 DeGuigne Drive Sunnyvale CA 94085 ...

Page 86: ...ors 10 100 Base TX RJ 45 MII Rate 10 100 Mbps auto negotiate Full or half duplex operation Protocols standards 802 3u Spanning Tree VLAN DSX 1 Interfaces Types Connectors 2 DSX 1 RJ 48C Network Management Console port RS 232 RJ45 DCE AUX port RS 232 RJ45 DTE In Band RF or LAN link via SNMP HTML GUI or V100 Telnet SNMP Agent embedded MIB II RFC 1213 T1 MIB RFC 1406 Enterprise MIB Alarms stored in l...

Page 87: ...25 GHz ODU B ODU B EXT Tx 5 725 to 5 825 GHz Rx 5 25 to 5 35 GHz Link requires one radio each of ODU A and ODU B Propagation Line of sight Range Up to 4 miles with integral antenna Up to 7 miles with external antenna ODU B EXT 99 9 availability C 25 Weather Sensitivity None Transmitter Power Output 1 dBm typical normal 27 dBm typical low power setting Receiver Sensitivity 77 dBm typical Power AC 9...

Page 88: ...s Indoor Unit IDU 1 72 H x 17 W x 12 D 4 4 cm x 43 2 cm x 30 5 cm Outdoor Unit ODU 4 75 H x 13 5 W x 10 25 D 12 1 cm x 34 3 cm x 26 0 cm Integral Antenna 18 7 H x 18 7 W x 75 D 47 5 cm x 47 5 cm x 1 9 cm Weight IDU 11 pounds 5 kg ODU 23 pounds 10 5 kg ODU Mount 8 pounds 3 6 kg Mounting IDU 19 EIA rack 1 unit wall or tabletop ODU 1 9 to 3 5 diameter pole mount IDU to ODU Connection IDU ODU Data Str...

Page 89: ...30 to 55 C ODU Relative Humidity up to 100 all weather operation ODU Wind loading 80 Mph 129 km h operational 120 Mph 193 km h survivability Altitude 10 000 AMSL Regulatory Safety UL 1950 EMC FCC Part 15 Subpart B Class A FCC Authorization FCC Part 15 Subpart E FCC Identifier NGP7020010 Industry Canada Certification 30281021764A Specifications subject to change without notice ...

Reviews: