background image

- 1 - 

The DVR Setup Menu


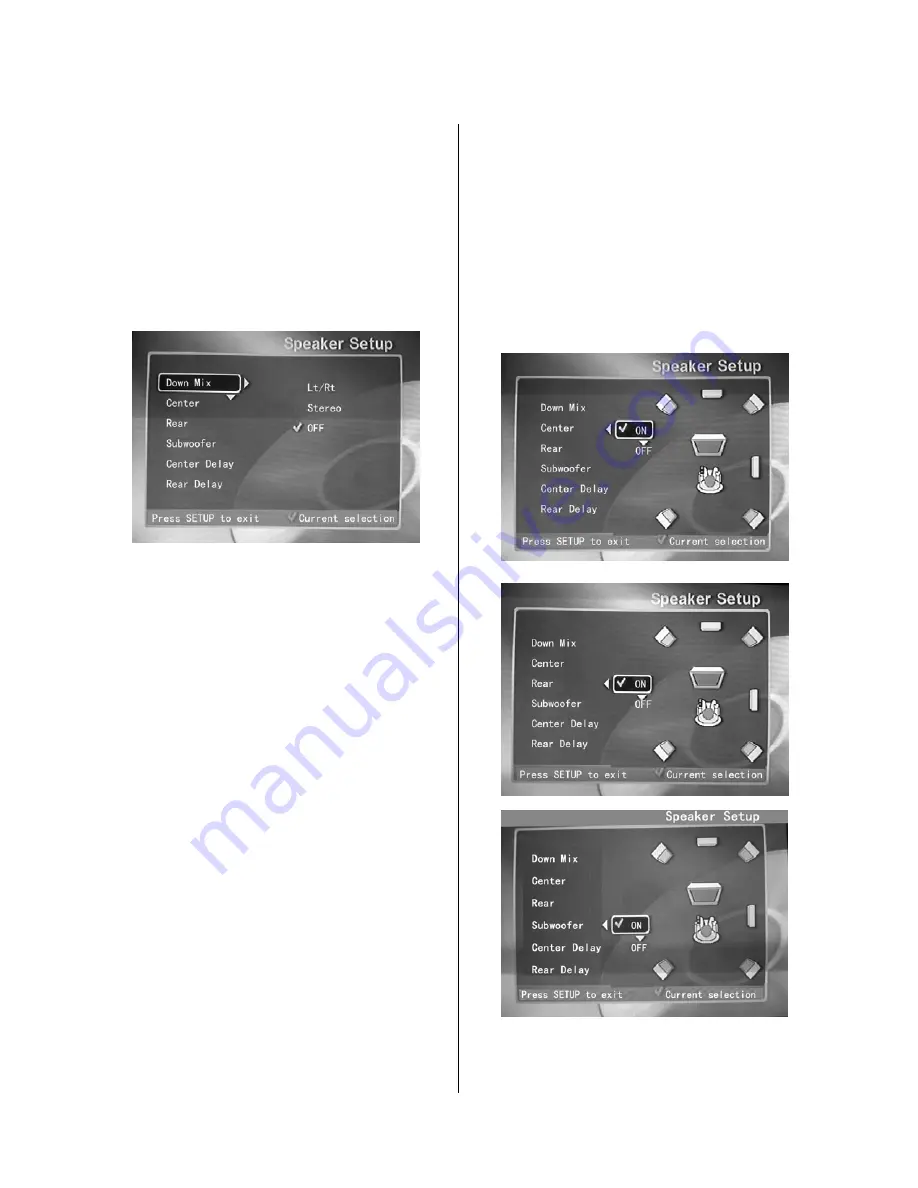
Speaker Setup (Stereo Mode)     
1.

 The DVD-Recorder is 6-channel DVD-Audio 

capable, provided a home theater audio receiver is 
present. If you 

are not

 hooking up the 

DVD-Recorder to a home theater audio receiver, the 
6 (5.1) audio channels will be automatically 
down-mixed for basic stereo playback. The 

Speaker 

Setup

 menu shown below shows the default setting 

for basic stereo use. 


Down mix 

function: means mixing 5.1 channels 

down to two channels. Only when Down mix is off 
will you see all the possible speaker options for 5.1 
speaker systems. Set these options to agree with the 
speakers installed in your home entertainment 
system. 


LT/RT

 function: This method of down mixing from 

5.1 channel to 2 channel audio is well suited as input 
to an external Dolby Pro Logic Decoder (2 channel to 
5.1 channel expansion). 


Stereo

 function: A different method (from LT/RT 

down mix) of down mixing from 5.1 channels to 2 
channels. 


Off

 function: No down mixing will occur. 


Speaker Setup (Multi-Channel Mode) 
1.

 This DVD-Recorder is 6-channel DVD-Audio 

capable (requires a home theater audio receiver). If 
you are connecting the DVD-Recorder to a home 
theater audio receiver, refer to the owner’s manual 
that came with your home theater audio receiver in 
order to select the desired multi-channel audio mode. 
Go to 

Setup Menu

 and select 

Dolby

 to use the 

Speaker Setup

 function in order to set up the center, 

rear, and subwoofer speakers properly. 


Figure 5. Basic TV-Stereo Speaker Setup 

Figure 6. Activating The Center, Rear and 

Subwoofer Speakers 

Summary of Contents for DVR-0800

Page 1: ...1 DVD Player Recorder DVR 0800 Operation Manual...

Page 2: ...Tuner The DVR Setup Menu Auto Channel Scan Setting The Clock TV Media Playback Display Picture Mode Resolution Video Output Speaker Setup Stereo Mode Speaker Test Auto Setup DVD RW DVD R Disk Recordi...

Page 3: ...gs level of safety y Protect the power cord from being walked on or pinched particularly at plugs convenience receptacles and the point where they exit from the product y Only use attachments accessor...

Page 4: ...ding of disks are prohibited This product incorporates copyright protection technology that is protected by method claims of certain U S patents and other intellectual property rights owned by Macrovi...

Page 5: ...r both DVD RW R Program recording of shows program the unit to record an upcoming show by selecting channel date start time end time and quality of recording Manual Real time Clock set up Back to back...

Page 6: ...rect sunlight or other heat sources Please store the disks only in their sleeves Cleaning a Disk Clean disks with a soft cloth Do not use any type of cleaning agent liquid or solvent Wipe from the ins...

Page 7: ...t status indicator 5 Fast forward rewind indicator 6 Disk type indicators 7 Track Chapter indicator 8 Playing time indicator Press to turn on off the power Use to load disk Connection for a video outp...

Page 8: ...put jack CVBS1 3 2ch Audio input jack 4 5 1ch Audio output jacks 5 VIDEO output jack 6 S VIDEO input jack 7 S VIDEO output jack 8 Component video output jacks 9 Optical Digital output jack 10 Coaxial...

Page 9: ...een Progressive and Interlace mode Press to clear the incorrect input when you edit a disc During DVD playback press to access various camera angles if the DVD disk contains multiple camera angles Whe...

Page 10: ...10...

Page 11: ...deo or Component Good Analog Video Connection Plug one end of the supplied video cable into the VIDEO OUT jack on the DVD Player and the other end to the VIDEO IN jack on your TV Better S Video Connec...

Page 12: ...edible stereo sound Use the audio connection described below 1 Standard Analog Audio Connection Using the supplied audio cable connect the AUDIO OUT jacks LEFT RIGHT on the DVD Player with the AUDIO I...

Page 13: ...ction Using an optical audio cable not included connect the OPTICAL jack on the DVD Player with the matching OPTICAL jack on your amplifier or stereo receiver 2 Coaxial Audio Connection Using a coaxia...

Page 14: ...ther set of each is on the rear panel for connecting a camcorder Note Most prerecorded videocassettes and DVDs are copy protected If you try to copy them with the DVD recorder the Recorder display may...

Page 15: ...V and press ENTER During MP3 or CD playback if you want to watch TV please open the disc tray and take out the disc first Auto Channel Scan 1 After you ve selected the setup menu return to the Recordi...

Page 16: ...using the TV Display function The DVD Recorder can display video information during playback on your TV in letterbox pan and scan or wide screen format if you have a wide screen 16 9 TV Picture Mode...

Page 17: ...s method of down mixing from 5 1 channel to 2 channel audio is well suited as input to an external Dolby Pro Logic Decoder 2 channel to 5 1 channel expansion Stereo function A different method from LT...

Page 18: ...lubs auditoriums churches stadiums and the like Rear Delay function Default 0 15ms Increasing the delay setting increases the virtual distance of the rear speaker from the listener The effect in combi...

Page 19: ...ns A FULL to OFF sliding control for dynamic range allows you to turn down the level of loud passages explosions car crashes and the like while at the same time keeping soft passages loud enough to cl...

Page 20: ...ion as shown here 4 Press the SETUP button on the remote to exit and save the selection Recording Modes The DVD Recorder offers three DVD recording functions Quick Record allows you to perform a simpl...

Page 21: ...wn to the Record Program function 4 Select the Quick Record function to call up the Record Show menu Note The player only supports hp DVD R disc Other discs recording qualities are not guaranteed 5 Pr...

Page 22: ...W R disc to be used 8 Go to Setup Menu and select Recording Setup and then Auto Chapter to determine how much time should be allotted to each chapter Use the navigation buttons on your remote control...

Page 23: ...to erase all data from a DVD RW disc Once any disc is erased whatever was on it is permanently gone Use the arrow buttons and the ENTER button of your remote control to erase your disc Finalize Disk...

Page 24: ...yback Pausing Playback 1 Press the button any time during playback of a disk A freeze frame is created that stays on the screen until you resume playing the disk Sound is muted during still playback 2...

Page 25: ...r up to three levels of magnification before returning to normal viewing 1 To zoom in on a single frame press the PAUSE button on the remote to freeze the frame Once the frame is displayed press the Z...

Page 26: ...disc tray insert the JPEG disc and close the tray 2 The disc contents are displayed JPEGs may be in a folder 3 To preview a picture use direction buttons to move the highlight over a folder entry The...

Page 27: ...to use a new password the default password must first be entered A new password comprised of a mixture of letters and numbers ex GB28MN0 works best NOTE If you decide to use passwords keep a written r...

Page 28: ...n the DVD Recorder and the TV Distorted Picture Check the disc for fingerprints Clean the disc with a soft cloth wiping from the center to the edge in a straight line Sometimes a small amount of pictu...

Page 29: ...ltage 0 5Vp p Impedance 75 Video Output Voltage 1Vp p 0 2 Impedance 75 Unbalanced Negative S Video Output Voltage Y 1Vp p C 0 286Vp p Impedance 75 Output Component Output Voltage 0 7Vp p Impedance 75...

Reviews: