background image


Listening to your system

05


37


En


Chapter 5


Listening to your system


Auto playback


• Default setting: 


On


There are many ways to listen back to sources using this 
receiver, but for the simplest, most direct listening option 
is the Stream Direct feature. With this, the receiver 
automatically detects what kind of source you’re playing 
and selects multichannel or stereo playback as 
necessary. 


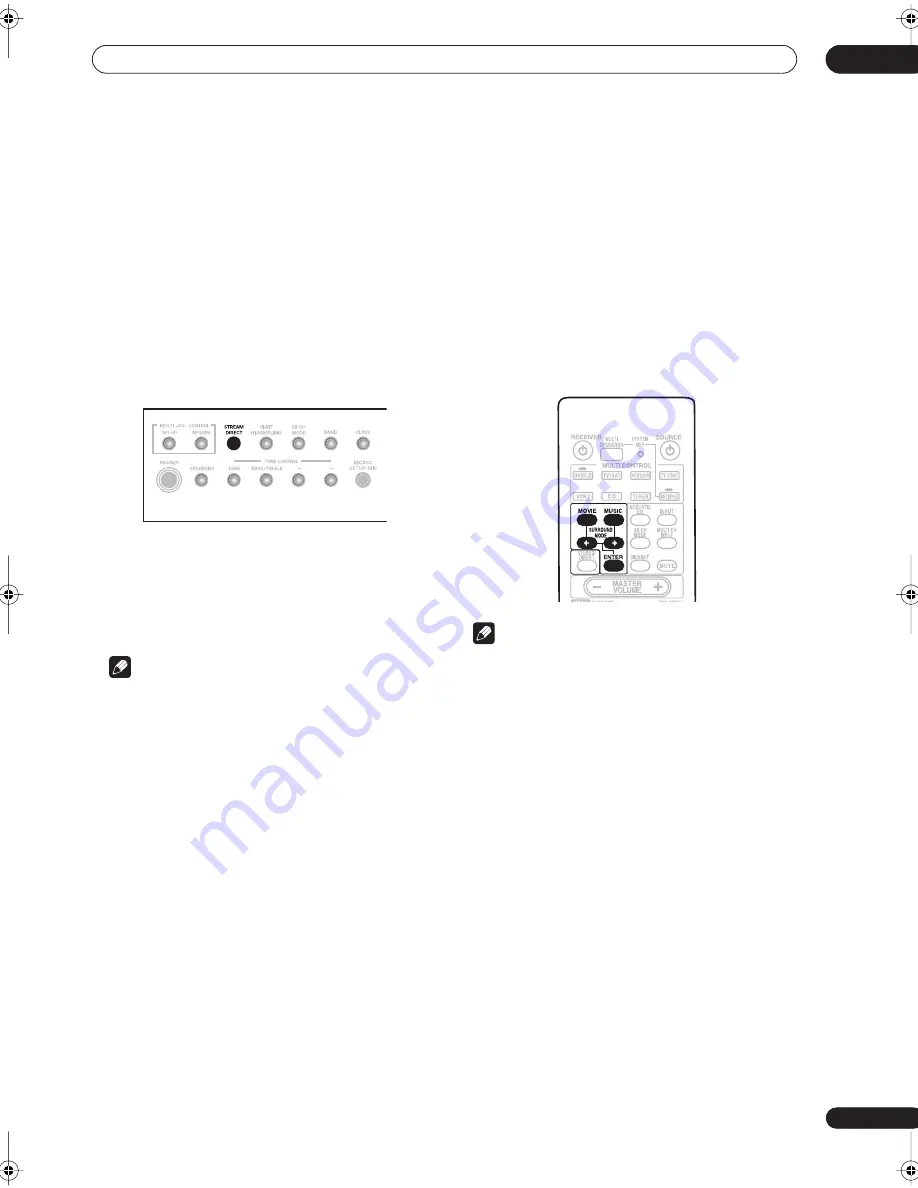
While listening to a source, press STREAM 

DIRECT on the front panel to switch it on or off.


The decoding or playback format shows briefly in the 
display before showing 


STREAM DIRECT


. Check the 

digital format indicators in the front panel display to see 
how the source is being processed. 


 Note


• Stereo surround (matrix) formats are decoded 

accordingly using 


NEO:6 CINEMA


 or 


2


Pro Logic 

IIx MOVIE


 (see 


Listening in surround sound


 below for 

more on these decoding formats).

• The Stream Direct feature is canceled if you connect 

headphones or select the multichannel analog 
inputs.


Listening in surround sound


Using this receiver, you can listen to any source in 
surround sound. However, the listening mode options 
and the current active mode may change depending on 
your speaker setup, the 


SB CH


 mode setting, and the type 

of source you’re listening to.

• If you connected surround back speakers, see also 


Using the surround back channel


 on page 42 for more 

on the 


SB CH


 mode setting.


While listening to a source, press MOVIE or 

MUSIC and 


/


 (cursor left/right) to select a 

listening mode, then press ENTER.


You can also use the front panel 


MUSIC


 and 


MOVIE


buttons instead of the remote control to select listening 
modes. After selecting the mode you want, simply turn 
the 


MULTI JOG


 dial to cycle through the available 

options, pressing 


ENTER


 to select a mode.


 Note


• If the 


SB CH MODE


 is switched to 


OFF


, or the 

surround back speakers are set to 


NO


 (this happens 

automatically if the 


Surround back speaker setting


 on 

page 50 is set to anything but 


Normal System


), 


2


Pro Logic IIx


 (below) becomes 


2


Pro Logic II


 (5.1 

channel sound).

• When the Virtual Surround Back mode (page 43) is 

switched on, 


+VSB


 will show in the front panel 

display after modes which are using this feature.

• In modes that give 6.1 channel sound, the same 

signal is heard from both surround back speakers. 

• You can’t use the 


MUSIC


 and 


MOVIE


 modes with or 

sources over 48kHz when using one of the digital 
inputs.

VSX-54TX_0430.book 37 ページ 2004年5月6日 木曜日 午後8時7分

Summary of Contents for Elite VSX-54TX

Page 1: ...your purchase will be on file for reference in the event of an insurance claim such as loss or theft Improve product development Your input helps us continue to design products that meet your needs Receive a free Pioneer newsletter Registered customers can opt in to receive a monthly newsletter Receive free tips updates and service bulletins on your new product ...

Page 2: ...erference to radio or television reception which can be determined by turning the equipment off and on the user is encouraged to try to correct the interference by one or more of the following measures Reorient or relocate the receiving antenna Increase the separation between the equipment and receiver Connect the equipment into an outlet on a circuit different from that to which the receiver is c...

Page 3: ... as to provide some protection against voltage surges and built up static charges Article 810 of the National Electrical Code ANSI NFPA 70 provides information with regard to proper grounding of the mast and supporting structure grounding of the lead in wire to an antenna discharge unit size of grounding conductors location of antenna discharge unit connection to grounding electrodes and requireme...

Page 4: ...he speakers 29 Connecting antennas 30 AM loop antenna 30 FM wire antenna 30 Connecting external antennas 31 Plugging in the receiver 31 About the AC outlet 31 04 Controls and displays Front panel 32 Display 34 Remote control 35 05 Listening to your system Auto playback 37 Listening in surround sound 37 The MOVIE listening modes 38 The MUSIC listening modes 38 Dolby Pro Logic IIx Music settings 39 ...

Page 5: ...the system 64 10 Other connections Second Zone speaker B setup 65 Switching the speaker system 65 Bi amping your front speakers 66 Bi wiring your speakers 66 Multi room listening 67 Making multi room connections 67 Using the multi room controls 68 Connecting an IR receiver 69 Connecting additional amplifiers 69 Connecting a PC for Advanced MCACC output 70 Advanced MCACC output using your PC 70 11 ...

Page 6: ... surround sound including a special LFE Low Frequency Effects channel for deep realistic sound effects The built in Dolby Pro Logic IIx and DTS Neo 6 decoders not only provide full surround sound decoding for Dolby Surround sources but will also generate convincing surround sound for any stereo source Also with the addition of a surround back speaker you can take advantage of the built in Dolby Di...

Page 7: ...mp or wet areas in extremely hot or cold areas in places where there is vibration or other movement in places that are very dusty in places that have hot fumes or oils such as a kitchen Opening the front panel To open the front panel push gently on the lower third of the panel with your finger Using the remote control Loading the batteries Load the batteries into the remote control as shown below ...

Page 8: ...re no obstacles between the remote and the remote sensor on the unit The remote has a range of about 23 feet 7 meters Remote operation may become unreliable if strong sunlight or fluorescent light is shining on the unit s remote sensor Remote controllers for different devices can interfere with each other Avoid using remotes for other equipment located close to this unit 30 23 feet 7m 30 ...

Page 9: ...ou won t have to make changes for realistic surround sound but other possibilities like listening to a CD with multichannel surround sound are explained in Listening to your system on page 37 Setting up for Surround Sound This receiver was designed with the easiest possible setup in mind so with the following quick setup guide you should have your system hooked up for surround sound in no time at ...

Page 10: ... front left and right speakers only are necessary Note that your main surround speakers should always be connected as a pair but you can connect just one surround back speaker if you like it must be connected to the left surround back terminal You can use speakers with a nominal impedance between 6 16Ω please see Switching the speaker impedance on page 63 if you plan to use speakers with an impeda...

Page 11: ...a big effect on the sound Place your speakers as shown below for the best surround sound effect For more tips on speaker placement see Placing the speakers on page 29 4 Plug in the receiver and switch it on followed by your DVD player your subwoofer and the TV Make sure you ve set the video input on your TV to this receiver Check the manual that came with the TV if you don t know how to do this Al...

Page 12: ... output at high volume 1 Switch on the receiver and your TV Use the RECEIVER button to switch on 2 Connect the microphone to the MCACC SETUP MIC jack on the front panel Make sure there are no obstacles between the speakers and the microphone Place the microphone on the supplied microphone stand shown above for the best results with the Auto Surround Setup Important If you have a tripod use it to p...

Page 13: ...ed go to the next step If you see an ERR message in the right side column there may be a problem with the speaker connection If selecting Retry above doesn t fix the problem turn off the power and check the speaker connections 11 Make sure OK is selected then press ENTER A progress report is displayed on screen while the receiver outputs more test tones to determine the optimum receiver settings f...

Page 14: ... set to output multichannel analog audio Note Depending on your DVD player or source discs you may only get digital 2 channel stereo and analog sound In this case select one of the surround listening modes see Listening in surround sound on page 37 if you need to do this if you want multichannel surround sound Playing a source Here are the basic instructions for playing a source such as a DVD disc...

Page 15: ...operly 2 IR input output An IR connection allows you to connect an external remote control sensor when your component system is in a closed cabinet or shelving unit for example See Connecting an IR receiver on page 69 for connection details 3 Control input output Mini plug terminals for connection to other Pioneer components to enable you to control all your equipment from a single remote sensor S...

Page 16: ...ing to the input functions 100 mA max See Switching components on and off using the 12 volt trigger on page 60 for connection details 15 RS 232C connector This port is provided for connecting a personal computer for graphical output when using Advanced MCACC 16 Speaker terminals These are the main speaker terminals for front center surround and surround back speakers See Installing your speaker sy...

Page 17: ... the most common type of video connection and should be used to connect to the composite video terminals They have yellow plugs to distinguish them from cables for audio S video cables S video cables give you clearer picture reproduction than regular video cables by sending separate signals for the luminance and color Component video cables Use component video cables to get the best possible color...

Page 18: ... on page 24 if you want to use the component video outputs to connect this receiver to your TV See About the video converter on page 16 if you plan on connecting your other video components using different types of video cables than for your TV 2 Connect the analog audio outputs from your TV to the TV SAT inputs on this receiver Use a stereo RCA phono cable for the connection 3 Connect an optical ...

Page 19: ...which input you connected the player to see Assigning the digital inputs on page 72 2 If your DVD player only has stereo analog audio outputs connect these to the DVD LD AUDIO inputs on this receiver Use stereo RCA phono cables for the connection If your DVD player has multichannel analog outputs see Connecting the multichannel analog outputs below for how to connect it 3 Connect a composite or S ...

Page 20: ...re to connect each output to its corresponding input on the receiver 2 If your DVD player also has outputs for surround back channels connect these to the corresponding MULTI CH IN jacks on this receiver Use standard RCA phono cables for the connections If there is only a single surround back output be sure to connect it to the SURROUND BACK L jack on this receiver Note To listen to multichannel a...

Page 21: ...from your set top box component to the DIGITAL 1 TV SAT input on this receiver Use an optical cable for the connection If your set top box only has a coaxial digital output you can connect it to one of the coaxial inputs on this receiver using a coaxial digital audio cable When you set up the receiver you ll need to tell the receiver which input you connected the set top box to see Assigning the d...

Page 22: ... audio connection and a standard RCA video or S video cable for the video connection For a second recorder use the VCR2 outputs 3 Connect an optical digital audio output from the recorder to a digital input on this receiver The example illustration below shows a recorder connected to the optical DIGITAL 2 CD R TAPE1 input When you set up the receiver you ll need to tell the receiver which input yo...

Page 23: ...andard RCA video or S video cable for the video connection See About the video converter on page 16 if you plan to use a different type of video cable than you used to connect your TV 2 If the source component has a digital audio output connect it to a spare digital audio input on this receiver Use a coaxial digital audio cable or an optical cable for the connection depending on the type of input ...

Page 24: ...our TV connected to this receiver s component video MONITOR output 1 Connect the component video outputs of your source to a set of component video inputs on this receiver Use a three way component video cable for the connection 2 Assign the component video inputs to the input source you ve connected This must be done so that they can be used in conjunction with the audio video input s to which yo...

Page 25: ...t to one of the optical inputs on this receiver using an optical cable When you set up the receiver you ll need to tell the receiver which input you connected the player to see Assigning the digital inputs on page 72 The digital outputs from other components can be connected to any spare digital audio inputs on this receiver You can assign them when setting up the receiver see Assigning the digita...

Page 26: ...audio inputs on this receiver If you re connecting a tape deck MD recorder etc connect the analog audio outputs REC to the analog audio inputs on the recorder Use a stereo RCA phono cable for the connections 2 Connect the stereo audio outputs to the LINE inputs on this receiver If you use a turntable with this LINE IN jack only connect one with a built in phono equalizer AUDIOIN OUT PLAY OUT IN RE...

Page 27: ... are especially convenient for portable equipment such as camcorders video games and portable audio video equipment The input signals can be accessed by selecting VIDEO as the input source Pull down the front cover where indicated to access the front panel inputs The illustration below shows example connections to a portable DVD player Note that you may need a specialized optical cable for this co...

Page 28: ...ery least front left and right speakers only are necessary Note that your main surround speakers should always be connected as a pair but you can connect just one surround back speaker if you like it must be connected to the left surround back terminal You can use speakers with a nominal impedance between 6 16Ω please see Switching the speaker impedance on page 63 if you plan to use speakers with ...

Page 29: ...ted in a number of ways depending on your setup See Speaker Setting on page 50 for an overview of the possible configurations Other connections on page 65 provides greater detail on alternate speaker setups such as using speaker system B page 65 bi amping page 66 and bi wiring page 66 Placing the speakers Where you put your speakers in the room has a big effect on the quality of the sound The foll...

Page 30: ...both AM antenna wires 3 Press the AM LOOP antenna terminal tabs to open and insert one wire into each terminal 4 Release the tabs to secure the AM antenna wires 5 Place the AM antenna on a flat surface and point in the direction giving the best reception Avoid placing near computers television sets or other electrical appliances and do not let it come into contact with metal objects Note The signa...

Page 31: ... while If you find it damaged ask your nearest Pioneer authorized independent service company for a replacement Do not use any power cord other than the one supplied with this unit Do not use the supplied power cord for any purpose other than that described below The receiver should be disconnected by removing the mains plug from the wall socket when not in regular use for example when on vacation...

Page 32: ... MUSIC surround listening modes 4 ENTER Use to confirm your selection with the MULTI JOG dial 5 STANDBY indicator Lights when the receiver is in standby 6 Remote sensor Receives the signals from the remote control 7 Display See Display on page 34 8 Advanced MCACC indicator page 41 Lights when Acoustic Calibration EQ is on Acoustic Calibration EQ is automatically set to ALL CH ADJUST after the Auto...

Page 33: ...encies when using the tuner TUNER EDIT Press to memorize and name a station for recall with the MULTI JOG dial 18 MULTI ROOM SOURCE controls If you ve made multi room connections see Multi room listening on page 67 use these controls to control the sub room from the main room see Using the multi room controls on page 68 19 PHONES jack page 40 Use to connect headphones no sound will be heard throug...

Page 34: ...adcast in auto stereo mode MONO page 46 Lights when the tuner MPX mode is set to mono TUNED Lights when tuned to a broadcast 8 SB CH page 42 Indicates the surround back channel or Virtual Surround Back setting AUTO ON or OFF 9 Program format indicators These change according to which channels are active in Dolby DTS and sources LS S and RS will light at the same time to indicate 6 1 channel source...

Page 35: ...OL buttons They are available once you ve programmed the remote to control the appropriate component for example your TV or DVD player See Controlling other equipment on page 53 for more on this 7 Number buttons The operation of these buttons depends on whether the remote control has been set to the RECEIVER or MULTI CONTROL setting see Controlling other equipment on page 53 for more on this When ...

Page 36: ... this button to access receiver functions or when setting up the receiver 13 Receiver functions ACOUSTIC EQ Press to select an acoustic calibration EQ setting INPUT Press to select an input source The button will cycle through all the possible input sources SB CH MODE page 42 Use to select the surround virtual back channel mode MULTI CH INPUT page 40 Press to select the component connected to the ...

Page 37: ...the listening mode options and the current active mode may change depending on your speaker setup the SB CH mode setting and the type of source you re listening to If you connected surround back speakers see also Using the surround back channel on page 42 for more on the SB CH mode setting While listening to a source press MOVIE or MUSIC and cursor left right to select a listening mode then press ...

Page 38: ...ith DTS ES encoded sources DTS ES THX Up to 7 1 channel sound with DTS ES encoded sources especially suited to multichannel movie sources depending on the disc DISC 6 1 or MTRX 6 1 may be displayed Advanced effect modes ACTION Designed for action movies with dynamic soundtracks SCI FI Designed for science fiction with lots of special effects DRAMA Designed for movies with lots of dialog MUSICAL Cr...

Page 39: ...ers for a wraparound effect 3 Use the buttons to adjust the setting Center Width is adjustable between 0 and 7 default 3 Dimension between 3 and 3 default 0 Panorama is ON or OFF default OFF 4 Press EFFECT CH SEL again to adjust other settings Note If the SB CH MODE is switched to OFF 2 Pro Logic IIx above becomes 2 Pro Logic II 5 1 channel sound however the above setting will still be effective I...

Page 40: ...el All sources will be heard in stereo downmixed When you disconnect them it reverts to the previous mode Note Many receiver features such as matrix decoding are not accessible when the headphones are connected When headphones are connected no sound is heard from the speakers However sound will still be output from the preouts You can only hear the front left and right channels when MULTI CH IN is...

Page 41: ...h digital signals the signal type Dolby Digital or DTS also shows in the display The default AUTO setting is usually sufficient letting the receiver decide the most suitable signal type However in other cases for example if you want to record the analog output of a digital source then you should set the input signal type to analog 1 Press RECEIVER 2 Press SIGNAL SEL to select the type of input sig...

Page 42: ...l SB CH AUTO Automatically switches to 6 1 or 7 1 decoding for 6 1 encoded sources for example Dolby Digital EX or DTS ES SB CH OFF Surround back channel is switched off Note You will only hear the surround back channel when you ve selected Normal Surround in the Surround back speaker setting on page 50 Changing the speaker system may automatically change this setting see notes below If the surrou...

Page 43: ...ound back channel options Each press cycles through the options as follows VIRTL SB ON Virtual Surround Back is used for all sources VIRTL SB AUTO Automatically applied to 6 1 encoded sources for example Dolby Digital EX or DTS ES VIRTL SB OFF Virtual Surround back is switched off Note You can t use the Virtual Surround Back setting with THX CINEMA PRO LOGIC II PRO LOGIC IIx MULTI CH IN or STEREO ...

Page 44: ...he digital inputs If you switch on either of these modes when DIRECT is selected the receiver automatically switches to STEREO Using the tone control You can use the tone control to make customized settings for the bass and treble Switching the tone control on or off Default setting Off You ll need to switch the tone control on to adjust the bass and treble below 1 If you re using the remote press...

Page 45: ...ULTI CH IN You can t use digital noise reduction with sources over 48kHz when using one of the digital inputs If you switch on digital noise reduction when DIRECT is selected the receiver automatically switches to STEREO Listening to dual mono soundtracks Default setting DUAL ch1 You can specify how dual mono encoded Dolby Digital soundtracks should be played Dual mono is not widely used but is so...

Page 46: ... has found one Repeat this step to search for other stations Manual tuning To change the frequency one step at a time press the TUNE buttons repeatedly High speed tuning Press and hold the TUNE buttons for high speed tuning releasing the button once you reach the frequency you want Tuning directly to a station Sometimes you ll already know the frequency of the station you want to listen to In this...

Page 47: ...uttons on the remote control to select the station preset 5 While the display is blinking press ENTER 6 Repeat steps 1 5 to memorize up to 30 stations Listening to memorized station presets You can do this from both the remote control and the front panel 1 Press CLASS to select the class in which the station is stored Press repeatedly to cycle through the three memory classes A B and C 2 Use the S...

Page 48: ...le characters are listed below ABCDEFGHIJKLMNOPQRSTUVWXYZ abcdefghijklmnopqrstuvwxyz 0123456789 _ space To exit the process at any time press TUNER EDIT 5 Repeat steps 1 4 to memorize up to 30 preset broadcast station names Tip To change a station name just enter the new name over the top of the old one To erase a station name enter a new name of four spaces You can switch between the frequency di...

Page 49: ...he OSD will go to sleep until a button is pressed With other screens the receiver automatically exits and no settings will be made Caution The test tones used in the Surround Setup are output at high volume the volume increases to 0db automatically 1 Switch on the receiver and your TV Use the RECEIVER button to switch on If headphones are connected to the receiver disconnect them 2 Using the remot...

Page 50: ...another room see Multi room listening on page 67 3 When you re finished select Exit You will return to the Surround Setup menu Normal surround setting If you aren t satisfied with the results the Auto Setup Automatically setting up for surround sound on page 12 you can use these settings to adjust speaker parameters manually Note that these settings overwrite the settings made with the Auto Setup ...

Page 51: ...front speakers are set to SMALL In this case all bass frequencies are sent to the subwoofer If the surround speakers are set to NO the surround back speakers will automatically be set to NO If you select one surround back speaker only make sure that speaker is hooked up to the left surround back terminal If you re using a THX speaker setup we recommend setting all speakers to SMALL 3 When you re f...

Page 52: ...ft all speakers For good sound depth and separation from your system you need to specify the distance of your speakers from the listening position The receiver can then add the proper delay needed for effective surround sound 1 Select Speaker Distance from the Normal setup menu 2 Specify the distance of each speaker from the listening position Adjust the distance of each speaker within the range o...

Page 53: ...the component you want to control is switched on 2 While holding down the REMOTE SETUP button press 1 to select the preset recall setup mode The LED begins to blink 3 Press the MULTI CONTROL button that matches the connection for the component you want to control For example press DVD LD if you want to control the DVD player that you connected to the DVD LD terminals The LED lights continuously Ch...

Page 54: ...ECEIVER or TUNER buttons 3 Select the button corresponding to the command you want to teach the remote control For example press if you want to program the play command from your DVD player remote control The LED blinks rapidly When programming TV CONT you can only select one of the TV CONTROL buttons 4 Point the two remote controls towards each other then press the corresponding button on the oth...

Page 55: ...CT Switches the TV input Not possible with all models TV TV CHANNEL Selects channels Cable TV Satellite TV TV TV VOLUME Adjusts the TV volume TV Use to move back channels Cable TV Satellite TV TV DTV Use to move forward channels Cable TV Satellite TV TV DTV Use to choose the BLUE commands on a DTV menu Satellite TV DTV Use to move back a page in the menu Cable TV Use to choose the YELLOW commands ...

Page 56: ...ward playback CD MD CD R VCR DVD LD DVD recorder Cassette deck Hold down for fast reverse playback CD MD CD R VCR DVD LD DVD recorder Cassette deck Stops playback on some models pressing this when the disc is already stopped will cause the disc tray to open CD MD CD R VCR DVD LD DVD recorder Cassette deck SUB TITLE Displays changes the subtitles on multilingual DVDs DVD DVD recorder Number buttons...

Page 57: ...t where two buttons are listed the first component is the the default for example DVD LD is a Pioneer DVD player TOP MENU GUIDE Displays the top menu of the current DVD LD or DVR you are using DVD LD DVD recorder Takes you to the guide menu of the system VCR Press to select a track CD RETURN Takes you to the previous menu VCR DVD LD DVD recorder ENTER Navigates menu options VCR DVD LD DVD recorder...

Page 58: ...D blinks 4 Repeat steps 2 3 for as many components as you want 5 When you re finished press the REMOTE SETUP button to exit Note You can t use direct function with the RECEIVER TUNER or TV CONT functions Multi Operation and System off The Multi Operation feature allows you to program a series of commands for the components in your system For example you could turn on your TV turn on your DVD playe...

Page 59: ...function selected in step 2 has video input terminals 5 When you re finished press the REMOTE SETUP button to exit Using multi operations You can start multi operations with the receiver switched on or in standby 1 Press MULTI OPERATION 2 Press the MULTI CONTROL button for the component that has been set up with a multi operation The receiver switches on if it was in standby and the programmed mul...

Page 60: ...you ve specified the input functions that will switch on the trigger you ll be able to switch the component on or off just by pressing the input function s you ve set on page 74 Operating other Pioneer components with this unit s sensor Many Pioneer components have SR CONTROL jacks which can be used to link components together so that you can use just the remote sensor of one component When you us...

Page 61: ...l all your components using this receiver s remote control refer to Using the remote control with other components on page 53 and Programming signals from other remote controls on page 54 If you have connected a remote control to the CONTROL IN jack using a mini plug cable you won t be able to control this unit using the remote sensor ...

Page 62: ...his 3 Prepare the source you want to record Tune to the radio station load the CD video DVD etc 4 Prepare the recorder Insert a blank tape MD video etc into the recording device and set the recording levels Refer to the instructions that came with the recorder if you are unsure how to do this Most video recorders set the audio recording level automatically check the component s instruction manual ...

Page 63: ...n choose between four brightness for the front panel display Note that when selecting sources the display automatically brightens for a few seconds 1 Press RECEIVER 2 Press DIMMER repeatedly to change the brightness of the front panel display Tip Switching the dimmer to lowest setting will also switch off the MCACC indicators Switching the speaker impedance Default setting Speaker 8Ω Ω Ω Ω You can...

Page 64: ...imes and all learned remote control commands will be erased Clearing all remote control settings You can clear all custom settings you have made with the remote Press and hold both the REMOTE SETUP button and 0 for more than 3 seconds The LED lights will blink 3 times and all remote control settings will be erased Resetting the system Use this feature to reset the system to its factory default set...

Page 65: ...ck speaker setting on page 50 three speaker system settings are possible using the SPEAKERS button If you selected Normal Surround the button will simply switch your main speaker system on or off The options below are for the Second Zone setting only Use the SPEAKERS button on the front panel to select a speaker system setting As mentioned above if you have selected Normal Surround the button will...

Page 66: ... speaker terminals Caution Most speakers with both Hi and Low terminals have two metal plates that connect the Hi to the Low terminals These must be removed when you are bi amping the speakers or you could severely damage the amplifier See your speaker manual for more information If your speakers have a removable crossover network make sure you do not remove it for bi amping Doing so may damage yo...

Page 67: ... SOURCE MONITOR OUT jacks both on the rear of this receiver You should have a pair of speakers attached to the sub room amplifier as shown in the illustration below SurrBack System multi room setup You must select MR S in Surround back speaker setting on page 50 to use this setup Note that the sound in the sub room will be temporarily interrupted when controlling the main room for example changing...

Page 68: ...e the MASTER VOLUME dial to adjust the volume This is only possible if you selected the VARIABLE volume control in Multi Room and IR receiver setup on page 74 5 When you re finished press CONTROL again to return to the main room controls You can also press the MULTI ROOM SOURCE ON OFF button on the front panel to switch off all output to the sub room Note Multi room can t be used when you re setti...

Page 69: ...ther manufacturers may not use the IR terminology Refer to the manual that came with your component to check for IR compatibility If using two remote controls at the same time the IR receiver s remote sensor takes priority over the remote sensor on the front panel Connecting additional amplifiers This receiver has more than enough power for any home use but it s possible to add additional amplifie...

Page 70: ...ernet access Connect your computer to the RS 232C jack on the rear panel of the receiver Make sure that the receiver and all connected components are switched off and disconnected from the power outlet when you do this Use a commercially available cable to connect the RS 232C jack on your computer to the 9 pin RS 232C jack on this receiver See the documentation provided with the Advanced MCACC app...

Page 71: ...t you ve connected to the digital and component video inputs see The Input Assign menu below Function Rename Change the names that appear on the receiver display and on screen display see Function Rename on page 73 Multi Room Specify your volume setting and IR receiver type for a multi room setup see Multi Room and IR receiver setup on page 74 12V Trigger Specify which components are switched on o...

Page 72: ...numbers beside the inputs on the back of the receiver 3 Select the component that corresponds with the one you connected to that input Select between DVD LD TV SAT VCR1 VCR 2 CD CD R or MD Use the cursor up down buttons and ENTER to do this If you assign a digital input to a certain function for example DVD LD then any digital inputs previously assigned to that function will automatically be switc...

Page 73: ...the System Setup menu 2 Select the name of the input you want to rename 3 Edit the name as necessary then press ENTER repeatedly to set the name and move to the following line Use the front panel MULTI JOG dial or on the remote to change the character and ENTER to move forward a position If you want to change a character you input you can press RETURN to go back one position The name can be up to ...

Page 74: ... speaker setting on page 50 you won t be able to change the volume level 12 Volt Trigger Default setting OFF all components After connecting a component the 12 volt trigger see Switching components on and off using the 12 volt trigger on page 60 it switches on automatically when you select an input function set to switch the trigger on Specify which input functions switch on the trigger below 1 Se...

Page 75: ...l be sent to the subwoofer see Crossover Network below Fine Channel Level Make fine adjustments to the overall balance of your speaker system see Fine Channel Level below Fine Channel Delay Make precise delay settings for your speaker system see Fine Channel Delay on page 76 Acoustic Cal EQ Measure the acoustic characteristics of your room and make detailed adjustments to the frequency balance of ...

Page 76: ...dB so that you ll have plenty of room to adjust the other speaker levels 3 Select each channel in turn and adjust the levels 10dB as necessary Use cursor up down to adjust the volume of the speaker you selected to match the front left reference speaker When it sounds like both tones are the same volume press ENTER to confirm and continue to the next channel If you want to go back and adjust a chan...

Page 77: ...ld have the mic connected when using any of the setup options Setting the Acoustic Calibration EQ automatically If you have already completed Automatically setting up for surround sound on page 12 ALL CH ADJUST and FRONT ALIGN below should already be set Therefore if you want to adjust your settings manually you can skip to Setting the Acoustic Calibration EQ manually below 1 Select Acoustic Cal E...

Page 78: ...nnel and ENTER to select it Use the cursor up down buttons to select the frequency and cursor up down to boost or cut the EQ When you re finished the cursor automatically moves to the next channel after you press ENTER The front speakers can t be adjusted if you selected FRONT ALIGN Tip Changing the frequency curve of one channel too drastically will affect the overall balance If the speaker balan...

Page 79: ...s setup minimizes the unwanted effects of room reverberation by calibrating your system based on the direct sound coming from the speakers It can also provide you with a graphical output of the frequency response of your room Note Before setting up with Professional Acoustic Calibration you should finish calibrating using the Auto Surround Setup on page 12 How to use Professional Acoustic Calibrat...

Page 80: ...furniture and the dimensions of the room The sooner the frequency analysis the less it is influenced by the room We recommend an earlier time setting of 20 40ms to compensate for two major factors that will influence the sound of most rooms Reverberance of high vs low frequencies Depending on your room you may find that lower frequencies seem overly reverberant compared to higher frequencies i e y...

Page 81: ...press ENTER Complete is displayed on screen after the Acoustic Calibration Equalization is set Select Exit to return to the Professional Acoustic Calibration menu 5 If you selected Reverb Measurement select Start and press ENTER Complete is displayed on screen when the reverb measurement is finished this may take 2 6 minutes After selecting Exit you can select Reverb View to see the results on scr...

Page 82: ... Bass Peak Level Some audio sources for example Dolby Digital and DTS include ultra low bass tones Set the bass limiter as needed to prevent the bass from distorting the soundfrom the subwoofer 1 Select Bass Peak Level from the Expert setup menu The current setting is displayed When OFF is displayed the attenuator is off bass output is not affected Important When 80 is displayed no bass is output ...

Page 83: ... Range Control from the Expert setup menu 2 Choose the setting that you want OFF No dynamic range adjustment use when listening at higher volume MID Mid setting MAX Dynamic range is reduced loud sounds are reduced in volume while quieter sounds are increased 3 When you re finished select Exit You will return to the Expert setup menu Tip For general dynamic range control you can use the Midnight li...

Page 84: ...nd lower the 63 Hz and 125 Hz equalizer levels using the manual setting Turning the digital safety feature on may allow you to turn up the volume a little more To switch between SAFETY ON and SAFETY OFF put the receiver into standby then press the STANDBY ON button while holding down the MULTI JOG CONTROL SET UP button on the front panel The unit does not respond when the buttons are pressed Stati...

Page 85: ...er Setting on page 50 The SB CH mode is switched off Set the surround back channel to SB CH ON see page 42 The source is not a 6 1 channel playback source Choose an advanced effect listening mode see Listening in surround sound on page 37 The surround back speakers aren t connected properly Check Installing your speaker system on page 28 to make sure the speakers are connected correctly The surrou...

Page 86: ... DTS signal output is turned off Make sure the player s settings are correct and or the DTS signal out is on Refer to the instruction manual supplied with the DVD player The digital output level is turned down on a CD player or other component equipped with digital output level adjustment capability The DTS signal has been altered by the player and cannot be read Set the digital volume level of th...

Page 87: ...es 19 27 You are using component video connections for your source but not for your TV Using the video converter video signals can be converted from a composite or S video input to a component video output but not vice versa See page 16 for more on this You are using component video connections and the component video inputs are assigned incorrectly Check Assigning the component video inputs on pa...

Page 88: ...tal connections or the digital input is assigned incorrectly Check your digital connections and or assign the digital inputs correctly see Assigning the digital inputs on page 72 The multichannel analog inputs are selected Press MULTI CH INPUT again see Using the multichannel analog inputs on page 40 The Dolby DTS indicator doesn t light when playing Dolby DTS software The player is paused Press p...

Page 89: ...ithin 23 feet and a 30º angle of the remote sensor on the front panel see Operating range of the remote control on page 8 There is an obstacle between the receiver and the remote control Remove the obstacle or move to another place Strong light such as fluorescent light is shining onto the unit s remote control sensor Avoid exposing the remote sensor on the front panel to direct light Something is...

Page 90: ...d by bass management in the receiver Dolby Surround is an encoding system which embeds surround sound information within a stereo soundtrack which a Dolby Pro Logic decoder can then use for enhanced surround listening with greater sound detail Manufactured under license from Dolby Laboratories Dolby Pro Logic Surround EX and the double D symbol are trademarks of Dolby Laboratories DTS The DTS tech...

Page 91: ...closest speaker as you move away from the middle seating position Adaptive Decorrelation slightly changes one surround channel s time and phase relationship with respect to the other surround channel This expands the listening position and creates with only two speakers the same spacious surround experience as in a movie theatre THX Select Before any home theatre component can be THX Select certif...

Page 92: ...ANS 3053 3054 GRUNDIG 3055 HITACHI 3056 3057 3058 3059 3060 INSTANT REPLAY 3061 3062 ITT NOKIA 3063 JC PENNY 3064 3065 3066 3067 3068 3069 JVC 3070 3071 3072 KENDO 3073 KENWOOD 3074 3075 3076 LOEWE 3077 3078 LUXOR 3079 LXI 3080 3081 3082 3083 3084 3085 3086 MARANTZ 3087 3088 MARTA 3089 MATSUI 3090 MEMOREX 3091 3092 MINOLTA 3093 3094 MITSUBISHI 3095 3096 3097 3098 3099 MULTITECH 3100 3101 3102 NEC ...

Page 93: ...onse 5 Hz to 100 MHz dB FM Tuner Section Frequency Range 87 5 MHz to 108 MHz Usable Sensitivity Mono 13 2 dBf IHF 1 3 µV 75 Ω 50 dB Quieting Sensitivity Mono 20 2 dBf Stereo 38 6 dBf Signal to Noise Ratio Mono 73 dB at 85 dBf Stereo 70 dB at 85 dBf Distortion Stereo 0 5 1 kHz Alternate Channel Selectivity 60 dB 400 kHz Stereo Separation 40 dB 1 kHz Frequency Response 30 Hz to 15 kHz 1dB Antenna In...

Page 94: ...r all we want you listening for a lifetime We Want You Listening For A Lifetime Used wisely your new sound equipment will provide a lifetime of fun and enjoyment Since hearing damage from loud noise is often undetectable until it is too late this manufacturer and the Electronic Industries Associationís Consumer Electronics Group recommend you avoid prolonged exposure to excessive noise This list o...

Page 95: ...Published by Pioneer Corporation Copyright 2004 Pioneer Corporation All rights reserved 04E00001 Printed in ARB7309 A ...

Reviews: