45
d
e
4
3
f
b
c
L
R
SW
b
c
g
e
d
h
i
1
To power supply
2
Power cord
3
Left
4
Right
5
Front speaker (STD) or high range speaker (NW)
6
Rear speaker (STD) or middle range speaker (NW)
7
White
8
White/black
9
Grey
a
Grey/black
b
Green
c
Green/black
d
Violet
e
Violet/black
f
Subwoofer (4 Ω)
g
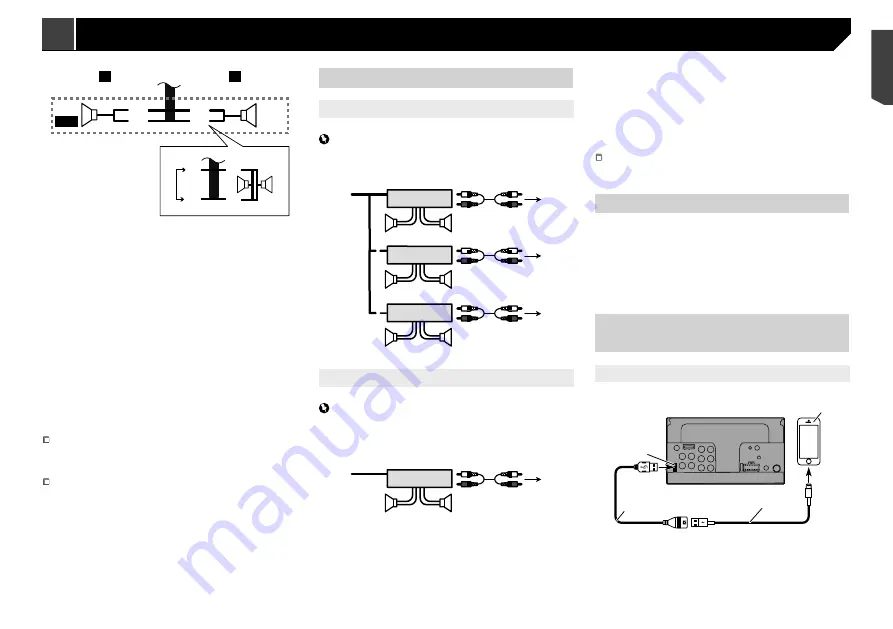
When using a subwoofer of 2 Ω, be sure to connect the
subwoofer to the violet and violet/black leads of this unit. Do
not connect anything to the green and green/black leads.
h
Not used.
i
Subwoofer (4 Ω) × 2
When a subwoofer is connected to this product instead of
a rear speaker, change the rear output setting in the initial
setting. The subwoofer output of this product is monaural.
Refer to
Switching the rear speaker output
on page 35
With a two-speaker system, do not connect anything to the
speaker leads that are not connected to speakers.
Power amp (sold separately)
Without internal amp
Important
The speaker leads are not used when this connection is in
use.
1
1
3
2
4
3
8
5
5
3
2
6
7
7
9
9
2
1
With internal amp
Important
Front speaker and Rear speaker signals (STD) or middle range
speaker and high range speaker signals (NW) are output from
the speaker leads when this connection is in use.
1
3
2
8
9
9
1
System remote control
Connect to Blue/white cable.
2
Power amp (sold separately)
3
Connect with RCA cable (sold separately)
4
To Rear output (STD)
To middle range output (NW)
5
Rear speaker (STD)
Middle range speaker (NW)
6
To Front output (STD)
To high range output (NW)
7
Front speaker (STD)
High range speaker (NW)
8
To subwoofer output (STD)
To low range output (NW)
9
Subwoofer (STD)
Low range speaker (NW)
Please select the appropriate speaker mode between stand-
ard mode (STD) and network mode (NW).
Refer to
On first-time startup
on page 8
iPhone and smartphone
For details on how to connect an external device using a
separately sold cable, refer to the manual for the cable.
For details concerning the connection, operations and
compatibility of iPhone, refer to
Setup for iPod / iPhone or
smartphone
on page 15.
For details concerning the connection and operations of
Android device, refer to
Setup for iPod / iPhone or smartphone
on page 15.
iPhone with Lightning
connector
Connecting via the USB port
1
2
4
3
1
USB port
2
USB cable 1.5 m
3
USB interface cable for iPod / iPhone (CD-IU52) (sold
separately)
4
iPhone with Lightning connector
9
Blue/white
Connect to system control terminal of the power amp (max.
300 mA 12 V DC).
a
Light green
Used to detect the ON/OFF status of the handbrake. This
lead must be connected to the power supply side of the
handbrake switch.
b
Power supply side
c
Handbrake switch
d
Earth side
Speaker leads
1
2
9
a
d
e
7
4
3
5
6
8
b
c
L
R
F/H
R/M
Perform these connections when using a subwoofer without the
optional amplifier.
45
< CRB4735-A >
Connection
Connection
Summary of Contents for AVH-X1890DVD
Page 59: ...59 59 CRB4735 A ...
Page 60: ...60 60 CRB4735 A ...
Page 61: ...61 61 CRB4735 A ...
Page 62: ...62 62 CRB4735 A ...
Page 63: ...63 63 CRB4735 A ...


