background image

44

 


d
e

4

3

f

b
c

L

R

SW

b

c

g

e

d

h

i

1

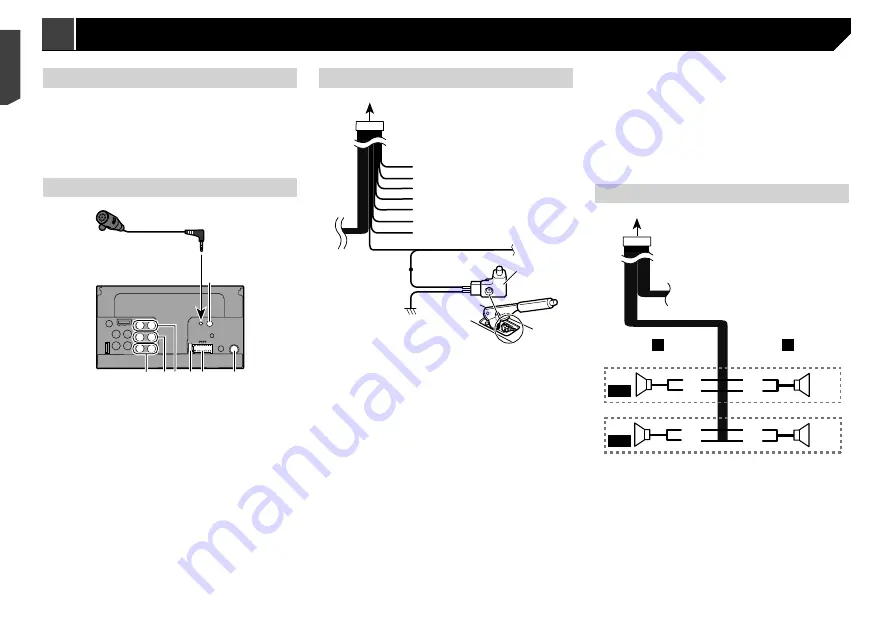
  To power supply

2

  Power cord

3

 Left

4

 Right

5

  Front speaker (STD) or high range speaker (NW)

6

  Rear speaker (STD) or middle range speaker (NW)

7

 White

8

 White/black

9

 Grey

a

 Grey/black

b

 Green

c

 Green/black

d

 Violet

e

 Violet/black

f

  Subwoofer (4 Ω)

g

  When using a subwoofer of 2 Ω, be sure to connect the 

subwoofer to the violet and violet/black leads of this unit. Do 

not connect anything to the green and green/black leads.

h

  Not used.

i

  Subwoofer (4 Ω) × 2

  When a subwoofer is connected to this product instead of 

a rear speaker, change the rear output setting in the initial 

setting. The subwoofer output of this product is monaural.

  Refer to 

Switching the rear speaker output

 on page 35

  With a two-speaker system, do not connect anything to the 

speaker leads that are not connected to speakers.

Notice for the blue/white lead

  When the ignition switch is turned on (ACC ON), a control 

signal is output through the blue/white lead. Connect to an 

external power amp’s system remote control terminal, the 

auto-aerial relay control terminal, or the aerial booster power 

control terminal (max. 300 mA 12 V DC). The control signal is 

output through the blue/white lead, even if the audio source 

is switched off.

This product

1

2

4

5

6

3

7

9 8

1

  Microphone 4 m

(AVH-X5890BT) (AVH-X2890BT)

2

  This product

3

  Wired remote input 

Hard-wired remote control adapter can be connected (sold 

separately).

4

  Aerial jack

5

  Power supply

6

  Fuse (10 A)

7

  Front output (STD)/High range output (NW)

8

  Rear output (STD)/Middle range output (NW)

9

  SubWoofer output (STD)/Low range output (NW)

Power cord

1

2

3
4
5
6
7
8
9

a

b

c

b

d

1

  To power supply

2

  Power cord

3

 Yellow 

To terminal supplied with power regardless of ignition switch 

position.

4

 Red 

To electric terminal controlled by ignition switch (12 V DC) 

ON/OFF.

5

 Orange/white 

To lighting switch terminal.

6

  Black (earth) 

To vehicle (metal) body.

7

 Violet/white 

Of the two lead wires connected to the back lamp, connect 

the one in which the voltage changes when the gear shift 

is in the REVERSE (R) position. This connection enables 

the unit to sense whether the car is moving forwardss or 

backwardss.

8

 Yellow/black 

If you use an equipment with Mute function, wire this lead 

to the Audio Mute lead on that equipment. If not, keep the 

Audio Mute lead free of any connections.

9

 Blue/white 

Connect to system control terminal of the power amp (max. 

300 mA 12 V DC).

a

  Light green 

Used to detect the ON/OFF status of the handbrake. This 

lead must be connected to the power supply side of the 

handbrake switch.

b

  Power supply side

c

  Handbrake switch

d

  Earth side

Speaker leads

1

2

 

 


9
a

d
e

7

4

3

5

6

8

b
c

L

R

F/H

R/M

Perform these connections when using a subwoofer without the 

optional amplifier.

44

< CRB4735-A >

< CRB4735-A >

Connection

Connection

Summary of Contents for AVH-X1890DVD

Page 1: ...Owner s Manual AVH X5890BT AVH X4890DVD AVH X2890BT AVH X1890DVD Monitor RDS AV Receiver English ...

Page 2: ...amming 19 Receiving traffic announcements TA 19 Receiving news announcements 19 Receiving alarm broadcasts 19 Disc 19 Starting procedure 21 Selecting files from the file name list 21 Switching the media file type 21 Searching for the part you want to play 21 Operating the DVD menu 21 Switching the subtitle audio language 21 Operating the DVD menu using touch panel keys 21 Compressed files 22 Start...

Page 3: ...Phone and smartphone 45 iPhone with Lightning connector 45 iPhone with 30 pin connector 46 Android device 46 Camera 46 External video component and the display 47 Installation 47 Precautions before installation 47 Before installing 47 Installation notes 47 Installation using the screw holes on the side of this product 48 Installing the microphone 48 Mounting on the sun visor 48 Installation on the...

Page 4: ...aler or the nearest authorised Pioneer Service Station Do not use this product in this condition because doing so may result in a fire electric shock or other failure If you notice smoke a strange noise or odour from this product or any other abnormal signs on the LCD screen turn off the power immediately and consult your dealer or the nearest authorised Pioneer Service Station Using this product ...

Page 5: ...roducts Please check the support section of the Pioneer website for all available software updates Protecting the LCD panel and screen Do not expose the LCD screen to direct sunlight when this product is not used This may result in LCD screen malfunc tion due to the resulting high temperatures When using a mobile phone keep the aerial of the mobile phone away from the LCD screen to prevent disrupt...

Page 6: ...battery if the remote control is not used for a month or longer There is a danger of explosion if the battery is incorrectly replaced Replace only with the same or equivalent type Do not handle the battery with metallic tools Do not store the battery with metallic objects If the battery leaks wipe the remote control completely clean and install a new battery When disposing of used batteries comply...

Page 7: ...ween media file types when playing the data of Disc USB 10 RETURN Returns to the specified point and begins playback from there 11 Pauses or resumes playback or For audio Press and hold to perform fast reverse or fast forwards For video Press to perform fast reverse or fast forwards or Press to return to the previous track chapter or go to the next track chapter Press to answer or end a call Stops...

Page 8: ...h front and rear speakers or a 6 speaker system with front and rear speakers and subwoofers Network Mode 3 way system with a high range speaker middle range speaker and subwoofer low range speaker for reproduction of high middle and low frequencies bands WARNING Do not use the unit in standard mode when a speaker system for 3 way network mode is connected to this unit This may cause damage to the ...

Page 9: ...efg Abcdefg 6 10 48 21 6 10 iPod Disc AUX iPod Bluetooth Audio Radio AV 48 21 6 10 Radio Camera View Source OFF PowerOFF System Top menu screen Time and date setting screen Setting menu screen AV operation screen Phone menu screen AV source selection screen Application operation screen Application menu screen favourite source icons Recent application icons 4 4 1 You can control the iPhone or smart...

Page 10: ...ss 2 Touch the AV operation key The AV operation screen appears iPod 48 21 Abcdefghi Abcdefghi ABC Pops 99999 99999 9999 99 9999 99 6 10 1 1 Displays the source list Selecting a source Source on the AV source selection screen 1 Display the AV source selection screen 2 Touch the source icon p When you select Source OFF the AV source is turned off Source on the source list 1 Display the source list ...

Page 11: ...tration make sure that Visibility in the Bluetooth menu is set to On For details on a Bluetooth device operations refer to the operating instructions supplied with the Bluetooth device Refer to Switching visibility on page 12 p Two mobile phones can be connected to this product at the same time Refer to Switching the connected Bluetooth device on page 12 p If you try to connect an unconnected mobi...

Page 12: ...his product off and never disconnect the phone while the software is being updated 1 Connect the USB storage device stored the version update file to this unit Refer to Plugging and unplugging a USB storage device on page 8 2 Display the Bluetooth screen Refer to Displaying the Bluetooth screen on page 11 3 Touch BT Software Update 4 Touch Start Follow the on screen instructions to finish updating...

Page 13: ...device on page 11 Displaying the Phone menu screen 1 Press 2 Touch The Phone menu screen appears Making a phone call You can make a phone call in many different ways Direct dialling 1 Display the Phone menu screen Refer to Displaying the Phone menu screen on page 13 2 Touch 3 Touch the number keys to enter the phone number 4 Touch to make a call 5 Touch to end the call p You may hear a noise when ...

Page 14: ...n switch to private mode talk directly on your mobile phone 1 Touch or to turn private mode on or off p If two mobile phones are connected to this product and the first phone is set to private mode you can receive incoming calls on the second phone while maintaining the call in progress on the first phone p When two mobile phones are connected to this product and private mode of the first phone is...

Page 15: ... entry of an unknown user no phone number in the received call history If calls are made by operating your mobile phone no history data will be recorded in this product Phone book transfers If there are more than 1 000 phone book entries on your mobile phone not all entries may download completely Depending on the phone this product may not display the phone book correctly If the phone book in the...

Page 16: ...tor cables p Operation methods may vary depending on the iPod model and the software version p Depending on the software version of the iPod it may not be compatible with this product For details about iPod compatibility with this product refer to the information on our website This manual applies to the following iPod models iPod with 30 pin connector iPhone 3GS 4 4s iPod touch 2nd 3rd 4th genera...

Page 17: ...ion is required Available sources iPod audio iPod video iPod iPhone with a Lightning connector Device connection method When connecting via Bluetooth AVH X5890BT AVH X2890BT When connecting via CD IU52 sold separately Smartphone Setup Device iPhone iPod iPhone iPod Connection Wireless via BT USB Bluetooth connection Bluetooth connection is required Available sources iPod audio iPod video AppRadioM...

Page 18: ...trongest broadcast frequencies under the preset tuning keys 1 to 6 p Storing broadcast frequencies with BSM may replace those you have already saved p Previously stored broadcast frequencies may remain stored if the number of frequencies stored has not reached the limit 1 Touch 2 Touch to begin a search While the message is displayed the six strongest broadcast frequencies will be stored under the...

Page 19: ...switch On or Off Receiving traffic announce ments TA The traffic announcement can be received from the last selected frequency interrupting the other sources The default setting is Off 1 Display the Radio settings screen Refer to Displaying the Radio settings screen on page 18 2 Touch TA Interrupt to switch On or Off Receiving news announcements The news can be received from the last selected freq...

Page 20: ...tion is available for DVDs featuring multi angle recordings Sets a repeat play range Repeats all files Repeats the current chapter Repeats the current title DVD 48 21 Stop 99 99 9999 99 9999 99 01 L R Pause 6 10 ᵫᶓᶊᶒᶇᴾᶁᶆ ᵐᵍᵐ ᵫᵮᵣᵥᵋᵟ ᵒᵖᶉᵦᶘᴾᵏᵔᶀᶇᶒ ᵰᶃᶒᶓᶐᶌ Video source screen 2 Resumes playback Bookmark This function is available for DVD Video You can memorise one point as a Bookmark for a disc up to fi...

Page 21: ... Touch the item Music Switches the media file type to music compressed audio Video Switches the media file type to video CD DA Switches the media file type to CD audio data CD DA Searching for the part you want to play p For DVD Videos you can select Title Chapter or 10Key p For Video CDs you can select Track or 10Key PBC only 1 Touch 2 Touch the item to select the search function 3 Touch 0 to 9 t...

Page 22: ...s all files Repeats the current folder Repeats the current file Selects the previous folder or the next folder Audio source screen 2 Example USB Constructs the database for using the Music Browse mode This function is available only for USB ROM 48 21 Stop 9999 99 9999 99 OFF Full 01 Pause 6 10 Abcdefghi Abcdefghi 5 Stops playback 3 Performs frame by frame playback Performs slow motion playback Hid...

Page 23: ...itches between playback and pause 4 Still image screen 1 Displays the MIXTRAX screen Refer to MIXTRAX on page 30 2 Displays the link search screen This function is available for the USB storage device only Refer to Selecting a song from the list related to the song currently playing link search on page 24 3 Selects a file from the list Refer to Selecting files from the file name list on page 24 p ...

Page 24: ...a file types you can switch between media file types to play 1 Touch 2 Touch the item Music Switches the media file type to music compressed audio Video Switches the media file type to video CD DA Switches the media file type to CD audio data CD DA Photo Switches the media file type to still image JPEG data Audio file operations Selecting a file by Music Browse p This function is available for the...

Page 25: ... source screen 1 1 2 Switches between playback and pause Skips files forward or backward 3 4 iPod ᵫᵧᵶᵲᵰᵟᵶᴾᵣᵸ 48 21 Abcdefghi Abcdefghi ABC Pops 99999 99999 6 10 x1 Plays files in random order Normal playback Fast playback Slow motion playback Audio source screen 2 Plays randomly songs or videos within the selected list Plays album randomly Sets a repeat play range Repeats all in the selected list ...

Page 26: ...r iPod touch quit all applica tions before connecting the device 2 Display the AV source selection screen 3 Touch iPod Selecting song or video sources from the playlist screen You can search for the song or video you want to play from the playlist screen 1 Touch 2 Touch or to switch the music or video category list 3 Touch the category If you use English as the system language the alphabet search ...

Page 27: ...se listed subject to limitations while driving but the extent to which content can be used is determined by the App providers Starting procedure When connecting an iPhone or smartphone to this product you must select the method for connecting your device Settings are required according to the connected device Refer to Setup for iPod iPhone or smartphone on page 15 For iPhone users 1 Connect your i...

Page 28: ...ced Audio Distribution Profile Only playing back songs on your audio player is possible A2DP and AVRCP Audio Video Remote Control Profile Playing back pausing selecting songs etc are possible p By pressing the or button you can also skip files forwards or backwards p By pressing and hold the or button you can also perform fast reverse or fast forwards p Depending on the Bluetooth device connected ...

Page 29: ...video images stop in a safe place and apply the handbrake Starting procedure You can display the video image output by the device connected to video input 1 Display the System setting screen 2 Touch Input Output settings 3 Confirm that AUX Input is turned on 4 Display the AV source selection screen 5 Touch AUX The image is displayed on the screen Setting the video signal When you connect this prod...

Page 30: ...llowing items are available Auto PAL NTSC PAL M PAL N SECAM iPod ᵫᵧᵶᵲᵰᵟᵶᴾᵣᵸ 48 21 Abcdefghi Abcdefghi ABC Pops 99999 99999 9999 99 9999 99 6 10 Switches between playback and pause Activates the MIXTRAX mode Selects a track Example iPod p By pressing the or button you can also skip files forwards or backwards p By pressing and hold the or button you can also perform fast reverse or fast forwards MI...

Page 31: ...1 2 Touch Flash Pattern 3 Touch the item Sound1 default to Sound6 The flash pattern changes according to the sound level Select a desired mode L Pass1 to L Pass6 The flash pattern changes according to the bass level Select a desired mode Random1 The flash pattern changes randomly according to the sound level mode and low pass mode Random2 The flash pattern changes randomly according to the sound l...

Page 32: ...g To display the camera image touch Camera View on the AV source selection screen Refer to Source on the AV source selection screen on page 10 p To set the rear view camera as the camera for Camera View mode set Back Camera Input to On Refer to Setting rear view camera activation on page 32 CAUTION Pioneer recommends the use of a camera which outputs mirror reversed images otherwise the screen ima...

Page 33: ...ou stop your vehicle in a safe place and apply the handbrake 1 Display the System setting screen Refer to Displaying the System setting screen on page 31 2 Touch Dimmer Settings 3 Touch Day Night to switch the following items Day default Turns the dimmer manually to off Night Turns the dimmer manually to on Setting the dimmer duration optional You can adjust the time that the dimmer is turned on o...

Page 34: ...n only update the firmware when the vehicle is stopped and the handbrake is engaged 1 Download the firmware update files 2 Connect a blank formatted USB storage device to your computer and then locate the correct update file and copy it onto the USB storage device 3 Connect the USB storage device to this product 4 Turn the source off Refer to Selecting a source on page 10 5 Display the System sett...

Page 35: ...he default setting is On 1 Display the Audio setting screen Refer to Displaying the Audio setting screen on page 34 2 Touch Subwoofer to switch On or Off Adjusting the cutoff frequency value You can adjust the cutoff frequency value of each speaker The following speakers can be adjusted Standard Mode Front Rear Subwoofer Network Mode High Mid Subwoofer p Subwoofer Settings is available only when S...

Page 36: ...on setting is set to Front L or Front R p To use this function the vehicle s acoustics must be meas ured in advance If you touch TA On the time alignment is turned off mandatorily Switching the time alignment preset 1 Display the Audio setting screen Refer to Displaying the Audio setting screen on page 34 2 Touch Time Alignment Preset 3 Touch the item Initial default Sets to the initial setting va...

Page 37: ...quency The distance has been calculated by a computer to provide optimum delay to ensure accurate results Do not change this value The reflected sound within the vehicle is strong and delays occur The LPF on active subwoofers or external amps delay the lower sounds If an error occurs during measurement check the following before measuring the vehicle s acoustics Front speakers left right Rear spea...

Page 38: ...an be memorised separately for the AV operation screen and the Top menu screen 4 Touch the item Preset displays Selects the desired preset background display custom Displays the background display image imported from the USB storage device Refer to Saving the image as the wallpaper on page 24 off Hides the background display Setting the illumination colour The illumination colour can be selected f...

Page 39: ... lan guage is switched during playback using the appropriate key Setting the angle icon display The angle icon can be set so it appears on scenes where the angle can be switched p This setting is available when the selected source is Disc CD Video CD or DVD 1 Display the Video Setup screen 2 Touch DVD DivX Setup 3 Touch Multi Angle repeatedly until the desired setting appears On default Turns the ...

Page 40: ... demand content on this product you must first register this product with your DivX VOD content provider You do this by generating a DivX VOD registra tion code which you submit to your provider p Keep a record of the code as you will need it when you register this product to the DivX VOD provider p This setting is available when the selected source is Disc CD Video CD or DVD 1 Display the Video S...

Page 41: ...lecting a shortcut 1 Display the Favourites screen 2 Touch the desired menu item Removing a shortcut 1 Display the Favourites screen 2 Touch the favourite menu column The selected menu item is removed from the Favourites screen You can also remove a shortcut by touching the star icon in the registered menu column CD 48 21 Ẃ04 ẂAbcdefghi 6 10 2 1 AV 48 21 Full 6 10 3 1 Clock display Displays the ti...

Page 42: ...ratio differs from the image the image may be displayed partly cut off either at the top bottom or sides p This setting is for JPEG images only p You cannot operate this function while driving p Different settings can be stored for each video source p When a video is viewed in a wide screen mode that does not match its original aspect ratio it may appear different p The video image will appear coa...

Page 43: ...ecome wound around the steering column or gearstick Be sure to install this product its cables and wiring away in such so that they will not obstruct or hinder driving Make sure that the cables and wires will not interfere with or become caught in any of the vehicle s moving parts especially the steering wheel gearstick handbrake sliding seat tracks doors or any of the vehicle s controls Do not ro...

Page 44: ...with power regardless of ignition switch position 4 Red To electric terminal controlled by ignition switch 12 V DC ON OFF 5 Orange white To lighting switch terminal 6 Black earth To vehicle metal body 7 Violet white Of the two lead wires connected to the back lamp connect the one in which the voltage changes when the gear shift is in the REVERSE R position This connection enables the unit to sense...

Page 45: ... middle range speaker and high range speaker signals NW are output from the speaker leads when this connection is in use 1 3 2 8 9 9 1 System remote control Connect to Blue white cable 2 Power amp sold separately 3 Connect with RCA cable sold separately 4 To Rear output STD To middle range output NW 5 Rear speaker STD Middle range speaker NW 6 To Front output STD To high range output NW 7 Front sp...

Page 46: ...also allows you to check what is behind you while driving WARNING USE INPUT ONLY FOR REVERSE OR MIRROR IMAGE REAR VIEW CAMERA OTHER USE MAY RESULT IN INJURY OR DAMAGE CAUTION The screen image may appear reversed With the rear view camera you can keep an eye on trailers or back into a tight parking spot Do not use for entertainment purposes Objects in rear view may appear closer or more distant tha...

Page 47: ... product use compatible parts in the manner specified after you have the parts compatibility checked by your dealer If parts other than supplied or compatible ones are used they may damage internal parts of this product or they may work loose and the product may become detached Do not install this product where it may i obstruct the driver s vision ii impair the performance of any of the vehicle s...

Page 48: ...the way 3 Dashboard or console 4 Frame In some types of vehicles discrepancy may occur between the unit and the dashboard If this happens use the supplied frame to fill the gap 5 Truss head screw Be sure to use the screws supplied with this product Installing the microphone X5890BT X2890BT Install the microphone in a place where its direction and dis tance from the driver make it easiest to pick u...

Page 49: ...rrectly The system is performing still slow motion or frame by frame playback with DVD Video There is no sound during still slow motion or frame by frame playback with DVD Video The system is paused or performing fast reverse or forwards during the disc playback For the media other than music CD CD DA there is no sound on fast reverse or forwards The icon is displayed and operation is impossible T...

Page 50: ...gained from charging This problem may be resolved by stopping any unneces sary services on the smartphone Error messages When problems occur with this product an error message appears on the display Refer to the table below to identify the problem then take the suggested corrective action If the error persists record the error message and contact your dealer or your nearest Pioneer service centre ...

Page 51: ...le current Disconnect the USB storage device and do not use it Turn the ignition switch to OFF then to ACC or ON and then connect a compliant USB storage device The USB interface cable for iPod iPhone is short circuited Confirm that the USB interface cable for iPod iPhone or USB cable is not caught in something or damaged Audio Format not supported This type of file is not supported on this produc...

Page 52: ...ed on this DVD drive The region number of the player can be found on this product s chassis DVD R DVD RW DVD R SL Single Layer DVD R DL Dual Layer discs Unfinalised discs which have been recorded with the Video format video mode cannot be played back Discs which have been recorded with the Video Recording format VR mode cannot be played back DVD R DL Dual Layer discs which have been recorded with ...

Page 53: ... characters are used for the file name the subtitle file may not be recognised The character code for the subtitle file should comply with ISO 8859 1 Using characters other than ISO 8859 1 may cause the characters to be displayed incorrectly The subtitles may not be displayed correctly if the displayed characters in the subtitle file include control code For materials that use a high transfer rate...

Page 54: ...xtension for the file and folder name Depending on the display area this product may try to display them with a reduced font size However the maximum number of the characters that you can display varies according to the width of each character and of the display area Folder selection sequence or other operations may be altered depending on the encoding or writing software Regardless of the length ...

Page 55: ... of conditions and the following disclaimer in the documentation and or other materials provided with the distribution Neither the name of the Xiph org Foundation nor the names of its contributors may be used to endorse or promote prod ucts derived from this software without specific prior written permission THIS SOFTWARE IS PROVIDED BY THE COPYRIGHT HOLDERS AND CONTRIBUTORS AS IS AND ANY EXPRESS ...

Page 56: ...ffected by any of the following compatibility issues with future firmware versions of smartphone compatibility issues with future versions of the connected content application s for the smartphone changes to or discontinuation of the connected Content application s or service by its provider Notice regarding video viewing Remember that use of this system for commercial or public view ing purposes ...

Page 57: ...ng Colour system PAL NTSC PAL M PAL N SECAM compatible Audio Maximum power output 50 W 4 ch 4 Ω 50 W 2 ch 4 Ω 70 W 1 ch 2 Ω for subwoofer Continuous power output 22 W 4 50 Hz to 15 kHz 5 THD 4Ω LOAD Both Channels Driven Load impedance 4 Ω 4 Ω to 8 Ω 2 Ω for 1 ch allowable Preout output level max 4 0 V Equaliser 13 Band Graphic Equaliser Frequency 50 Hz 80 Hz 125 Hz 200 Hz 315 Hz 500 Hz 800 Hz 1 25...

Page 58: ...2 4 2 0 Decode Size MAX 8 192 H x 7 680 W MIN 32 H x 32 W H 264 video decoding format Base Line Profile MPEG4 video decoding format Simple Profile Bluetooth AVH X5890BT AVH X2890BT Version Bluetooth 3 0 certified Output power 4 dBm Max Power class 2 Frequency band 2 400 MHz to 2 483 5 MHz FM tuner Frequency range 87 5 MHz to 108 MHz Usable sensitivity 11 dBf 0 8 µV 75Ω mono S N 30 dB Signal to noi...

Page 59: ...59 59 CRB4735 A ...

Page 60: ...60 60 CRB4735 A ...

Page 61: ...61 61 CRB4735 A ...

Page 62: ...62 62 CRB4735 A ...

Page 63: ...63 63 CRB4735 A ...

Page 64: ...901 TEL 905 479 4411 PIONEER EUROPE NV Haven 1087 Keetberglaan 1 B 9120 Melsele Belgium Belgique TEL 0 3 570 05 11 PIONEER ELECTRONICS ASIACENTRE PTE LTD 253 Alexandra Road 04 01 Singapore 159936 TEL 65 6472 7555 PIONEER ELECTRONICS AUSTRALIA PTY LTD 5 Arco Lane Heatherton Victoria 3202 Australia TEL 03 9586 6300 PIONEER ELECTRONICS DE MEXICO S A DE C V Blvd Manuel Avila Camacho 138 10 piso Col Lo...

Reviews: