< CRD4847-A >
English
20
Chapter
53
En
p
Touch anywhere on the LCD screen to
display the touch panel keys again.
6
Displays the Phone menu screen.
For details, refer to Displaying the phone
menu on page 16.
7
Changes the wide screen mode.
For details, refer to Changing the wide
screen mode on page 71.
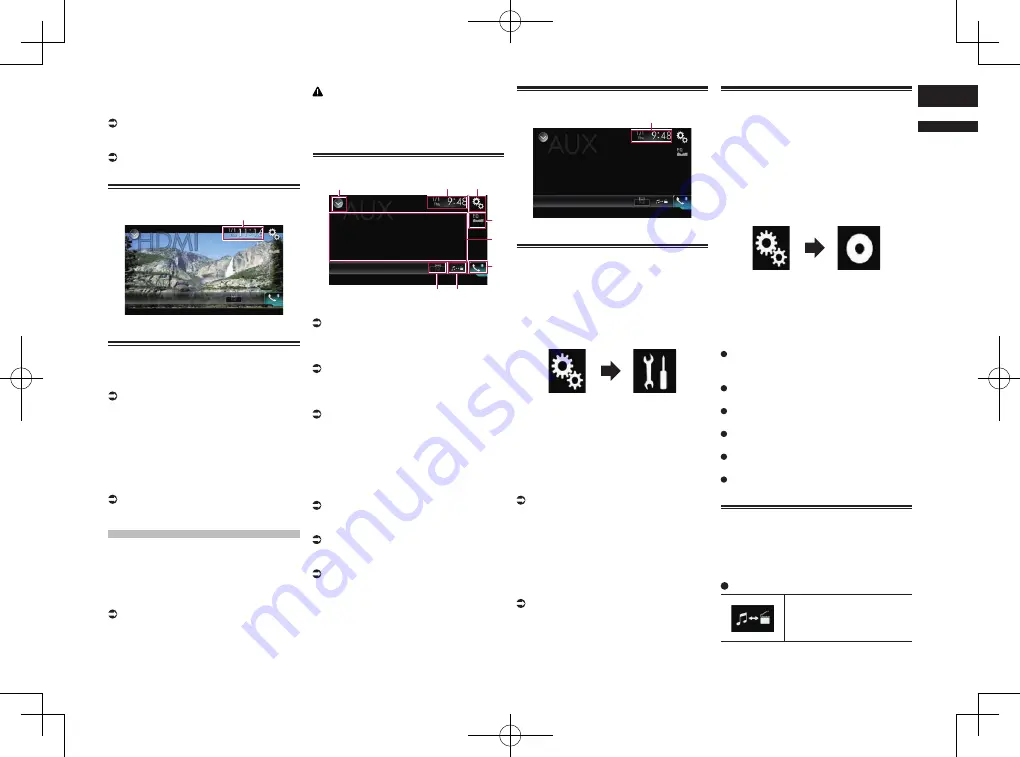
Reading the screen
1
1
Current time and date
Starting procedure
1 Display the AV source selection
screen.
For details of the operations, refer to
Displaying the AV operation screen on
page 12.
2 Touch [HDMI] on the AV source
selection screen.
The image is displayed on the screen.
3 Use the touch panel keys on the
screen to control the external unit.
For details, refer to Using the touch panel
keys on page 52.
Using an AUX source
You can display the video image output by
the device connected to this product. This
section describes operations for an AUX
source.
p
A Mini-jack AV cable (CD-RM10) (sold
separately) is required for connection.
For details, refer to Connecting the exter-
nal video component on page 78.
CAUTION
For safety reasons, video images cannot be
viewed while your vehicle is in motion. To
view video images, you must stop in a safe
place and apply the parking brake.
Using the touch panel keys
1
3
2
8
5
4
6
7
1
Displays the source list.
For details, refer to Selecting a front
source on the source list on page 13.
2
Displays the Time and date setting
screen.
For details, refer to Setting the time and
date on page 70.
3
Displays the Setting menu screen.
4
Recalls equalizer curves.
For details, refer to Using the equalizer on
page 64.
5
Hides the touch panel keys.
Touching this area hides the touch panel
keys.
p
Touch anywhere on the LCD screen to
display the touch panel keys again.
6
Displays the Phone menu screen.
For details, refer to Displaying the phone
menu on page 16.
7
Switches the operation screen.
For details, refer to Switching the opera-
tion screen on page 53.
8
Changes the wide screen mode.
For details, refer to Changing the wide
screen mode on page 71.
Reading the screen
1
1
Current time and date
Starting procedure
You can display the video image output by
the device connected to video input.
1 Press the HOME button to display
the Top menu screen.
2 Touch the following keys in the
following order.
The “
System
” screen appears.
3 Touch [Input/Output Settings].
4 Confirm that “AUX Input” is turned
on.
p
The default setting is “
On
”.
5 Display the AV source selection
screen.
For details of the operations, refer to
Displaying the AV operation screen on
page 12.
6 Touch [AUX] on the AV source
selection screen.
The image is displayed on the screen.
7 Use the touch panel keys on the
screen to control the external unit.
For details, refer to Using the touch panel
keys on page 53.
Setting the video signal
When you connect this product to an AUX
equipment, select the suitable video signal
setting.
p
You can operate this function only for the
video signal input into the AUX input.
1 Press the HOME button to display
the Top menu screen.
2 Touch the following keys in the
following order.
The “
Video Setup
” screen appears.
3 Touch [Video Signal Setting].
4 Touch [AUX].
The pop-up menu appears.
5 Touch the item you want to set.
Auto
(default):
Adjusts the video signal setting
automatically.
PAL
:
Sets the video signal to PAL.
NTSC
:
Sets the video signal to NTSC.
PAL-M
:
Sets the video signal to PAL-M.
PAL-N
:
Sets the video signal to PAL-N.
SECAM
:
Sets the video signal to SECAM.
Switching the operation
screen
You can switch between the screen to oper-
ate music files and that to operate video
files.
Touch the following key.
Switches between the
screen to operate video files
and that to operate music
files.


