58
ζ
ZETA6xxx Installation Guide
7. Repeat the procedure as outlined in step 6 for the
three leads labeled
B
(
B CENTER TAP
is the center
tap lead for Phase B of the motor).
8. Proceed to the Terminal Connections section below.
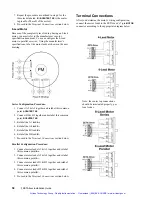
8-Lead Motor
Because of the complexity involved in phasing an 8-lead
motor, you must refer to the manufacturer’s motor
specification document. You can configure the 8-lead
motor in parallel or series. Using the manufacturer’s
specifications, label the motor leads as shown in the next
drawing.
Series Configuration Procedure:
1. Connect A2 & A3 together and relabel this common
point
A CENTER TAP
.
2. Connect B2 & B3 together and relabel this common
point
B CENTER TAP.
3. Relabel the A1 lead
A+.
4. Relabel the A4 lead
A-.
5. Relabel the B1 lead
B+.
6. Relabel the B4 lead
B-.
7. Proceed to the Terminal Connections section below.
Parallel Configuration Procedure:
1. Connect motor leads A1 & A3 together and relabel
this common point
A+
.
2. Connect motor leads A2 & A4 together and relabel
this common point
A–
.
3. Connect motor leads B1 & B3 together and relabel
this common point
B
+.
4. Connect motor leads B2 & B4 together and relabel
this common point
B
–.
5. Proceed to the Terminal Connections section below.
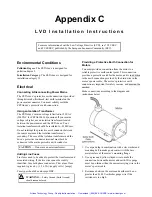
Terminal Connections
After you determine the motor’s wiring configuration,
connect the motor leads to the ZETA6xxx’s 7-pin
MOTOR
connector according to the appropriate diagram below.
Note: the center top connections
should be terminated properly, per
local codes.
Artisan Technology Group - Quality Instrumentation ... Guaranteed | (888) 88-SOURCE | www.artisantg.com


