background image

15

14

13

8

12

9

3

17

1

2

16

4

5

7

6

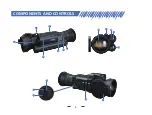
COMPONENTS AND CONTROLS

8

Summary of Contents for SA32

Page 1: ...User Manual Thermal Imaging SA32 SA62 LRF...

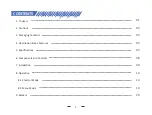
Page 2: ...1 1 To Users 2 Cau ons 3 Packaging Contents 4 Descrip on Key Features 5 Speci ca ons 6 Components and Controls 7 Installa on 8 Opera on 8 1 Shortcut Mode 8 2 Menu Mode 9 Remark 01 02 03 04 05 08 09 14...

Page 3: ...n lated environment without strong electromagne c elds and the storage environment temperature should not be lower than 5 F or higher than 120 F Do not disassemble the device without authoriza on If t...

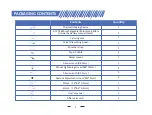
Page 4: ...r strap Type C cable Metal mount Allen wrench D4 0mm Mount ghtening screw KM 10mm Allen wrench D1 5mm Red dot adjustment screw M3 3mm Shim 1 15 8 5 0 1mm Shim 2 15 8 5 0 2mm User s manual A er sales c...

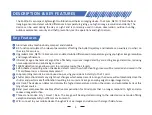
Page 5: ...sers to precisely acquire their targets Self Ac vated recording when the device detects recoil the whole shoo ng process will be recorded and saved in the TF card Never miss a memorable moment Loop re...

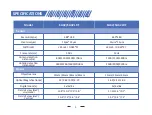
Page 6: ...0m Objec ve lens 25mm 35mm 45mm Op cal Magni ca on x 1 6X 2 2X 2 8X 2x 4x 8x Field of view HxV Horizontal 17 5 12 5 9 7 Field of view HxV Ver cal 2x 4x 8x 384 288 12 m 12 m 25mK 0 025 50Hz 800 1100 14...

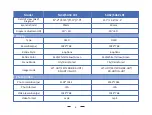
Page 7: ...op ons 6 op ons Red White Yellow Green Red White Yellow Green Re cle Color City Rain Forest City Rain Forest Scene Mode WT HOT SKY EDGE BK HOT RD HOT IN HOT WT HOT SKY EDGE BK HOT RD HOT IN HOT Image...

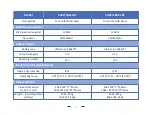
Page 8: ...pera ng me h 5h 5h Degree of protec on IP67 IP67 Opera ng temp 20 C 5 F 50 C 120 F 20 C 5 F 50 C 120 F Product dimension L x W x H mm SA32 195 77 56mm SA32 LRF 195 79 59mm SA62 195 77 56mm SA62 LRF 19...

Page 9: ...15 14 13 8 12 9 3 17 1 2 16 4 5 7 6 COMPONENTS AND CONTROLS 8...

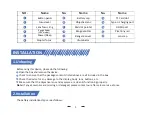
Page 10: ...ame 2 Installa on 1 Unboxing The ba ery installa on steps are as follows Before using this device please do the following Open the box and remove the device Check to ensure that the package contents l...

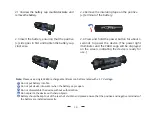
Page 11: ...nsure that the posi ve and nega ve terminals of the ba ery are installed correctly 1 2 3 4 5 2 1 Unscrew the battery cap counterclockwise and removethebattery 2 2 Remove the insulating tape on the pos...

Page 12: ...is included in the product packaging 1 2 3 4 5 11 bracket and accessories mount ghtening screws Allen wrench D4 0mm and shims from the box of the mount with two screws facing the objec ve lens direc...

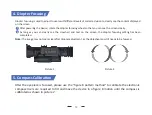
Page 13: ...is used to adjust to users with di erent levels of corrected vision to clearly see the content displayed on the screen Note The image may not seem clear a er diopter adjustment as the objec ve lens s...

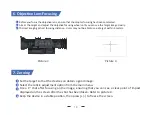
Page 14: ...on the screen a er the shot has been taken Refer to picture 4 Keep the device in a stable posi on then press to freeze the screen Before you focus the objec ve lens ensure that the diopter focusing h...

Page 15: ...eted Press and hold Menu to save and exit Note The rst item RTZ in the sub menu represents the saved zero se ng there are ve pro les A E The X and Y values represent the corresponding display posi ons...

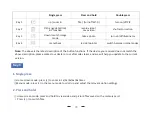
Page 16: ...ngle press Home screen mode press to zoom in 1x 2x 4x 6x 8x mes Menu mode press in the menu mode to scroll up and adjust the relevant op on se ngs 2 Press and hold Home screen mode press and hold to v...

Page 17: ...nd then enter the menu interface Key 2 1 Single press 16 Press OK to play pause the saved videos When playing videos press to fast forward or rewind 2 4 8 mes Press Menu to access the following se ngs...

Page 18: ...range indicator is turned o Press OK a third me to turn o the B C indicator when the B C func on is turned on 1 Single press hot iron mode Menu mode press to scroll down or adjust the relevant op on s...

Page 19: ...press Menu to go back to the previous page 3 Double press Home screen mode double press Menu to switch between city forest rain scene modes 2 Press and hold Home screen mode press and hold Menu to en...

Page 20: ...to enter the sub menu Press menu OK to switch the contrast brightness detail mode op ons and press to adjust the op on value Press and hold OK to exit Upon the next startup the device will maintain t...

Page 21: ...ullet travel speed a er it is red from your ri e expressed in meters Bullet Wt refers to the weight of the bullet expressed in grams g or grains gr which can be obtained from the manufacturers speci c...

Page 22: ...in Celsius C or Fahrenheit F which is also one of the important indicators a ec ng air density in B C which can be measured by using professional tes ng equipment Scope Ht refers to the height di eren...

Page 23: ...rn to the menu Calibrate means to enter the calibra on state A er selec ng please place the device on a horizontal plane surface and press OK to perform automa c calibra on A er calibra on the device...

Page 24: ...screen will only zoom the image in PIP window and the A er the PIP shortcut key mode is turned on the PIP shortcut key will automa cally replace the red dot Press to move the cursor to the scene mode...

Page 25: ...ce Press to move the cursor to the hot track se ng op on and press OK to enter the sub menu Press to move the cursor to select O or On Press OK to save and return to the previous page 10 Hot Track 24...

Page 26: ...lect preferred loop me dura on O Three minutes Five minutes or Ten A er selec on press OK to con rm and save and return to the previous page The auto power o func on allows the device to automa cally...

Page 27: ...to enable Wi Fi and return to the home screen 16 Record Audio 17 WiFi 26 Press to move the cursor to the Wi Fi se ng op on and press OK to enter the sub menu Press to move the cursor to select On or O...

Page 28: ...sers can set the system date and me of the device return to the previous page opera on and return to the previous page 19 Date Time 18 Language If users want to reformat the TF Card it will delete all...

Page 29: ...system and delete all the user data AND all personalized se ngs Please operate with cau on 21 Blind Pixel Compensa on 22 Default Se ngs Press to move the cursor to restore default se ng op on press O...

Page 30: ...age 24 Version REMARK PARD has included an original mount in the package To ensure the best user experience we highly recommend our original mount If users want to use their own mount some devia on wh...

Reviews: