


1.
Power ON. (LED lights on)
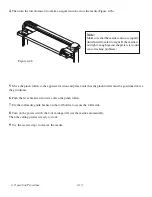
2.
Place the media and lower down the pinch rollers (must position above the grid drums).
3.
Sizing
- Press the related ARROW KEYS
for
roll
(cut from the current position),
edge
(cut from the
edge)
or
single
.
4.
Setup computer and connect with cutting plotter properly.
5.
On-line condition
- Plotter is ready to receive data from computer.
LCM shows:
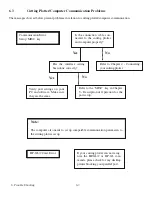
Only under the “Off line mode” can press setup keys, such as CUT_TEST, SPEED_KEY, FORCE_KEY, OFF-
SET_KEY, MISC.KEY, TOOL_SELECT_KEY, and also the ARROW_KEYs.
•
Cutting test
- Press CUT TEST , position carriage by ARROW KEYS , ENTER .
•
Speed/Force/Offset
- Press related key to adjust then repeat the step of Cutting Test for best cutting
result.
•
Function
– Recut, Copy, Quality, Setup and Communication Setup follow the instruction shown on
LCM.
6.
As the cutting plotter receive data from host, LCM displays as follow:
When you are at this state, the only key you can press is Pause_Key.
7.
Change the setting value during cutting - Press PAUSE , for continue cutting press RESUME .
8.
Data Clear
- Will terminate the cutting and clear the data in the buffer. Press DATA CLEAR then
ENTER
.
Metric Unit
English Unit
S– – –.– F – – –. – O –. – – M
L: – – – – –. – – W : – – – –. – –
D a t a I n P r o c e s s i n g E
S – – – . – – F – – – . – – O – . – – –
Quick Menu
A. Quick Menu I


