


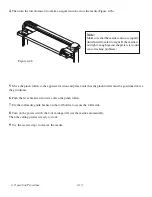


Step 2
Load your media on the platen and slide it under the pinch rollers from either the front side or the backside. The
color alignment rulers on the platen extension will help you to adjust the media precisely.
Note:
Be sure that the media must cover
the paper sensors on the platen when
loading the media. At least one of
the two paper sensors (Figure4-18)
should be covered. Once the media
covers the sensor, the cutting plotter
will size the media’s width and length
automatically.
Backside
Figure 4-18
Paper
Step 3
Then move the pinch rollers manually to the proper position. Be sure the pinch rollers must be positioned above
the grid drum. The white marks on the main beam will remind you where the grid drums are
(Figure 4-19).
Step 4
Push the lever backward to lower down the pinch rollers.
Step 5
Turn on the power; the tool carriage will measure the size of the
media automatically and the plotting cutter will begin to work.
Figure 4-19
4. Operation Procedure 4-7
White Marks


