background image


SMARTZONE  G6 UPS USER  MANUAL 


34 


Initialization Page 

As the UPS unit powers  up and  initializes  the FPD will show the  Smartzone  UPS 
initialization  page, refer to Figure  20. 


Figure 20: UPS Initialization  Page on the Front Panel  Display 

Home Pages 

After initialization  is complete, the FPD automatically  transitions  to the home page. This 
is a summary page  that provides  a quick view of the  UPS current operating  conditions. 
This  page also  allows  the user quick access other pages  in the FDP. 

The home page has  two pages,  the first page provides  the system status  with a block 
diagram of the current working mode. The second page  provides  more information on 
the input  and output  measurements,  on the charged  capacity of the battery,  on the 
battery runtime, on the current output  active and  apparent  power, and on the current 
load  connected to the UPS. 

Home Page 

The home page contains  all the key information that  the user needs  for a quick view of 
the operating  status  of the UPS system, refer to Figures  21 and 22. Figure  21 is 
representative  of all 5-10kVA Single-Phase  UPS units.  Figure  22 is representative  of all 
10-20kVA 3-Phase  UPS units.   

The dark blue  banner  along  the top of the page  provides  the  KVA of the unit, the system 
working mode, and the date and time that is set in the system. The figures show 10kVA, 
Normal Mode, 2022-01-01  and 07:00:00  for the above parameters. 

The light  blue banner  near the top of the page  is the secondary banner  that  provided 

Summary of Contents for SmartZone

Page 1: ...User Manual Uninterruptible Power Supply 5 10KVA SINGLE PHASE 10 20KVA 3 PHASE...

Page 2: ...nel Display FPD 25 Status LED Indicators 25 Power Button Operation 26 Turn On Off UPS 26 Display Operations 28 Menu Structure 29 Display Icons 31 Initialization Page 34 Home Pages 34 Status Pages 37 A...

Page 3: ...SMARTZONE G6 UPS USER MANUAL 2 Appendix D 10 to 20kVA Dry contact port definition 89 Appendix E 10 to 20kVA Backfeed protection port definition 90 Appendix F 10 to 20kVA REPO port definition 91...

Page 4: ...al monitoring control and configuration through a PC This manual provides the information on how to operate the system with all interfacing options The UPS units support VRLA Value Regulated Lead acid...

Page 5: ...ize battery utilization and battery life Intelligent Charging Method The UPS units have an advanced three stage charging method to extend the battery life and guarantee fast charging 1st stage constan...

Page 6: ...connected to loads via outlets or a hardwire connection on the UPS depending on the UPS unit purchased The AC power source for the loads is provided by the output s on the UPS Figure 1 High level Doub...

Page 7: ...power to the load ECO Mode When the UPS is in Normal Mode and the requirement to the load is not critical the UPS can be set at ECO mode to increase the efficiency of the power supplied When the UPS i...

Page 8: ...these units always operate with a wider frequency range 3 phase UPS units always operate in generator mode with no derating Generator mode works in conjunction with normal or ECO mode NOTE If operatin...

Page 9: ...relays will open and the output will shut down AC power to the load will be lost If input power is lost while operating in bypass mode the output relays will open and the output will shut down AC pow...

Page 10: ...e system A single mode system is a single UPS connected to an AC power source and that UPS provide the AC power to the load Parallel Mode All 3 phase UPS units may optionally be configured into a para...

Page 11: ...onfirm that the parallel control cables are connected in a ring configuration between all UPS units in the Parallel mode system control connection in Figure 2 Power ON the first UPS unit and set the w...

Page 12: ...ON all battery breakers and confirm the parameter V I are normal Set all units in the Parallel mode system to normal mode Then connect the load s and confirm the output current from the system is bal...

Page 13: ...t provide a quick high level view of the units operating conditions Normal LED Green sinewave indicates the unit is operating in normal mode Battery LED Yellow battery indicates the unit is operating...

Page 14: ...cted when no external Maintenance Bypass Switch is present in the system The external Maintenance Bypass Switch is only supported on the 10to20kVA 3 Phase UPS Family EPO Signal 7 All units have an Eme...

Page 15: ...ons 1 and 2 3 and 4 5and 6 7 and 8 These dry contact ports allow remote monitoring and control via switches and indicators Back Feed Contacts BACKFEED 1 4 21 For future use OutputSensor Port OUTPUT 22...

Page 16: ...e turned off earlier to conserve battery capacity for the Group 1 outlets Figure 6 North American 5kVA Rear View U05x11V U06N11V U06S11V The 6kVA NA UPS unit has a terminal block for a hardwire connec...

Page 17: ...y backup mode the Group 2 and Group 3 outlets may be turned off earlier to conserve battery capacity for the Group 1 output Figure 8 European 6 10kVA Rear View U06N12V U06S12V U10N11V U10S11V The 10kV...

Page 18: ...roup 3 2x C 19 with a 16A output breaker are switchable outlets these outlets should contain non critical loads During battery backup mode the Group 2 and Group 3 outlets may be turned off earlier to...

Page 19: ...ction and is non switchable Figure 11 European 10 20kVA 3 Phase Rear View U10x32V U15x32V U20x32V Figure 11B 10 20kVA 3 Phase Input Output Battery Terminal Block 10 20kVA3 PhaseUPSPhysical Feature Cal...

Page 20: ...utral wire is drawn from the connection between the negative lead of the 10th or 20th battery and the positive lead of the 11th or 21st battery A total of three wires are connected to the UPS unit the...

Page 21: ...tridges must be changed in sets Do not mix old and new battery cartridges Maintenance Bypass Switch The Maintenance Bypass Switch is an optional 3 RU unit that allows the 3 phase UPS unit to be remove...

Page 22: ...upports Panduit environmental sensors and or sensor hub with the cables provided in the sensor installation kit MAC ID Label The MAC ID of the wired ethernet port is listed on the label on the facepla...

Page 23: ...he table below and is dependent on the duration of the button press RESS DURATION FUNCTION 8 Seconds Soft Reset to Restart Reboot NMC 20 Seconds Hard Reset to Reset factory default settings of NMC Mic...

Page 24: ...power fails Pin 1 to Pin 3 would change from NC Normal Closed to Open 4 AC fail Close When the input utility power fails Pin 1 to Pin 4 would change from NO Normal Opened to Close 5 Batt low Open Whe...

Page 25: ...contains eleven dry contact outputs plus common and one dry contact input plus ground The input and outputs are factory programmed according to functions listed in the table below Figure 16 Relay Car...

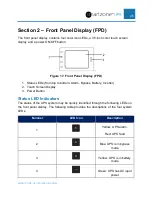
Page 26: ...top to bottom Alarm Bypass Battery Inverter 2 Touch Screen Display 3 Power Button Status LED Indicators The status of the UPS system may be quickly identified through the following LEDs on the front...

Page 27: ...the Input and Output breakers on the UPS are in the ON position Press and hold the ON OFF button for more than 2 seconds to turn ON the UPS power Starting the 3 Phase UPS with an Optional Maintenance...

Page 28: ...BS source is supplying power to the load through the Maintenance breaker Switch to Normal Operation from Maintenance Bypass through the MBS Note Never attempt to switch the UPS back to Normal Mode unt...

Page 29: ...the power distribution panel 3 Phase UPS only Switch OFF the Output breaker on the MBS The UPS shuts down To completely isolate the UPS from AC Input Mains you either need a MBS unit that is operating...

Page 30: ...SMARTZONE G6 UPS USER MANUAL 29 Menu Structure 5 10kVA Single Phase UPS Menu Structure Figure 18 5 10kVA Single phase UPS Menu Structure...

Page 31: ...SMARTZONE G6 UPS USER MANUAL 30 10 20kVA 3 Phase UPS Menu Structure Figure 19 10 20kVA 3 Phase UPS Menu Structure...

Page 32: ...warning event menu page 4 Event Icon When pressed goes to the alarm warning event menu page 5 AC Input Icon Mains or Bypass input circuitry will turn green on the home page when active 6 Rectifier Ico...

Page 33: ...tions illuminated Each bar represents 25 of the load capacity 11 Battery Charge Status Indicates the battery charge status Each incremental 25 bar is sold ON when charged or will blink ON and OFF when...

Page 34: ...ssed goes to the status menu page 19 Alarm Icon When pressed goes to the alarm warning event menu page 20 Settings Icon When pressed goes to the settings menu page 21 Maitenance Icon When pressed goes...

Page 35: ...ides more information on the input and output measurements on the charged capacity of the battery on the battery runtime on the current output active and apparent power and on the current load connect...

Page 36: ...y and provides power to the inverter The inverter converts the DC power back to AC power to provide a pure AC sinewave at the specified frequency to the output Pressing on the Mains Bypass Battery or...

Page 37: ...the page are the input measured parameters voltage and current of each phase On the right side of the page are the output measured parameters voltage and current of each phase and output frequency For...

Page 38: ...and time that is set in the system The light blue banner near the top of the page is the secondary banner that allows the user to transition to other FPD pages Pressing the house takes the user back t...

Page 39: ...Status Menu Page Mains Input Status Page This page provides detailed input measurements This page has the same two banners across the top of the page as described in the main menu page The main body...

Page 40: ...has the same two banners across the top of the page as described in the main menu page The main body of the page contains the bypass line to neutral input voltage for each phase the bypass line to li...

Page 41: ...e power will move up from the second page and be displayed on this page also only one measurement is shown on each of the lines Press the down arrow to go to the next output page Press the up and over...

Page 42: ...he first page contains status of the output breaker in the Maintenance Bypass Switch unit and the status of three dry contact points battery switch input switch and bypass switch The MBS output breake...

Page 43: ...here is no Maintenance Bypass Switch unit in the system the status of this switch will be Open The Generator Access point is sensed through an IN dry contact port on the back of the 3 Phase UPS The Ge...

Page 44: ...ambient temperature in the first connected EBP unit NOTE The voltage current and status is shown for the positive battery and the negative battery as described in Section 1 of this document The overal...

Page 45: ...e in minutes Press the up arrow to go to the previous Battery Status page Press the up and over arrow to return to the Status Menu page Figure 32 Battery Status Page 2 Alarm Pages The alarm page has t...

Page 46: ...S Figure 33 Alarm Menu Page Audio ON Current Alarm Page This page provides a list of the alarms and warnings that are currently active in the system The most recent alarm warning is at the top of the...

Page 47: ...the yellow warning icon and events are identified by the blue event icon Each entry also includes a short description the location where the event occurred and a date time stamp when the event occurre...

Page 48: ...however the advanced setting pages are password protected Setting Menu Page This is the menu page for the UPS setting pages This page has the same two banners across the top of the page and the same...

Page 49: ...ribed in the Status Menu page The main body of this page has four levels that may be pressed to transition the FPD to the various basic setting pages From this page the user may transitions to the pag...

Page 50: ...us Menu page The main body of this page has three password entry boxes for entering the current password and then entering the new password twice The default password is 123456 It is recommended to ch...

Page 51: ...40 Password Setting Page Figure 41 Password Keyboard Page Brightness Setting Page This page allows the user to set the brightness and timeout on the display This page has the same two banners across t...

Page 52: ...page allows the user to set the date and time in the UPS This page has the same two banners across the top of the page as described in the Status Menu page The main body of this page has two lines on...

Page 53: ...th the proper credentials NOTE It is recommended to change the default password for security reasons Change this default password on the Password Setting Page from the Basic Setting Menu page Password...

Page 54: ...password entry box will have six Stars and a Login button will appear under the box Pressing on the Login button logs the user into the UPS and transitions the FPD to the Advanced Setting Menu page T...

Page 55: ...ase UPS units levels that may be pressed to transition the FPD to the various advanced setting pages From this page the user may transitions to the pages that set the system parameters set the paralle...

Page 56: ...Mode line press on the left or right arrows to select Normal Energy Saving ECO Convert Frequency CF or Generator Gen working mode default is Normal mode On the System Configuration line press on the l...

Page 57: ...lel System Configuration may alternately be setup in a parallel redundancy mode where total capacity of the system is the number of units in the system minus the number of redundant units in the syste...

Page 58: ...right arrows on the Output Frequency Hz line allows the user to select 50 or 60Hz as the desired output frequency of the UPS default is depending on the UPS SKU EU UPS units are defaulted to 50Hz and...

Page 59: ...may be changed so the number of settable parameters in the UPS unit will dictate the number of Battery Setting pages in the system These pages have the same two banners across the top of the page as d...

Page 60: ...efault is enabled This is a battery life optimization parameter Note This is supported only on the 3 Phase UPS units so the single phase UPS units will not have this line present on these pages Pressi...

Page 61: ...pressing on the number in front of the M allows the user to type in the install month and pressing on the number in front of the D allows the user to type in the install day The default values for th...

Page 62: ...SMARTZONE G6 UPS USER MANUAL 61 Figure 50 Battery Setting Page 1 3 Phase UPS Figure 51 Battery Setting Page 2 3 Phase UPS...

Page 63: ...of the page as described in the Status Menu page The main body of this page has the settings for bypass voltage protection limits and frequency limits When the difference between the bypass voltage a...

Page 64: ...ected to the output of the UPS The Bypass Volt Prot Upper Limit line may be adjusted from 10 to 25 by using the left and right arrows to select the appropriate upper voltage limit default is 10 When t...

Page 65: ...Force INV OFF Input Switch Bypass Switch BATT Switch BATT Trip BATT Ground Thunder or EPO of the first input dry contact between IN pins 1 and 2 default is Close Close means there is nothing assigned...

Page 66: ...n the UPS Pressing on the button field next to the OUT 1 contact toggles the sense of this output contact between Normally Opened and Normally Closed Pressing the left right arrows on the OUT 01 line...

Page 67: ...s Close After making all the necessary changes on this page press the Save Config button to save the changes Press on the up arrow to go to the previous page Press the down arrow to go to the next pag...

Page 68: ...the list contains the current setting of the Automatic Self Check mode The user may press on any one of the desired self check modes in the list which will automatically transition the FPD to that se...

Page 69: ...the setting for the disable of the automatic self check of the UPS There are no options on this page this page is just used to disable the Auto Self Check Press the Save Config button to disable the A...

Page 70: ...4 hour clock Pressing on the number in front of the Min allows the user to select the minute in that hour that the self check battery test should start After making all the necessary changes on this p...

Page 71: ...s page press the Save Config button to save the changes Press the up and over arrow to return to the Battery Self Check page NOTE Upon returning to this page the Self Check Mode line will have Weekly...

Page 72: ...ouch correction page shows an x y cross hair on the screen The user must touch the intersection of the cross hair for the first screen calibration Another x y cross hair appears in another location on...

Page 73: ...page has the same two banners across the top of the page as described in the Status Menu page The main body of this page allows the user to turn ON and OFF each controllable outlet group The EU Single...

Page 74: ...Mode a system configured with 2 or more UPS unit connected in parallel then the user should press the Parallel ON or Parallel OFF button to turn ON or OFF the group of parallel UPS output inverters Th...

Page 75: ...ations to Start or Stop the manual one time Battery Test Pressing the Start Manual Self Check location will immediately starts the battery test Pressing the Stop Manual Self Check location will immedi...

Page 76: ...o provide high level information about the UPS and the firmware loaded in the core modules of the UPS The first page provides general information about the UPS and maps to the FW information that is c...

Page 77: ...contains five modules The 3 phase UPS has the LCD Firmware Version the Monitor Firmware Version the UPS Rectifier CPLD Firmware Version UPS Rectifier DSP Firmware Version the UPS Inverter CPLD Firmwa...

Page 78: ...re 70 UPS Firmware Version Page 2 3 Phase UPS The single phase 5 10kVA UPS has the LCD Firmware Version the Monitor Firmware Version the UPS CPLD Firmware Version UPS DSP Firmware version so the firmw...

Page 79: ...7 DC bus OV Hardware circuit Fault Continuous Fault On 8 DC bus Low Voltage output on Alarm Continuous Alert On 9 DC bus Low Voltage outputon Alarm Continuous Alert On 10 DC Bus Voltage Low outputoff...

Page 80: ...Blink 41 Battery Disconnected Alarm Periodic Battery Blink 42 Battery Disconnected Alarm Periodic Battery Blink 43 Battery Low Pre Alarm Alarm Periodic Battery Blink 44 Battery Low Pre Alarm Alarm Pe...

Page 81: ...nuous Fault On 76 Back feed Relay Weld close Fault Continuous Fault On 77 Back feed Relay Weld Open Fault Continuous Fault On 78 Logic Power Supply Event Alarm Continuous Alert On 79 EEPROM Error Faul...

Page 82: ...Periodic Fault On 00A Battery SCR Fault Fault Periodic Fault On 00C Charge SCR Fault Fault Periodic Fault On 00E Fan Fault Fault Periodic Fault On 011 Fan Power fault Fault Periodic Fault On 012 Char...

Page 83: ...lt Periodic Fault On 091 Bypass SCR Broken Fault Continuous Fault On 094 Bypass SCR short Fault Continuous Fault On 097 BPS Over Temperature Fault Continuous Fault On 09A Output CT Reverse Fault Conti...

Page 84: ...mismatch Alarm Periodic Bypass Blink 143 Parallel Overload Alarm Periodic Bypass Blink 144 Bypass Overload Alarm Periodic Bypass Blink 145 Maintenance Switch Misuse Alarm Periodic Alarm On 146 ECU Com...

Page 85: ...nput voltage low The input switch of the UPS is not switched on Measure if the UPS input voltage frequency is within the window Check if UPS input is switched on 2 Utility normal but Utility LED does...

Page 86: ...Remove some load 7 The UPS only works on bypass mode The UPS is set to ECO mode or the transfer times to bypass mode are limited Set the UPS working mode to UPS type non parallel or to reset the time...

Page 87: ...mware version Password 123456 6 digits The password must be 6 characters numbers only Date and Time 2022 01 01 and 07 00 00 Date and time Enter the current date and time Settings Advanced Output Volta...

Page 88: ...Parallel Basic Units 2 2 4 This is the number of UPS units in the system Parallel Redundancy Units 0 1 3 The parallel system is setup for a redundancy parallel configuration this is the ID number of...

Page 89: ...voltage that will cause the outlets to automatically turn off when the UPS is in battery mode EOD Group 3 1 75 1 75 1 84 1 92 Set Group 3 outlets to a battery cell voltage that will cause the outlets...

Page 90: ...put dry contact signal GND IN 7 Input_contact_4 Input dry contact signal port Select with LCD IN 8 GND Input dry contact signal GND Output Dry Contact Interface Port Name Function OUT 1 Output_1_RLY O...

Page 91: ...AL 90 Appendix E 10 to 20kVA Backfeed protection port definition Definition of male port Instruction UPS Instruction Pin1 PIN2 Normally NO Pin3 PIN4 Normally NC Function description Drive the bypass b...

Page 92: ...ered when the wire jumper between pins 3 and 4 is removed or the EPO contact changes to Normally Open NO EPO NO 1 Connect wires from the Normally Open NO contact of the EPO switch relay The EPO functi...

Reviews: