background image

2


This product is not intended for use by persons (including children) with reduced physical, 

sensory or mental capabilities, or lack of experience and knowledge, unless they have been 

given supervision or instruction concerning use of the product by a person responsible for the 

safety. Children should be supervised to ensure that they do not play with the product.

If the supply cord is damaged, it must be replaced by the manufacturer, its service agent or 

similarly qualified persons in order to avoid a hazard.

Disconnect power supply before maintenance and filling water and water drainage.
For cleaning and descaling see "maintenance“ and regarding filling (water supply) see 

“WATER SUPPLY/DRAINAGE METHOD”.

The safety precautions should be strictly followed in order to prevent injury or damage to properties.

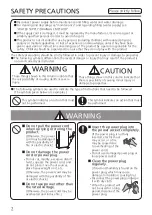
The following symbols differentiate the levels of danger or injury that may result if the product is 

not used correctly as instructed. 

CAUTION

WARNING

WARNING

Those things shown in this column indicate that 

there is possibility of causing death or severe 

injury. 

Those things shown in this column indicate that 

there is possibility of causing minor injury or 

damage to properties. 

The following symbols are used to indicate the type of instructions that need to be followed.

(The symbols given below are examples.)

This symbol indicates an action that must 

not be performed. 

This symbol indicates an action that must 

be performed. 

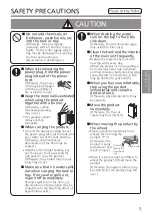
Do not pull the power cord 

when carrying or storing the 

product.

(Otherwise, the power 

cord may be damaged 

with the possibility of 

fire or electric shock.)

Do not damage the power 

cord or power plug.

Do not use power other than 

the rated voltage.

Do not cut, modify, excessive distort, 

twist, squeeze the power cord, and 

do not place it near heat sources, 

place heavy weight on it, etc.
(Otherwise, the power cord may be 

damaged with the possibility of fire 

or electric shock.)

(Otherwise, the power cord may be 

overheated and induce fire.)

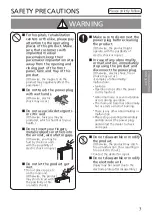
Insert the power plug into 

the power socket completely.

Do not use damaged power plug or 

loose power socket.

(If the power plug is not fully 

inserted, electric shock 

may occur, or a fire 

may be caused due 

to overheating of the 

power cord.)

Clean the power plug 

regularly.

Disconnect the power plug and wipe 

it with dry cloth.

(If dust and humidity is found on the 

power plug, which may cause 

damage to insulation, causing fire.)

When the product will 

not be used for a long 

period, disconnect the 

power plug.

Please strictly follow

SAFETY PRECAUTIONS

Summary of Contents for ziaino F-JPW50H

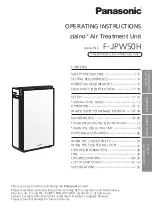
Page 1: ... 19 26 25 26 26 29 32 27 27 28 29 31 32 OPERATING INSTRUCTIONS ziaino Air Treatment Unit Model No This product is for indoor use only OPERATION CONFIRMATION AND SETUP MAINTENANCE OTHER INFORMATION CONTENTS SAFETY PRECAUTIONS SETTING REQUIREMENTS OPERATING REQUIREMENTS EACH PARTS IDENTIFICATION OPERATION WATER SUPPLY DRAINAGE METHOD ADDING A SALT TABLET SETUP WHEN REPLACING THE ELECTRODE UNIT MAINT...

Page 2: ...sing minor injury or damage to properties The following symbols are used to indicate the type of instructions that need to be followed The symbols given below are examples This symbol indicates an action that must not be performed This symbol indicates an action that must be performed Do not pull the power cord when carrying or storing the product Otherwise the power cord may be damaged with the p...

Page 3: ...ith the possibility of fire or electric shock Otherwise electric shock fire or smoke may occur Examples of abnormality malfunction Operation stops after the power cord is touched Abnormal noise or severe vibration occurs during operation The main unit becomes abnormally hot or emits a smell of burning Leakage There is any other abnormalities or malfunction Please stop operating immediately and dis...

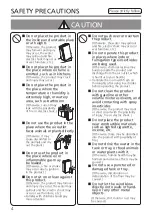
Page 4: ...ure etc Do not push over or overturn the product Otherwise the water may spill out and fire electric shock may occur or wet furniture etc Do not operate this product in places where indoor fumigation type insecticides are being used Otherwise chemical residue may build up inside the product and discharge from the air outlet which is harmful to your health Ventilate the room with fresh air thorough...

Page 5: ... caused due to the bleaching effect of hypochlorous acid Make sure that no water spills out when carrying the tank or tray If any water spills out wipe it off immediately Otherwise the sink and water pipe may oxidize to form rust When draining the water turn on the tap to flush the sink clean Replace the water in the tank with new tap water every day When the product is not operating a foul odor m...

Page 6: ...se it may cause mildew and miscellaneous bacterium breeding since the effect of hypochlorous acid is weakened while the power is off There is no problem if the power plug is disconnected briefly If the product will not be in use for a long time disconnect the power plug and empty the tank and tray If the product inhales cigarette smoke the interior of the main unit may become dirty with cigarette ...

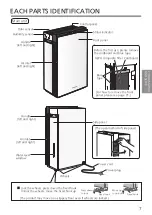
Page 7: ... panel please see page 21 Side panel Power plug Control panel Water level window Status indicator Humidity sensor Wheels The product may move on a slippery floor even if wheels are locked Fixed hook Fixed hook Press down to lock Move up to unlock Lock the wheels press down the fixed hook Unlock the wheels move the fixed hook up Odor sensor The open method of side panel HEPA composite filter EACH P...

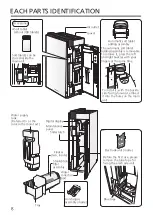
Page 8: ... part Before the first use please remove the blue tape for fixing the electrode unit Referred to as the tank in the main text To remove it press the left and right buckles with your fingers at the same time Accessories Salt tablets can be stored inside the main unit Salt tablet About 300 tablets Water supply tank Slider latch Floater Sterilization filter assembly Tray Anti fungus assembly inside E...

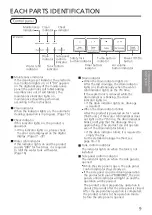
Page 9: ... If the water tank is removed while the drain indicator is blinking the drain indicator lights on After the last drainage the drain indicator lights on simultaneously when the water refill indicator lights on the 7th time Turbo button indicator Water refill indicator When the indicator lights on the automatic cleaning operation is in progress Page 15 If this indicator lights on the product is abno...

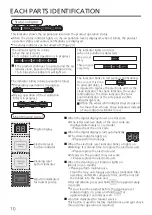
Page 10: ... operation of the sterilization filter is in progress When the digital display shows an error code Please check the error code When the digital display scrolls automatically When the electrode reset indicator blinks or lights on The drain indicator lights on Please perform drainage Blinking It is almost time to replace the electrode unit Please replace the electrode unit Please replace the electro...

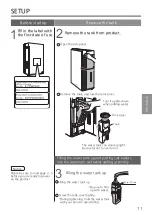
Page 11: ...over Turn it upside down when adding water The water tank can stand upright Be careful not to overturn it Tank cover Tank 3 1 2 Filling the water tank up and putting salt tablets into the automatic salt tablet adding assembly Filling the water tank up Filling the water tank up Be sure to fill it up with water During tightening hold the water tank with your hand to avoid tilting Water fill line Scr...

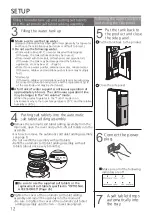
Page 12: ... automatic salt tablet adding assembly with salt tablets about once every 6 months For how to remove the automatic salt tablet adding assembly see page 8 Remove the automatic salt tablet adding assembly from the main unit open the cover and put 60 70 salt tablets into the assembly Put the tank back to the product Put the tank back to the product and close the side panel Close the side panel Connec...

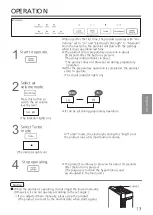
Page 13: ...ratory operation The status indicator lights on When used for the first time the product operates with Air Volume set to Lo and Electrolytic Strength to Medium From the next time the product will start with the settings when it stops operation last time The status indicator blinks in blue Press this button to switch the air volume level by level In Turbo mode the electrolytic strength is High and ...

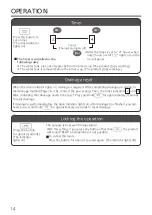
Page 14: ...product stops working Cancel The indicator lights off The timer is cancelled in the following cases After the timer is set to 4 hours when only 2 hours are left 2 lights on on the control panel When the drain indicator lights on drainage is required After completing drainage according to the drainage method Page 16 18 connect the power plug Then the timer indicators and blink indicating that drain...

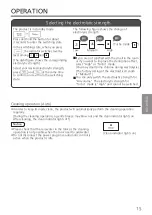
Page 15: ...trength In the switching state when you press the indicator switches level by level among and The following figure shows the change of electrolysis strength Press and hold the button for about 3 seconds to enter the switching state Selecting the electrolytic strength During the cleaning operation a gentle breeze may blow out and the clean indicator lights on After cleaning the clean indicator ligh...

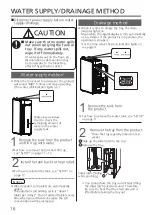
Page 16: ... water supply drainage Water supply method Drainage method WATER SUPPLY DRAINAGE METHOD When the tank need to add water the product will sound BIBI 5 times and stop operating The water refill indicator lights on Water level window Used to check the remaining amount of water in the water supply tank For how to remove the tank and fill it up see SETUP on page 11 12 For how to reinstall the tank see ...

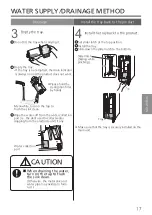
Page 17: ...led on the main unit Slide down the slider latch to the bottom Install the tray Set slider latch at the top position Tray Otherwise the metal sink and water pipe may oxidize to form rust When draining the water turn on the tap to flush the sink clean Please hold the sterilization filter by hands Water collection part Meanwhile turn on the tap to flush the sink clean Wipe the water off from the wat...

Page 18: ...k back to the main unit A salt tablet drops automatically into the tray When a salt tablet drops into the tray a click sound is heard Please add salt tablets Page 12 If salt tablets are stuck in the automatic salt tablet adding assembly please remove them If the automatic salt tablet adding assembly runs out of salt tablets the maintenance indicator lights on 00 is blinking on the digital display ...

Page 19: ...reached as long as there is an unpleasant odor or the water in the tank is reduced at a slower speed Alkaline detergent Polish acid detergents Thinner Kerosene Alcohol Bleach Make sure to disconnect the power plug before cleaning the product Otherwise the product might operate with the possibility of electric shock or injury Do not use acidic detergents or citric acid Otherwise toxic gas may be pr...

Page 20: ...ode unit inside Slider latch Air inlet When maintenance do not leave the removed parts unattended Otherwise it may cause tripping or damage Notice Automatic adding salt tablet assembly two inside Floater MAINTENANCE Referred to as the tank in the main text Water supply tank ...

Page 21: ...main unit Push the lower part of the front panel into the main unit Hang the upper hook of the front panel on the main unit Filter hook Filter hook turn down Concave part of the product turn up Toggle the filter hook upward and remove HEPA composite filter Toggle the filter hook downward to secure the HEPA composite filter Wipe off any dust and dirt using a well wrung out soft cloth Front panel an...

Page 22: ...e damaged please dispose the used HEPA composite filter as non flammable garbage Notice When the product will not be used for a long time do not leave salt tablets in the automatic salt tablet adding assembly When the salt tablets are hardened and cannot be removed soak the automatic salt tablet adding assembly before cleaning It is not required to maintain the automatic salt tablet adding assembl...

Page 23: ...oater expanded polystyrene The product may not work if they are not installed correctly Wash it with water Wipe the dirt with a swab or use a toothbrush to scrub it Remove the incrustation and any other dirt with a soft cloth moistened in water Install the sterilization filter assembly and anti fungus assembly onto the tray Place the anti fungus assembly horizontally into the recess Pay attention ...

Page 24: ...r Do not dry it with a drier Doing this may cause shrinkage Do not scrub it with a brush or wash it with a washing machine Press and wash sterilization filter with clean warm water Do not leave a gap between the sterilization filter and the filter plate as well as the filter frame nor press the round parts of both ends Otherwise performance degradation may be caused Install the filter plate onto t...

Page 25: ...es on page 26 Removing Installing the electrode unit Removing Press the slider latch down electrode unit Lift the slider latch electrode unit up Lift the slider latch electrode unit up Remove the tray from the main unit Take the tank out Disconnect the power plug Electrode unit Open Housing Remove the housing of the electrode unit Press Connector Remove the connector Press Press The electrode unit...

Page 26: ...ower plug into the power outlet to enter drying operation of the sterilization filter To prevent mildew and miscellaneous bacterium breading Wipe each part dry and install them back to the main unit Empty the tank and tray and clean the product Disconnect the power plug When idle for a long time Replacement salt tablets Replacement electrode unit Replacement HEPA composite filter Replacement steri...

Page 27: ...he middle of louver and insert the otherside into the other hole Concave projection How to install the louver Concave projection Square hole Square hole 1 2 1 2 1 2 While pressing them in the arrow direction insert them into the holes on the other side Put the protrusions into the hole of tray Hole Hole Protrusions Protrusions Buckle Floater Lower the buckle How to install the floater WHEN THE LOU...

Page 28: ... the entire room is not same Test No KJ202300624 Test Standard JIS B 9908 2011 Test method of air filter units for ventilation and electric air cleaners for ventilation Sensing scope Odor sensor Odor from cigarettes incense cooking pets Cosmetics alcohol sprays etc Humidity water vapor oil The wind generated when a door is opened or closed or sudden temperature changes May detect Sensor The sensor...

Page 29: ...the status indicator The drain indicator does not light on Even if the maintenance indicator lights on the product can still work The status indicator does not blink in red The status indicator of this product can be turned off Because the drainage frequency and time are reset each time if drainage is performed before the drain indicator lights on the drain indicator does not light on This is temp...

Page 30: ...on the sterilization filter assembly Remove the incrustation and dust Page 24 Clean the filter Page 21 22 When the humidity is high or it s cold the water in the tank decreases slowly Is the humidity high or the room temperature low A puchee sound is heard This is the sound of supplying water from the tank It is not abnormal Please continue to use the product Clean it Page 22 If the situation pers...

Page 31: ...12 13 14 Disconnect the power plug Erect the product Wipe the water off it Please confirm the following Possible situation Even if drainage is completed the drain indicator still lights on After drainage is completed the drain indicator will light on within approximately 1 week or if the water refill indicator does not light on the 7th time Check whether drainage is performed while the power plug ...

Page 32: ...ilencing laboratory environment The power consumption is about 0 9 W when the power plug is inserted into the power outlet and the operation is Off 8 W for cleaning operation Call the dealer Product is out of order Please disconnect the power plug and contact the dealer for repair P0723 0 JPW5H8950 Issue date 07 2023 Panasonic Corporation Web site http www panasonic com Panasonic Corporation 2023 ...

Reviews: