INSTALLATION OF CCU
I-7
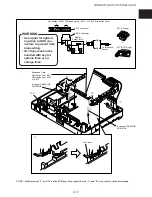
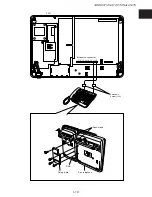
460mm
271mm
6mm
CCU
Front cover
w
w
e
r
y
t
Vertical installation
Horizontal installation
Template for wall mounting
q
2. INSTALLATION OF CCU
WARNING
Always unplug the AC plug from the outlet when working. If you do not, you may
receive an electric shock.
Do not touch the Power Supply Unit. You may be exposed to dangerously high tem-
peratures.
■
MOUNTING THE CCU ON THE WALL
NOTE : Use the appropriate screwdriver to fasten the screws.
Handle the CCU carefully to avoid damaging the cover.
The CCU can be installed horizontally or vertically.
The following explanation deals with how to horizontally install the CCU. When installing the
CCU vertically, install so that the power switch is facing upwards.
q
Use the wall-installation template supplied with the CCU (packed topmost) to determine the
installation position.
w
Remove two screws securing the front cover of the CCU.
e
Lift up the front cover, and remove the front cover from the three claws at the top of the CCU.
r
Attach four screws loosely to a wall strong enough to hold the weight of a CCU. The screws
should stand out 6mm from the wall surface.
t
Pass the screws through the holes on the back of the CCU and pull the unit in a downward
direction.
y
Tighten the four screws with a screwdriver to secure the CCU to the wall.
IMPORTANT
Place the CCU away
from heavy motors,
welders, dimmers,
radio receivers, and
computers which
generate electrical
noise.
Summary of Contents for VoiceSonic VB-9411AD
Page 60: ...MEMORANDUM ...
Page 94: ...CONNECTION OF OPTIONAL UNITS I 34 MEMORANDUM ...


