background image

51

Disable
Enable

To the sub-menu

Disable
Enable

Disable
Enable

Disable
Enable

No Protection
Protected

To the sub-menu

Disable
Enable

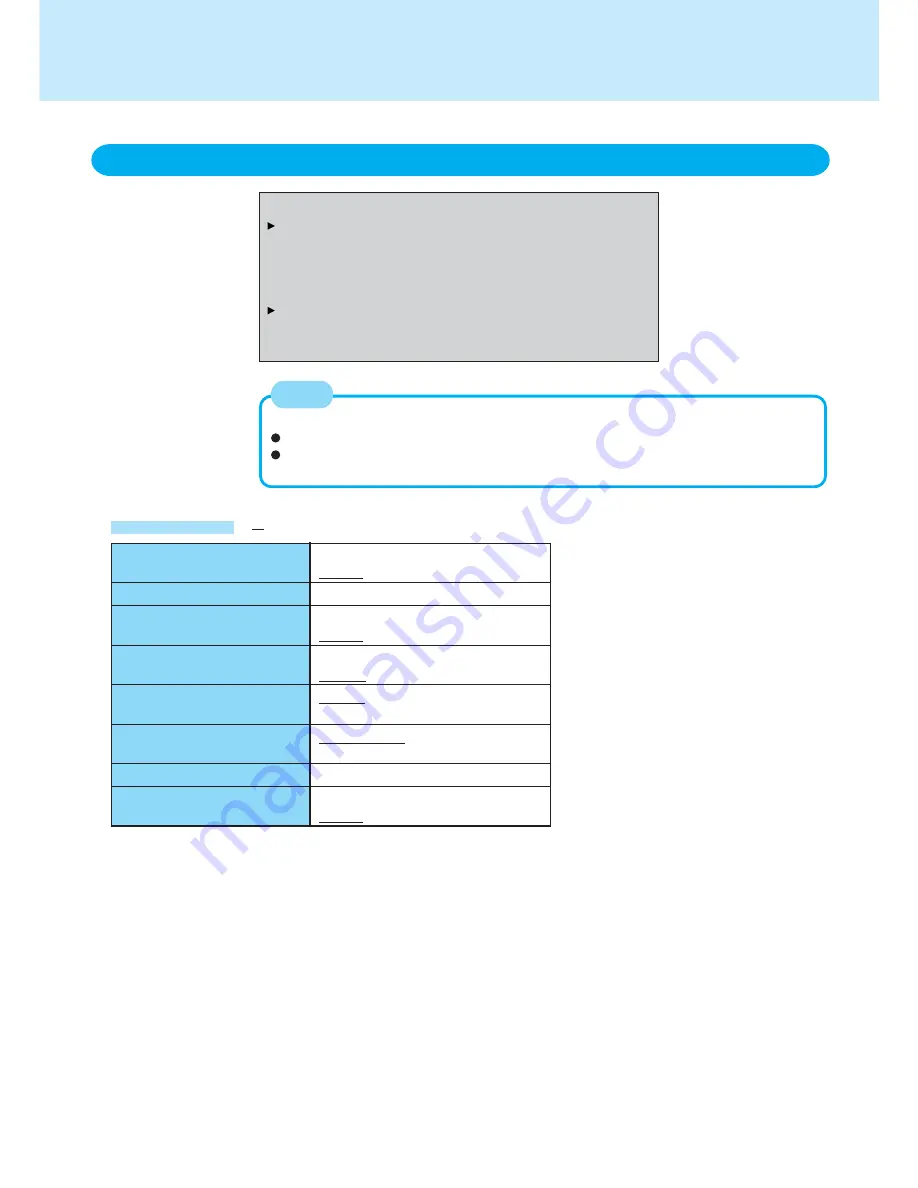
Password on boot

Set Supervisor Password

Setup Utility Prompt

Boot First Menu

Hard Disk Lock*

User Password Protection

Set User Password*

Floppy Operation

Setup Utility

Security Menu

Password on boot:

[Enable]

Set Supervisor Password:

[Enter]

Setup Utility Prompt:

[Enable]

Boot First Menu:

[Enable]

Hard Disk Lock:

[Disable]

User Password Protection:

[No Protection]

Set User Password:

[Enter]

Floppy Operation:

[Enable]

* Setting impossible when the Supervisor Pass-

word is not set.

(     :  Default)

Parameters

When the Setup Utility is started up with the User Password;

[Set Supervisor Password] and [Hard Disk Lock] will not be displayed.
The User Password can be changed only when [User Password Protection] has been
set to [No Protection].


The User Password cannot be deleted.

NOTE

Summary of Contents for Toughbook CF-48 Series

Page 1: ...30 RAM Module 32 Port Replicator 33 Printer 34 External Display 35 USB Devices 38 Modem 40 LAN 42 Wireless LAN 44 Hard Disk Drive 47 Setup Utility 48 Technical Information 53 DMI Viewer 54 List of Error Codes 55 Dealing with Problems Advanced 56 2000 When the cursor is moved to an item under Contents or to page green display the shape of the cursor will change to Under this condition if characters...

Page 2: ...ick is made the corresponding page in the Reference Manual will be displayed This illustration means to refer to the Operating Instructions Windows 2000 screens are used in this manual when no specific OS notes are re quired Some of the illustrations in this manual may differ slightly in shape from the actual items in order to make the explanation easier to understand Circular media such as CD ROM...

Page 3: ...splayed after log ging on to Windows OFF MUTE ON Fn F1 Fn F3 Fn F4 Fn F2 This key combination cannot be used to adjust the volume of the warning beep or speakers connected to the USB port NOTE Fn F5 Fn F6 Disabling the speakers will also disable the warn ing beep Speakers connected to the USB port cannot be muted Do not press the following key combinations until you log on to Windows and the hard ...

Page 4: ...n Descriptions Pressing this key combination causes the current status of the computer to be saved to memory and powers off the computer page 9 Pressing this key combination displays the remaining bat tery capacity on the screen page 21 Pressing this key combination causes the current status of the computer to be saved to the hard disk and powers off the computer page 9 PopupWindow Displayed after...

Page 5: ... for combination Fn key remains locked until Fn is pressed once more Notification This setting is only available when Use Fn key lock is checked Make sounds when Fn key is pressed 1 Notifies the user with a sound when Fn is pressed locked or released If MUTE is set you will not hear a beep Show status on screen Displays the Fn key status on the taskbar Fn is locked Fn is not locked Disable popup A...

Page 6: ...k is not connected or charging not being performed Orange Charging in progress Green Fully charged Red The battery level is very low the charge is approx 9 or less Connect the AC adaptor You can use the com puter when the indicator light is orange If you do not have an AC adaptor save your data and power off your computer After replacing the battery pack with a fully charged one turn your computer...

Page 7: ... your finger lightly over the surface Basic Operation To next page tapping clicking double tapping double clicking Besides the above operations operations such as Zoom and Pan are possible by allocating these functions to the buttons and or pad For more details refer to Mouse Properties Windows 2000 In Control Panel Mouse Windows XP In Control Panel Printers and Other Hardware Mouse The operations...

Page 8: ... substances such as oil come in contact with the touch pad The cursor may not work properly in such cases When the touch pad becomes dirty Wipe to remove dirt by using a dry soft cloth such as gauze or a soft cloth first applied with detergent diluted with water and then thoroughly wrung Do not use benzene or thinner or rubbing alcohol Doing so may adversely affect the surface e g discoloration In...

Page 9: ... use the hibernation mode make the setting below in advance Enabled in factory preset Fn key combinations page 4 Using the power switch page 11 From the shut down screen Standby Windows 2000 In Start Shut Down select Stand by Windows XP In start Turn Off Computer select Stand By Hibernation Windows 2000 In Start Shut Down select Hibernate Windows XP In start Turn Off Computer press and hold Shift ...

Page 10: ...upt your data or file the standby or hibernation function may not work or the computer or peripherals may fail to work properly When the floppy disk drive indicator hard disk drive indicator CD drive indicator or access lamp on the CD drive is on page 6 When playing recording audio files and displaying images such as MPEG files When using the communications software and the network function When u...

Page 11: ...ond beep will sound and the computer will be turned off forcibly Data not previously saved will be lost Windows XP Even when When I press the power button on my computer is set to Shut down with start Control Panel Performance and Maintenance Power Options Advanced if you press the power switch for more than four sec onds and do not release it a second beep will sound and the computer will be turn...

Page 12: ... display is opened If the computer does not resume when the LCD panel is opened press the power switch 1 Windows XP Stand by 2 Windows XP Control Panel Performance and Maintenance Resuming Operation Until resuming is complete requires about 15 seconds or 60 seconds if connected to a network after the display returns avoid the following Touching the keyboard except for password input touch pad or p...

Page 13: ...the Windows password 2 Even if no password is entered for about a minute when starting up the Setup Utility the power will not be turned off Reference Situation You do not want your computer to be used without permission You do not want the data on the hard disk to be read or data to be written to the hard disk in cases including theft You want to prevent theft or damage to data by using a floppy ...

Page 14: ...7 At Setup Notice press Enter 8 Press F10 and select Yes then press Enter Your password will not be displayed on the screen Only up to seven alphanumeric characters can be used There is no distinction between upper and lower case letters Use only the upper horizontal row of numeric keys to input your password Do not input your password while holding down Shift or Ctrl Disabling the Supervisor Pass...

Page 15: ...e User Password can not be set Set the Supervisor Password if you have not done so page 14 NOTE Your password will not be displayed on the screen Only up to seven alphanumeric characters can be used There is no distinction between upper and lower case letters Use only the upper horizontal row of numeric keys to input your password Do not input your password while holding down Shift or Ctrl When yo...

Page 16: ...orks with the internal hard disk This function does not work with the external hard disk NOTE CAUTION When the Hard Disk Lock is set to Enable it is impossible to read write data from to the hard disk when the hard disk is inserted in a different computer since a password is also set for the hard disk When the hard disk is returned to the original computer you can read and write data as before In ...

Page 17: ...cidentally using a floppy disk Preventing theft or damage to data using a floppy disk Security Measures 1 Run the Setup Utility page 48 2 Using either or select Security 3 Using either or select Floppy Operation and press Enter 4 Using and select Disable and press Enter To enable the floppy operation Select Enable 5 Press F10 and select Yes then press Enter Setting the Floppy Operation enabling di...

Page 18: ...erna tion mode page 4 Remove peripheral devices USB devices PC Cards external mouse etc when not in use Windows 2000 In Control Panel Power Options make settings in detail By making settings in detail for the timeout alarm etc it is possible to control the consumption of power Windows XP In Control Panel Performance and Maintenance Power Op tions make settings in detail By making settings in detai...

Page 19: ...ark Computing on the Road Starting up the Intel R SpeedStep TM technology Windows 2000 The icon differs depending on the current setting Maximum Performance The CPU performance is maximized at all times Automatic The CPU performance is automatically maximized only when necessary Battery Optimized Performance Maximum Battery Maximum battery life You can also start using Start Settings Control Panel...

Page 20: ...ged one turn your computer on Battery pack or charging may not be working properly Quickly save your data and power off your computer Remove the battery pack and disconnect the AC adaptor then connect them again If the problem persists contact Panasonic Technical Sup port Battery pack is not connected or charging not being per formed Battery Indicator Orange Green Red Blinking red Not lit When the...

Page 21: ... orange for a long period of time Low battery warning appears after a short period of time This may be caused by the use of standby mode for long periods of time The battery is discharging while the computer is in standby mode when the AC adaptor is not connected There may be a discrepancy with the value that is displayed on the taskbar of Windows but this is not a malfunction When the battery pac...

Page 22: ...art Control Panel Performance and Maintenance Power Options Alarms 2 Set alarm operations and remaining battery level for operating alarm func tions When disabling the speaker by pressing Fn F4 the sound alarm is also disabled About High Temperature Mode This computer has a high temperature mode function that prevents the degradation of the battery in high temperature environments We recommend set...

Page 23: ...ls except for the battery pack and AC adaptor 2 Use the Refresh Battery utility to fully discharge the battery pack 1 Run the Setup Utility page 48 2 Select Refresh Battery from Exit menu and press Enter 3 At the confirmation message select Yes and press Enter Once the battery indicator turns green the battery pack will be completely dis charged It takes approximately 4 5 hours until the power aut...

Page 24: ...if the contacts are dirty or damaged The battery pack is not charged when the computer is first purchased Be sure to charge it before using it for the first time When the AC adaptor is connected to the computer charging begins automatically In the standby mode do not remove change the battery pack Removing the pack in the standby mode will erase your data and may damage the computer CAUTION CAUTIO...

Page 25: ... g oil smoke or tobacco smoke Doing so could shorten the life of the drive lens We recommend cleaning the drive lens with an air puffer used for camera lenses Do not use any spray type of lens cleaning products Never insert foreign objects such as paper clips into the drive Doing so could cause it to malfunction Do not use any discs that have become deformed warped or are not completely round To a...

Page 26: ... start during file access depending on the status of the disc When playing back movies from a disc note that smooth playback may not be possible in some cases If the CD drive has not been accessed within 90 seconds the drive motor will automati cally shut down to reduce the power consumption When the CD drive is accessed once again the power of the drive motor is turned on However approximately 30...

Page 27: ... be set with the same region code as the DVD Video In the case of any other DVD Video Confirm Region appears Select region code and select OK Play now begins Confirm Region may not be displayed for some DVD Videos To confirm the current region code and the number of settings remaining right click on theWinDVD screen and select Setup Region When using DVD Media CD Drive CAUTION The region code can ...

Page 28: ...L Co Ltd RICOH Co Ltd CD R write speed CD RW write speed High Speed CD RW write speed 600 KB s 4X speed 1200 KB s 8X speed 2400 KB s 16X speed Max 3600 KB s 24X speed Max 600 KB s 4X speed 600 KB s 4X speed 1200 KB s 8X speed 1500 KB s 10X speed Depending on the disc the writing speed may become slower When writing to CD R RW discs Using the CD ROM of the CD R RW writer software included install t...

Page 29: ...RAM only non cartridge discs or removable cartridge discs can be used Depending on the disc the quality of the write operation may not be so good We recommend using any of the following discs Recommended Discs CD R HITACHI MAXELL Ltd MITSUBISHI CHEMICAL Co Ltd MITSUI CHEMICALS Inc RICOH Co Ltd TAIYO YUDEN Co Ltd CD RW High Speed CD RW MITSUBISHI CHEMICAL Co Ltd RICOH Co Ltd CD R write speed CD RW ...

Page 30: ...f card In such cases restart the computer When inserting one more CardBus type card with one already inserted after en tering the standby or hibernation mode the computer may not function properly If the computer freezes after resuming from the standby or hibernation mode try removing and then reinserting the PC Card If this does not correct the problem restart the computer Slot Socket 2 Slot Sock...

Page 31: ...n such cases turn off the power from Start menu then remove the card Windows XP start CAUTION Eject Button Removing a PC Card 1 Disable the card function Windows 2000 1 Select on the taskbar select the PC Card then select Stop 2 Follow the on screen instructions When the PC Card has been removed after the computer is turned off this step is not necessary Windows XP 1 Select on the taskbar select t...

Page 32: ... properly Inserting Removing RAM Module 4 Put the cover back into place 1 Insert the cover diagonally then fit it in place 2 Fasten the screw 1 Power off your computer Starting Up Shutting Down Do not shut down using the standby or hibernation function Disconnect the AC adaptor and remove the battery pack 2 Turn the computer over and remove the screw then remove the cover NOTE Whether the RAM modu...

Page 33: ... expansion bus connector on the bottom of your computer For more detailed information refer to the operation manual of the port replicator When connecting the external display to the display port on the port replicator the characters on the external display may be blurred if 1280 x 1024 or a higher resolution is set In this case select a resolution that is lower than 1280 x 1024 Although the compu...

Page 34: ...ailable select Add Printer icon and follow the on screen instructions Windows XP Select start Printers and Faxes Find your printer s icon double click on it then select Printer Set as Default Printer If no icon is available select Add a printer and follow the on screen instructions Parallel Port Printer You may need to install a driver for your printer Follow the on screen instructions and refer t...

Page 35: ...ug Play standards is connected select Properties Driver Update Driver in Monitor and make the monitor settings Windows XP Select start Control Panel Appearance and Themes Display Settings Advanced Monitor and make the monitor settings When a monitor that does not conform to the Plug Play standards is connected select Properties Driver Update Driver in Monitor and make the monitor settings External...

Page 36: ...he screen cannot be changed with Fn F3 If you change the resolution and or color setting be sure to restart the computer There are some applications that cannot be used in the Dualview When the button to maximize a window is pressed one of the displays will show the maximized display A window that has been maximized cannot be moved to the other display When the Dualview is being utilized the pop u...

Page 37: ...When the Dualview is used set Never for Plugged in and Running on batteries for Turn off monitor in Control Panel Performance and Main tenance Power Options Power Schemes If this setting is not made there are cases the display will not be shown properly To prevent images from being burned onto the external display manually shut off the power to the external display when the display does not have t...

Page 38: ...e Device Manager and the device may not be correctly recognized If this happens try removing and connect the device once more When USB devices are connected power consumption increases Remove USB devices when not in use especially when operating on battery power Although the computer s USB connector operates as USB 2 0 the port replicator s USB connector operates as USB 1 1 Windows 2000 When the c...

Page 39: ...ow the on screen instructions When is not displayed or when the USB device has been re moved after the computer is turned off this step is not necessary Windows XP 1 Select on the taskbar and select the USB device then select Stop 2 Follow the on screen instructions When is not displayed or when the USB device has been re moved after the computer is turned off this step is not necessary 2 Remove t...

Page 40: ...ion 2 Input the necessary information items such as area code dialing rules etc select OK then select OK Windows XP 1 Select Edit in start Control Panel Printers and Other Hardware Phone and Modem Options Dialing Rules then select the location from which you will be dialing in Country region 2 Input the necessary information items such as area code dialing rules etc select OK then select OK CAUTIO...

Page 41: ...hen the keyboard or touch pad is touched The computer cannot resume if a telephone is connected to the line of a modem e g a PC Card modem other than the internal modem NOTE When using this function it is recommended that the AC adaptor be con nected to the computer Concerning the setting for System standby Roughly consider the communication time and then set System standby There may be cases wher...

Page 42: ...er off your computer Starting Up Shutting Down Do not shut down using the standby or hibernation function 2 Connect the cable Connect the LAN port and the network system server HUB etc using a LAN cable LAN CAUTION Do not connect the modem telephone cable into the LAN port Do not use the standby or hibernation functions during communications ex cept when the Wake up from LAN function is in use as ...

Page 43: ...apters then select the net work adaptor name you are using and then select Power Management 2 Add the check mark for Only allow management stations to bring the com puter out of standby then select OK NOTE This is a function of the internal LAN to automatically power the computer on from a network server when the computer is in the standby or hibernation mode To use this function it is necessary t...

Page 44: ...ed Windows XP Do not use the Fast User Switching function Precautions Do not use wireless LAN on airplanes in hospitals or in other locations where wireless LAN signals may affect the operation of devices in the vicinity If you intend to use the computer in the environments described above turn the wireless LAN off using the following method To turn off the wireless LAN 1 Double click or on the ta...

Page 45: ...s then select Next 6 Make necessary changes and select Finish For security reasons we recommend that you enable the encryption WEP If you enable WEP enable encryption on the access point side as well 1 Select 64 bit or 128 bit from Data Encryption 2 Select Use pass phrase or Use hex key and enter the pass phrase or key In the case of ASCII character 64 bit 5 characters 128 bit 13 characters In the...

Page 46: ...ms Accessories Command Prompt 2 Input ipconfig all and press Enter 3 Make a note of the 12 digit string of alphanumerics displayed on the Physi cal Address line on the Wireless Network Connection side Then input exit and press Enter The IP address of the access point is wrong Following the operating instructions of the access point set the IP address of the access point again correctly Double clic...

Page 47: ... Down Do not shut down using the standby or hibernation function Disconnect the AC adaptor and remove the battery pack 2 Turn your computer over and remove the cover Slide the latch and then without releasing it slide and remove the cover Cover Hard Disk Latch 4 Inserting the hard disk Connect the hard disk to the connector and carefully insert the hard disk The hard disk may be damaged if its top...

Page 48: ...5 F6 To move among the values Enter To display sub menu of each item selected by F9 To set default settings except the password When starting up the Setup Utility with the User Password this key is not available F10 To save the settings and exit Key Operations When setting date and time Tab can be used to move the cursor NOTE 1 Turn on or restart the computer 2 Press F2 while Panasonic boot screen...

Page 49: ...isplay 4 Display Expansion CD Drive Speed 5 Environment Main Menu System Date xx xx xxxx 2 System Time xx xx xx 3 Touch Pad Enable Display Simultaneous Display Expansion Enable CD Drive Speed High Environment Normal Temperature Default Parameters 4 The display destination in cases where Win dows is not running is set here When an ex ternal display is connected the computer dis plays on both the in...

Page 50: ...able Wireless LAN Enable Disable Enable Disable Enable Uni directional Bi directional EPP ECP Disable Enable Disable Enable Disable Enable Disable Enable Setup Utility Advanced Menu Default 1 This item is displayed only when Parallel Port is set to Enable Parameters Display may differ depending on computer model 2 Disable is automatically set when LAN is set to Disable ...

Page 51: ...ble Set Supervisor Password Enter Setup Utility Prompt Enable Boot First Menu Enable Hard Disk Lock Disable User Password Protection No Protection Set User Password Enter Floppy Operation Enable Setting impossible when the Supervisor Pass word is not set Default Parameters When the Setup Utility is started up with the User Password Set Supervisor Password and Hard Disk Lock will not be displayed T...

Page 52: ... up the Setup Utility with the User Password Parameters Boot Menu Floppy Drive Hard Disk Drive CD Drive LAN The default order is as follows Floppy Drive Hard Disk Drive CD Drive LAN To move a device up by one in the order select the device with and and then press F6 To move a device down by one in the order select the device with and and then press F5 NOTE Boot Menu The device for starting up the ...

Page 53: ...ng the computer in a network environment we recommend that you set Sys tem standby and System hibernates to Never using the following procedure Windows 2000 Start Settings Control Panel Power Options Windows XP start Control Panel Performance and Maintenance Power Options Power Schemes When using the Files on the Retail Version of the Windows CD ROM The Windows files included in the Retail Version...

Page 54: ...agement Interface DMI The DMI Viewer can be used when you want to know information on the inter nal systems this computer supports starting with the CPU and memory Displayed information can be saved to a text file txt Run the DMI Viewer and display the information you wish to save 1 To save the item that is displayed Select Save Selected Data from File menu To save all items Select Save All Data f...

Page 55: ...the internal clock battery may need to be replaced Contact Panasonic Technical Support The data and time setting are incorrect Run the Setup Utility and set the date and time correctly If the problem persists the internal clock battery may need to be replaced Contact Panasonic Technical Support Startup has failed repeatedly so the Setup Utility settings have been returned to their default values a...

Page 56: ...ing procedure Windows 2000 Control Panel Date Time Windows XP Control Panel Date Time Language and Regional Options Date and Time When the computer is connected to a LAN confirm the date and time of the server If you continue to experience problems the internal battery maintaining the clock may need to be replaced Contact Panasonic Technical Support This computer will not correctly recognize the d...

Page 57: ...Note however that when the bright ness is increased the battery running time will become shorter Brightness can be set to separate levels for when the AC adaptor is connected and when it is disconnected If you are using an external mouse ensure that the external mouse has been connected correctly Restart the computer by using the keyboard Press U and select Restart with then press Enter If the com...

Page 58: ...splay no longer displays properly When the screensaver is set an error will occur dur ing a resume operation When an MPEG file is be ing played with Media Player the display destina tion cannot be switched using Fn F3 Windows XP An error occurs or the computer freezes while using Dualview Changing the number of colors of the display may affect the screen Restart the computer Windows XP When using ...

Page 59: ...tions for that access point Confirm whether the Intel R PROSet is installed using the following menu Windows 2000 Start Settings Control Panel Add Remove Programs Windows XP start Control Panel Add or Remove Programs If it has not been installed input c util drivers wlan proset proset exe in Start Run to install Windows XP start Network Only numbers can be in putted Only capital letters are being ...

Page 60: ...mes from the standby or hibernation mode serial devices such as a mouse modem or PC Cards may not function properly In such cases you will need to restart your computer or reinitialize the individual devices Check the computer printer connection Make sure the printer is on Make sure the printer is in the online state Make sure paper is in the printer tray and there is no paper jam Has the Setup Ut...

Page 61: ...ing to View Resources by type in Control Panel Performance and Maintenance System Hardware Device Manager Make sure a driver is installed Contact the manufacturer of the product When is displayed in the Device Manager try removing and inserting the device once more If the problem persists restart the computer Connecting Peripherals continued Has the floppy disk been correctly inserted Has the flop...

Page 62: ...g with Problems Advanced Cannot play disc or read data from it Cannot eject disc A blue background ap pears on the screen with the MPEG image The CD drive vibrates a lot The disc tray does not close Disk Operations continued Emergency Hole The position of the emergency hole differs depending on the drive Press Ctrl Shift Esc to open Task Manager and close the software application which is not resp...

Page 63: ...p 1 Display the screen you want to save 2 Press Ctrl Alt F8 pcinfo bmp will be saved in My Documents folder If pcinfo bmp file already exists it will be overwritten If pcinfo bmp file is set as a Read only or Hidden file the new file cannot be saved You can also save a copy of the screen to a file using the following procedure Windows 2000 Select Start Programs Panasonic PC InformationViewer Scree...

Page 64: ...ity for damage incurred directly or indirectly from errors omissions or discrepancies between the computer and the manuals Trademarks Microsoft Windows the Windows logo and IntelliMouse are registered trademarks of Microsoft Corporation of the United States and or other countries PS 2 is a registered trademark of International Business Machines Corporation Intel Pentium SpeedStep and PROSet are ei...

Reviews: