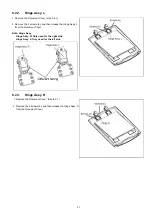


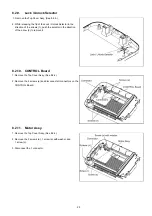
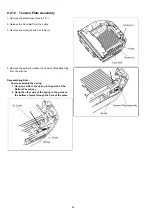
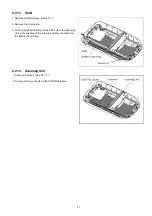


35
10 TROUBLESHOOTING
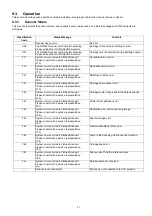
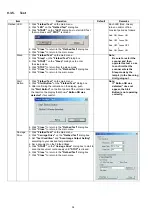
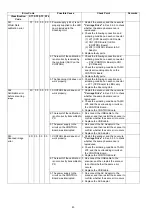
10.1. Troubleshooting-1 (when no error message is displayed on PC)
Phenomenon
Possible Cause
Check Point
Remarks
No power
1. Power Cord is not inserted to AC
Adaptor correctly.
1. Insert the Power Cord to the AC Adaptor,
correctly.
2. Replace the Power Cord.
2. AC Adaptor does not work correctly or
AC Adaptor failure occurs.
1. Connect the AC Adaptor to the scanner,
again.
2. Replace the AC Adaptor.
3. LEDs (Red and Green Indicators) or
their drive circuit does not work
correctly.
1. Check the following connection and
soldering condition on each connector:
→
JP4 (CONTROL Board) to JP1
(PANEL Board)
2. Check the LEDs soldering condition on the
PANEL Board.
3. Check the soldering condition (especially
ASIC and JP4) on the CONTROL Board.
4. Replace faulty parts.
4. Boot program for the scanner does not
work correctly.
1. Check the soldering condition (especially
ASIC) on the CONTROL Board.
2. Replace the CONTROL Board.
5. PC does not recognize USB
connection.
1. Check the USB cable's connection
between the PC and scanner.
2. Connect the USB cable again, and then
restart the scanner so as to check whether
the PC recognizes the USB connection.
3. Check the soldering condition (especially
JP5, ASIC, and their surrounding circuits)
on the CONTROL Board.
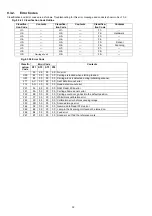
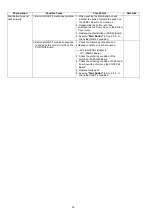
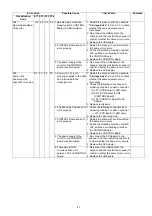
Defects in the scanned
image
(ex: black or white lines
or banding in the image
)
1. Dust on the Flatbed Glass
1. Clean the surface of the Flatbed Glass.
2. Execute
"Carriage Drive"
in Sec. 9.3.5 to
check the scanned image
2. Dust on the scanning position on the
Scanning Unit
1. Remove the dust on the scanning position.
2. Execute
"Carriage Drive"
in Sec. 9.3.5 to
check the scanned image.
3. Scanning Unit has some problems.
1. Execute
"Carriage Drive"
in Sec. 9.3.5
to check whether this phenomenon is
reproduced
2. Check the connection between CN2
(CONTROL Board) and CN1 (CCD Board
included in the Scanning Unit.)
3. Replace the Scanning Unit.
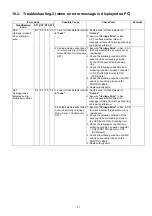
Scanning position is
shifted.
1.Carriage mechanical problem
1. Check the mechanical condition of
the belt and gears on the Motor Assy.
2. Check the belt tension controlled by the
Tension Plate Assy.
3. Reassemble the Scanning Unit while
checking the attachment of the shaft to the
scanner.
4. Execute
"Carriage Drive"
in Sec. 9.3.5.
5. Replace faulty parts.
Noise during scanning
1. Carriage mechanical problem
1. Check the mechanical condition of the
gears on the Motor Assy. and the gear for
the Tension Plate Assy. while executing
"Carriage Drive"
in Sec. 9.3.5.
2. Replace faulty parts
Summary of Contents for KV-SS080
Page 7: ...7 3 COMPONENT IDENTIFICATION 3 1 Part Names ...
Page 8: ...8 3 2 Scanner Status ...
Page 15: ...15 5 SECTIONAL VIEWS 5 1 Flatbed Block and Boards ...
Page 44: ...44 11 2 Block Diagram 2 Board ...
Page 47: ...47 12 PARTS LOCATION AND MECHANICAL PARTS LIST ...
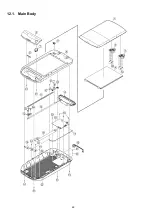
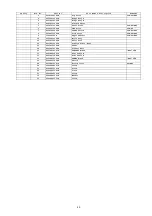
Page 48: ...48 12 1 Main Body ...
Page 50: ...50 12 2 Packing ...


