288
JAN 2006
Ver. 5.2
DP-3510/3520/3530/4510/4520/4530/6010/6020/6030
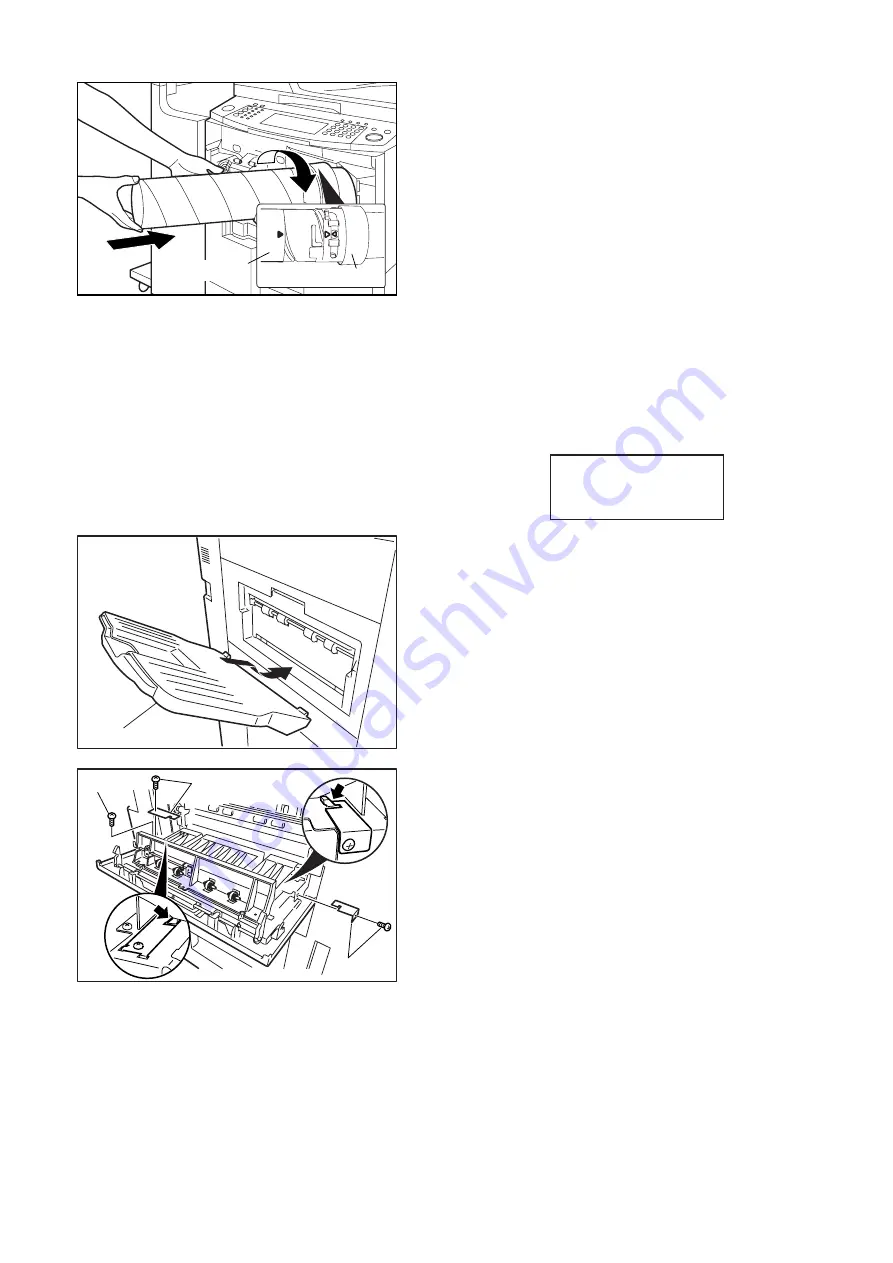
(22) Shake a new
Toner Bottle
10 to 15 times to
loosen the contents.
(23) Remove the Cap from the Toner Bottle.
(24) Insert the Toner Bottle into the Hopper Unit. Align
the Key of the Toner Bottle with the Key
Alignment Channel of the hopper unit. Insert the
Bottle as far as it will go and turn the Toner Bottle
clockwise until it locks in place. (Arrows on the
Bottle and the Hopper are aligned)
(25) Swing the
Toner Bottle / Hopper
closed (180
°
).
(26) Close the Front Cover.
(27) Plug the AC Power Cord into the wall outlet and
turn the Main Power Switch on the Back and the
Power Switch on the Left Side of the machine to
the ON position.
Note:
Perform the following adjustments after the
machine has warmed up and displays:
<For Other Destinations (not USA and Canada),
follow the steps (28) ~ (34) below>
(28) Install the Exit Tray Assembly to the Upper Exit
Cover.
(29) Open the Upper Exit Cover.
(30) Remove 1 Screw to free the Upper Exit Cover
Stopper.
(31) Install the Stop Plate and secure it with 1 Screw
as illustrated.
(32) Install the Stop Plate 2 and secure it with
1 Screw as illustrated.
(33) Secure the Upper Exit Cover Stopper with 1
Screw (removed in step (29) above).
(34) Close the Upper Exit Cover.
Toner Bottle
Hopper
Ready To Copy
Set Originals
(29)
(33)
(31)
(32)
Summary of Contents for DP-3530
Page 4: ...4 Beispiel DP 6530 4530 6030 Hinweis ...
Page 424: ...424 JAN 2006 Ver 5 2 DP 3510 3520 3530 4510 4520 4530 6010 6020 6030 ...
Page 425: ...425 JAN 2006 Ver 5 2 DP 3510 3520 3530 4510 4520 4530 6010 6020 6030 ...
Page 474: ...474 JAN 2006 Ver 5 2 DP 3510 3520 3530 4510 4520 4530 6010 6020 6030 memo ...
Page 842: ...memo ...
Page 858: ...DZZSM00298 ...


