


ELE-6
2-2. Setup of EVR software for camera adjustment
1. Copy all files of the Camera Adjustment software
(VVS0060)
to the PC.
2. Set the camera recorder to
“CAM”
mode.
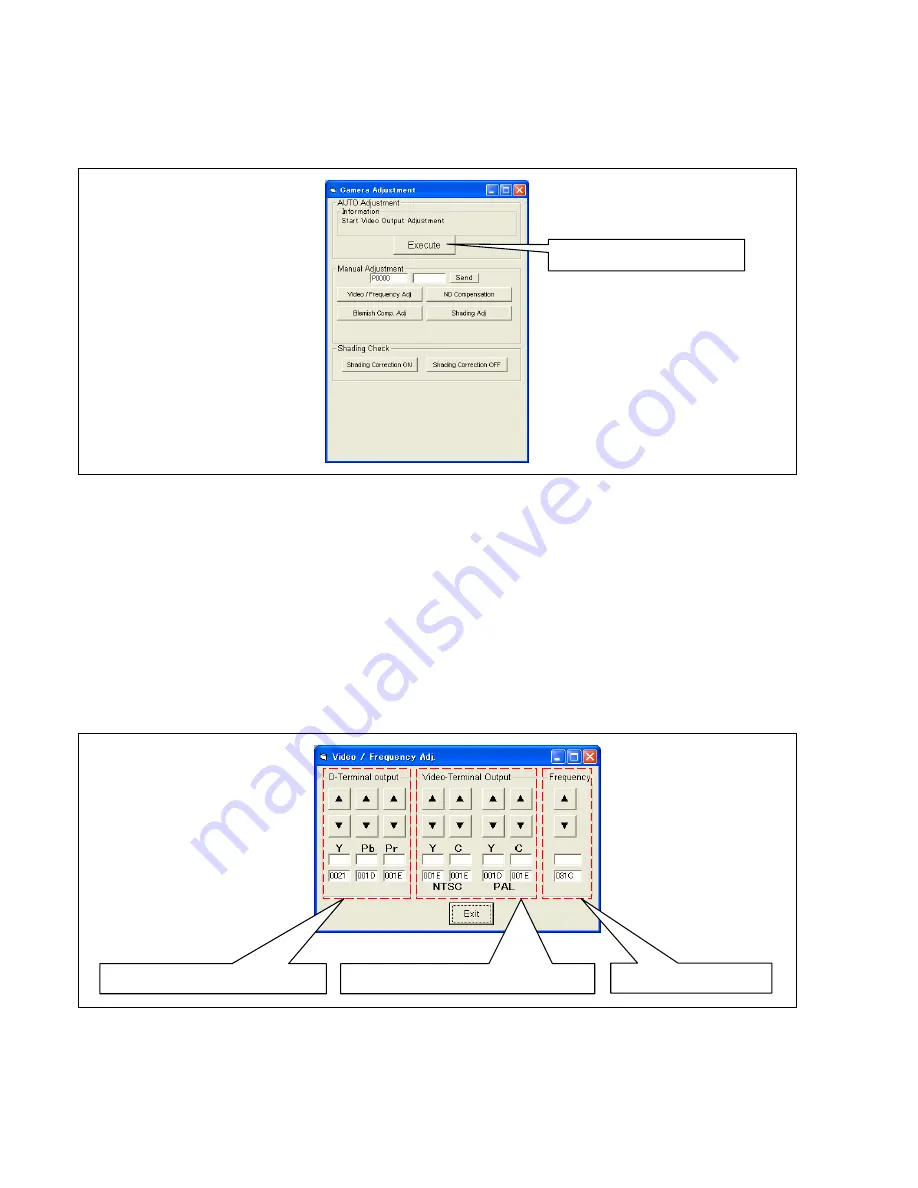
3. Start up the Camera Adjustment software by double-clicking
“Camera Adjustment Software.exe”
. The
Camera Adjustment
screen is displayed.
4. The
“Execute”
button is clicked on the
Camera Adjustment
screen.
Video/Frequency Adj.
screen is
displayed. Moreover, the built-in color bar is displayed on LCD panel.
2-3. Adjustment by screen Video / Frequency Adj. screen
The below indicates adjustment adjusts on the
Video / Frequency Adj.
screen.
●
D-Terminal Output Level Adjustment
●
Video Terminal Output Level Adjustment
●
Int. Frequency Adjustment
The adjustment value can be changed by clicking the adjustment button on the
Video / Frequency Adj.
screen.
NOTE:
Please click the
“Exit”
button on the
Video / Frequency Adj.
screen after completing the adjustment of the
above indicated three adjustments. The
Video / Frequency Adj.
screen is closed by clicking
“Exit”
button.
The auto adjustment starts when the
“Execute”
button is clicked again on the
Camera Adjustment
screen.
In this case, please click
“Video / Frequency Adj.”
button on the
Camera Adjustment
screen. The
Video/Frequency Adj.
screen is displayed.
Click the
“Execute”
button.
For D-Terminal Output Level Adj.
For Video Terminal Output Level Adj.
Int. Frequency Adj.
Summary of Contents for AG-HPX500
Page 3: ... 3 ...
Page 4: ... 4 ...
Page 6: ... 6 Read this first ...
Page 7: ... 7 ...
Page 8: ...MHNK250 0123456S7P ...
Page 117: ...MPL 17 LCD PARTS ASSEMBLY 101 101 101 1 6 7 8 9 E12 101 2 3 4 5 ...
Page 153: ...Panasonic Broadcast AG HPX500 Menu Information ...
Page 185: ...MPL 17 LCD PARTS ASSEMBLY 101 101 101 1 6 7 8 9 E12 101 2 3 4 5 ...


