


INF-31
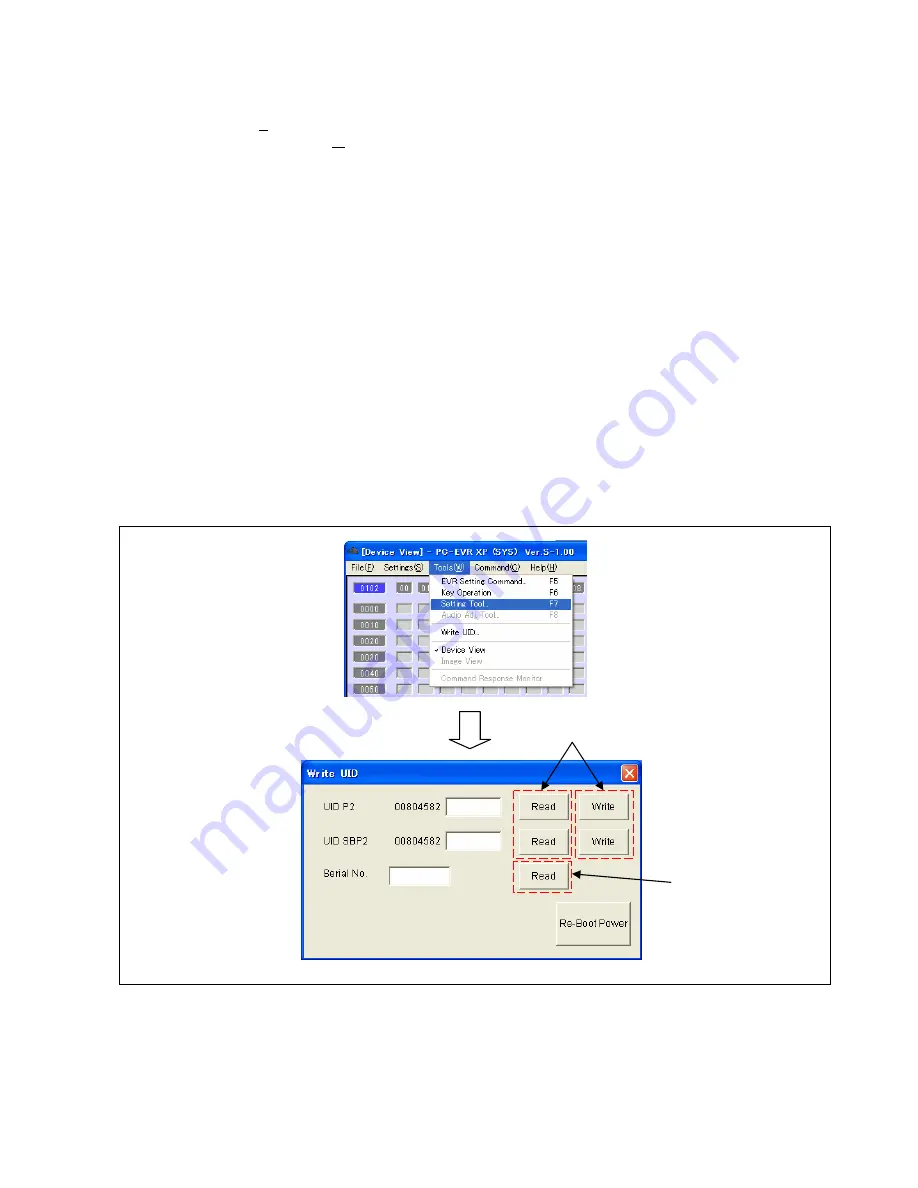
6-5. Write UID screen
This PC EVR software has
Write UID
screen.
< How to display the Write UID screen. >
1. Select
“SYSCON(S)”
section after start up the PC EVR software, and click
“OK”
button.
2. Select
“Write UID”
in
“Tools(W)”
menu,
Write UID
screen will appear on screen.
< Function of the Write UID screen. >
The following display and the setup can be performed on a
Write UID
screen.
●
Setting and display of UID information.
●
Display of Serial No..
6-5-1. UID display
Clicking
“Read”
button as shown in figure, UID information is displayed. The UID information can be confirmed
also with the DIAGNOSTIC menu and
Setting Tool
screen on PC EVR software. Please refer to item
“3-1-4. 1394
UID display”
(page INF-8) and item
“6-4-5. 1394 UID Display”
(page INF-28).
6-5-2. UID setting
Clicking
“Write”
button as shown in figure, UID information is write to camera recorder (The operation of power
OFF/ ON is required to save the number into the camera recorder). Please refer to item
“8. UID Writing
Procedure”
(page INF-39) about setting procedure.
6-5-3. Serial No. display
Clicking
“Read”
button as shown in figure, Serial No. is displayed. The Serial No. can be confirmed also with the
GUI service menu. Please refer to item
“4-4. SYSTEM INFO”
(page INF-14).
6-5-4. Power supply reboot
Clicking
“Re-Boot Power”
button, the power of camera recorder automatically OFF and ON.
For UID
For Serial No.
Summary of Contents for AG-HPX500
Page 3: ... 3 ...
Page 4: ... 4 ...
Page 6: ... 6 Read this first ...
Page 7: ... 7 ...
Page 8: ...MHNK250 0123456S7P ...
Page 117: ...MPL 17 LCD PARTS ASSEMBLY 101 101 101 1 6 7 8 9 E12 101 2 3 4 5 ...
Page 153: ...Panasonic Broadcast AG HPX500 Menu Information ...
Page 185: ...MPL 17 LCD PARTS ASSEMBLY 101 101 101 1 6 7 8 9 E12 101 2 3 4 5 ...


