


Machine Maintenance Procedures
3-35
Thermal Module Installation
0
IMPORTANT
:
+
Apply suitable thermal grease and ensure all heat pads are in place before
replacing module.
The following thermal grease types are approved for use:
N302 I-Connosseur
Honeywell
The following thermal pads are approved for use:
Eapus XR-PE
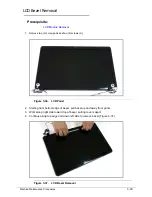
1.
Remove all traces of thermal grease from CPU using a lint-free cloth or cotton swab and Isopropyl
Alcohol, Acetone, or other approved cleaning agent.
2.
Apply small amount of thermal grease to center of CPU (B) (
Figure 3-31
).
NOTE:
NOTE
:
Force used during installation of thermal module is sufficient to spread grease over
CPU top.
3.
Align module (A) to mainboard screw holes.
4.
Install and secure four (4) screws (B) in numerical order from 1 to 4 to mainboard
(
Figure 3-30
).
5.
Install and secure two (2) screws (C) 5 and 6 to mainboard. Refer to (
Figure 3-30
)
.
6.
Install mainboard.
ID
Size
Quantity
Screw Type
C
M2.5*3 Ni
2
B
THML_SPRING_SCREW_
ASSY
4
Summary of Contents for EasyNote LS11HR
Page 1: ...Packard Bell EasyNote LS11HR LS13HR SERVICEGUIDE ...
Page 10: ...x ...
Page 11: ...CHAPTER 1 Hardware Specification ...
Page 14: ...1 4 ...
Page 55: ...CHAPTER 2 System Utilities ...
Page 77: ...CHAPTER 3 Machine Maintenance ...
Page 80: ...3 4 ...
Page 123: ...CHAPTER 4 Troubleshooting ...
Page 149: ...CHAPTER 5 Jumper and Connector Locations ...
Page 156: ...5 8 Jumper and Connector Locations ...
Page 157: ...CHAPTER 6 FRU List ...
Page 158: ...6 2 Exploded Diagrams 6 4 FRU List 6 6 Screw List 6 20 ...
Page 177: ...CHAPTER 7 Model Definition and Configuration ...
Page 178: ...7 2 Packard Bell EasyNote LS11HR LS13HR 7 3 ...
Page 202: ...7 26 Model Definition and Configuration ...
Page 203: ...CHAPTER 8 Test Compatible Components ...
Page 204: ...8 2 Microsoft Windows 7 Environment Test 8 4 ...
Page 214: ...8 12 Test Compatible Components ...
Page 215: ...CHAPTER 9 Online Support Information ...
Page 216: ...9 2 Introduction 9 3 ...
Page 218: ...9 4 Online Support Information ...


