background image

5.Use the Arbitrary Function Generator


104 

voltages  between  two  consecutive  points  will  not  change,  and  the  waveform 
looks like a step-up one.   

(4) 

Edit the waveform points

: Select 

Edit Points

 in the right menu.   


Select 

Point

, input the number of the point to be edited.   


Select 

Voltage

, input the voltage for the current point.   


Repeat the step above, set all the points to your needs.   


Select 

Save

, enter the file system.   

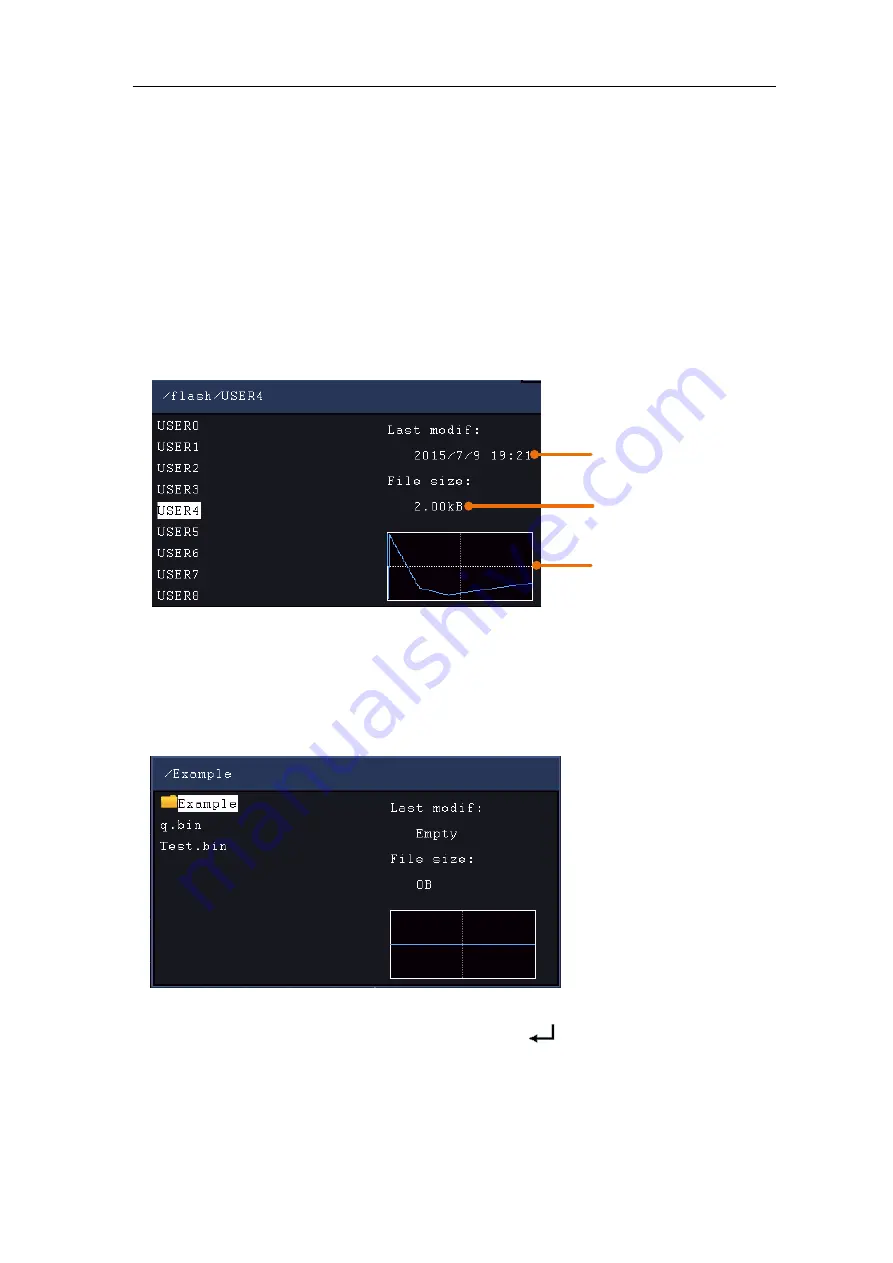
If  you  want  to  save  the  waveform  to  internal  memory,  select 

Memory

  in  the 

right menu as 

Internal

. Turn the 

M

 knob to select a file from USER0 through 

USER31. Select 

Save

 in the right menu. 

File size

Last modification time

Waveform graph


If a USB device is connected, and you want to save the waveform to it, select 

Memory

  in  the  right  menu  as 

USB

.  The  instrument  lists  a  directory  of  the 

folders and files on the USB memory device. Select a folder or file using the 

M


knob to scroll up and down the list. To enter the current folder, select 

Change 

Dir

 in the right menu, select it again to return to the upper directory.   


Enter  the  desired  storage  path,  select 

Save

  in  the  right  menu,  an  input 

keyboard pops up, input the file name, choose

in the keyboard to confirm. 

The waveform is saved as BIN file in the folder. 

Note: The input length can have up to 35 characters.   

Summary of Contents for XDS4000 Series

Page 1: ...XDS4000 Series Digital Storage Oscilloscopes User Manual www owon com ...

Page 2: ...eplace all materials published The information in this manual was correct at the time of printing However LILLIPUT will continue to improve products and reserves the rights to change specification at any time without notice is the registered trademark of the LILLIPUT Company Fujian LILLIPUT Optoelectronics Technology Co Ltd No 19 Heming Road Lantian Industrial Zone Zhangzhou 363005 P R China Tel 8...

Page 3: ...designated service centre a copy of the customers proof of purchase is also required This warranty shall not apply to any defect failure or damage caused by improper use or improper or inadequate maintenance and care We shall not be obligated to furnish service under this warranty a to repair damage resulting from attempts by personnel other than our company representatives to install repair or se...

Page 4: ...ntroduction to the Vertical System 15 Introduction to the Horizontal System 16 Introduction to the Trigger System 17 Touchscreen Controls 18 4 Advanced User Guidebook 24 How to Set the Vertical System 25 Use Mathematical Manipulation Function 27 Waveform math 29 User defined function 29 Digital Filter 30 Using FFT function 30 Use Vertical Position and Scale Knobs 36 How to Set the Horizontal Syste...

Page 5: ...s 101 To Set the Frequency 101 To Set the Period 102 To Set the Start Phase 102 To Set the Amplitude 102 To Set the Offset 102 To Set the High Level 102 To Set the Low Level 102 To Output Square Signals 102 To Output Ramp Signals 103 To Set the Symmetry of Ramp 103 To Output Pulse Signals 103 To Set the Pulse Width of Pulse 103 To Set the Duty Cycle of Pulse 103 To Output Arbitrary Signals 103 Cre...

Page 6: ...emonstration 121 Example 1 Measurement a Simple Signal 121 Example 2 Gain of a Amplifier in a Metering Circuit 122 Example 3 Capturing a Single Signal 123 Example 4 Analyze the Details of a Signal 125 Example 5 Application of X Y Function 126 Example 6 Video Signal Trigger 128 9 Troubleshooting 129 10 Technical Specifications 130 Oscilloscope 130 Trigger 133 Waveform Generator 134 Multimeter Optio...

Page 7: ... be grounded The product must be grounded properly before any connection with its input or output terminal When powered by AC power it is not allowed to measure AC power source directly because the testing ground and power cord ground conductor are connected together otherwise it will cause short circuit Check all Terminal Ratings To avoid fire or shock hazard check all ratings and markers of this...

Page 8: ...zard may be accessible potentially Caution It indicates a potential damage to the instrument or other property might occur Safety Symbols Symbols on the product The following symbol may appear on the product Hazardous Voltage Refer to Manual Protective Earth Terminal Chassis Ground Test Ground To avoid body damage and prevent product and connected equipment damage carefully read the following safe...

Page 9: ...id fire or electrical shock when the oscilloscope input signal connected is more than 42V peak 30Vrms or on circuits of more than 4800VA please take note of below items Only use accessory insulated voltage probes and test lead Check the accessories such as probe before use and replace it if there are any damages Remove probes test leads and other accessories immediately after use Remove USB cable ...

Page 10: ...nction inspection How to make a probe compensation How to set the probe attenuation coefficient How to use the probe safely How to implement an self calibration Introduction to the vertical system Introduction to the horizontal system Introduction to the trigger system Touchscreen Controls Note The following operations and pictures are based on the four channel model For the operation of the two c...

Page 11: ...display screen are menu selection buttons through which you can set the different options for the current menu The other buttons are function buttons through which you can enter different function menus or obtain a specific function application directly 10 3 5 4 9 8 1 6 2 7 Figure 3 1 Front panel 1 Display area 2 Select the right menu item 3 Control button and knob area 4 Probe Compensation Measur...

Page 12: ... Rear Panel 1 Handle 2 Air vents 3 Input terminals of multimeter optional 4 Foot stool Adjust the tilt angle of the oscilloscope 5 VGA port To connect the oscilloscope with a monitor or a projector as VGA output 6 LAN port the network port which can be used to connect with PC 7 USB Device port It is used to transfer data when external USB equipment connects to the oscilloscope regarded as slave de...

Page 13: ...3 Junior User Guidebook 7 Side Panel AC power input jack Air vents Fuse Control Area 1 2 3 8 4 5 6 7 Figure 3 3 Control Area Overview ...

Page 14: ...m functions FFT user function digital filter The Vertical Position knob control the vertical position of current channel and the Scale knob control voltage scale of current channel For Dual Channel with 3 buttons and 4 knobs CH1 CH2 buttons correspond to setting menu in CH1 CH2 Math button provides access to math waveform functions FFT user function digital filter The Vertical Position knob contro...

Page 15: ... triggered data captured and ready for a trigger Scan Capture and display the waveform continuously Stop Data acquisition stopped 4 Click to auto set 5 The two blue dotted lines indicates the vertical position of cursor measurement 6 The pointer indicates the trigger position in the record length 7 The T pointer indicates the horizontal position for the trigger 8 It shows present triggering value ...

Page 16: ...value Ps the Preshoot value RT the rise time value FT the fall time value PW the width value NW the Width value D the Duty value D the Duty value FRR the FRR FRF the FRF FFR the FFR FFF the FFF LRR the LRF the LRF LFR the LFR LFF the LFF PD the Delay A B value ND the Delay A B value TR the Cycle RMS CR the Cursor RMS WP the Screen Duty RP the Phase A B FP the Phase A B PC the Pulse count PC the Pu...

Page 17: ... in touch with our distributor responsible for this service or our local offices 3 Check the Complete Instrument If it is found that there is damage to the appearance of the instrument or the instrument can not work normally or fails in the performance test please get in touch with our distributor responsible for this business or our local offices If there is damage to the instrument caused by the...

Page 18: ...be with the input channel The probe which is not compensated or presents a compensation deviation will result in the measuring error or mistake For adjusting the probe compensation please carry out the following steps 1 Set the attenuation coefficient of the probe on the menu as 10X and that of the switch in the probe as 10X see How to Set the Probe Attenuation Coefficient on P13 and connect the p...

Page 19: ...enu of oscilloscope 1 Push the function menu button of the used channels CH1 CH2 button or CH1 CH4 button 2 Select Probe in the bottom menu select Attenu in the right menu turn the M knob to select the proper value corresponding to the probe This setting will be valid all the time before it is changed again Caution The default attenuation coefficient of the probe on the instrument is preset to 10X...

Page 20: ... to match the probe For example if you attach a 10 1 probe with the identifying pin the screen will prompt The probe attenuation factor is X10 and set the attenuation to 10X automatically on the oscilloscope vertical menu for the channel How to Use the Probe Safely The safety guard ring around the probe body protects your finger against any electric shock shown as Figure 3 9 Figure 3 9 Finger Guar...

Page 21: ...en the corresponding channel menu press again to turn off the channel Press the Math button to display the math menu in the bottom The pink M waveform appears on the screen Press again to turn off the math waveform Each channel has a set of Vertical Position and Vertical Scale knob The two knobs are marked by different colors which are also used to mark the waveforms on the screen and the channel ...

Page 22: ...sition knob to set the vertical display position back to 0 as a shortcut key this is especially helpful when the trace position is far out of the screen and want it to get back to the screen center immediately 3 Change the Vertical Setting and Observe the Consequent State Information Change With the information displayed in the status bar at the bottom of the waveform window you can determine any ...

Page 23: ...ement back to 0 as a shortcut key 3 Push the Horizontal HOR button to switch between the normal mode and the wave zoom mode Introduction to the Trigger System As shown in Figure 3 12 there are one knob and three buttons make up Trigger Controls The following practices will direct you to be familiar with the setting of the trigger system gradually Figure 3 12 Trigger Control Zone 1 Push the Trigger...

Page 24: ...et Select a menu item Touch the menu items in the bottom menu or in the right menu or in the left menu Switch menu items If there are options that can be switched on the menu you can repeatedly touch the area of the menu item to switch or push the corresponding button to switch See figure below Press repeatedly to switch the options Adjust value on the menu item Click to increase the value of curs...

Page 25: ...uch the channel pointer on the left side of the display area to make it in selected state Channel is off Channel is on and selected Channel is on Selected Unselected Channel pointer Set the horizontal and vertical position Click in the area as shown in the figure below the P icon will appear Click anywhere outside the icon to hide it Note Swipe up down or left right in this area you can make the i...

Page 26: ...selected channel Control the horizontal position Control the vertical position of the selected channel Click the P icon to fine turn long press to adjust continuously Set the trigger level Click in the area as shown in the figure below the L icon will appear Click anywhere outside the icon to hide it Note Swipe up down in this area you can make the icon appear and control it ...

Page 27: ...on to fine turn long press to adjust continuously Control the trigger level of the source in the trigger menu Set the time base and the voltage division Click in the area as shown in the figure below the M and V icons will appear Click anywhere outside the icon to hide it Note Swipe up down or left right in this area you can make the icon appear and control it ...

Page 28: ...y Control the time base Control the voltage division In the full screen pinch and spread horizontally to change the time base pinch and spread vertically to change the voltage division of the selected channel Measure with Cursors Click nearby a cursor line as shown in the figure below the line will be selected and the C icon will appear Click anywhere outside the icon to hide it Note Swipe in this...

Page 29: ...up and down Selected Unselected When the C icon appears in the full screen swipe left right to move the selected line Click the direction buttons of the C icon to fine turn long press to move continuously Click the center ab button to select a b or a b Control the vertical cursor line Switch to select the lines ...

Page 30: ...he Horizontal System How to Set the Trigger Decoding System How to Implement the Sampling Setup How to Set the Display System How to Save and Recall Waveform How to Record Playback Waveforms How to Clone and Recall a waveform How to Implement the Auxiliary System Function Setting How to Update your Instrument Firmware How to Measure Automatically How to customize an automatic measurement How to Me...

Page 31: ...etting Description Coupling DC AC GROUND Pass both AC and DC components of the input signal Block the DC component of the input signal Disconnect the input signal Inverted ON OFF Display inverted waveform Display original waveform Probe Attenu 0 001 X to 1000X Step by 1 2 5 Match this to the probe attenuation factor to have an accurate reading of vertical scale MeasCurr YES NO If you are measuring...

Page 32: ...t it as 10 3 To measure current by probing the voltage drop across a resistor Take the Channel 1 as an example if you are measuring current by probing the voltage drop across a 1Ω resistor the operation steps are shown as follows 1 Push the CH1 button to show CH1 SETUP menu 2 Select Probe in the bottom menu In the right menu set MeasCurr as YES the A V radio menu will appear below Select it turn t...

Page 33: ...high and the current flowing into the oscilloscope from the circuit under test is negligible 50Ω Match the oscilloscope with the equipment with an output impedance of 50Ω The maximum input voltage cannot exceed 5 Vrms Use Mathematical Manipulation Function The Mathematical Manipulation function is used to show the results of the addition multiplication division and subtraction operations between t...

Page 34: ...tion Edit Intg Diff Sqrt and user defined function Vertical div Turn the M knob to adjust the vertical position of the Math waveform Vertical V div Turn the M knob to adjust the vertical division of the Math waveform DIR channel CH1 CH2 Select channel type low pass Only the signals whose frequencies are lower than the current cut off frequency can pass the filter high pass Only the signals whose f...

Page 35: ...eps are as follows 1 Press the Math button to display the math menu in the bottom The pink M waveform appears on the screen 2 Select Waveform Math in the bottom menu 3 In the right menu select Factor1 as CH1 4 Select Sign as in the right menu 5 In the right menu select Factor2 as CH2 6 Select Vertical div in the right menu turn the M knob to adjust the vertical position of Math waveform 7 Select V...

Page 36: ... right menu select window select the desired window 6 When low pass or high pass type is selected select cut off fre in the right menu When band pass or band reject type is selected select upper or down in the right menu Turn M knob to adjust the frequency 7 In the right menu select Vertical div turn M knob to adjust the vertical position of Math waveform The voltage division of Math waveform is t...

Page 37: ...on value the upper one turn the M knob to adjust the horizontal position of FFT waveform then select to make the symbol in front of the time base value below turn the M knob to adjust the time base of FFT waveform 7 Select Vertical in the right menu do the same operations as above to set the vertical position and vertical division To select the FFT window There are 6 FFT windows Each one has trade...

Page 38: ...d higher order harmonics Hanning Good for magnitude but poorer frequency resolution than Hamming Recommend to use for Sine periodic and narrow band random noise Transients or bursts where the signal levels before and after the event are significantly different Kaiser The frequency resolution when using the Kaiser window is fair the spectral leakage and amplitude accuracy are both good The Kaiser w...

Page 39: ...gure 4 1 Figure 4 2 Figure 4 3 Figure 4 4 Figure 4 5 Figure 4 6 are examples for measuring sine wave with a frequency of 1kHz under the selection of six different windows for FFT Figure 4 1 Hamming window Figure 4 2 Rectangle window ...

Page 40: ...4 Advanced User Guidebook 34 Figure 4 3 Blackman window Figure 4 4 Hanning window ...

Page 41: ...gure 4 6 Bartlett window Notes for using FFT Use the default dB scale for details of multiple frequencies even if they have very different amplitudes Use the Vrms scale to compare frequencies DC component or offset can cause incorrect magnitude values of FFT ...

Page 42: ...tical Scale knobs If you want to set the vertical scale and vertical position of a channel press CH1 CH2 CH3 or CH4 at first to select the desired channel Then turn the Vertical Position and Vertical Scale knobs to set the values 1 The Vertical Position knob is used to adjust the vertical positions of the selected waveforms The analytic resolution of this control knob changes with the vertical div...

Page 43: ...ode Waveform Horizontal Zooming Press the Horizontal HOR button enter the waveform horizontal zooming mode The upper part of the display shows the main window and the lower part shows the horizontally zoomed window The horizontal zoom window is the horizontally enlarged portion of the selected area in the main window Main Window Time base of Zoom window Selected portion Horizontal position of Zoom...

Page 44: ...n that activates the trigger control menu Trigger Control The oscilloscope provides three trigger types single trigger logic trigger and bus trigger Each type of trigger has different sub menus Press Trigger Menu panel button then bottom menu Trigger Type select Single Logic or Bus Trigger on the popup right menus turn the M knob to choose different trigger types Single trigger Use a trigger level...

Page 45: ...ively as follows 1 Edge Trigger An edge trigger occurs on trigger level value of the specified edge of input signal Select Edge trigger mode to trigger on rising edge or falling edge In Edge Trigger mode the trigger setting information is displayed on bottom right of the screen for example indicates that trigger type is edge trigger source is CH1 coupling is DC and trigger level is 0 00mV Edge men...

Page 46: ...t the right corner after setting dotted line disappears 2 Video Trigger Choose video trigger to trigger on fields or lines of NTSC PAL or SECAM standard video signals In Video Trigger mode the trigger setting information is displayed on bottom right of the screen for example indicates that trigger type is Video trigger source is CH1 and Sync type is Even Video Trigger menu list MENU SETTING INSTRU...

Page 47: ...is CH1 coupling is DC polarity is positive and trigger level is 0 00mV Pulse Width Trigger menu list MENU SETTING INSTRUCTION Single Mode Pulse Set vertical channel trigger type as pulse trigger Source CH1 CH2 CH3 CH4 Select CH1 as the trigger source Select CH2 as the trigger source Select CH3 as the trigger source Select CH4 as the trigger source Coupling AC DC Noise Reject ON OFF Not allow DC po...

Page 48: ...hat trigger type is slope trigger source is CH1 slope is rising 0 00mV is the differential between up level and low level threshold Slope trigger menu list MENU SETTING INSTRUCTION Single Mode Slope Set vertical channel trigger type as slope trigger Source CH1 CH2 CH3 CH4 Select CH1 as the trigger source Select CH2 as the trigger source Select CH3 as the trigger source Select CH4 as the trigger so...

Page 49: ...gger level but fail to pass through the other trigger level Shown as below figure In Runt Trigger mode the trigger setting information is displayed on bottom right of the screen for example indicates that trigger type is runt trigger source is CH1 polarity is positive 0 00mV is the differential between up level and low level threshold Runt Trigger Runt Trigger menu list MENU SETTING INSTRUCTION Si...

Page 50: ...ower than the set pulse width Mode Holdoff Auto Normal Single Holdoff Acquire waveform even no trigger occurred Acquire waveform when trigger occurred When trigger occurs acquire one waveform then stop 100 ns 10 s adjust M knob or click to set time interval before another trigger occur press panel button or click to move cursor to choose which digit to be set 6 Windows Trigger Provide a high trigg...

Page 51: ...he oscilloscope triggers on the negative Windows pulse Enter Triggers when the trigger signal enters the specified trigger level range Exit Triggers when the trigger signal exits the specified trigger level range Time Specify the hold time of the input signal after entering the specified trigger level The oscilloscope triggers when the accumulated hold time is greater than the windows time Availab...

Page 52: ... the trigger source Select CH2 as the trigger source Select CH3 as the trigger source Select CH4 as the trigger source Edge Edge Start timing when the rising edge of the input signal passes through the trigger level Start timing when the falling edge of the input signal passes through the trigger level Configure Idle Time Set idle time Idle time means the minimum time of idle clock before searchin...

Page 53: ...ottom right of the screen for example indicates that trigger type is Nth Edge trigger source is CH1 150V is up level or low level threshold Nth Edge Trigger Nth Edge Trigger menu list MENU SETTING INSTRUCTION Single Mode Nth Edge Set vertical channel trigger type as Nth Edge trigger Source CH1 CH2 CH3 CH4 Select CH1 as the trigger source Select CH2 as the trigger source Select CH3 as the trigger s...

Page 54: ...veform then stop 100 ns 10 s adjust M knob or click to set time interval before another trigger occur press panel button or click move cursor to choose which digit to be set Turn ON OFF Noise Reject Range 0 3div to10div Logic Trigger Trigger according to logic relation In Logic Trigger mode the trigger setting information is displayed on bottom right of the screen for example indicates that trigge...

Page 55: ...is equal to the set time Is True Trigger when the time of true condition is lower than the set time Mode Holdoff Auto Normal Single Holdoff Noise Reject ON OFF Acquire waveform even no trigger occurred Acquire waveform when trigger occurred When trigger occurs acquire one waveform then stop 100 ns 10 s adjust M knob or click to set time interval before another trigger occur press panel button or c...

Page 56: ... Trigger on the start frame of position After choosing this condition press Configure to enter detailed settings Error Trigger when error frame is detected After choosing this condition press Configure to enter detailed settings Chk Error Trigger when Chk Error is detected After choosing this condition press Configure to enter detailed settings Data Trigger on the last bit of the preset data After...

Page 57: ... transmission rate is determined by SCL and the transmission data is determined by SDA As shown in below figure oscilloscope can trigger on the start restart stop ack lost specific device address or data value also device address and data value at the same time In I2C bus trigger mode the trigger setting information is displayed on bottom right of the screen for example indicates that trigger type...

Page 58: ...mat Byte length Set data byte length available range 1 5 bytes Adjust M knob or click to set byte length Select the data bit ranges from 0 to byte length 8 1 Set data to be H L or X H or L Set all the data bits to be the specified value in Data CurrentBit Data All Bits Addr Data Trigger when Address and Data conditions are met at the same time Mode Holdoff Auto Normal Single Acquire waveform even ...

Page 59: ...its of the serial data character string It can be set to any integer between 4 32 adjust M knob or click to set Data Bits Set the number of the data bits ranges from 0 31 adjust M knob or click to set Current Bit Set the value of the current data bit as H L or X H or L Set all the data bits to be the specified value in Data Data Bits Current Bit Data All Bits Mode Holdoff Auto Normal Single Acquir...

Page 60: ...ission signal on the CAN signal line Received signal on the CAN signal line Sample Point Turn the M knob or tap on in touchscreen to set the Sample point which is a point within a bit s time The oscilloscope samples the bit level at this point Sample point is represented by the percentage of the time from the start of the bit s time to the sample point time in the bit s time The range is 5 to 95 C...

Page 61: ...anel End Trigger on the end frame of the data frame Missing Ack Trigger on Missing Ack Bit Stuffing Trigger on Bit Stuffing Error Mode Holdoff Auto Normal Single Acquire waveform even no trigger occurred Acquire waveform when trigger occurred When trigger occurs acquire one waveform then stop Bus Decoding Optional 1 UART RS232 Decoding To decode UART RS232 signal 1 Connect the UART RS232 signal to...

Page 62: ...e UART Set bus type of decoding as UART RS232 Configure Common Baud Turn the M knob to select from the Baud list on the left Custom Baud Turn the M knob or tap on in touchscreen to set the Baud The range is 50 to 10 000 000 Tip You can select the nearest value in Common Baud and then adjust it in this menu Data Bits Set the data width of each frame to match the signal It can be set to 5 6 7 or 8 P...

Page 63: ... trigger menu and decoding menu you can set anyone of them the other will be changed synchronously Decoded information interpretation Information Abbreviation Background Read Address R Read or do not display Green Write Address W Write or do not display Green Data D Data or do not display Black Note Use the Trigger Level knob to adjust the thresholds of bus trigger and bus decoding When the ACK AC...

Page 64: ...decoding menu you can set anyone of them the other will be changed synchronously Note Use the Trigger Level knob to adjust the thresholds of bus trigger and bus decoding LS First in Bit Order menu item Least Significant Bit First means that the least significant bit will arrive first hence e g the hexadecimal number 0x12 will arrive as the sequence 01001000 in binary representation will be decoded...

Page 65: ...ignal correctly and obtain stable display Refer to CAN Trigger on page 53 4 Push the Decode button on the front panel Select bus type as CAN set parameters based on the characteristics of the signal When the parameters are set correctly the information carried by the signal will be displayed Tip If there are repetitive menu items in both trigger menu and decoding menu you can set anyone of them th...

Page 66: ...ta in a csv spreadsheet formatted file on the external USB storage device ASCII Table ON OFF Select ON to display the ASCII table How to Operate the Function Menu The function menu control zone includes 8 function menu buttons Measure Acquire Utility Cursor Autoscale Save Display Help and 3 immediate execution buttons Autoset Run Stop Single How to Implement Sampling Setup Push the Acquire button ...

Page 67: ...dition CH1 CH3 on CH2 CH4 off CH2 CH4 on CH1 CH3 off max 400M for one channel 10K 100K 1M 10M 100M 200M 400M The description of the Intrpl menu is shown as follows Function Menu Setting Description Intrpl Sinx x Use sine x x interpolation x Use linear interpolation Interpolation method is a processing method to connect the sampled points using some points to calculate the whole appearance of the w...

Page 68: ...4 Advanced User Guidebook 62 Figure 4 9 Sine x x interpolation Figure 4 10 Linear interpolation How to Set the Display System Push the Display button and the Display menu is shown as follows ...

Page 69: ...controlling value is changed 5 Select Clear in the bottom menu to erase the results of previous acquisitions from the display The oscilloscope will start to accumulate acquisitions again Function Menu Setting Description Type Dots Vect Only the sampling points are displayed The space between the adjacent sampling points in the display is filled with the vector form Persist Color Persist ON OFF Tur...

Page 70: ... bottom menu 3 Select Color in the right menu choose between ON OFF Figure 4 11 The color temperature function is on XY Format This format is only applicable to Channel 1 and Channel 2 After the XY display format is selected Channel 1 is displayed in the horizontal axis and Channel 2 in the vertical axis the oscilloscope is set in the un triggered sample mode the data are displayed as bright spots...

Page 71: ...counter can only measure the frequency of the triggering channel The frequency range is from 2Hz to the full bandwidth Only if the measured channel is in Edge mode of Single trigger type the counter can be enabled The counter is displayed at the right bottom of the screen Operation steps 1 Push Trigger Menu button set the trigger type to Single set the trigger mode to Edge select the signal source...

Page 72: ...he current object address When the show is ON if the current object address has been used the stored waveform will be shown the address number and relevant information will be displayed at the top left of the screen if the address is empty it will prompt None is saved Close All Close all the waveforms stored in the object address Save Save the waveform of the source to the selected address Whateve...

Page 73: ...e the waveform of CH1 CH2 and Math into the address 1 the operation steps should be followed 1 Turn on CH1 CH2 and Math channels 2 Push the Save button 3 Saving Select Type in the bottom menu select Wave in the left menu 4 Select Storage in the bottom menu select Internal in the right menu 5 Select Source in the bottom menu check CH1 CH2 Math in the right menu for Source 6 Select Object Show in th...

Page 74: ... is set as External you should install the USB disk Please refer to the contents below to install the USB disk and name the file to be saved Save the current screen image The screen image can only be stored in USB disk so you should connect a USB disk with the instrument 1 Install the USB disk Insert the USB disk into the USB Host port of Figure 3 1 Front panel If an icon appears on the top right ...

Page 75: ...e second method using the formatting tools Use system provided function to format the USB disk 1 Connect the USB disk to the computer 2 Right click Computer Manage to enter Computer Management interface 3 Click Disk Management menu and information about the USB disk will display on the right side with red mark 1 and 2 Figure 4 12 Disk Management of computer 4 Right click 1 or 2 red mark area choos...

Page 76: ...rmatting process Figure 4 15 Formatting the USB disk 7 Check whether the USB disk is FAT32 with allocation unit size 4096 after formatting Use Minitool Partition Wizard to format Download URL http www partitionwizard com free partition manager html Tip There are many tools for the USB disk formatting on the market just take Minitool Partition Wizard for example here ...

Page 77: ...3 Click Reload Disk on the pull down menu at the top left or push keyboard F5 and information about the USB disk will display on the right side with red mark 1 and 2 Figure 4 16 Reload Disk 4 Right click 1 or 2 red mark area choose Format Figure 4 17 Choose format 5 Set File System FAT32 Cluster size 4096 Click OK ...

Page 78: ...atting Figure 4 19 Apply setting 7 Formatting process Figure 4 20 Format process 8 Format the USB disk successfully Figure 4 21 Format successfully How to Record Playback Waveforms Push Save button Select Type in the bottom menu in the left menu turn the M knob to select Record Wave Record function can record the input current wave You can set the ...

Page 79: ...Turn the M knob to select the number of frames to record 1 1000 Interval Turn the M knob to select the interval between recorded frames 10ms 10s Refresh ON OFF Refresh wave during recording Stop refreshing Operate Play Stop Begin to record Stop recording Note Both of the waveforms of Channel 1 and Channel 2 will be recorded If a Channel is turned off while recording the waveform of the channel is ...

Page 80: ...as Internal 5 Select Mode in the bottom menu select Record in the right menu 6 Select FrameSet in the bottom menu set End frame and Interval in the right menu 7 In the bottom menu set Refresh 8 In the bottom menu select Operate as Play 9 Select Mode in the bottom menu select Playback in the right menu Set FrameSet and Playmode select Operate as Play 10 To save the wave recorded select Mode in the ...

Page 81: ... left menu turn the M knob to select Record 3 Select Mode in the bottom menu select OFF in the right menu 4 In the bottom menu select Storage as External 5 Select Mode in the bottom menu select Record in the right menu 6 Select FrameSet in the bottom menu set End frame and Interval in the right menu If you want to record wave to external infinitely select Infinity in the right menu the End frame w...

Page 82: ...aveform files saved to a USB memory device are saved with the extension ota If the optional Arbitrary Function Generator is available in your instrument you can output the stored waveform from a file in the internal memory or in a USB memory device and the waveform between two cursors can be output directly without save operation The signal generator manufactured by our company can be used to read...

Page 83: ...een two cursors and output it through the built in generator Save Save Save the waveform between two cursors Storage Internal Save to internal memory When selecting an object a message will appear in the screen center show the information of the selected object Externa l Save the waveform onto a USB memory device Insert a USB memory device into the port on the front panel If the icon appears on th...

Page 84: ...o edit the file name will pop up Turn the M knob to select the keys push the knob to input Select the key in the keyboard to confirm The cloned waveform will be saved onto the USB memory device as a OTA file To output the waveform stored in the internal memory through the generator The generator is optional 1 Push Save button 2 Select Type in the bottom menu turn the M knob to select Clone in the ...

Page 85: ...he generator will output the waveform between two cursors Data format description of OTA waveform file OTA file consists of two parts the file header and the channel data The file header represents the parameter of file data which is expressed in parameter name value Each parameter name is a case sensitive string of 4 bytes The parameter value is at least 4 bytes 1 Format description of the file h...

Page 86: ...4 bytes int 1 or 2 9 VOL2 Parameter name Meaning Value Comment VOL2 Voltage division divided by 400 is ADC resolution 4 bytes float The value indicates voltage the unit is mV such as 200 mV 2 Data The data type is signed integer You can determine the data type char short int or int based on the BYTE parameter The valid range is determined by the ADCB parameter e g the valid range for 8 bit ADC is ...

Page 87: ...the factory settings ProbeCh Check whether probe attenuation is good Function Menu Setting Description Language Choose the display language of the operating system Set Time Display ON OFF On Off the date display Hour Min Setting Hour Minute Day Month Setting Date Month Year Setting Year KeyLock Lock all keys Unlock method push Trigger Menu button in trigger control area then push Force button repe...

Page 88: ...ult users can adjust probe attenuation to the best Operation steps are as follows 1 Connect the probe to CH1 adjust the probe attenuation to the maximum 2 Push the Utility button select Function in the bottom menu select Adjust in the left menu 3 Select ProbeCh in the bottom menu tips about probe checking shows on the screen 4 Select ProbeCh again to begin probe checking and the checking result wi...

Page 89: ...lect Source in the right menu select the source in the left menu Set Horizontal tolerance and Vertical tolerance in the right menu Select Create in the right menu to create the rule 4 Set output type 1 Select Output in the bottom menu to enter output settings 2 Set Type in the right menu to Pass or Fail 3 When the Stop in the right menu is set to ON and the measured signal meets the set rules the ...

Page 90: ...f VGA port Connect the VGA port to an external monitor or projector Turn on the VGA port in this menu the oscilloscope display can be shown on an external monitor or projector Device and Print Setup menu items set the print output refer to How to Print the Screen Image on page 99 LAN Set Using the LAN port the oscilloscope can be connected with a computer Update Use the front panel USB port to upd...

Page 91: ...ve the USB memory device during the update process To update your instrument firmware do the following 1 Push the Utility button select Function in the bottom menu select Configure in the left menu select About in the bottom menu View the model and the currently installed firmware version 2 From a PC visit the website and check if the website offers a newer firmware version Download the firmware f...

Page 92: ... most 8 types of measurements could be displayed on the bottom left of the screen The oscilloscopes provide 39 parameters for auto measurement including Period Frequency Mean PK PK RMS Max Min Top Base Amplitude Overshoot Preshoot Rise Time Fall Time PulseWidth PulseWidth Duty Cycle Duty Cycle Delay A B Delay A B Cycle RMS Cursor RMS Screen Duty FRR FRF FFR FFF LRR LRF LFR LFF Phase A B Phase A B ...

Page 93: ...stics Measure Only if the waveform channel is in the ON state the measurement can be performed The automatic measurement can not be performed in the following situation 1 On the saved waveform 2 On Waveform Math waveform 3 On the Video trigger mode On the Scan format period and frequency can not be measured Measure the period the frequency of the CH1 following the steps below 1 Push the Measure fr...

Page 94: ...ements including Mean PK PK RMS Max Min Vtop Vbase Vamp OverShoot PreShoot Cycle RMS and Cursor RMS Figure 4 24 below shows a pulse with some of the voltage measurement points Figure 4 24 Mean The arithmetic mean over the entire waveform PK PK Peak to Peak Voltage RMS The true Root Mean Square voltage over the entire waveform Max The maximum amplitude The most positive peak voltage measured ...

Page 95: ...ge over the first entire period of the waveform Cursor RMS The true Root Mean Square voltage over the range of two cursors The automatic measurement of time parameters The oscilloscopes provide time parameters auto measurements include Period Frequency Rise Time Fall Time D width D width Duty Duty Delay A B Delay A B Screen Duty Phase A B and Phase A B Figure 4 25 shows a pulse with some of the ti...

Page 96: ...nction menu FRR Time between Source A first rising edge and Source B first rising edge FRF Time between Source A first rising edge and Source B first falling edge FFR Time between Source A first falling edge and Source B first rising edge FFF Time between Source A first falling edge and Source B first falling edge LRR Time between Source A first rising edge and Source B last rising edge LRF Time b...

Page 97: ...tics Gating Press the Measure button and the automatic measurement function menu is displayed at the bottom of the screen Press the Set softkey at the bottom of the screen the setting menu appears on the right side of the screen Select the Gating menu There are two menus Screen and Cursor under the range Click the Screen and then click the Cursor or press the right Screen menu button twice to set ...

Page 98: ... right menu 3 Select the first menu item in the bottom menu the Type menu will display at the right of the screen In the right menu select Time Voltage for Type two blue dotted lines displayed along the horizontal direction of the screen two blue dotted lines displayed along the vertical direction of the screen Cursor measure window at the left bottom of the screen shows the cursor readout 4 In th...

Page 99: ...e horizontal cursors are set as the intersections of the vertical cursors and the waveform Figure 4 27 Auto Cursor The Cursor Measurement for FFT mode In FFT mode push the Cursor button to turn cursors on and display the cursor menu The description of the cursor menu in FFT mode is shown as the following table ...

Page 100: ...r measurement will be applied Perform the following operation steps for the amplitude and frequency cursor measurement of math FFT 1 Press the Math button to display the math menu in the bottom Select FFT In the right menu select Format In the left menu turn the M knob to select amplitude unit V RMS or Decibels 2 Push Cursor to display the cursor menu 3 In the bottom menu select Window as Extensio...

Page 101: ...voltage division and time scale automatically according to the type amplitude and frequency of the signals The menu is as follows Function Menu Setting Instruction Autoscale ON OFF Turn on Autoscale Turn off Autoscale Mode Follow up and adjust both vertical and horizontal settings Follow up and only adjust horizontal scale Follow up and only adjust vertical scale Wave Show Multi period waveforms O...

Page 102: ...vertical position voltage division trigger level or time scale the oscilloscope will pause the Autoscale function To resume Autoscale push the Autoset front panel button 6 When video triggering the horizontal time scale is 50us 7 While the Autoscale is working the settings below will be made forcibly The DSO will switch from the wave zoom mode to the normal mode In the decoding pass fail or XY mod...

Page 103: ... proper division Vertical Position Adjust to the proper position Bandwidth Full Horizontal Level Middle Horizontal Sale Adjust to the proper division Trigger Type Slope or Video Trigger Source The previous source before autoseting When the previous source has no input signal the source will be set to the minimum channel which has input signal When all the channels have no input signal the source w...

Page 104: ... for some icons Multi period To display multiple periods Single period To display single period FFT Switch to FFT mode Rising Edge Display the rising edge of square waveform Falling Edge Display the falling edge of square waveform Cancel Autoset Go back to display the upper menu and waveform information Note The Autoset function requires that the frequency of signal should be no lower than 20Hz an...

Page 105: ...r more details please see Save Function Menu on P65 How to Print the Screen Image To print an image of what appears on the oscilloscope screen do as the follows 1 Connect the printer to the USB Device port on the rear panel of the oscilloscope Note The USB Device port supports PictBridge compatible printers 2 Push the Utility button select Function in the bottom menu select Output in the left menu...

Page 106: ...Output in the left menu In the bottom menu select Output in the right menu select AG Output Connect the BNC cable to the port marked Out in the back of the oscilloscope Figure 5 1 Generator Output Ports To see the output of the generator connect the other end of the BNC cable to one of the input channels on the front of the oscilloscope To Set Channels Push to turn on off the channel output The in...

Page 107: ...iod Start Phase Amplitude High Level Offset Low Level To Set the Frequency Select Frequency in the right menu if Frequency is not displayed select Period and push it again to switch to Frequency Set the parameter in the right menu see below Three methods to change the chosen parameter Turn the M knob to change the value of cursor position Press direction key to move the cursor Use the input keyboa...

Page 108: ...the right menu To Set the Offset Select Offset in the right menu if Offset is not displayed select Low Level and select it again to switch to Offset Set the parameter in the right menu To Set the High Level Select High Level in the right menu if High Level is not displayed select Amplitude and select it again to switch to High Level Set the parameter in the right menu To Set the Low Level Select L...

Page 109: ... select Width and select it again to switch to Duty Cycle Set the parameter in the right menu To Output Arbitrary Signals The menu items of Arbitrary waveform are Frequency Period Start Phase Amplitude High Level Offset Low Level New File Browse Built in You can operate the menu by using the menu selection buttons on the right To set the Frequency Period Start Phase Amplitude High Level Offset Low...

Page 110: ... a file from USER0 through USER31 Select Save in the right menu File size Last modification time Waveform graph If a USB device is connected and you want to save the waveform to it select Memory in the right menu as USB The instrument lists a directory of the folders and files on the USB memory device Select a folder or file using the M knob to scroll up and down the list To enter the current fold...

Page 111: ...in Waveform There are 46 built in Arbitrary waveforms Steps for selecting the built in waveform 1 Push button to show the bottom menu of generator 2 Select Arb in the bottom menu select Others in the right menu and select Built in 3 Select Common Math Window or Others in the right menu E g select Others to enter the following interface 4 Turn the M knob to select the desired waveform or touch if t...

Page 112: ...LT Attenuation oscillation curve CPulse Coded pulse PPulse Positive pulse NPulse Negative pulse Maths ExpRise Exponential rise function ExpFall Exponential fall function Sinc Sinc function Tan Tangent Cot Cotangent Sqrt Square root XX Square function HaverSine HaverSine function Lorentz Lorentz function ln Natural logarithm function Cubic Cubic function Cauchy Cauchy distribution Besselj BesselI f...

Page 113: ...uency point You can also adjust the chart s scale and offset settings for the gain and phase plots Note If the signal is disturbed seriously it is recommended to select Average in Acquire Mode before running the analysis the averages can only be set as 4 or 16 and then run the analysis Push the Utility button select Function in the bottom menu select FRA in the left menu The description of FRA Men...

Page 114: ... 250dB to 250dB Phase Scale Adjust scale of phase plot range from 5 to 180 Phase Offset Adjust offset of phase plot range from 180 to 180 Autoscale Autoscale gain and phase plots Analysis Run stop the analysis F Frequency G Gain P Phase To run the frequency response analysis do the following 1 The waveform generator output is connected to a device under test The input to the device is probed by CH...

Page 115: ...MM Menu Push DMM button on the front panel to enter exit the multimeter function The button backlight will be lighted when the multimeter function is enabled Figure 6 2 Multimeter Button The bottom menu of multimeter is as below Menu Setting Description Current ACA DCA Measuring AC current Measuring DC current Voltage ACV DCV Measuring AC voltage Measuring DC voltage R Measuring resistance ...

Page 116: ...t the voltage range DMM Information Window The Multimeter Information Window is displayed on the top right of the screen 4 1 2 8 3 6 7 5 Figure 6 3 Multimeter Information Window Description 1 Manual Auto range indicators MANUAL refers to the measuring range in manual operation mode and AUTO refers to the measuring range in automatic operation mode 2 Measurement mode indicators A Current measuremen...

Page 117: ...Connect the black test lead to one side of the circuit with a lower voltage connect the red test lead to the other side with a higher voltage Reversing the leads will produce a negative reading but will not damage the multimeter 6 Turn on the power of the measured circuit and read the display 7 Turn off the power of the measured circuit and discharge all high voltage capacitors Remove the test lea...

Page 118: ...o 2 Connect the black test lead to the COM terminal on the back of the oscilloscope and the red test lead to the terminal 3 Probe the test points to measure the resistance in the circuit If the reading is below 50 the multimeter will beep Measuring Capacitance 1 Push DMM button on the front panel Select in the bottom menu select it until switching to C 2 Insert the supplied capacitance measurer to...

Page 119: ...ct Configure in the bottom menu select Show Info in the right menu as ON The information window will be shown on the display 2 Select OFF to hide Auto or Manual Range Auto range is set as default To switch auto or manual range do the following steps 1 Select Configure in the bottom menu 2 Select Auto Range in the right menu AUTO will be shown on the display 3 Select Switch Range in the right menu ...

Page 120: ...ctions will be shown on the screen The record file will be named as Multimeter_Recorder csv If a file with the same name already exists in the USB memory device it will be overwritten If you want to keep the existing file back up it to other location in advance Select STRT in the bottom menu to start recording 9 When the record time gets to the defined duration the recording will be ended If you w...

Page 121: ...t to other location in advance Select Export in the bottom menu to export How to chart the data You can open the CSV file using Microsoft Excel or your favorite spreadsheet application and create charts based on the data In the following steps Microsoft Excel 2010 is used as an example 1 Open Multimeter_Recorder csv in Excel Interval Measurement mode Reference value of the relative measurements 2 ...

Page 122: ...on to choose from Using USB Port 1 Connection Use a USB data cable to connect the USB Device port in the back panel of the Oscilloscope to the USB port of a PC 2 Install the driver Run the Oscilloscope communication software on PC push F1 to open the help document Follow the steps of title I Device connection in the document to install the driver 3 Port setting of the software Run the Oscilloscope...

Page 123: ... Here we set the IP address to 192 168 1 71 Figure 7 2 Set the network parameters of the computer 3 Set the network parameters of the Oscilloscope Software Run the software on the computer choose the Ports settings of the Communications menu item Set Connect using to LAN About the IP the first three bytes is same as the IP in the step 2 the last byte should be different Here we set it to 192 168 1...

Page 124: ...nu it prompts Reset to update the config After resetting the oscilloscope if you can get data normally in the oscilloscope software the connection is successful Figure 7 4 Set the network parameters of the oscilloscope Connect through a router 1 Connection Use a LAN cable to connect the oscilloscope with a router the LAN port of the oscilloscope is in the right side panel the computer should be co...

Page 125: ...he Oscilloscope Software Run the software on the computer choose the Ports settings of the Communications menu item Set Connect using to LAN About the IP the first three bytes is same as the IP in the step 2 the last byte should be different Here we set it to 192 168 1 72 The range of the port value is 0 4000 but the port which under 2000 is always used so it is suggested to set it to the value ab...

Page 126: ...ottom menu set the Type item as LAN and select Set In the right menu set IP and Port to the same value as the Ports settings in the software in step 3 The Netgate and Net mask should be set according to the router Select Save set in the bottom menu it prompts Reset to update the config After resetting the oscilloscope if you can get data normally in the oscilloscope software the connection is succ...

Page 127: ...d on which you can further regulate the vertical and horizontal divisions till the waveform meets your requirement 2 Perform Automatic Measurement The oscilloscope can measure most of the displayed signals automatically To measure the period the frequency of the CH1 following the steps below 1 Push the Measure front panel button to show the Measure menu 2 Select Add in the bottom menu 3 In the lef...

Page 128: ...he circuit signal input end and the CH2 channel to the output end Operation Steps 1 Push the Autoset button and the oscilloscope will automatically adjust the waveforms of the two channels into the proper display state 2 Push the Measure button to show the Measure menu 3 Select Add in the bottom menu 4 In the left Type menu turn the M knob to select PK PK 5 In the right menu select CH1 in the Sour...

Page 129: ...ns supported by our Oscilloscope user can solve this problem by taking an easy approach First to run your test using auto trigger to find out the closest trigger level and trigger type this helps user to make few small adjustments to achieve a proper trigger level and mode Here is how we achieve this The operation steps are as follows 1 Set the probe menu attenuation coefficient to 10X and that of...

Page 130: ...acquiring wait for trigger to happen If a signal reaches to the set trigger level one sampling will be made and then displayed in the screen By using this approach a random pulse can be captured easily For instance if we want to find a burst burr of high amplitude set the trigger level to a slightly higher value of the average signal level push the Run Stop button and wait a trigger Once there is ...

Page 131: ...Mode in the bottom menu 3 Select Peak Detect in the right menu The signal displayed on the screen containing some noise by turning on Peak Detect function and changing time base to slow down the incoming signal any peaks or burr would be detected by the function see Figure 8 4 Figure 8 4 Signal with Noises Separate Noises from the Signal When focusing on signal itself the important thing is to red...

Page 132: ... after it passes through a circuit network X Y mode is a very useful when examining the Phase shift of two related signals This example takes you step by step to check out the phase change of the signal after it passes a specified circuit Input signal to the circuit and output signal from circuit are used as source signals For the examination of the input and output of the circuit in the form of X...

Page 133: ...e Vertical Scale and Vertical Position knobs optimizing the waveform 9 With the elliptical oscillogram method adopted observe and calculate the phase difference see Figure 8 6 Figure 8 6 Lissajous Graph Based on the expression sin q A B or C D thereinto q is the phase difference angle and the definitions of A B C and D are shown as the graph above As a result the phase difference angle can be obta...

Page 134: ...teps 1 Push the Trigger Menu button to display the trigger menu 2 Select the first menu item in the bottom menu Select Single in the right menu 3 In the left menu select Video as the mode 4 Select Source in the bottom menu Select CH1 in the right menu 5 Select Modu in the bottom menu Select NTSC in the right menu 6 Select Sync in the bottom menu Select Field in the right menu 7 Turn the Vertical S...

Page 135: ...t for the input channel and the attenuation ration of the probe to make sure they are match see How to Set the Probe Attenuation Coefficient on P13 4 There is a waveform displayed but it is not stable Check whether the Source item in the TRIG MODE menu is in conformity with the signal channel used in the practical application Check on the trigger Type item The common signal chooses the Edge trigge...

Page 136: ...ards can be fulfilled except one s marked with the word Typical Oscilloscope Performance Characteristics Instruction Bandwidth XDS4504 XDS4502 500 MHz XDS4354 XDS4352 350 MHz Vertical Resolution A D 8 bits Channel XDS4502 XDS4352 2 XDS4504 XDS4354 4 Waveform Capture Rate 600 000 wfms s Multi level Gray Scale Display Color Temperature Display Use gray scale to indicate frequency of occurrence where...

Page 137: ...s max 400M for one channel Scanning speed S div 500ps div 1000s div step by 1 2 5 Sampling rate relay time accuracy 2 5 ppm max Ta 25 5 Interval T accuracy DC 100MHz Single 1 interval time 1 ppm reading 0 6 ns Average 16 1 interval time 1 ppm reading 0 4 ns Vertical system Sensitivity 1 mV div 10 V div Displacement 1V 1mV div 2V 2mV div 50mV div 20V 100mV div 500mV div 200V 1V div 5V div 100V 10V ...

Page 138: ...cle RMS Cursor RMS Screen Duty FRR FRF FFR FFF LRR LRF LFR LFF Phase A B Phase A B Pulse Count Pulse Count Rise Edge Count Fall Edge Count Area and Cycle Area Waveform Math FFT FFTrms Intg Diff Sqrt User Defined Function digital filter low pass high pass band pass band reject Decoding Type optional UART RS232 I2 C SPI CAN Waveform storage 100 waveforms Lissajous figure Bandwidth Full bandwidth Pha...

Page 139: ...ling Video Trigger Modulation Support standard NTSC PAL and SECAM broadcast systems Line number range 1 525 NTSC and 1 625 PAL SECAM Pulse trigger Trigger condition Positive pulse Negative pulse Pulse Width range 30 ns to 10 s Slope Trigger Trigger condition Positive pulse Negative pulse Time setting 30 ns to 10 s Runt Trigger Polarity Positive Negative Pulse Width Condition Pulse Width Range 30 n...

Page 140: ...o 1023 Byte Length 1 to 5 SPI Trigger Trigger Condition Timeout Timeout Value 30 ns to 10 s Data Bits 4 bit to 32 bit Data Line Setting H L X CAN Trigger optional Signal Type CAN_H CAN_L TX RX Trigger Condition Start of Frame Type of Frame Identifier Data ID Data End of Frame Missing Ack Bit Stuffing Error Baud Rate Common Custom Sample Point 5 to 95 Frame Type Data Remote Error Overload Waveform ...

Page 141: ...10 Technical Specifications 135 Arbitrary Waveforms Exponential Rise Exponential Fall Sin x x Step Wave Noise and others total 46 built in waveforms and user defined arbitrary waveform ...

Page 142: ...5 10digit Impedance 200Ω 2MΩ 0 8 10digit 20MΩ 1 10digit 100MΩ 5 10digit General Technical Specifications Display Display Type 10 4 Colored LCD Liquid Crystal Display Display Resolution 800 Horizontal 600 Vertical Pixels Display Colors 65536 colors TFT screen Output of the Probe Compensator Output Voltage Typical About 3 3 V with the Peak to Peak voltage 1 MΩ Frequency Typical Square wave of 1 KHz ...

Page 143: ...operating 15 000 m Cooling Method Fan cooling Mechanical Specifications Dimension 422 mm 226 mm 135 mm L H W Weight Approx 5 kg without accessories Interval Period of Adjustment One year is recommended for the calibration interval period ...

Page 144: ...here the liquid crystal display will be exposed to direct sunlight for long periods of time Caution To avoid any damage to the instrument or probe do not exposed it to any sprays liquids or solvents Cleaning Inspect the instrument and probes as often as operating conditions require To clean the instrument exterior perform the following steps 1 Wipe the dust from the instrument and probe surface wi...

Page 145: ...ded to scrub with soft detergent or fresh water To avoid damage to the instrument or probe do not use any corrosive chemical cleaning agent Warning Before power on again for operation it is required to confirm that the instrument has already been dried completely avoiding any electrical short circuit or bodily injury resulting form the moisture ...

Reviews: