108 / 181
Manual-ZintoA_final_ger_engl_it_20081017.doc
05.11.2008, Dipl.-Ing. S. Spitzley
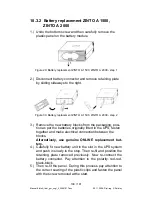
Figure 28: Battery replacement ZINTO A 800, ZINTO A 1000 - step 2
3.) Remove the new battery blocks from the packaging, posi-
tion as per the batteries originally fitted in the UPS, fasten
together and make electrical connection between the
blocks.
Alternatively,
use
genuine ONLINE replacement bat-
tery.
4.) Carefully fit new battery unit in the slot in the UPS system
and push in slowly to the stop. Then re-fit and position the
retaining plate removed previously. Now re-connect the
battery connector. Pay attention to the polarity: red-red,
black-black.
5.) Then re-fit the panel. During this process pay attention to
the correct seating of the plastic clips and fasten the panel
with the screws removed at the start.
Summary of Contents for ZINTO A 1000
Page 1: ...www online ups com Manual ZINTO A Series A 800 A 1000 A 1500 A 2000 A 3000 ...
Page 3: ...2 181 Manual ZintoA_final_ger_engl_it_20081017 doc 05 11 2008 Dipl Ing S Spitzley ...
Page 63: ...62 181 Manual ZintoA_final_ger_engl_it_20081017 doc 05 11 2008 Dipl Ing S Spitzley ...
Page 65: ...64 181 Manual ZintoA_final_ger_engl_it_20081017 doc 05 11 2008 Dipl Ing S Spitzley ...
Page 123: ...122 181 Manual ZintoA_final_ger_engl_it_20081017 doc 05 11 2008 Dipl Ing S Spitzley ...


