background image

11

L/R:

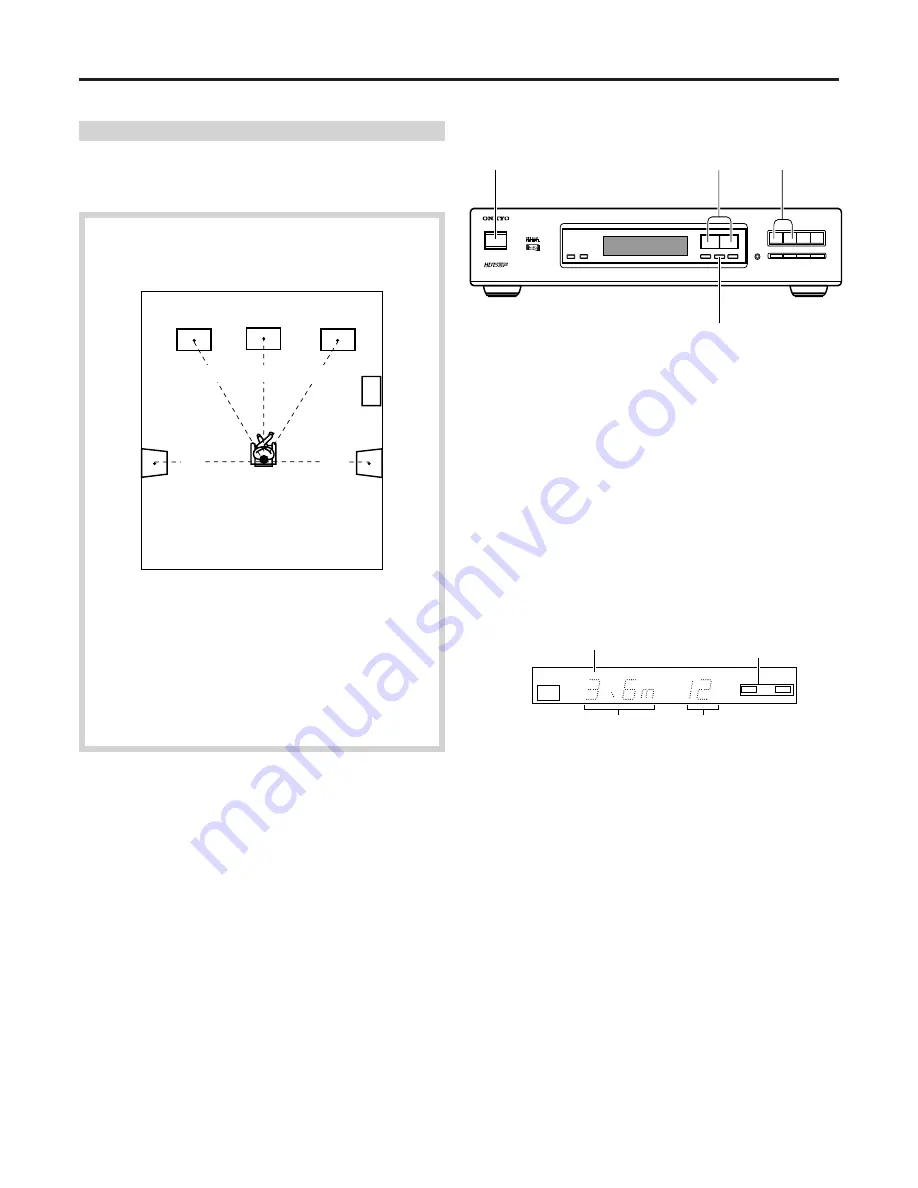
Distance from listening position to L/R Front speaker position.

C:

Distance from listening position to Center speaker position.

LS/RS: Distance from listening position to L/R Surround speaker position.

L

C

R

LS

RS

Left
Surround
speaker

Left Front
speaker

Center
speaker

Right Front
speaker

Subwoofer

Right
Surround
speaker

Listening position

Speaker setting and distance setting

Distance setting

For each speaker type, set the distance from your listening position to
where the speaker is located.

Distance setting procedure

1

Press POWER.

2

Press INPUT-1 or INPUT-2.
Skip this step if the desired input mode is already selected.
Do not press MULTI-CH INPUT or you will not be able to go to
the next and later steps.

3

Press DISTANCE repeatedly to select the speaker type for
which you are setting the distance and then press
PARAMETER CONTROLLER to display the parameter you
want to set.
Each time you press the DISTANCE button, the speaker
indicator(s) that is blinking changes as follows.
L/R (L/R Front)

 → 

C (Center)

 → 

LS/RS (L/R Surround)

 →

COMPLETE

Press the PARAMETER CONTROLLER button to display
parameter you want to set while the speaker indicator is blinking.

When the setting for the current speaker type has been done, press
DISTANCE and the speaker indicator(s) for the next speaker type
will blink.
You will get out of the distance setting mode if the speaker setting
operation is interrupted for 3 seconds or longer. To return to the
speaker setting mode in this case, press the DISTANCE button
again.

Note:
The channels whose speaker setting is "NO" or "NONE" will be
skipped.

1

4

2

3

The distance setting can be adjusted in units of 1 foot (0.3 meter). The
value you can set varies depending on the speaker type.

L/R:

Set the actual distance from listening position to L/R Front
speaker position, within the range of 1 - 30 feet (0.3 - 9.0
meters).

C:

Set the difference between the actual Center speaker
distance from the listening position and the L/R Front
speaker distance from the listening position, within the
range of 0 to -5 feet (0 to -1.5 meters).

LS/RS:

Set the difference in the actual L/R Surround speaker
distance from the listening position and the L/R Front
speaker distance from the listening position, within the
range of 0 to -15 feet (0 to -4.5 meters).

DOLBY
DIGITAL

INPUT-1 

f t

L

R

Distance setting indication

Indicator for speaker(s) for which
setting is being made

Indication in meters

Indication in feet

Summary of Contents for ED-301

Page 1: ...the instructions in this manual will enable you to obtain the optimum performance and maximum listening enjoyment from your new ED 301 Please retain this manual for future reference Instruction Manua...

Page 2: ...have fallen or liquid has been spilled into the appli ance or C The appliance has been exposed to rain or D The appliance does not appear to operate normally or exhibits a marked change in performance...

Page 3: ...receiving antenna Increase the separation between other equipment and the receiver Connect the equipment into an outlet on a circuit different from that to which the receiver is connected Consult the...

Page 4: ...c decoders and output to amplifiers Two types of 5 1 channel audio output 5 1 channel signals can be output in two ways You can use either the independent multi channel audio output jacks RCA type or...

Page 5: ...river into the groove in the switch Slide the switch all the way to the right 120 V or to the left 220 230 V whichever is appropriate Before using this unit Supplied accessories Check that the followi...

Page 6: ...ayout however may vary depending on the size and wall material of your listening room To obtain ideal sound field effects be sure to place the Right and Left Front speakers at the same distance from y...

Page 7: ...making connection When this terminal is not in use replace the protective cap To connect players use cables supplied with the equipment or the proper commercially available cables If your speakers are...

Page 8: ...tions System connection using one A V amplifier with 5 1 channel audio input e g ONKYO TX SV919THX 828THX 646 545 454 444 If your A V amplifier has 5 1 channel audio input jacks connect the ED 301 s 5...

Page 9: ...plifiers instead of one A V amplifier with 5 1 channel input See the previous page for how to connect the player Caution If your speakers are connected via three independent power amplifiers do not co...

Page 10: ...YES 1 Press POWER 2 Press INPUT 1 or INPUT 2 Skip this step if the desired input mode is already selected Do not press MULTI CH INPUT or you will be unable to go on to the next and later steps 3 Pres...

Page 11: ...you want to set while the speaker indicator is blinking When the setting for the current speaker type has been done press DISTANCE and the speaker indicator s for the next speaker type will blink You...

Page 12: ...V amplifier If the amplifier s input level is too high use the VOLUME control button of the ED 301 to decrease the ED 301 s output level If no sound is heard check if the ED 301 is selected on the am...

Page 13: ...one may be adjusted in the range of 3 dB according to your taste 1 Press POWER 2 Press INPUT 1 or INPUT 2 Skip this step if the desired input mode is already selected Do not press MULTI CH INPUT or yo...

Page 14: ...ect decoding mode When the decoding mode is switched depending on the Dolby Digital software or playing equipment a skipped sound or noise may be caused at an early stage of reproduction After playing...

Page 15: ...output jacks or an external decoder 1 Press POWER 2 Press MULTI CH INPUT The display will now show MULTI CH Each time you press this button the INPUT 1 or INPUT 2 indicator shown at the upper right se...

Page 16: ...ights when the listening mode is SURROUND STEREO Stereo mode SURROUND Dolby Pro Logic mode PHANTOM appears if the Center speaker setting is NONE 3 STEREO appears if the L R Surround speaker setting is...

Page 17: ...ress MIDNIGHT THEATER when the DOLBY DIGITAL indicator is lit on the display The M THEATER indicator appears at an upper part of the display and the message MIDNIGHT THEATER scrolls To cancel the Midn...

Page 18: ...ars Main unit 1 1 1 1 1 POWER switch 10 16 2 2 2 2 2 TEST TONE button 12 3 3 3 3 3 DIMMER button 17 4 4 4 4 4 PARAMETER CONTROLLER button 10 13 5 5 5 5 5 INPUT 1 INPUT 2 button 10 16 6 6 6 6 6 LISTENI...

Page 19: ...e laser disc player via a demodulator See page 7 Check that the audio connection cables are correctly connected Check that the A V amplifier is set properly Set the SURROUND 3 STEREO or PHANTOM mode b...

Page 20: ...2 2429 3118 Fax 852 2428 9039 http www onkyo co jp HOMEPAGE Frequency response 20Hz 20kHz 0dB 3dB Input sensitivity and impedance Input 1 2 200mV at 50k Multi channel Audio Input L R C LS RS SW 200mV...

Reviews: