Installing the Remote Message Waiting Light
Remote Message Waiting Light (RMWL) Installation
20-2
MAY CONTAIN U.S. AND INTERNATIONAL EXPORT CONTROLLED INFORMATION
80-J4866-2 Rev. G
Installing the Remote Message Waiting Light
Caution
Be sure to clear the area behind the dash before drilling.
1.
Select a suitable location for the RMWL. Make sure that there is approximately 2-
1/2
" of
clearance directly behind the mounting surface where the light will be inserted.
2.
Carefully drill a
3/4
" diameter hole in the mounting surface.
3.
Pull the RMWL bulb assembly straight out of the housing assembly. Remove the nut
and washer from the housing assembly.
4.
Insert the RMWL housing assembly into the hole in the mounting surface and re-install
the washer and nut. Tighten the nut until the housing assembly is secured flush against
the vehicle dash and re-install the bulb assembly.
5.
Connect the power wire to a +12/+24 VDC unswitched source, such as the BAT+ wire
on the MCP100 power cable.
• The power wire can be identified by the in-line fuse holder.
6.
Connect the RMWL’s ground wire to the accessory cable’s green MSG ALERT wire
using a butt splice.
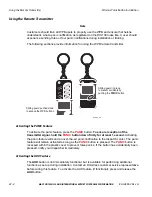
If the RMWL bulb burns out, use a GE53 replacement bulb. The light is protected by a
2-amp in-line fuse.
Installation Verification
1.
Have the dispatcher, or Omnitracs Customer Support, 800-541-7490, send an Important
or Sleepy Important message.
2.
Verify that the light comes ON.
3.
Verify that the light goes OFF when the message is read on the display unit.
4.
Refer to the
MCP100 Diagnostic Guide
for troubleshooting procedures.
Mobile Application
Server
Butt
Splice
+12 VDC
Unswitched
Bulb
Assembly
Housing
Assembly
Washer
Nut
Accessory Cable
MSG ALERT Wire
(green)
Ground
Wire
Mounting
Surface
Fuse
(2 AMP)
OM/E-0093-148A


