background image

2-40

d-COLOR MF283/MF223

Loading paper

2

2.8

1

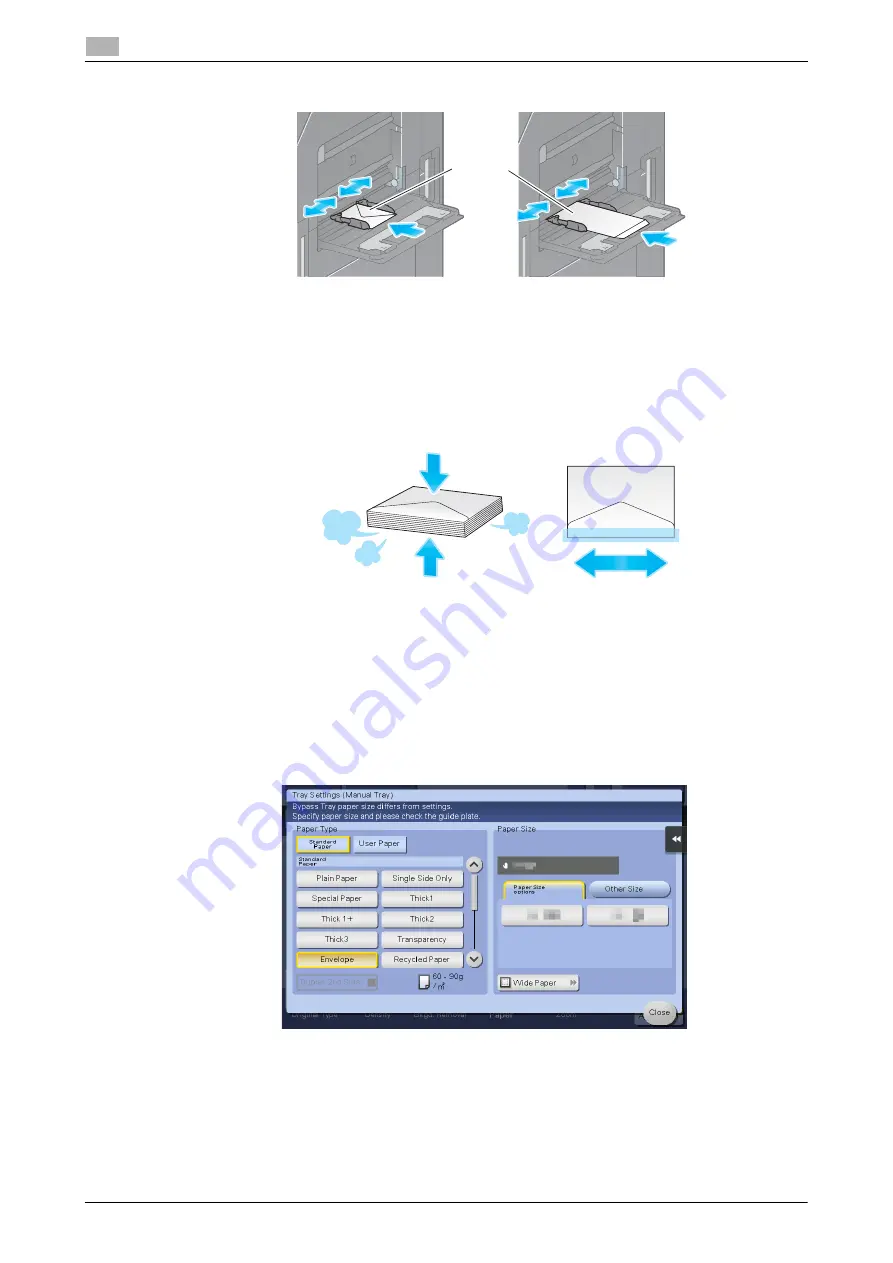
Load envelopes as shown in the figure with the flap part facing up, then align the 

Lateral Guide

 to them.

%

Insert envelopes into the tray until their edges are pressed against the back.

%

The flap side of envelopes cannot be printed on.

The screen for selecting the paper type and paper size appears.

NOTICE

When loading envelopes into the 

Bypass Tray

, note the following points.

When loading envelopes, remove air from them, and securely press along the flap fold line. Otherwise, 
it will result in an envelope wrinkle or paper jam.

Do not use envelopes that have glue or release paper on the flaps or the part covered by the flap on the 
body. Otherwise, the machine may be damaged or a failure may occur.

2

Change the paper type setting.

%

Select [Envelope] from [Paper Type].

The screen for selecting the envelope size appears.

max. 
10 sheets

Summary of Contents for d-COLOR MF283

Page 1: ...d COLOR MF283 MF223 QUICK GUIDE...

Page 2: ......

Page 3: ...1 Internal laser radiation 1 11 CDRH regulations 1 11 For European users 1 12 Laser safety label 1 12 Ozone release 1 12 Acoustic noise for European users only 1 12 For EU member states only 1 12 Tele...

Page 4: ...me of parts 2 21 2 6 Touch Panel 2 23 2 6 1 Main menu 2 23 Layout of main menu 2 23 Customizing the main menu 2 24 2 6 2 Slide menu 2 25 Customizing the slide menu 2 25 2 6 3 Operating the Touch Panel...

Page 5: ...the USB memory device External memory 3 11 Various methods for transmitting and saving data 3 12 3 2 2 Sending data to your Windows computer SMB Send 3 13 Preparation flow 3 13 Operation flow 3 14 Ch...

Page 6: ...ing a destination 3 59 3 6 Using a USB memory device 3 60 3 6 1 Printing data in a USB memory device 3 60 Printing data 3 60 3 6 2 Saving the scanned data in the USB memory device External memory 3 62...

Page 7: ...5 6 5 3 When the machine cannot be powered on 5 8 5 4 When the Touch Panel is not visible 5 9 5 5 When a message appears to replace consumables or carry out cleaning 5 10 When staples in the finisher...

Page 8: ...Contents 6 d COLOR MF283 MF223...

Page 9: ...1 Introduction...

Page 10: ......

Page 11: ...ine safely and properly be sure to read the safety information on page 1 5 of this manual before use In addition this manual contains the following information Be sure to read the manual before using...

Page 12: ...An ENERGY STAR product uses energy more efficiently saves you money on utility bills and helps protect the environment Environmental benefits of power management Electricity consumption of a device de...

Page 13: ...al symbols Power source connection Pictorial indication Description WARNING Improper handling can cause serious injury or death CAUTION Improper handling can cause minor injury or damage to houses and...

Page 14: ...s not long enough to be plugged into a wall outlet contact your Technical Representative Do not unplug and plug in the power cord with a wet hand as an electri cal shock could result Plug the power co...

Page 15: ...lting in a fire or electric shock CAUTION If instructed to use fixing legs When the product has been installed fix the product using the fixing legs Not using the fixing legs could cause the product t...

Page 16: ...ed only to 13 56 MHz for use in inside the ma chine proximity communication or electromagnetic induction heating IH technology limited only to 20 05 kHz to 100 kHz is being used This machine generates...

Page 17: ...toner bottle take utmost care to avoid inhaling it or even getting skin contact If toner lands on your skin or clothing wash thoroughly with soap and water If you inhale toner move to a place with fr...

Page 18: ...ions must be registered with the FCC and are subject to FCC control Any changes made by the purchaser or user without first contacting the manufacturer will be subject to penalty under FCC regulations...

Page 19: ...nd Drug Administration of the U S Department of Health and Human Services DHHS This means that the device does not produce hazardous laser radiation The label shown on page 1 12 indicates compliance w...

Page 20: ...sque une utilisation prolong e de l appareil est effectu e Pour avoir la certitude de travailler dans un environnment r unissant des conditions de confort sant et de s curit il est pr f rable de bien...

Page 21: ...port Graphic symbols used on this machine These are some of major exemplary graphical symbols Graphic symbols Descriptions Graphic symbols Descriptions Graphic symbols Descriptions ON position OFF pos...

Page 22: ...ions Be very careful that an accident does not occur when operations such as removing paper jams and staple jams are performed NOTICE Do not remove caution labels or notations If any caution label or...

Page 23: ...opean single terminal connection to the public switched telephone network PSTN However due to differences between the individual PSTNs provided in different countries the approval does not of itself g...

Page 24: ...4 SD 511 MK 748 CU 101 67 7 8 1724 25 7 16 646 23 1 16 585 47 7 8 1216 61 7 16 1561 35 11 16 906 15 13 16 401 16 15 16 430 30 15 16 786 10 254 12 3 8 314 7 1 16 179 Unit inch mm d COLOR MF283 MF223 DF...

Page 25: ...mmendation listed below Copies that are to be kept for a long time should be kept where they are not exposed to light in order to prevent them from fading Adhesive that contains solvent e g spray glue...

Page 26: ...ies Internal revenue stamps canceled or uncanceled Passports Immigration papers Motor vehicle licenses and titles House and property titles and deeds General Identification cards badges or insignias C...

Page 27: ...s Incor porated Copyright 1995 2009 Adobe Systems Incorporated All rights reserved Adobe and Reader are trademarks of Adobe Systems Incorporated Ethernet is a registered trademark of Xerox Corporation...

Page 28: ...of Bluetooth SIG Inc All other product and brand names are trademarks or registered trademarks of their respective companies or organizations Note User s Guide may not be reproduced in part or in ful...

Page 29: ...he Software only for backup or installation purpose in the support of the normal and intended use of the Software v transfer the Software to other party by transferring a copy of this Agreement and al...

Page 30: ...ain in full force and effect as if such part or parts determined illegal or void had not been included 10 NOTICE TO US GOVERNMENT END USERS The Software is a commercial item as that term is defined at...

Page 31: ...CH DAMAGES OR FOR ANY CLAIM BY ANY THIRD PARTY KM OR ITS LICENSOR DISCLAIMS ALL WARRANTIES WITH REGARD TO THE PROGRAM EXPRESS OR IMPLIED INCLUDING WITHOUT LIMITATION IMPLIED WARRAN TIES OF MERCHANTABI...

Page 32: ...1 24 d COLOR MF283 MF223 i Option LK 105 v4 searchable PDFs End User License Agreement 1 1 11...

Page 33: ...2 About This Machine...

Page 34: ......

Page 35: ...ions such as FTP WebDAV and E mail The intended use also requires that The system is used within the limits of device specifications and specifications of optional components All safety instructions i...

Page 36: ...nual describes basic procedures users will need to know in order to use this machine as well as set ting procedures It also introduces major functions and basic troubleshooting procedures to make use...

Page 37: ...t cost reductions 4 Search by Illustration Searches for the required operations of this machine based on the output result functions and operation images 2 3 4 1 Item Specifications Supported Operatin...

Page 38: ...notations 7WARNING Improper handling can cause serious injury or death 7CAUTION Improper handling can cause minor injury or damage to houses and property NOTICE This symbol indicates a risk that may r...

Page 39: ...a topic only for administrators Symbols Notations Description 0 This check mark symbol shows a precondition of a procedure This symbol indicates a supplementary explanation of a procedural in structi...

Page 40: ...2 8 d COLOR MF283 MF223 About this machine 2 2 3 2 3 About this machine 2 3 1 Optional components Various optional components can be added to meet your office requirements List of optional components...

Page 41: ...is is also used when the Authentication Unit AU 102 or Authen tication Unit AU 201S is installed 10 Keypad KP 101 It is equipped on the side of the Control Panel Allows you to enter numbers by using t...

Page 42: ...nced functions such as a function that converts a file into a DOCX or XLSX type a function that generates highly func tional and high quality data and the E mail RX Print function i Op tion LK 110 v2...

Page 43: ...ase the Paper Feed Cabinet PC 114 Paper Feed Cabinet PC 214 Paper Feed Cabinet PC 414 or Desk DK 514 18 Mount Kit MK 735 Required to use the machine unit that has Authentication Unit AU 201S built in...

Page 44: ...ad the original 3 Bypass Tray Used to load custom size paper or special paper 4 Paper Tray Used to load standard size paper The number of trays varies de pending on the installed Paper Feed Cabinet 5...

Page 45: ...8 Paper Feed Cabinet PC 214 Fax Kit FK 513 Power Supply BOX MK 734 Clean Unit CU 101 and Mount Kit MK 748 dReference For details refer to the User s Guide DVD No Name 1 Jack for connecting a telephone...

Page 46: ...2 3 3 Name of parts Optional units This section shows the names of distinctive parts for each optional unit that can be installed in this machine Finisher FS 533 Punch Kit PK 519 No Name 1 Punch Kit...

Page 47: ...d COLOR MF283 MF223 2 15 2 3 About this machine 2 Job Separator JS 506 No Name 1 Output Tray...

Page 48: ...2 16 d COLOR MF283 MF223 About this machine 2 2 3 Finisher FS 534 Saddle Stitcher SD 511 Punch Kit PK 520 No Name 1 Output Tray 2 Staple Cartridge 3 Punch Scrap Box 4 Saddle Stitcher...

Page 49: ...d COLOR MF283 MF223 2 17 2 3 About this machine 2 No Name 1 Punch Kit 2 Staple Cartridge 3 Folding Output Tray...

Page 50: ...y of the Control Panel Use Main Power Switch to restart this machine 2 4 1 Turning the power on and off Turn the power on and off only when necessary for example when the administrative settings are c...

Page 51: ...ode Holding down the Power key shifts to the Sub Power OFF mode To return this machine from the power save mode to the normal mode press the Power key again Status of this machine Description Power Sa...

Page 52: ...ct Administrator Settings System Settings Power Supply Power Save Settings Power Key Setting For information on the default administrator password refer to the User s Guide CD DVD After the setting is...

Page 53: ...ce Kit EK 609 is required to use the Bluetooth LE function You can place an iOS terminal with Mobile Print for iPhone iPad installed on the mobile touch area to establish a pairing with this machine o...

Page 54: ...mber of copies These keys can be assigned to any function in the Administrator Settings to be easy to use 9 Power Press this key to switch to the power save mode In the normal mode the key lights up b...

Page 55: ...layed on the panel For details on how to display Language refer to the User s Guide DVD Function Search Tap this button to search for copy settings or fax scan settings to go to the target function sc...

Page 56: ...ree screens as necessary Up to 25 keys can be assigned to three main menu screens which can be switched In addition you can specify your favorite background pattern If necessary you can add a backgrou...

Page 57: ...tting to prevent the slide menu Also you can display the Keypad or change the background color dReference For details refer to the User s Guide DVD No Name Description 1 Tab key Tap this key to open a...

Page 58: ...hen remove your finger from the screen immediately This action can select or determine a menu Double tap Lightly touch the screen with your finger twice in succession Used to retrieve detailed informa...

Page 59: ...r parallel in a front to back and side to side direc tion on the screen Used to move to the intended display location if data spans multiple screens Long tap Hold down the document by the finger Used...

Page 60: ...on the screen and then rotate them Used to rotate a preview image Precautions on using the Touch Panel Note the following points when operating the Touch Panel Applying a strong force to the Touch Pan...

Page 61: ...will be displayed It can also be displayed by pressing the 10 Keypad key default Register key 3 How to move the Keypad Move your finger while the upper side of Keypad is being pressed How to close th...

Page 62: ...s refer to the User s Guide DVD 2 6 5 Entering characters When entering characters to register an address or program use the keyboard screen displayed on the Touch Panel When typing in Group1 1 To typ...

Page 63: ...s are executed starting from the job at the top of the list of currently active jobs If you are in a hurry to execute any particular jobs you can rearrange the job execution order dReference For detai...

Page 64: ...me areas If the Hard Disk is not installed in this machine up to 82 jobs in cluding all types of jobs can be registered The table below shows the maximum number of jobs that can be registered for each...

Page 65: ...ingle side only paper special paper thick paper letterhead colored paper and recycled paper How to load paper 1 Pull out the tray NOTICE Be careful not to touch the Film 2 Slide the Lateral Guide to f...

Page 66: ...paper 1 Pull out the tray NOTICE Be careful not to touch the Film 2 Load paper into the right tray Load paper into the tray with the print side facing up NOTICE Do not load the tray with paper of a s...

Page 67: ...ing so may cause a paper jam or damage to the machine Folded torn or creased paper or bundles of sheets of different sizes Type Size Standard size paper 11 e 17 w to 5 1 2 e 8 1 2 w v 4 e 6 w A3 w to...

Page 68: ...align the Lat eral Guide to the paper Insert paper into the tray until their edges are pressed against the back NOTICE Do not load an excessive number of sheets such that the top of the stack is highe...

Page 69: ...gainst the back The screen for selecting the paper type and paper size ap pears NOTICE When loading postcards into the Bypass Tray note the following points When loading curled postcards uncurl the po...

Page 70: ...ressed against the back The screen for selecting the paper type and paper size ap pears 2 Change the paper type setting Select Transparency from Paper Type Transparencies can only be printed in black...

Page 71: ...pen the Right Door then lift the Fusing Ad justment Lever up to the envelope position top 7CAUTION The inside of this product has areas subject to high temperature which may cause burns When check ing...

Page 72: ...appears NOTICE When loading envelopes into the Bypass Tray note the following points When loading envelopes remove air from them and securely press along the flap fold line Otherwise it will result in...

Page 73: ...velope with the flap opened to set the size as a custom sized enve lope When envelope printing has been completed return the Fusing Ad justment Lever you moved to the normal printing position bottom 7...

Page 74: ...Guide to the paper Insert label sheets into the tray until their edges are pressed against the back The screen for selecting the paper type and paper size ap pears 2 Change the paper type setting Sel...

Page 75: ...uide to the paper Insert index papers into the tray until their edges are pressed against the back The screen for selecting the paper type and paper size ap pears 2 Change the paper type setting Selec...

Page 76: ...2 44 d COLOR MF283 MF223 Loading paper 2 2 8...

Page 77: ...3 Basic Settings and Operations...

Page 78: ......

Page 79: ...k that this machine is correctly connected to the network cable For details refer to page 3 4 2 Checking network settings of this machine Administrator Check the network settings of this machine For d...

Page 80: ...al the default settings are available for network connection however some network environ ments require a change on network settings If no IP address is displayed you need to configure the network Tap...

Page 81: ...e printer driver 4 Select this machine from the list If multiple identical models are displayed check the IP address to select an appropriate one For details on how to check the IP address of this mac...

Page 82: ...twork settings of this machine For details refer to page 3 7 The network can be used with the default settings unless otherwise requested 3 Installing the printer driver Install the printer driver on...

Page 83: ...ation software 2 Configuring the printer driver for printing Select a printer driver and change the setting if necessary before printing Checking the cable connection Check that a LAN cable is connect...

Page 84: ...DVD The Bonjour name is displayed on the printer driver as a connected device name To change the Bonjour name tap Bonjour Name and enter the name using the displayed key board Tips If no IP address i...

Page 85: ...the desktop Example Driver OS_10_6_x Letter GENERIC_28C 8 pkg Printer driver for OS X 10 6 When ordinarily using metric sized paper select a printer driver in the A4 directory The last three digits o...

Page 86: ...printer for the Bonjour connection Search for this machine from the list of printers for which Kind is set to Bonjour and click it If you cannot identify the connected machine because multiple same p...

Page 87: ...on the network Once settings are configured you can send data easily For details refer to page 3 13 and page 3 21 Transmitting data as E mail attachment E mail TX Send scanned data as an E mail attac...

Page 88: ...e to meet your needs Issuing a scan instruction from a computer Web service function Saving data to a User Box on the HDD Save in User Box Sending to an FTP server FTP TX Sending to a WebDAV server We...

Page 89: ...nnected to the network cable For details refer to page 3 14 2 Checking network settings of this machine Administrator Check the network settings of this machine For details refer to page 3 14 The netw...

Page 90: ...to the LAN port of this ma chine and the green LED is on Checking network settings of this machine Tap Utility and select Device Information Then check that the IP address is displayed Tips In general...

Page 91: ...Computer System properties 2 Check the computer name and write it down in the Host address column of the checklist 3 Open the command prompt In Windows 8 8 1 while pressing the Windows key press the...

Page 92: ...ngs then select the Turn on file and printer shar ing check box In Windows Vista open the Start menu select Control Panel Network and Sharing Center then turn on File sharing 2 Create a new folder and...

Page 93: ...me to be displayed on the assigned key For Sort Character enter the same name as Name This sets the appropriate index for the name which you entered into Name to Index To change the setting tap Index...

Page 94: ...nction 3 3 2 5 While checking the checklist enter the host address and file path you wrote down When not specifying a folder enter a slash for the file path When specifying a folder enter only the fol...

Page 95: ...d COLOR MF283 MF223 3 19 3 2 Scan to Send function 3 Sending the original 1 Load the original 2 Tap Scan Fax 3 Select a destination 1 2...

Page 96: ...Touch Panel 5 Press the Start key Settings Description Simplex Duplex Select whether to scan one or both sides of the original Resolution Specify the scanning resolution Color Select whether to scan t...

Page 97: ...eck that this machine is correctly connected to the network cable For details refer to page 3 22 2 Checking network settings of this machine Administrator Check the network settings of this machine Fo...

Page 98: ...ed to the LAN port of this ma chine and the green LED is on Checking network settings of this machine Tap Utility and select Device Information Check that the IP address is displayed Tips In Mac OS X1...

Page 99: ...onfiguring this machine Mac OS X 10 7 or later The following settings are only required in Mac OS X 10 7 or later Select NTLM v1 v2 in Utility Administrator Settings Network Settings SMB Settings Clie...

Page 100: ...ormation Check the host address and user ID 0 This operation requires administrator privileges for your computer Check the IP address and user name and write it down in the Host Address and User ID co...

Page 101: ...3 Select the File Sharing check box then click Options 4 Select the Share files and folders using SMB Windows and user name check boxes then click Done 5 Under Shared Folders click 6 Select a new fold...

Page 102: ...ndex for the name which you entered into Name to Index To change the setting tap Index 4 While checking the checklist enter the user ID and password you wrote down 5 While checking the checklist enter...

Page 103: ...d COLOR MF283 MF223 3 27 3 2 Scan to Send function 3 6 Tap Close...

Page 104: ...3 28 d COLOR MF283 MF223 Scan to Send function 3 3 2 Sending the original 1 Load the original 2 Tap Scan Fax 3 Select a destination 1 2...

Page 105: ...Touch Panel 5 Press the Start key Settings Description Simplex Duplex Select whether to scan one or both sides of the original Resolution Specify the scanning resolution Color Select whether to scan t...

Page 106: ...tails refer to page 3 31 2 Checking network settings of this machine Administrator Check the network settings of this machine For details refer to page 3 31 3 Configuring the E mail transmission envir...

Page 107: ...eneral the default settings are available for network connection however some network environ ments require a change on network settings If no IP address is displayed you need to configure the network...

Page 108: ...ission environment 1 Tap Utility and select Administrator Settings Network Settings E Mail Settings For information on the default administrator password refer to the User s Guide CD DVD 2 Tap E Mail...

Page 109: ...function 3 4 Enter the SMTP server address Configuring administrator information 1 Tap Utility and select Administrator Settings Administrator Machine Settings Administrator Reg istration 2 Enter the...

Page 110: ...3 34 d COLOR MF283 MF223 Scan to Send function 3 3 2 Sending the original 1 Load the original 2 Tap Scan Fax 3 Enter a destination 1 2...

Page 111: ...uch Panel 5 Press the Start key Settings Description Simplex Duplex Select whether to scan one or both sides of the original Resolution Specify the scanning resolution Color Select whether to scan the...

Page 112: ...times 1 Checking the cable connection Administrator Check that this machine is correctly connected to the telephone line For details refer to page 3 37 2 Registering transmission information Administr...

Page 113: ...onnected to the LINE port of this ma chine Registering transmission information 1 Tap Utility and select Administrator Settings Fax Settings Header Information For information on the default administr...

Page 114: ...the dialing method 1 Tap Utility and select Administrator Settings Fax Settings Line Parameter Setting 2 Tap Dialing Method Sender settings Sender Fax No Settings Enter the name to be displayed as a s...

Page 115: ...f you do not know the type of the dialing method If you do not know the type of the dialing method operate push buttons of your phone When you hear beep boop beep set Dialing Method to PB If you do no...

Page 116: ...OR MF283 MF223 Fax function 3 3 3 3 Enter a destination 4 Check the setting if necessary Tap Check Setting to check the setting You can also check the setting using the keys displayed on the Touch Pan...

Page 117: ...mputer Advantages to send a fax directly from a computer Realizing paper saving Completing fax operations without leaving your desk Offering clear images by sending data directly from a computer Tips...

Page 118: ...page 3 43 The network can be used with the default settings unless otherwise requested 3 Installing the fax driver on your computer Install the printer driver on your computer For details refer to pag...

Page 119: ...owever some network environ ments require a change on network settings If no IP address is displayed you need to configure the network Tap Utility and select Administrator Settings Network Settings TC...

Page 120: ...eration requires administrator privileges for your computer 1 Insert the printer driver DVD ROM into the DVD ROM drive of the computer 2 Click Printer Install 3 Proceed with the procedure according to...

Page 121: ...int Clicking Preferences can change the setting of the printer driver as required If user authentication is enabled in this machine specify the required data such as the user name and password 4 Enter...

Page 122: ...he basic operations to make a copy 1 If user authentication is enabled the login screen appears Tap the entry area or keyboard icon to enter the required information then tap Login or press Access key...

Page 123: ...nput area for entering the number of copies Settings Description Original Type Specify the original type of the original Color Specify the color to output an image Booklet The pages in the original da...

Page 124: ...entication by user or group in this machine Installing optional units enables IC card NFC or biometric authentication If IC card or NFC authentication is enabled place the IC card or Android terminal...

Page 125: ...address books This sec tion explains an example to register an address book to which a fax is sent Using the Control Panel to register an address book Registration from Util ity Select a destination t...

Page 126: ...s sets the appropriate index for the name which you entered into Name to Index To change the setting tap Index Entry items and the number of setting screens vary depending on the destination type Use...

Page 127: ...ion 3 Using the Control Panel to register an address book Registration in scan fax mode Select a destination type and register destination information 1 Display the scan fax screen 2 Tap Address Reg 3...

Page 128: ...r enter the same name as Name Entry items and the number of setting screens vary depending on the destination type For informa tion on entry items refer to page 3 54 Registration by Direct Input The d...

Page 129: ...Tap Utility and select Device Information Check that the IP address is displayed If no IP address is displayed you need to configure the network For details refer to the User s Guide DVD 2 Start a We...

Page 130: ...User Box to be used as a destination Fax Name Enter the name of the destination to be registered as an address book Fax Number Enter the fax number of the destination PC SMB Name Enter the name of th...

Page 131: ...periodic intervals Registering a new group 1 Tap Utility and select One Touch User Box Reg Create One Touch Destination Group 2 Tap New 3 Enter the destination name you want to register Tap Name and...

Page 132: ...dress book on the destination selection screen The following two meth ods can be used to search for a destination Index Searches for the target destination name using an index Registration Number Sear...

Page 133: ...ving a registered destination Retrieve an address book or group to specify it as a destination to which data is sent Retrieving a destination 1 Tap Scan Fax The destinations which are categorized into...

Page 134: ...3 58 d COLOR MF283 MF223 Registering a destination 3 3 5 2 Narrow down destinations using index and address type 2 1 3 4...

Page 135: ...scription Direct Input Directly enter a destination using the keyboard screen or Keypad Job History Specify a target destination in the job history latest five destinations on the scan fax screen Addr...

Page 136: ...ith USB version 2 0 1 1 interface Formatted in FAT32 Without security function added or with security function that can be turned off as required There is no upper limit for the memory size Available...

Page 137: ...d COLOR MF283 MF223 3 61 3 6 Using a USB memory device 3 3 Select data to be printed and tap Print 4 Check print settings 2 1 4 3...

Page 138: ...at is not connected to the network Available USB memory device Compatible with USB version 2 0 1 1 interface Formatted in FAT32 Without security function added or with security function that can be tu...

Page 139: ...d COLOR MF283 MF223 3 63 3 6 Using a USB memory device 3 2 Tap External Memory Functional Settings 3 Select Save Document and ON Tap OK 1 2 3...

Page 140: ...USB memory device 3 3 6 Saving data in the USB memory device 1 Load the original 2 Connect a USB memory device to this machine NOTICE Do not use a USB device other than a flash memory device 3 Tap Sa...

Page 141: ...e setting using the keys displayed on the Touch Panel To change the setting tap the desired key on the Touch Panel Settings Description Simplex Duplex Select whether to scan one or both sides of the o...

Page 142: ...3 66 d COLOR MF283 MF223 Using a USB memory device 3 3 6 6 Press the Start key NOTICE Do not disconnect the USB memory device during data saving...

Page 143: ...to display the description of a function on the screen and view an operation procedure with moving images If you have any questions during operation try to use this guidance function Getting help on t...

Page 144: ...3 68 d COLOR MF283 MF223 Using the guidance function 3 3 7 3 Narrow down the information you want to know...

Page 145: ...the Help Menu and select a menu depending on an objective to display the guidance screen 1 Press the Guidance key default Register key 2 2 Select a menu Name Description Exit Returns to the screen th...

Page 146: ...3 70 d COLOR MF283 MF223 Using the guidance function 3 3 7 3 Narrow down the information you want to know...

Page 147: ...ation Tap this button to display operation examples and explanations of this machine sorted by function Other Functions Tap this button to display the guidance menu of the functions and set tings that...

Page 148: ...DVD 2 Configure a setting for each option Settings Description Administrator Password Change the administrator password of this machine Password Rules Configure whether to enable the password rules On...

Page 149: ...ap Set Now to configure the Quick Security function Tips You can specify whether to display the Quick Security key on the main menu This key is not displayed in the default state To display the key ta...

Page 150: ...3 74 d COLOR MF283 MF223 Using the Quick Security function 3 3 8...

Page 151: ...4 Advanced Functions...

Page 152: ......

Page 153: ...that converts a file into a DOCX or XLSX type a function that generates highly functional and high quality da ta and the E mail RX Print function This requires the registration of i Option LK 110 v2 T...

Page 154: ...n licenses for i Option LK 102 v3 and i Option LK 105 v4 If you purchase i Option LK 110 v2 you do not need to purchase i Option LK 102 v3 or i Option LK 105 v4 The Hard Disk is optional in some areas...

Page 155: ...dministrator Settings Forward License Settings Install License Token Code For information on the default administrator password refer to the User s Guide CD DVD 3 Enter the token number shown in the t...

Page 156: ...ister the request code and the contents of the token certificate on the Web site of the License Manage ment Server LMS This procedure is available when this machine cannot be connected to the Internet...

Page 157: ...ver LMS Enter the MFP Serial Number and Re quest Code then click Next The URL is https licensemanage com index aspx 5 Enter the Token Number select the option you want to register from the Product Des...

Page 158: ...o enable i Option You should write them down on a memo pad or print them out on paper by clicking Print You could also store them in your USB memory device The license code input could be omitted by u...

Page 159: ...his machine cannot be connected to the Internet By inputting the codes 1 Tap Utility and select Administrator Settings Forward License Settings Install License Function Licence Code For information on...

Page 160: ...lity and select Administrator Settings Forward License Settings Install License from Ext Memory 3 Select Yes then tap OK This machine restarts automatically Configuring each function Configure the req...

Page 161: ...equent times 1 Enabling the Web browser function Administrator Enable the Web browser function on this machine For details refer to page 4 12 If you cannot enable the Web browser above proceed to step...

Page 162: ...password refer to the User s Guide CD DVD 2 Select ON then tap OK This machine is connected to the Internet to communicate with the License Management Server LMS and it restarts automatically Tips Wh...

Page 163: ...ver LMS This procedure is available when this machine cannot be connected to the Internet 1 Display the serial number of this machine Tap Utility and select Device Information 2 Write down the serial...

Page 164: ...able Web browser function You should write them down on a memo pad or print them out on paper by clicking Print You could also store them in your USB memory device The license code input could be omit...

Page 165: ...this machine cannot be connected to the Internet By inputting the codes 1 Tap Utility and select Administrator Settings Network Settings Forward twice Web Browser Settings Web Browser Usage Settings...

Page 166: ...4 16 d COLOR MF283 MF223 Using the Web browser function 4 4 2 4 Enter the license code you wrote down 5 Select Yes then tap OK This machine restarts automatically 2 1 1 2...

Page 167: ...unction 4 By using a USB memory device 1 Tap Utility and select Administrator Settings Network Settings Forward twice Web Browser Settings Web Browser Usage Settings 2 Select ON then tap OK 3 Wait a f...

Page 168: ...F283 MF223 Using the Web browser function 4 4 2 4 Connect the USB memory device stored with the license code 5 Select Install License from Ext Memory 6 Select Yes then tap OK This machine restarts aut...

Page 169: ...The pre specified home page appears Displaying Web pages 1 Tap the URL display area 2 Enter the URL of a desired page then tap OK The target page appears Tips Selecting Menu Display allows you to zoo...

Page 170: ...ng the file 3 Specify the output paper To change the setting tap the desired key on the Touch Panel 4 Press the Start key Settings Description Color Select whether to print in color or black and white...

Page 171: ...5 Troubleshooting...

Page 172: ......

Page 173: ...sage is displayed it is advisable to promptly prepare replacement consumables For Toner Cartridge Toner is low Replace when indicated appears followed by Replace Toner Car tridge Replace the Toner Car...

Page 174: ...representative if the paper jam indication persists even after you have checked 5 1 3 When an error message appears When an error is detected the following message appears Take the appropriate action...

Page 175: ...tion Image stabilization is performed while a large number of copies are being output or the temperature or hu midity inside the machine has changed Upon completion of image stabilization printing is...

Page 176: ...Head Glass Printing quality deteriorates if the Print Head Glass is dirty If this occurs clean the Print Head Glass ac cording to the following procedure 1 Open the Front Door of the machine 2 Releas...

Page 177: ...l the way to the back end of the Print Head Glass section and then slowly pull it out Repeat this operation approximately three times for all of the Print Head Glass sections 5 Mount the Printhead Cle...

Page 178: ...he Main Power Switch and the Power key for the status Check whether the power plug of this machine is firmly plugged into the power outlet Also check that the breaker has not tripped Check to see that...

Page 179: ...n Power Save Low Power Sleep mode this machine returns from Power Save mode when the Touch Panel is touched or a key on the Control Panel is pressed and the Touch Panel appears normally On the Control...

Page 180: ...finisher have run out When staples in the Finisher have run out a message appears to prompt you to make replenish them Take action while referring to the label inside the machine When the punch scrap...

Page 181: ...ntract When it is time to replace a Toner Cartridge When it is time to replace a Toner Cartridge a replacement prompt message appears Replace it based on the maintenance contract Tap Start Guidance to...

Page 182: ...lt status this message is displayed only in some area The settings by the service representative are required to display a message about Drum Unit For de tails contact your service representative When...

Page 183: ...t status this message is displayed only in some area The settings by the service representative are required to display a message about Imaging Unit For details contact your service representative Whe...

Page 184: ...rns or other damage 7CAUTION Do not leave toner related parts e g toner cartridge and developing unit within easy reach of children Licking any of these parts or ingesting toner could damage your heal...

Page 185: ...developing unit near devices susceptible to magnetism such as precision equipment and data storage devices otherwise they may malfunction They could cause these products to malfunction Do not force op...

Page 186: ...tive will collect your used Drum Unit Put it in a black plastic bag and store it in a box by itself A Drum Unit may be damaged due to exposure to light Do not take a Drum Unit out of a black plastic b...

Page 187: ...6 Index...

Page 188: ......

Page 189: ...gement Server LMS 4 6 4 13 Loading Paper 2 33 2 34 2 35 Low Power mode 2 20 M Main Menu 2 23 MFP 2 12 Multi job 2 32 O Options 2 8 2 14 P PC Fax TX 3 41 PCL 3 6 Power Save mode 2 20 Print Function 3 3...

Page 190: ...6 4 d COLOR MF283 MF223 6...

Reviews: