40496501TH Draft Version
54
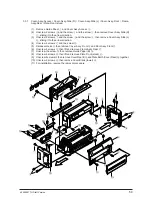
3.3.1
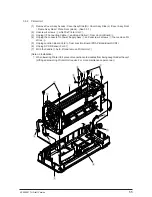
Cover-Assy-Access / Cover-Assy-Side (R) / Cover-Assy-Side (L) /Cover-Assy-Front / Frame-
Assy-Rear / Plate-Front (stuck)
(1)
Remove Guide Sheet
1
and Cover Assy Access
2
.
(2)
Unscrew 2 screws
3
and the screw
4
and the screw
5
, then remove Cover Assy Side (R)
6
, sliding it to the arrow direction.
(3)
Unscrew 2 screws
7
and the screw
8
and the screw
9
, then remove Cover Assy Side (L)
0
, sliding it to the arrow direction.
(4)
Unscrew 4 screws
A
and the screw
B
.
(5)
Release Hooks
C
then remove Cover Assy Front
D
and Door Assy Front
E
.
(6)
Unscrew 4 screws
F
then lift and remove Frame Assy Rear
G
.
(7)
Unscrew the screw
H
then remove Guide Paper (B)
I
.
(8)
Unscrew 6 screws
J
then lift and remove Plate Front (stuck)
K
.
(9)
Unscrew 4 screws
L
then remove Cover Rear B
M
and Plate Earth (Cover Rear)
N
together.
(10) Unscrew 2 screws
O
then remove Cover Blank (lower)
P
.
(11) For installation, reverse the removal procedure.
G
F
F
F
J
B
A
C
J
I
N
6
9
P
O
M
H
1
2
3
5
6
D
K
4
J
J
7
0
B
E
J
F
L
L
Summary of Contents for PACEMARK 4410
Page 1: ...PACEMARK 4410 PRINTER SERVICE HANDBOOK...
Page 52: ...40496501TH Draft Version 52 Figure 3 1 3 2 Parts Layout...
Page 95: ...40496501TH Draft Version 95...
Page 168: ...XXXXXXXXTH Draft Version 8 5 Fig 8 5 45 38 38 40 42 39 44 44 122 41...
Page 169: ...XXXXXXXXTH Draft Version 8 6 142 141 11 119 Fig 8 6...
Page 170: ...XXXXXXXXTH Draft Version 8 7 Fig 8 7 105 102 61 33 104 100 101...


