background image

34

Océ TCS400 User manual

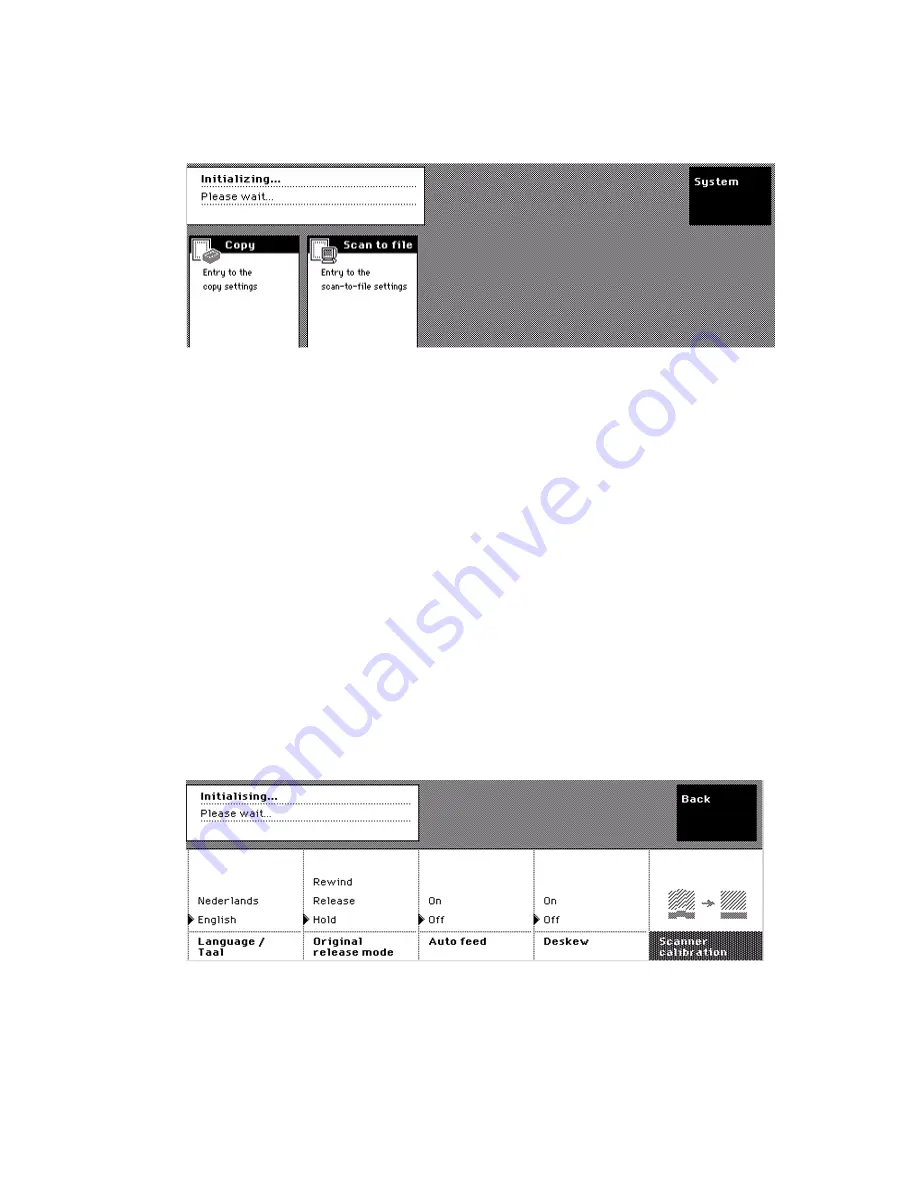
When you select the 'Entry to the scan-to-file settings', the screen displays the 
scan-to-file settings with the default values defined in the Océ Settings Editor. 
(see ‘

Define the copy settings on the scanner operator panel

’ on page

61

)

[14] The Home screen

[14] The Home screen

The home screen also gives access to the system settings. Use the softkey 
above the 'System' card to access the following:

The language settings.
The language settings include the first and the second language defined in 
the Océ Settings Editor.

The original handling settings.
The original handling settings include the original release modes and the 
auto feed settings.

'Deskew'
When this setting is enabled , the scanner automatically corrects the angle 
of a slightly skewed image. The 'Deskew' setting operates only when the 
'Size' setting on the 'Original' card is set to 'Automatic'. (see ‘

Define the size 

of the originals

’ on page

66

)(see ‘

Define the size of the originals

’ on 

page

85

)

The scanner calibration wizards.

[15] The System screen

[15] The System screen

If an error occurs on the scanner, the screen displays an error recovery screen. 
The error recovery screen fills the complete screen.

Summary of Contents for TCS400

Page 1: ...Oc TCS400 User s Manual...

Page 2: ...nt hereof without obligation to notify any person of such revision or changes Edition 2003 10 Oc Technologies B V US Trademarks Products in this manual are referred to by their trade names In most if...

Page 3: ...tarted Introduction 40 Turn on and off the Oc TCS400 41 Turn on and off the Oc TCS400 41 Energy save modes 44 Prepare the Oc TCS400 for use 46 Change the display language of the Oc TCS400 46 Configure...

Page 4: ...Use the Oc TCS400 scanner to scan to file 79 The scan to file settings on the scanner operator panel 79 Define the scan to file settings on the scanner operator panel 82 Create and start a scan to fi...

Page 5: ...y from the scanner 144 Calibrate the scanner 146 Update the IT8 file for scanner calibration 149 Chapter 9 Manage jobs on the Oc TCS400 Introduction to how to manage your jobs 152 Delete or stop jobs...

Page 6: ...mmed original 212 System errors and permanent errors 213 Miscellaneous errors 214 Correct smartcard errors 216 Chapter 12 Oc Power Logic controller Oc Settings Editor Introduction to the Oc Power Logi...

Page 7: ...6 Connect to the controller 260 Use Oc Remote Logic 262 Automatic logon 262 Change the password 263 Log on to the controller applications 264 Chapter 16 Account logging Introduction to account logging...

Page 8: ...ser manual Appendix B Safety information 303 Instructions for safe use 304 Safety data sheets 306 EPA ENERGY STAR 309 Appendix C Miscellaneous 311 Reader s comment sheet 312 Addresses of local Oc orga...

Page 9: ...9 Oc TCS400 User manual Chapter 1 Introduction...

Page 10: ...copier or printer data files etc from being damaged Caution The information that follows Caution is given to prevent you from suffering personal injury Description Each section or subsection contains...

Page 11: ...lp in the Oc Settings Editor The documentation for the drivers and the job submission software The User s Manual The User s Manual is supplied with the Oc TCS400 as a PDF file in 16 languages on the C...

Page 12: ...line help in the help menu The documentation for the drivers and the job submission software The documentation set for the drivers and the job submission software includes the following Windows Print...

Page 13: ...on user is referred to as an anonymous user in this manual Repro operator The repro operator is responsible for the daily use of the Oc TCS400 in a central repro department The repro operator has no p...

Page 14: ...ble for installing and configuring the Oc TCS400 in the network environment The system administrator has the following tasks and permissions in the Oc Settings Editor Update the IT8 data file for scan...

Page 15: ...15 Oc TCS400 User manual Chapter 2 Get to know the Oc TCS400...

Page 16: ...TCS400 allows you to create a customized configuration The Oc Power Logic Controller is required for all configurations The Oc TCS400 main components When you have a configuration without a monitor a...

Page 17: ...multifunctional color system 1 The Oc TCS400 multifunctional color system 1 The printer 2 The Oc Power Logic controller inside a separate controller cabinet with a monitor a keyboard and a mouse direc...

Page 18: ...00 printer Introduction The printer is a 36 inch color printer with a true resolution of 600 dpi The Oc TCS400 is available with 1 or 2 media rolls Illustration 2 The media input side of the printer 2...

Page 19: ...Get to know the Oc TCS400 19 3 The output side of the printer 3 The output side of the printer...

Page 20: ...in components of the printer 1 Printer operator panel 2 Carriage with the printheads 3 Media rolls 4 Integrated receiving tray 5 Ink tanks 6 The door to the integrated Oc Power Logic controller cabine...

Page 21: ...Get to know the Oc TCS400 21 5 The printer operator panel 5 The printer operator panel 6 The carriage with the printheads 6 The carriage with the printheads...

Page 22: ...22 Oc TCS400 User manual 7 The ink tanks 7 The ink tanks 8 The maintenance cassette 8 The maintenance cassette...

Page 23: ...Get to know the Oc TCS400 23 9 The media rolls 9 The media rolls 10 The integrated Oc Power Logic controller cabinet 10 The integrated Oc Power Logic controller cabinet...

Page 24: ...ns of the printer operator panel You can turn the printer operator panel for easy vision from both sides of the printer Use the printer operator panel to view system information on the on line screen...

Page 25: ...line key with green LED 5 The stop key 6 The lower softkeys The screen The screen of the printer operator panel displays different types of information The type of information depends on the mode of...

Page 26: ...erator panel see The on line mode and the off line mode on page 27 Use the upper softkeys to perform the following Scroll through the information tabs on the on line screen Scroll through the wizard c...

Page 27: ...ntroduction Use the on line off line key to switch between the on line mode and the off line mode on the screen of the printer operator panel If you press the on line off line key while the printer is...

Page 28: ...ation for the empty tank blinks The ink tank is not in place The indication shows a dashed rectangle Possible obstruction of ink path see Miscellaneous errors on page 208 Printhead information The sta...

Page 29: ...he off line mode the green LED is off The printer operator panel displays a set of wizards A wizard always requires a user action When you initially enter the off line mode the printer operator panel...

Page 30: ...nk see Replace the ink tanks on page 183 7 Display counters Select this wizard to check the amount of media and ink that is used since the system was installed Press the softkey for Finish to return t...

Page 31: ...an optical resolution of 508 dpi The main components are described below The main components of the Oc TCS400 scanner 12 The main components of the scanner 12 The main components of the scanner 1 Scan...

Page 32: ...ctions of the scanner operator panel Use the scanner operator panel for the following Define the settings for the copy jobs Define the settings for the scan to file jobs Start the scanning Access to s...

Page 33: ...s 8 The lower softkeys 9 The stop key 10 The correction key 11 The arrow keys The screen When you turn on the scanner the screen displays the home screen The home screen contains the Entry to the copy...

Page 34: ...second language defined in the Oc Settings Editor The original handling settings The original handling settings include the original release modes and the auto feed settings Deskew When this setting...

Page 35: ...tion key two times to reset the numeric display to 1 The home key Use the home key to return to the home screen When you are in an error recovery screen you cannot use the home key to return to the ho...

Page 36: ...tings Manage the job queue Manage the set memory Receive jobs over the network The location of the Oc Power Logic controller You can place the Oc Power Logic controller in one of the following locatio...

Page 37: ...two types of settings Key operator settings KO settings System administrator settings SA settings The key operator can define the key operator set tings The system administrator can define the system...

Page 38: ...38 Oc TCS400 User manual...

Page 39: ...39 Oc TCS400 User manual Chapter 3 Getting started...

Page 40: ...troduction This chapter contains all the information you need to get started You can learn more about the following Turn on and off the Oc TCS400 The energy save modes Change the display language Conf...

Page 41: ...and the Oc Power Logic controller on and off together or separately You can define if this setting is On or Off The following paragraphs describe how to turn on and off the Oc TCS400 when the above s...

Page 42: ...On 1 Press the on off button of the printer The Oc Power Logic controller and the printer both start up 16 The on off button of the printer 16 The on off button of the printer Perform the following wh...

Page 43: ...System Synchronize printer and Power Logic controller power on off if the Oc Settings Editor is set to Off 1 Press the on off button on the printer The printer shuts down 2 Open the Oc System Control...

Page 44: ...rs the energy save mode When the Oc TCS400 is in the energy save mode you can activate the system as follows Send a job Press a key on the printer operator panel Press the retract button to retract a...

Page 45: ...wake up from the sleep mode The green LED illuminates This indicates that the system wakes up During the wake up period the screen remains blank Press any key on the scanner operator panel to activat...

Page 46: ...a keyboard mouse and monitor with your Oc Power Logic controller you must use Oc Remote Logic to connect to the controller applications Change the language of the operator panels You can change the l...

Page 47: ...ll change If you use the controller applications local on the controller and you change the display language the display language of all applications will change How to change the language on the on l...

Page 48: ...oftkey for System to enter the system screen 2 Press the softkey below the Language card to change the language 19 The language card on the system screen 19 The language card on the system screen Note...

Page 49: ...ings Only the system administrator is authorized to define the system settings Actions in the Configure system wizard You can perform the following actions in the Configure system wizard Enable DHCP f...

Page 50: ...to the Configure system card 3 Press the softkey below the Configure system card to enter the wizard The screen displays the message Use this wizard to configure the system 4 Press the key for Next T...

Page 51: ...m the DHCP server The wizard finishes here Press the key for Back and continue with step 10 if you want to configure the network settings manually 9 After you select No press the key for Next 10 The s...

Page 52: ...ngs Press the key for Finish to confirm the settings and to exit the wizard How to configure the system from the Oc Settings Editor 1 Log on to the system administrator mode 2 From the View menu in th...

Page 53: ...53 Oc TCS400 User manual Chapter 4 Send print jobs to the Oc TCS400...

Page 54: ...n of the Oc TCS400 includes the following Printer drivers Oc Print Exec Workgroup FTP After you send jobs to the printer you can manage the jobs through the Oc Queue Manager and the printer operator p...

Page 55: ...Make sure you define the correct print mode for your job Make sure you define the correct media type for your job Make sure you define the correct job settings For example orientation rotate shift an...

Page 56: ...le in the documentation provided with the drivers Available printer drivers Use the following printer drivers with the Oc TCS400 to print files from the software applications Windows printer driver Us...

Page 57: ...led information Before you begin Requirements for the browser software and network Microsoft Internet Explorer 4 01 SP 2 or higher versions or Netscape Navigator 4 08 or higher versions TCP IP network...

Page 58: ...lder on the FTP site of your Oc TCS400 Web browsers that support job submission through FTP The following Web browser supports the drag and drop of files Netscape Navigator 4 x Drag the jobs into the...

Page 59: ...59 Oc TCS400 User manual Chapter 5 Make copy jobs on the Oc TCS400...

Page 60: ...not described anywhere else in this manual The chapter Ensure the best quality output describes how to use the settings that control the image quality on the output The on line help in the Oc Settings...

Page 61: ...description of the setting cards and describes how to change the default settings for the copy jobs The copy settings The copy settings are divided over the following four setting cards on the scanne...

Page 62: ...eading strip Select the area of the original that you can see on the output Use the settings on the Output card for the following Define all the settings that deal with the output media Define the out...

Page 63: ...lt values of the settings in the Oc Settings Editor See the on line help in the Oc Settings Editor about how to define the default settings How to define the copy settings 1 On the home screen press l...

Page 64: ...put mode section of the Original card select Single sheet 5 On the Media section in the Output card select the required media 6 Use the numeric keys to define the number of copies If the Start key is...

Page 65: ...the required media 7 Press the green Start key for each original of a set To close a set press the Start key without feeding an original Note When Auto feed is enabled on the System screen each origi...

Page 66: ...tomatically detected width of the original Custom The width is the width selected in the Original custom width setting and the length is equal to the length selected in the Original custom length sett...

Page 67: ...dth as the Original size method use the softkey for Standard to select the original standard size for the defined paper range 4 If you select Custom as the Original size method use the softkey for Cus...

Page 68: ...e default values for the Area selection Define the area selection 1 Select the Original card with the upper softkeys 2 Use the softkey for Size to select Custom as the Original size method Note The Ar...

Page 69: ...that was not selected The complete image on the output is grayed out except the selected area Off The Area selection setting is not active 7 Use the settings Horizontal offset and Vertical offset to...

Page 70: ...ttings Editor to define the default paper range used in the Media size setting Use the KO Jobs Copy Template Output card Media setting in the Oc Settings Editor to define a default media type for your...

Page 71: ...dth When the Scale setting on the Layout card is set to Automatic Roll width fits the image to the media roll selected in the Media setting A DIN or ANSI size Use this setting to print the output on t...

Page 72: ...range from 10 to 1000 When the result of the scale factor is larger than the output size loss of information occurs Use the automatic scaling setting 1 Select Automatic with the softkey for Scale on t...

Page 73: ...you define the position of the image on the output first define the media width on the Output card When you select Automatic as the Media width the system puts the image on the output based on the wi...

Page 74: ...enter of the output 3 Select the Vertical align with the softkey for Align Use the arrow keys to select one of the following Top The image is put on the top of the output Bottom The image is put on th...

Page 75: ...ing on the Image card of scanner operator panel The settings for image quality The selection of the media and the quality modes depends on the application of the output see Recommended media types and...

Page 76: ...76 Oc TCS400 User manual...

Page 77: ...77 Oc TCS400 User manual Chapter 6 Scan to file on the Oc TCS400...

Page 78: ...e size and the image quality and the available file formats for scan to file Chapter 6 the Use Oc Scan Manager for your scan to file jobs describes the software application that you need for your scan...

Page 79: ...his section gives a description of the setting cards for the scan to file jobs The scan to file settings The scan to file settings are divided over following 4 setting cards on the scanner operator pa...

Page 80: ...s that deal with the destination and file output Select the destination for scan to file Define the file format see File formats for scan to file on page 91 Define the file compression see The setting...

Page 81: ...trol the file size and the image quality on page 86 Define the color depth see The settings that control the file size and the image quality on page 86 Define the correct color mode Define the exposur...

Page 82: ...the scan to file settings 1 On the home screen press lower softkey for Entry to the scan to file settings to enter the settings screen 2 Select a card with the upper softkeys 3 Change the settings wi...

Page 83: ...ect the following The color depth for the selected file type in the Colour depth section The resolution for the file in the Resolution section Note Make sure that the file properties you select are su...

Page 84: ...ient 2 Enter the Open command followed by the host name of the Oc Power Logic controller or the IP address Note You can also enter ftp host_name in the FTP client Press Enter 3 The connection with the...

Page 85: ...ing Before you begin Use the KO System Media Paper series setting in the Oc Settings Editor to define the default paper range used when you select Standard as the Original size method Define the origi...

Page 86: ...better the quality of the image the larger the file size The settings that control the size of the file and the quality of the image are interdependent The definition of one settings influences the o...

Page 87: ...on the File card Path KO Jobs Scan to file Defaults File compression Use this setting to define the compression method for the files TIFF organization on the File card Path KO Jobs Scan to file Defaul...

Page 88: ...ssion factor results in a smaller file size The highest available com pression factor for TIFF files is Packbits The highest available com pression factor for PDF files is Flate Note Group 3 and Group...

Page 89: ...atibility with old drawing programs N A File resolution A higher resolution results in a larger file size A higher resolution results in a higher image quality color depth A higher number of bits per...

Page 90: ...e compres sion methods Available color depths TIFF File organization Raw Stripped Tiled None uncompressed Black white 1 bit per pixel Grayscale 8 bits per pixel RGB 24 bits per pixel Group 3 2D Black...

Page 91: ...on the Oc TCS400 91 File formats for scan to file Introduction The Oc TCS400 supports the following file formats for scan to file TIFF 6 0 PDF 1 3 CALS I The format you select depends on the function...

Page 92: ...nge of picture bit depth and al lows a many forms of compression You can use TIFF files in most graphic applica tions The data can be stored in a TIFF file in the following ways Raw This file organiza...

Page 93: ...lication You must use Adobe Acro bat or Adobe Illustrator ap plications to open the PDF files A feature of the PDF file format is its ability to describe com plex pages and documents while maintaining...

Page 94: ...the Output card 1 1 The image on the output has the exact size of the image on the original Custom You can define a scale factor in a range from 10 to 1000 When the result of the scale factor is larg...

Page 95: ...95 Oc TCS400 User manual Chapter 7 Use Oc Scan Manager for your scan to file jobs...

Page 96: ...tart the Oc Power Logic controller applications on page 220 Description of the Oc Scan Manager The Oc Scan Manager allows you to do the following Create the destinations for scan to file Define the fi...

Page 97: ...tains an overview of the Oc Scan Manager application Use the Oc Scan Manager for scan to file The structure of the Oc Scan Manager The Oc Scan Manager has the following fields The menu bar The top too...

Page 98: ...the destination Save the destination When a file is selected the File menu includes the following items View the properties of the selected file Delete the selected file Print the selected file View...

Page 99: ...last use the Refresh button on the toolbar to update the view or select Refresh in the View menu 30 The Refresh button on the toolbar 30 The Refresh button on the toolbar Component Function New Create...

Page 100: ...image in the file The status bar The status bar of Oc Scan Manager displays the following information The system status connected disconnected The system to which Oc Scan Manager is connected The sca...

Page 101: ...A System Set memory reservation setting in the Oc Settings Editor to define the available space on the controller for scanned files A network destination with SMB An internet destination with FTP You...

Page 102: ...tton to select the path 6 Click OK to accept the destination properties Create a network destination with SMB 1 Create a shared folder on a workstation For example c Scan 2 From the File menu on the O...

Page 103: ...e FTP on the workstation 3 From the File menu on the Oc Scan Manager select New You can also click the New button on the toolbar The Destination properties dialog box opens 4 From the Type drop down l...

Page 104: ...ion 1 Select a destination 2 From the File menu select Properties You can also click the Properties button on the toolbar 3 Check the Locked check box Uncheck the Locked check box to unlock the destin...

Page 105: ...From the File menu select Properties You can also click the Properties button on the toolbar 3 Change the destination properties like described in the Create destinations section see Create destinati...

Page 106: ...destination 2 From the File menu select Properties You can also click the Properties button on the toolbar 3 Enter a name in the Base name text box The Base name can contain for automatic file naming...

Page 107: ...iew a scanned file 1 Select a file 2 From the File menu select View You can also click the View button on the toolbar 32 The View button on the toolbar 32 The View button on the toolbar Oc View Statio...

Page 108: ...the toolbar The system deletes the selected file Clear the temporary store 1 From System menu select Clear temporary store or 2 Use the settings Path KO System Disk cleanup in the Oc Settings Editor...

Page 109: ...es window Oc View Station LT Introduction to Oc View Station LT Description of Oc View Station LT Oc View Station LT is a viewer included in Oc Scan Manager Oc View Station LT displays the scanned fil...

Page 110: ...110 Oc TCS400 User manual Overview of Oc View Station LT Introduction Oc View Station LT has the following fields The menu bar The view ribbon The view area 37 Oc View Station LT 37 Oc View Station LT...

Page 111: ...window 1 1 Show the image at a 1 1 scale factor Magnify Zoom into the page Reduce Zoom out of the page Refresh Refresh the view of all the windows that show the active document Invert Reverse the bla...

Page 112: ...section below Status bar Shows the status bar at the bottom of the Oc View Sta tion LT window The Status Bar shows the pointer co or dinates and a status line Reference Show the Reference window The...

Page 113: ...ter clockwise to the left Rotate the image 90 degrees counter clockwise to the right Rotate the image 180 degrees Enables you to measure the lines and the areas on the im age how the Reference window...

Page 114: ...Then the viewer shows a red border with a red cross 38 An error view in Oc View Station LT 38 An error view in Oc View Station LT Use your right mouse button to click on the file shown in the view ar...

Page 115: ...115 Oc TCS400 User manual Chapter 8 Ensure the best quality output...

Page 116: ...ou to identify and analyze changes in the output quality the Quality check print the Tone scale area check print and the Demo print The Check the output quality section of this chapter describes these...

Page 117: ...rements are different from the original The colored lines are not well aligned Missing sections in lines or stepped lines Missing parts of text Drop out caused by nozzle problems 2 Make sure you defin...

Page 118: ...es on the Image card on the scanner operator panel Define the default output modes in the Oc Settings Editor Modes related to color Use this setting to define the color mode of the Oc TCS400 You can s...

Page 119: ...For example to check if all the information is visible on the printed output Release The print speed is high The output quality is very good This quality mode offers a good combination of output quali...

Page 120: ...he cockling of the media When you select the Area fills mode the printer prints vivid colors The Area fills mode is the best mode for files that contain filled areas For example GIS files Lines Text W...

Page 121: ...ntain line drawings and text For example CAD draw ings Photo The system optimizes for filled ar eas Dark original The system optimizes for originals with a dark media background An image drawn on dark...

Page 122: ...mation The Maps mode is the best mode for GIS files magazines and newsletters Artwork The system optimizes for filled areas and produces optimal color fastness The media background of the image is opt...

Page 123: ...for the print jobs The image type for the copy jobs The output quality mode The following determines the actual quality of your printed output The print speed The lower the print speed the better the...

Page 124: ...de Print speed A0 not in cluding the drying time and the pro cessing time Lines Text Line art Dark origi nal Blueprint Check Grayscale All media 1 10 Lines Text Line art Dark origi nal Blueprint Relea...

Page 125: ...Presentation Uncoated media 9 35 Coated me dia Film and photo paper 12 00 Area fills Photo Artwork Check All media 9 35 Area fills Photo Artwork Release Uncoated media 6 40 Coated me dia 11 45 Film a...

Page 126: ...mended media types and quality modes Introduction The selection of the media and the quality modes depends on the application of the output The tables give you an idea of which media type and quality...

Page 127: ...nslucent bond Check Release To release a draw ing Draft paper Standard paper Tracing paper Premium coated paper Matte film Bond Translucent bond Deluxe bond Release To present a drawing Draft paper St...

Page 128: ...paper Tracing paper Bond Translucent bond Check To release a draw ing Draft paper Standard paper Premium coated paper Matte film Bond Deluxe bond Release To present a draw ing Draft paper Standard pap...

Page 129: ...ality see Use the Optimize print quality wizard on page 141 How to make a quality check print The system prints the Quality check print in the Presentation quality mode and the Lines Text content mode...

Page 130: ...to the color of another area The media type influences the image quality The bleeding test consists of black and yel low areas with white lines in between If you use Pre mium Grade paper a 0 008 inch...

Page 131: ...ored lines Check to ensure that the colored lines are well aligned and sharp Missing sections in lines or stepped lines Check for the quality of lines Two patterns to show the line quality cir cles an...

Page 132: ...or the Tone scale area print You are recommended to use Premium coated paper for the Tone scale area check print Do the following to make a tone scale area print 1 Scroll to the System information car...

Page 133: ...owing problems 26 Description of output quality problems 26 Description of output quality problems The Optimize print quality section describes how you can solve problems with the quality see Use the...

Page 134: ...o print in the Presentation quality mode and the Area fills content mode The demo print takes 12 minutes to print There are two methods for starting the demo print Through the Oc System Control Panel...

Page 135: ...following problems 27 Description of output quality problems Graphical representa tion of the problem Problem Description Drop out Problems with the nozzles can cause drop out Banding Banding means th...

Page 136: ...the cockling of the media caused by ink saturation Cockling can occur in the Lines text content mode The system does ink reduction correc tions in the Area fills con tent mode Not available Coalescen...

Page 137: ...uality check print Use the Area fills content mode see Output quality and print speed on page 123 The media type defined on the printer must be the same as the media available on the printer If the me...

Page 138: ...the printer from areas of high humidity White stripes in filled areas Quality check print Use the Area fills content mode Use the Presentation quality mode see Output quality and print speed on page...

Page 139: ...inthead wizard to replace the failing printheads Missing parts of characters Quality check print Use the Lines text content mode Use the Presentation quality mode Use the Optimize print quality wizard...

Page 140: ...the problem The print con tains regular hor izontal light or dark bands Demo print The media type defined on the printer must be the same as media roll available on the printer If the media type defin...

Page 141: ...nozzle failure detection and printhead alignment from the printer operator panel During the Optimize print quality wizard the system performs an alignment The alignment requires the use of media Make...

Page 142: ...nly calibrate on six defined media types see Overnight printing on page 179 When calibration is not possible with the loaded media the system asks you to load the correct media When calibration is pos...

Page 143: ...The screen displays the message Aligning printheads When you select No the system returns to the off line menu When there are printheads with defective nozzles you cannot do a printhead alignment The...

Page 144: ...consistent output quality Automatic scanner adjustment The scanner automatically makes the adjustments to make sure the quality is consistent Settings on the scanner operator panel Scanner calibratio...

Page 145: ...Image card of the scanner operator panel When the glass plate and the white platen are dirty the background of the image can also become polluted When the glass plate and the white platen are dirty cl...

Page 146: ...ty decreases Use the scanner calibration wizard when the following error message appears on the screen Unable to align the cameras Please calibrate the scanner Before you begin Turn on the scanner at...

Page 147: ...calibration wizard on the System screen The screen displays Use this wizard to calibrate the scanner and the time and the date of the last successful calibration 40 The first step of the scanner cali...

Page 148: ...calibration The calibration takes 10 minutes If you press the key for Cancel the calibration process aborts Then the screen prompts you to remove the calibration sheet 43 The fourth step of the scann...

Page 149: ...n find the IT8 file on the disk supplied with the scanner calibration sheet If you receive a new scanner calibration sheet replace the IT8 file on the controller with the IT8 file received with the sc...

Page 150: ...150 Oc TCS400 User manual...

Page 151: ...151 Oc TCS400 User manual Chapter 9 Manage jobs on the Oc TCS400...

Page 152: ...S400 Delete or stop a job Feed originals on the scanner Set the Original release mode Cut the output Clean cut a roll of media Change the media type Change the default drying time Use the fallback mod...

Page 153: ...panel The printer stops immediately A dialog box on the screen asks the user to resume or delete the job If you do not select an option the printer automatically continues the printing after 5 minute...

Page 154: ...f the controller was still processing part of the job the controller flushes the job Note An anonymous user cannot cancel a job from a remote system How to place jobs on hold in the Oc Queue Manager 1...

Page 155: ...elete or stop an active job on the printer on page 153 The copy jobs have a special indication on the Oc Queue Manager When the printer prints a copy job delete or stop the copy job from the printer o...

Page 156: ...ss the green Start key to feed the original through the scanner How to feed the original 1 When Auto feed is enabled first define the job settings 2 Feed the original face down 3 Align the original on...

Page 157: ...release mode setting in the Oc Settings Editor to define the default values Define where originals are held after they are scanned The Original release mode has the following settings Hold The scanner...

Page 158: ...adjust the pressure platen on your scanner to the thickness of your original 30 The adjustment steps 30 The adjustment steps Position Thickness 0 default position 2 mm 0 08 1 4 mm 0 16 2 6 mm 0 24 3...

Page 159: ...rs in the recesses in the front of the slider Adjust the slider to the thickness of the original 45 Put two fingers in the recesses in the front of the slider 45 Put two fingers in the recesses in the...

Page 160: ...e error message Unable to adjust the scanner lower the pressure platen can appear If this error message appears return the pressure platen to the default position Wait until the scanner adjustment is...

Page 161: ...cut a roll of media Use this option to cut the roll so that the edge is straight You can only use the Feed cut wizard to cut the output when Automatic cut is disabled in the Oc Settings Editor Note I...

Page 162: ...the output press the key for Finish to return to the on line screen After you select Cut the system returns to the on line menu How to use the Feed cut wizard to clean cut a roll of media 1 Press the...

Page 163: ...ower softkeys to select the cut length option Select one of the following Yes long strip Feeds the media with a full roll rotation feed 20 inches before the printer cuts the media Yes short strip The...

Page 164: ...s This section describes the following How to remove and load a roll of media How to change the type of media defined on the system When to do Change a roll when a job needs a media type or size that...

Page 165: ...Manage jobs on the Oc TCS400 165 How to remove a roll of media 1 Press the retract button on the right hand side of the roll 47 Press the retract button 47 Press the retract button...

Page 166: ...166 Oc TCS400 User manual The medium automatically retracts from the printer 2 Use both hands to remove the roll 48 Remove the roll 48 Remove the roll...

Page 167: ...Manage jobs on the Oc TCS400 167 3 Both far ends of the roll contain flanges with handles Lift the handles to release the flanges 49 Release the flanges 49 Release the flanges...

Page 168: ...168 Oc TCS400 User manual 4 Remove the flanges 50 Remove the flanges 50 Remove the flanges...

Page 169: ...TCS400 169 How to load a new media roll 1 Insert the flanges in both ends of the new media roll 2 Press the handles down to fasten the flanges 3 Put the saddles into position at the ends of the track...

Page 170: ...rinter as shown in the figure below The medium loads into the printer from the top of the media roll Make sure the medium makes contact with the paper guide 6 The printer automatically draws the mediu...

Page 171: ...Select the media type 2 Press the key for Next to enter the cut option screen The system displays the question Cut 3 Use the lower softkeys to select the cut option for the media 53 Select the cut op...

Page 172: ...ollution of the system can occur 1 Press the on line off line key to set the printer off line 2 Use the upper softkeys to scroll to the Change media type card 54 Change media type card on the off line...

Page 173: ...ton and continue in the Change media type wizard the screen displays the message Select roll to change media type for Use the lower softkeys to select the correct roll to change the media type for 56...

Page 174: ...to print a job on a media size that is one size smaller than the media defined on the system For example 23x33 prints in landscape on 33x47 and 17x23 prints in landscape on 23x33 You are not required...

Page 175: ...de Of you print grayscale in the Check quality mode the system decreases the drying time to 20 of the default value You can change the drying time for all the media types You can select a percentage o...

Page 176: ...bs 1 15 Deluxe bond Oc Deluxe Bond uncoated 24 lbs 0 20 Premium coated paper Oc Premium Grade Paper 24 lb bond 0 20 Coated bond Oc Color Bond coated 24 lbs 0 20 Matte photo paper Oc Smart Matte Paper...

Page 177: ...r example if you set the default drying time for Premium coated paper under the conditions used in the table above to 200 the drying time will be 0 40 How to change the default drying time 1 Open the...

Page 178: ...mode If the fallback mode is enabled and printheads fail the printer continues to print with the same quality at half the speed If the printer is in the grayscale mode and a color printhead fails the...

Page 179: ...ignment when a large change in climate occurs Use of overnight printing The setting Overnight printing has the following options Check The system checks for failing printhead nozzles Check and optimiz...

Page 180: ...180 Oc TCS400 User manual Note If the system detects a failing printhead and the fallback mode is enabled the system automatically switches to the fallback mode see Fallback mode on page 178...

Page 181: ...181 Oc TCS400 User manual Chapter 10 Maintenance...

Page 182: ...maintenance This chapter describes the maintenance activities for the operator The operator can perform the following maintenance activities Replace the ink tanks Replace failing printheads Replace th...

Page 183: ...a percentage You can replace the ink tanks at any time A wizard is not required When to do You must replace an ink tank in the following situations The ink level indicator on the printer operator pane...

Page 184: ...k inward and upward to release the ink tank 58 Push the tank inward and upward 58 Push the tank inward and upward 2 Pull the ink tank straight out of the slot 59 Pull the tank out 59 Pull the tank out...

Page 185: ...olor of the ink in the ink tank Note Do not shake the ink tank or touch the opening of the ink tank 2 Slide the ink tank into the slot until you feel a resistance and stop Note The ink tank fits in on...

Page 186: ...the printhead lifetime and cause problems with the ink system Note Only replace a defective printhead from the Replace printhead wizard When to do The system indicates which printheads are defective O...

Page 187: ...e on line off line key on the printer operator panel to take the printer off line 2 Use the upper softkeys to scroll to the Replace printhead card 3 Press the softkey below the Replace printhead card...

Page 188: ...alibration is possible with both rolls use the lower softkeys to select the roll to use 5 Press the key for Next The screen displays the message Carriage moving to center position while the carriage m...

Page 189: ...e printheads press the key for Next Find the correct printhead number on the printhead carriage 8 Pull the metal clamp of the printhead cover up The cover moves up Hold the clamp with one hand because...

Page 190: ...d nozzle areas of the printhead after you remove the protective tape 2 Hold the clamp with one hand and use your other hand to place the new printhead in the printhead holder The printhead only fits i...

Page 191: ...printheads at room temperature 7 The screen displays the message Make sure that all head covers are properly positioned Press the key for Done The screen displays the message Close top cover 8 Close...

Page 192: ...e Replace cassette wizard appears When the maintenance cassette is full the system produces a double audio signal The red LEDs of the printer operator panel remain illuminated Immediate action is requ...

Page 193: ...printer operator panel to take the printer off line If you replace the cassette as the result of the message Maintenance cassette full Press Continue to enter the Replace cassette wizard press the sof...

Page 194: ...age Carriage moving to center position while the carriage moves to the center Then the screen displays the message Open maintenance door 5 Open the door to the maintenance cassette The screen displays...

Page 195: ...prevent the spilling of ink Be careful with the ink on the maintenance cassette How to place the maintenance cassette 1 Slide the new maintenance cassette into the cassette holder 2 Close the cover of...

Page 196: ...set to zero Select New if you inserted a cassette that was not used before The end of life counter is reset to zero Note Make sure you select the correct option Never select New for a used cassette Th...

Page 197: ...scan area Introduction This section describes how to clean the glass plate and the white platen of your Oc TCS400 scanner You can find the required tools in the maintenance kit supplied with the scann...

Page 198: ...Use one hand to press down on the platen Put two fingers in the openings on the front of the slider Move the slider toward the center until the pressure platen disengages 60 Use one hand to press dow...

Page 199: ...e procedure for the other slider Use the two handles on top of the pressure platen to remove the pressure platen 61 One of the two handles on top of the pressure platen 61 One of the two handles on to...

Page 200: ...white surface and the transport rollers with a lint free cloth and a mild streak free glass cleaner First clean the platen s white area and then the transport rollers Use a separate clean dry lint fr...

Page 201: ...platen passed the safety button Hold the slider in its position 63 The location of the safety button 63 The location of the safety button Press the safety button and release the slider Use one hand to...

Page 202: ...202 Oc TCS400 User manual...

Page 203: ...203 Oc TCS400 User manual Chapter 11 Error handling...

Page 204: ...e not in a wizard The carriage is away from its home position too long The media required for the job is not available on the printer The Oc Queue Manager contains damaged jobs that you cannot delete...

Page 205: ...damage to the printer The system handles the error recovery for the jammed media through a series of dialog boxes Use the following procedure to remove the jammed media How to remove jammed media Att...

Page 206: ...oved the jammed media 5 Close the cover or door that the printer operator panel indicates 6 Insert the roll of media in the printer The printer is ready for use Note If you remove the media from the f...

Page 207: ...If a system error occurs you must turn the printer off and on Note After the system is turned off wait a few seconds before you turn the system on again How to deal with permanent errors 1 A permanent...

Page 208: ...roll If the end of the media roll is reached during printing and the other roll does not contain the same media type the system produces a short interrupted audio signal The red LEDs on the printer op...

Page 209: ...heads are dry you must replace the printheads Always replace the printheads or the maintenance cassette in one continuous action to prevent the drying of the printhead nozzles When you replace a print...

Page 210: ...sible obstruction of ink path If the ink tank is full but the printer detects no ink in the ink reservoir it is possible that the ink path is blocked The system produces a short interrupted audio sign...

Page 211: ...l Oc service organization Clear the set memory Attention When you clear the set memory all jobs on the system are deleted Clear the set memory when the Oc Queue Manager contains damaged jobs that you...

Page 212: ...eed the original on page 156 How to remove a jammed original 1 Use the softkeys for Forward or Rewind to remove the jammed original from the scan area 2 If the removing of the original with the softke...

Page 213: ...operator panel 65 A system error message on the scanner operator panel 66 A permanent error message on the scanner operator panel 66 A permanent error message on the scanner operator panel How to corr...

Page 214: ...installed see Correct smartcard errors on page 216 An adjustment error The scanner can only perform the automatic adjustment if the pressure platen is placed in the default position If the pressure pl...

Page 215: ...e scanner calibration sheet then calibrate the scanner see Update the IT8 file for scanner calibration on page 149 see Calibrate the scanner on page 146 Before you calibrate the scanner always make su...

Page 216: ...found inside the front compartment in the small drawer marked PUSH When to do If the smartcard is not installed correctly the screen displays an error message When the screen displays an error message...

Page 217: ...217 Oc TCS400 User manual Chapter 12 Oc Power Logic controller Oc Settings Editor...

Page 218: ...tor if you do not have a keyboard mouse and monitor with your Oc Power Logic controller Description of the Oc Settings Editor Use the Oc Settings Editor to define the default settings for the system a...

Page 219: ...settings in the Oc Settings Editor on page 228 Poker settings Printer language PDL settings Pen settings Automatic Language Selection ALS settings Controller identification settings Set memory reserva...

Page 220: ...on describes how to start the applications locally on the Oc Power Logic controller The section Start the applications with Oc Remote Logic describes how to start the applications from a remote workst...

Page 221: ...Editor The structure of the Oc Settings Editor 68 The structure of the Oc Settings Editor 68 The structure of the Oc Settings Editor The Oc Settings Editor displays the following fields 1 The menu ba...

Page 222: ...ferent controller for remote users only Close the application Edit Define the host name Define the default system you want to connect to during start up Use Automatic logon to start the Oc Settings Ed...

Page 223: ...O settings or the SA settings in a file Apply Apply the changes you made to the settings Note The button is enabled after you change a setting The button is disabled after you apply the settings or af...

Page 224: ...left toolbar 71 The left toolbar 34 The buttons of the left toolbar Button Function Jobs Gives access to the settings for the jobs Note The Jobs button is only available in the key operator view Prin...

Page 225: ...ecial group of settings of this button A shadow highlight indicates which button is activated The on line help in the Oc Settings Editor includes complete information about the different settings Syst...

Page 226: ...der to show all the settings in that folder The display does not include the unavailable settings for the system components Update area Define the settings selected in the tree structure The update ar...

Page 227: ...ected or disconnected The system name local host if you are working on the controller The user mode key operator system administrator or anonymous The view mode KO Settings or SA Settings 36 The icons...

Page 228: ...orized to view the settings How to define the key operator settings 1 Log on to the key operator mode 2 Use the buttons on the left toolbar to display the required group of settings 3 Select the requi...

Page 229: ...se files contain the values for the key operator settings and the system administrator settings after the last Apply If you need a complete overview of all settings defined in the Oc Settings Editor y...

Page 230: ...ransferred to the system If you are logged on as a key operator the system only loads the KO settings If you are logged on as a system administrator the system only loads the SA settings Repro operato...

Page 231: ...231 Oc TCS400 User manual Chapter 13 Oc Power Logic controller Oc System Control Panel...

Page 232: ...System Control Panel if you do not have a keyboard mouse and monitor with your Oc Power Logic controller See Oc Power Logic controller Oc Settings Editor for information about how to start the applic...

Page 233: ...trol Panel 73 The structure of the Oc System Control Panel The Oc System Control Panel includes the following items 1 The menu bar 2 The toolbar with buttons to access the view area 3 The status of th...

Page 234: ...e Automatic logon to automatically start up in the defined user mode Select the two screen languages View Select one of the display languages for the application Display the items for the status contr...

Page 235: ...es Note If a roll is disabled the roll icon is grayed out The text disabled replaces the media information Ink View the ink levels of the four colors Controller View the status of the controller Memor...

Page 236: ...m name localhost if you work on the Oc Power Logic controller The job status for example Printing The user mode Key operator Repro operator System administrator Service operator or Anonymous 39 The ic...

Page 237: ...Control Panel uses a number of icons to display the information about the media available on the printer The following icons are used Icon Description The media roll is available and the roll is read...

Page 238: ...238 Oc TCS400 User manual...

Page 239: ...239 Oc TCS400 User manual Chapter 14 Oc Power Logic controller Oc Queue Manager...

Page 240: ...on the controller see Start the Oc Power Logic controller applications on page 220 See Oc Power Logic controller Oc Remote Logic for information about how to start the application from a remote works...

Page 241: ...delete the jobs A repro operator key operator or system administrator is allowed to move jobs to top The anonymous user mode only allows the user only to view the queue All the buttons and menu items...

Page 242: ...an overview of the Oc Queue Manager application Use the Oc Queue Manager to manage the jobs in the job queue The structure of the Oc Queue Manager The Oc Queue Manager includes the following items 1...

Page 243: ...Then enter the password Click Log off to leave the user mode Click Connect to and select a different controller only for remote users Click Close to leave the Oc Queue Manager Edit Click Options to de...

Page 244: ...for the print queue The print queue window in the left hand pane contains two sections The top section above the separation line shows the job that is printed The bottom section under the separation...

Page 245: ...obs are sent to the inbox when the setting KO System Job management Print jobs in the Oc Settings Editor is set to inbox or if Send to inbox is enabled in the driver The history queue in the right han...

Page 246: ...eived a job in the print queue Processing a job in the print queue Processed a job in the print queue An active job in the print queue bold font and above the gray separation line Printing a job Deliv...

Page 247: ...were previous placed on hold The Oc Queue Manager displays the jobs in the sequence that the jobs are received The copy jobs have priority over the print jobs How to print jobs from the inbox queue or...

Page 248: ...the Oc Queue Manager Attention You can never undo this action 1 Select the jobs in the print queue the history queue or the inbox queue 2 From the Job menu select Delete or click the Delete button on...

Page 249: ...u can select more than one job with the mouse and the shift or control key Note The active print job cannot be placed on hold in the Oc Queue Manager How to restart jobs in the Oc Queue Manager 1 Clic...

Page 250: ...250 Oc TCS400 User manual...

Page 251: ...251 Oc TCS400 User manual Chapter 15 Oc Power Logic controller Oc Remote Logic...

Page 252: ...Oc Settings Editor Use the application to change the default settings of the system Oc Queue Manager Use the application to manage the print jobs Oc System Control Panel Use the application to view th...

Page 253: ...32 Mb RAM Installation procedure for Microsoft Windows platforms 1 Insert the Oc Remote Logic CD ROM or the Oc Power Logic controller CD ROM into the CD ROM drive of your PC 2 The installation starts...

Page 254: ...the three applications or use remotelogic AL as the application launcher UNIX versions and the required JRE Note OS Operating System JRE Java Runtime Environment Where to download the Java Runtime Env...

Page 255: ...1 8 2 From the Oc Remote Logic CD ROM load RemoteLogic_vX tar or RemoteLogic_vX zip 3 Set the environment variable RL_VM_HOME to point to the Java Products remotelogic UNIX installation directory 4 If...

Page 256: ...the programs menu of your operating system Use a command line parameter Use the programs menu to start the applications 1 Select Oc Remote Logic 2 Select the Launcher application 3 Select the require...

Page 257: ...ver to connect to language1 lang Specifies the first language in combination with the parameter country1 country country1 country Specifies the first language in combination with the parameter languag...

Page 258: ...r AL exe Application launcher The easiest method for applying the parameters to the applications is to create a shortcut for an application Then add the command line properties Language Language param...

Page 259: ...ter The example below shows how to start the controller applications with the configuration file Myconfig cfg connected to the MyTCS400 server The first language is set to UK English and the second la...

Page 260: ...lable in the Connect to dialog box you must add the Oc TCS400 to the list of available systems How to connect to a system 1 Open the application you want to run 2 From the File menu select Connect to...

Page 261: ...w to remove a system 1 From the File menu select Connect to 2 Click Edit The Edit systems dialog box appears 3 Select the system you want to remove 4 Click Remove The system is removed from the list 5...

Page 262: ...cally in the indicated user mode How to enable automatic logon 1 From the Edit menu select Options The Options window appears 2 Select the Enable automatic logon checkbox 3 From the drop down box sele...

Page 263: ...o change the password 1 From the File menu select Log on 2 Click Password in the dialog box 3 Open the drop down list and select a user 4 Enter the old password 5 Enter the new password 6 Enter the ne...

Page 264: ...y assigned operators are allowed to use the user modes Different passwords are required to access the user modes You do not need a password for the anonymous user mode Passwords The default password f...

Page 265: ...logged on as special user If you are not logged on you have Anonymous user permissions see The Oc TCS400 users on page 13 The status bar at the bottom shows the user mode The logon is limited to one...

Page 266: ...266 Oc TCS400 User manual...

Page 267: ...267 Oc TCS400 User manual Chapter 16 Account logging...

Page 268: ...The account logging function The Oc Power Logic controller can keep track of all your print jobs The job information and the use of media is stored for each job Account logging enables you to collect...

Page 269: ...efine the file properties Print the jobs on the correct account Get the generated account log file Use the generated account log file Enable the account logging option Account logging is an option A p...

Page 270: ...is kept on the controller Define the time in the Oc Settings Editor File field separator The file field separator separates the items of a record in the account log file The file field separator depen...

Page 271: ...ontroller You can get your files from the local host through FTP File Transfer Protocol Use the generated account log file After you got the account log file from the controller you can view and use t...

Page 272: ...import the account log file into Microsoft Excel 1 Start Microsoft Excel 2 Open the account log file on your system Microsoft Excel shows the content of the account log file see Account information i...

Page 273: ...through FTP in a web browser 1 Start a web browser 2 Enter the ftp address of the Oc TCS400 system The browser shows the ftp directories on the Oc TCS400 system 76 The FTP directory on the system 76...

Page 274: ...g files through FTP from an MS DOS box 1 Launch an FTP client 2 Enter the ftp command An MS DOS box appears with the FTP prompt 3 Enter the Open command 4 Enter the host name or the IP address of the...

Page 275: ...anonymous or simply press Enter to start the connection A connection is now set up for the default user anonymous 7 Enter binary to set binary as the transmission mode 8 Use the command cd accounting...

Page 276: ...art of a single job will have the same value for the Job Unique ID field The Job Unique ID field is part of each record and is unique for each job in the file Use the Job Unique ID field to collect re...

Page 277: ...sed as a comment For example to explain the meaning of the fields if the file is imported in an application like Microsoft Excel The 6411 record in each account log file contains the actual account lo...

Page 278: ...211 for the Oc TDS600 6311 for the Oc TDS400 6411 for the Oc TCS400 Account ID AccID text 255 Account ID Escaped according to es caping rules When the Account ID is not available this field is empty N...

Page 279: ...Records are numbered from the first layer of the first input page to the last layer of the last input page of the job Job Unique ID JobUID num 8 Unique job ID generated by the con troller The Job Uni...

Page 280: ...ce type SrcType text N A The type of source page The different types of PDLs are TIFF CALS PDF PS NIRS HPGL HPGL2 C4 CAL COMP and ASCII Source width SrcWth num 6 Native width of source page in units 1...

Page 281: ...COPY STF scan to file CHK check plot ICOPY interrupt copy INTRNL internal job REPLOT from history queue Process com pletion Prc Cmplt text N A How the process was completed for this page DONE normal...

Page 282: ...v ered Output page number Out Pg num 6 The page number of the output page in this job Starts at 1 Outputmedia type Med Type text N A The type of output medium PPAPER plain paper TRANSPARENT FILM POLYE...

Page 283: ...o file jobs Outputmedia source Med Src text N A Source of the output media For exam ple ROLL1 ROLL2 The field is empty for scan to file jobs Output fold method Fold text N A Folding in 2 directions AF...

Page 284: ...eld is empty for print jobs and copy jobs Output file compression FileCmpr text N A Compression method of output file in case of digitaloutput GROUP3 GROUP4 PACKBITS LZW The field is empty for print j...

Page 285: ...4 The resolution of output in width di rection in dpi Output reso lution height direction num 4 The resolution of output in height di rection in dpi Completion ID CmpId num 8 The completion ID indica...

Page 286: ...s When a system does not support a function the field remains empty Output con tent type Cont Mod text 255 The content type of the print jobs LINES TEXT AREA FILL STANDARD POSTER Image type ImageType...

Page 287: ...in the job 45 Media format for output media Format name Width units of 1 72 inch Height units of 1 72 inch A0 33 x 47 2384 3370 A1 23 x 33 1684 2384 A2 17 x 23 1191 1684 A3 842 1191 A4 595 842 E 2448...

Page 288: ...lues change position for output with landscape orientation Note The above list is not a list of supported media types and sizes Not all systems support all the described media types and sizes jis B4 7...

Page 289: ...289 Oc TCS400 User manual Appendix A System specifications...

Page 290: ...tanks Ink level monitoring Ink level indication on the printer operator panel and through Oc Remote Logic Out of ink signaling Print speed Grayscale 1 33x47 portrait per 1 minute and 10 seconds or 1...

Page 291: ...ond Specialties Calibration Automatic printhead alignment Failing nozzle compensation Unattended printing in the overnight mode Dimensions 58 44 x 29 72 x 78 4 H x D x W Voltage 100 120 230 V Frequenc...

Page 292: ...inal feed Center loading Original size Minimum 6 x 4 L x W Maximum 200 x 44 L x W Maximum media thickness 15 mm 0 6 Exposure control Exposure dark areas Exposure light areas Scale method Custom scale...

Page 293: ...ro cut and custom cut modes Leading and trailing strip adjustment 0 16 inches Concurrent scanning and printing Scan to file Scanner Mainte nance Kit Maintenance software integrated in the Oc Power Log...

Page 294: ...Media types The Oc TCS400 supports the following media Media name Notes Uncoated media Oc Draft Paper 20 lb bond Oc Standard Paper 24 lb bond Oc Check Bond Uncoated 20 lbs US equivalent of Oc Draft Pa...

Page 295: ...tions 295 Media sizes Oc Double Matte Film 95 Oc Double Matte Erasable Film 3 mil Oc Double Matte Erasable Film 4 mil Maximum Minimum Media width 91 44 cm 24 inch Roll length 110 yards Not applicable...

Page 296: ...high speed hard discs one ded icated to file spooling and one for set memo ry Graphical user interface Optional keyboard mouse and monitor Standard interface 10 100BaseT with RJ45 Optional interfaces...

Page 297: ...ueue Manager Oc Remote Logic Oc Print Exec Workgroup LT Optional Account logging Records jobs by user and account number Information stored in a ASCII or UTF 16 file for later use Print processing tec...

Page 298: ...art Photo Dark original Blueprint Printer transfer curves Standard Language sensing Automatic Language Sensing ALS Standard file formats Vector HPGL HPGL 2 Calcomp Raster HP RTL TIFF 6 0 NIFF CALS I...

Page 299: ...a Microsoft Windows network location with Server Message Block SMB Scan to an internet location with File Transfer Protocol FTP Resolution 72 200 300 400 and 600 dpi File formats TIFF PDF CALS I Avail...

Page 300: ...Scan mode Single scan File naming Automatically generate unique file names for each scan Viewing View scans at point of scanning Oc Image Log ic The best scan quality for different image types Ease o...

Page 301: ...Generating HP GL RTL AutoCAD 14 on all sup ported platforms Oc ADI AutoCAD 2000 2001 2002 on all supported platforms Oc HDI Graphical application soft ware on Microsoft Win dows Apple Macintosh and Un...

Page 302: ...302 Oc TCS400 User manual...

Page 303: ...303 Oc TCS400 User manual Appendix B Safety information...

Page 304: ...cribed in this manual Do not place any liquids on the machine Use maintenance materials and other materials for their original purpose only Keep maintenance materials away from children Do not mix cle...

Page 305: ...ed on a level horizontal surface of sufficient strength See the Oc TCS400 safety data sheet in this appendix for information about the weight of the equipment Make sure there is sufficient space aroun...

Page 306: ...ets as new information becomes available It is the user s responsibility to determine the suitability of this information for the adoption of safety precautions as may be necessary It is the user s re...

Page 307: ...S400 printer The content of this safety data sheet is subject to the disclaimer of liability on page see Disclaimer of this manual Material safety data sheet Oc inksOc TCS400 This safety data sheet wa...

Page 308: ...operation 119 W incl user interface Mains connection Cable with plug Safety class I IEC 536 Protective earth connection Protection class IP X0 IEC 529 Sound pressure level at operator position Standb...

Page 309: ...which helps to prevent air pollution from electricity generating plants and saves money on your utility bills As an ENERGY STAR Partner Oc Technologies B V has determined that this printer model meets...

Page 310: ...int job is completed The key operator can adjust this default time within a range between 30 and 240 minutes It is suggested that you determine the appropriate default time for your work pattern by ch...

Page 311: ...311 Oc TCS400 User manual Appendix C Miscellaneous...

Page 312: ...is manual convenient in size readability and arrangement page layout chapter order etc O Yes O No Could you find the information you were looking for O Always O Most of the times O Sometimes O Not at...

Page 313: ...l in your occupation Name Occupation Company Phone Address City Country Please return this sheet to Oc Technologies B V For the attention of ITC User Documentation P O Box 101 5900 MA Venlo The Nether...

Page 314: ...laan 32 1140 Brussel Belgium http www oce be Oc Malaysia Sdn Bhd 3 01 Level 3 Wisma Academy Lot 4A Jalan 19 1 46300 Petalig Jaya Selangor Darul Ehsan Malaysia www ocemal com my Oc Brasil Com rcio e In...

Page 315: ...dby Denmark http www oce dk Oc Singapore Pte Ltd 190 MacPherson Road 03 00 Wisma Gulab Singapore 348548 Oc Finland OY Tallberginkatu 2 A PL 163 00180 Helsinki Finland http www oce fi Oc Espa a SA Busi...

Page 316: ...237 Hungary http www oce hu Oc Nederland B V P O Box 800 5201 AV s Hertogenbosch The Netherlands http www ocenl nl Oc Ireland Ltd 3006 L ake Drive Citywest Business Campus Saggart Co Dublin Ireland O...

Page 317: ...lass plate of the scanner 198 Clean the scan area 198 Clean the white platen of the scanner 198 Clear set memory 211 color modes color 118 grayscale 118 Components Power Logic controller 36 printer 18...

Page 318: ...llback mode 178 186 Feed the original 156 File formats 91 File name define 106 File size 86 G GIS drawings Color 128 color high density 128 H Humidity 137 175 179 I Image quality 86 Image type Artwork...

Page 319: ...ize 137 Output quality problems solutions 137 Overnight printing 179 Overview system 16 P Password 263 264 Place Maintenance cassette 195 Printheads 190 Power Logic Controller System Control Panel 233...

Page 320: ...to controller 260 Install UNIX 254 Windows 253 Remove system 261 Remote logic applications 252 Command line parameters 257 start applications 256 Remove Jammed media 205 Jammed original 212 Maintenan...

Page 321: ...system configuration 230 Status bar 236 Toolbar 235 User operations 232 T Temperature 179 Temporary store clear 108 Thick originals 158 Tone scale area check 132 Turn on and off scanner 43 Turn on sy...

Reviews: