background image

4

Utility <Administrator Setting>

4-64

Océ im9220

Uti

lit

y <Adm

ini

st

rat

or Settin

g>

Ch

ap

te

r 4

4.4

2 Administrator/Machine Register

4.4.1

1 Administrator Registration

Use this function to register the administrator name and the extension 
number which are displayed on the left side of the Utility Screen.

PrOcédure

1

Press the [Utility/Counter] to display the Utility Screen.

2

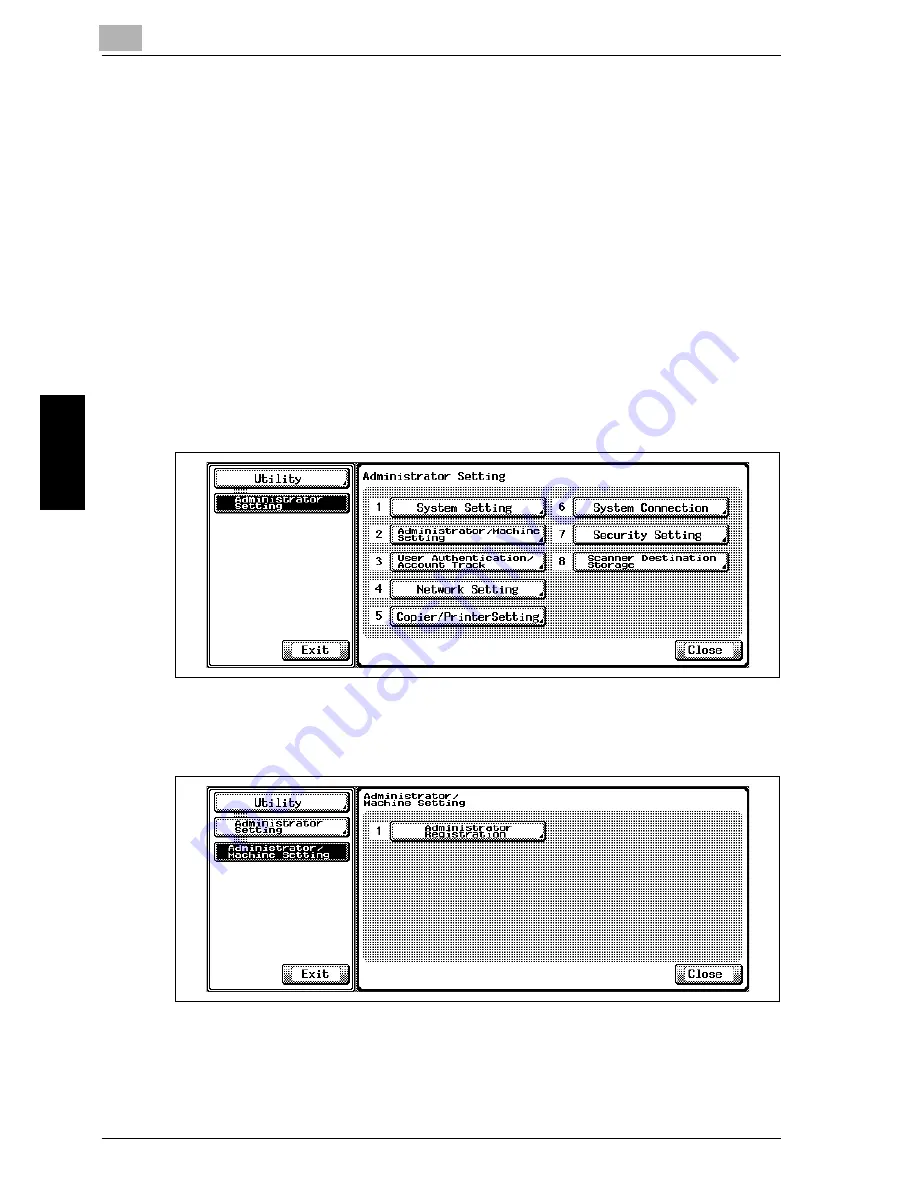
Touch [6 Administrator Setting], enter the administrator password, and 
then touch [OK].
The Administrator Setting Screen will be displayed.

3

Touch [2 Administrator/Machine Setting].

The Administrator/Machine Setting Screen will be displayed.

4

Touch [1 Administrator Registration].

The Administrator Registration Setting Screen will be displayed.

Summary of Contents for im9220

Page 1: ...For Oc and Imagistics Models Oc User s Guide POD Administrator s Reference im9220...

Page 2: ...S 1 866 462 4478 CAN 01277 846 146 UK Should your system develop a problem that cannot be remedied by using the maintenance or troubleshooting procedures outlined in this manual please contact the Oc...

Page 3: ...es Adobe Adobe Logo Acrobat Acrobat Logo PostScript and PostScript Logo are registered trademarks or trademarks of Adobe Systems Inc RC4 is a registered trademark or trademark of RSA Security Inc in t...

Page 4: ...e according to your daily use Please refer to this guide for a setup and management of the machine includ ing paper setting tray setting and a network setup Oc im9220 User s Guide Network Scanner This...

Page 5: ......

Page 6: ...User Setting Outlines 3 2 3 2 List of the User Setting 3 3 3 3 1 System Setting 3 8 3 3 1 1 Language Setting 3 8 3 3 2 2 Buzzer Setting 1 Buzzer On Off Volume Setting 3 9 3 3 3 2 Buzzer Setting 2 Buz...

Page 7: ...Completion 3 45 3 4 16 5 Tandem Setting 5 Distribution Recovery 3 47 3 5 3 Copier Setting 3 49 3 5 1 1 Reset Setting 1 Initial Setting 3 49 3 5 2 1 Reset Setting 2 Reset Function Setting 3 51 3 5 3 1...

Page 8: ...n Setting 4 56 4 4 2 Administrator Machine Register 4 64 4 4 1 1 Administrator Registration 4 64 4 5 3 User Authentication Account Track 4 66 4 5 1 1 General Settings 1 User Authentication 4 66 4 5 2...

Page 9: ...tion Set 4 164 4 7 5 Auto Image Rotation 4 165 4 7 6 Suspend Interruption 4 166 4 7 7 Reserve Copy Function 4 168 4 7 8 Suspend Scanning when Tray is pulled 4 169 4 7 9 Continuous Print Copy 4 171 4 7...

Page 10: ...chine Setting File 5 26 5 6 Box Edit 5 34 6 Web Connection Setting 6 1 Web Connection Outlines 6 2 6 2 Access 6 4 6 3 Screen Configuration 6 5 6 3 1 Logging in Using Administrator Mode 6 6 6 4 Adminis...

Page 11: ......

Page 12: ...1 Paper Setting Chapter 1 Paper Setting...

Page 13: ...g items size setting and tray setting Select one of the following four items as size setting Standard Size Custom Size Wide Size Paper Tab Paper Set paper type by specifying the following four items a...

Page 14: ...paper is used for copying in general and is called PPC paper The normal paper is usually not a recycled paper Embossed The Embossed paper has a non smooth surface on which a toner is hard to be fixed...

Page 15: ...1g m 0 1 Thick 2 PPC paper 162 200g m 0 0 2 Thin PPC paper 50 61g m 0 0 1 Recycled Fine paper 62 71g m 0 1 Exclusive A Smooth paper 62 71g m 0 1 Exclusive B Smooth paper 72 90g m 0 1 Exclusive C Smoot...

Page 16: ...0 44 5 48 9 75 9 20 2 28 1 42 0 34 7 46 7 51 3 80 0 21 3 29 6 44 3 36 5 49 2 54 1 83 7 22 3 31 0 46 4 38 2 51 5 56 6 88 0 23 4 32 6 48 7 40 2 54 1 59 5 90 0 24 0 33 3 49 8 41 1 55 4 60 9 98 3 26 2 36...

Page 17: ...tc on the basis of settings for each tray Recommended Setting PrOc dure 1 Specify the paper size and type for each tray 2 Make setting change on the paper type for each tray as required ac cording to...

Page 18: ...case the Paper Setting key on the Sys tem Setting Screen will be grayed out to show inactivity Contact your service representative if desired For the details of how to set the paper size of an upper l...

Page 19: ...etting 1 8 Oc im9220 Paper Setting Chapter 1 3 Enter the eight digit administrator password and then touch OK The Administrator Setting Screen will be displayed 4 Touch 1 System Setting 5 Touch 8 Pape...

Page 20: ...6 Touch 1 Tray Setting The Tray Setting Screen will be displayed 7 Touch a desired tray key to highlight it 8 Touch Change to change a tray setting The Tray Setting Menu Screen will be displayed 9 Tou...

Page 21: ...the setting and return to the Tray Setting Menu Screen 11 Touch Colored Paper The Colored Paper Setting Screen will be displayed 12 Select a desired paper color Touch OK to complete the setting and r...

Page 22: ...g screen will be displayed 16 Enter the adjustment values as follows Touch Front or Back to select the printed side Select the adjustment item Vertical Horizontal Up Down and Right Left Enter the desi...

Page 23: ...ve When setting wide size be sure to specify the precise dimensions of pa per to be used Service can set the machine to display the Tray Setting key on the Utility Screen Contact your service represen...

Page 24: ...ing 1 Oc im9220 1 13 Paper Setting Chapter 1 3 Enter the eight digit administrator password and then touch OK The Administrator Setting Screen will be displayed 4 Touch 1 System Setting 5 Touch 8 Pape...

Page 25: ...creen will be displayed 7 Touch a desired tray key to highlight it 8 Touch Size Setting to change a tray setting The Size Setting Screen will be displayed 9 Touch the desired key to specify the detect...

Page 26: ...be detected instead of 8 5 13 Touch OK to complete the setting and return to the Size Setting Screen 11 Select Custom Size when setting loading the custom size of paper in the specified tray Touch Cu...

Page 27: ...size then enter the desired size using the control panel keypad The value should fall within the range from the horizontal size of the standard wide size paper to a maximum of 445mm can be set Simila...

Page 28: ...ontrol panel keypad Setting range is from 1 to 5 Touch Input Size to set the desired size Touch X Y or Z indicating the vertical horizontal or index size then enter the desired size using the control...

Page 29: ......

Page 30: ...2 Controller Setting Chapter 2 Controller Setting...

Page 31: ...on troller Setting Screen will be displayed The menu comprises the following settings 01 Report Type Use the function to print out the report type selected from the screen See page 2 7 Available with...

Page 32: ...i tially used The selectable items vary depending upon the configuration of installed options Auto Tray 1 Tray 2 Tray 3 LCT By pass Auto 3 Output Tray Select the exit tray to be initially used Auto Ma...

Page 33: ...Select the orientation of the image printed on copy paper Portrait Landscape Portrait 16 Banner Option Select to print the banner page Off On Off 17 Banner Tray Select the paper feed tray for print i...

Page 34: ...Danish Norwegian PC 1004 PI Font PS Math PS Text Roman 8 Windows 3 0 Latin 1 Windows Baltic Windows 3 1 Latin 1 Win dows 3 1 Latin 2 Windows 3 1 Latin 5 PC 866 Ukraine Roman 8 4 Form lines Specify th...

Page 35: ...fault Default 9100 1 Select the default port number 1 to 6 1 Port 2 9112 1 Select the number for Port 2 1 to 6 1 Port 3 9113 1 Select the number for Port 3 1 to 6 1 Port 4 9114 1 Select the number for...

Page 36: ...ill be displayed 3 Touch 01 Report Type The Report Type Selection Screen will be displayed 4 Touch the desired report type key to select it 5 Touch Execute The Controller Setting Screen will be restor...

Page 37: ...er 01 Basic Setting specifies basic settings for printer 02 PCL Setting specifies the settings concerning printer protocol 03 PS Setting allows the machine to output the PS error print 04 TIFF Setting...

Page 38: ...to 6 Touch Set to complete the setting If wrong number is entered touch Reset to re enter the correct number 5 Perform the Basic Setting Touch 01 Basic Setting The Basic Setting Screen will be dis pl...

Page 39: ...utput Order Select to exit face up or face down in initial state 11 Image Order Select the print page order in initial state 12 Print Number Specify the print quantity in initial state 13 Sort Select...

Page 40: ...lect the medium of font source 02 Font Number Specify the font number available from the font source 03 Symbol Set Specify the symbol set 04 Form lines Specify the number of lines per page 05 Font poi...

Page 41: ...etting 01 Print to PS error Select On to print the error report when an error occurs while rasterizing PostScript data 02 PDF PS Conversion error control Select On to stop printing error pages resulte...

Page 42: ...mage Position Select the image position to be printed on a page Touch OK to complete the setting The TIFF Setting Screen will be restored Touch Return to complete the setting and restore the Printer S...

Page 43: ...y Screen 2 Touch Controller The Controller Setting Screen will be displayed 3 Touch 03 Select Printer Setting The Select Printer Setting Screen will be displayed 4 Touch the key to be specified Touch...

Page 44: ...the setting If wrong number is entered before touching Set touch Reset to re enter the correct number 6 Touch Return The Controller Setting Screen will be restored 7 If further changes are required to...

Page 45: ...y the Utility Screen 2 Touch Controller The Controller Setting Screen will be displayed 3 Touch 04 Spool The Spool Selection Screen will be displayed 4 Touch the desired key to select it 5 Touch OK to...

Page 46: ...3 Touch 05 Interface Setting The Interface Setting Screen will be displayed 4 Touch Parallel Timeout or Network Timeout 5 Use the control panel keypad to enter the time then touch Set The available ra...

Page 47: ...2 Controller Setting 2 18 Oc im9220 Controller Setting Chapter 2 7 If further changes are required touch the desired key Touch the Utility to complete the setting and restore the Utility Screen...

Page 48: ...3 Utility User Setting Chapter 3 Utility User Setting...

Page 49: ...User Setting Outlines Press the Utility Counter on the con trol panel to display the Utility Screen The Utility Screen includes two types of setting items one in which a user can set and the other in...

Page 50: ...l the machine returns to the initial condi tion without selecting any key on the touch panel or the control panel Off 60 seconds 120 seconds 180 seconds 240 seconds 300 seconds 360 seconds 420 seconds...

Page 51: ...is frequently used Two levels Preset1 lightest Preset2 darkest 3 Photo Mode Density Setting Select the density level set in EE Auto Density Set ting when the Photo Mode is selected Lighter Standard Da...

Page 52: ...setting is the settings defined in 1 Initial Setting Full auto Initial Setting Full auto Finisher Mode by Full auto Select the Finisher mode when Full Auto is se lected as pressing Reset Group Sort St...

Page 53: ...set or save the original direction setting made on the Special Original Screen and the bind po sition setting made on the Output Mode Screen after completion of each copying job Do Not Release Release...

Page 54: ...dpi Default Original Image Type Setting Select the default original type Text Photo Text Photo Dot Matrix Text Photo Default Density Setting Select the default density level Lighter Darker 9 levels Au...

Page 55: ...Press the Utility Counter to display the Utility Screen 2 Touch 1 System Setting The System Setting Screen will be displayed 3 Touch 1 Language Setting The Language Setting Screen will be displayed 4...

Page 56: ...d as touching the screen and also select the buzzer volume PrOc dure 1 Press the Utility Counter to display the Utility Screen 2 Touch 1 System Setting The System Setting Screen will be displayed 3 To...

Page 57: ...complete the setting and return to the Buzzer Setting Screen 7 If further changes are required touch the desired key Touch Utility to restore the Utility Screen 3 3 3 2 Buzzer Setting 2 Buzzer for Job...

Page 58: ...Job Stop Setting The Buzzer for Job Stop Setting Screen will be displayed 5 Select the desired time to highlight it 6 Touch OK to complete the setting and return to the Buzzer Setting Screen 7 If furt...

Page 59: ...1 Press the Utility Counter to display the Utility Screen 2 Touch 1 System Setting The System Setting Screen will be displayed 3 Touch 3 1 SHOT Indication Time The 1 SHOT Indication Time Screen will b...

Page 60: ...el or the control panel PrOc dure 1 Press the Utility Counter to display the Utility Screen 2 Touch 1 System Setting The System Setting Screen will be displayed 3 Touch 4 Panel Reset Timer Setting The...

Page 61: ...specified as the Basic Screen the 5 Sub Area Display On Off key will be grayed out to show unavailability PrOc dure 1 Press the Utility Counter to display the Utility Screen 2 Touch 1 System Setting...

Page 62: ...he machine re sponses to it PrOc dure 1 Press the Utility Counter to display the Utility Screen 2 Touch 1 System Setting The System Setting Screen will be displayed 3 Touch 6 Key Response Time The Key...

Page 63: ...The changed password is reflected to the user authentication setting de scription PrOc dure 1 Press the Utility Counter to display the Utility Screen 2 Touch 1 System Setting The System Setting Scree...

Page 64: ...he User Authen tication Screen The entered name will be displayed on the screen 5 Enter the current password Touch Password to display the Input User Password Screen Enter the current password The ent...

Page 65: ...8 Oc im9220 Utility User Setting Chapter 3 6 Enter a new user password Touch New Password to display the Input New Password Screen Enter a new password the touch OK Touch Check Input to display the Re...

Page 66: ...ete the setting and return to the Utility Screen 8 If further changes are required touch the desired key Touch Utility to restore the Utility Screen 3 3 9 8 Warm Up Screen On Off PrOc dure 1 Press the...

Page 67: ...ter 3 4 Select On when Warm Up Screen is displayed and Off when Warm Up Screen is not displayed 5 Touch OK to complete the setting and return to the Utility Screen 6 If further changes are required to...

Page 68: ...when ATS functions You may also select the priority of the detection for each tray PrOc dure 1 Press the Utility Counter to display the Utility Screen 2 Touch 2 Function Setting The Function Setting...

Page 69: ...elected will not be detected even when ATS functions The selected tray will be displayed under Tray Priority as the tray key 6 Touch to highlight the desired tray key under Tray Priority then change i...

Page 70: ...Automatic Tray Selection On or Off PrOc dure 1 Press the Utility Counter to display the Utility Screen 2 Touch 2 Function Setting The Function Setting Screen will be displayed 3 Touch 1 Feed Tray Sett...

Page 71: ...ay Setting 3 Auto Paper Type Selection Select the paper type setting of the tray which is automatically selected when ATS functions When the paper type that is not specified with this function is desi...

Page 72: ...of the tray which is automatically selected when ATS functions Touch to highlight the desired type of keys under Paper Type Weight Colored Paper and Hole Punch You may choose more than one key for eac...

Page 73: ...the Utility Screen 2 Touch 2 Function Setting The Function Setting Screen will be displayed 3 Touch 2 Each Function Setting The Each Function Setting Screen will be displayed 4 Touch Fine Adjust Marg...

Page 74: ...a PC is prohibited after touching a touch key on the touch panel PrOc dure 1 Press the Utility Counter to display the Utility Screen 2 Touch 2 Function Setting The Function Setting Screen will be disp...

Page 75: ...y User Setting Chapter 3 5 Select the desired interval time key to set the timer and then touch OK to return to the Each Function Setting Screen 6 If further changes are required touch the desired key...

Page 76: ...lity Counter to display the Utility Screen 2 Touch 2 Function Setting The Function Setting Screen will be displayed 3 Touch 2 Each Function Setting The Each Function Setting Screen will be displayed 4...

Page 77: ...levels lighter or three levels darker Density shift can be applied to each Original Image Type Auto Text photo Low Contrast Photo and Text PrOc dure 1 Press the Utility Counter to display the Utility...

Page 78: ...5 Touch Lighter or Darker to specify the desired Density shift for each Original Image Type 6 Touch OK to complete the setting and return to the Density Setting Screen 7 If further changes are requir...

Page 79: ...Select and preset two levels from the 32 levels The preset density level setting can be recalled from Spe cial Image on the Copy Screen PrOc dure 1 Press the Utility Counter to display the Utility Sc...

Page 80: ...layed 6 Touch Darker or Lighter to select the desired density level to preset either between the darkest and normal or between normal and the lightest 7 Output density level sample sheet Select the sa...

Page 81: ...desired density level using the control panel keypad The number entered will be displayed in the box above Set Density To output the sample sheet of the specified density level touch Set Density then...

Page 82: ...of Photo Mode to be specified in AES PrOc dure 1 Press the Utility Counter to display the Utility Screen 2 Touch 2 Function Setting The Function Setting Screen will be displayed 3 Touch 3 Density Set...

Page 83: ...ng 4 Image Density Selection Change the Image density of the darkest shadow part Adjust the image den sity of any dark part of the original to darker maximum dark or lighter just like offset printing...

Page 84: ...ty Selection The Image Density Selection Screen will be displayed 5 Touch the desired density key to highlight it 6 Touch OK to complete the setting and return to the Density Setting Screen 7 If furth...

Page 85: ...the Utility Counter to display the Utility Screen 2 Touch 2 Function Setting The Function Setting Screen will be displayed 3 Touch 4 Preset Zoom 4 Touch the desired preset key from 1 to 3 and display...

Page 86: ...he master ma chine before starting to print Detail By default the Tandem Setting key is not displayed Contact your service representative PrOc dure 1 Press the Utility Counter to display the Utility S...

Page 87: ...s printing with scanning on the run while the sub machine waits for all the data to be transmitted then starts printing With Off selected printing job starts on both master and sub ma chines while the...

Page 88: ...on both master and sub machines Detail By default the Tandem Setting key is not displayed Contact your service representative 2 Note Permit cannot be selected if the setting 5 Distribution Recovery is...

Page 89: ...achine transmits the image data to sub machine and a proof copy will be made on both master and sub machines With Prohibit selected a proof copy can be made on the master machine only Sub machine will...

Page 90: ...service representative 2 Note If the setting 2 Tandem Sub Machine Wait Proof is set to Prohibit the shift value previously specified for the sub machine cannot be used be cause the transmitted image...

Page 91: ...ighlight it With Master Machine Shift Data Setting selected the shift value specified for the master machine will be used on the sub machine With Sub Machine Shift Data Setting selected the shift valu...

Page 92: ...d Detail By default the Tandem Setting key is not displayed Contact your service representative PrOc dure 1 Press the Utility Counter to display the Utility Screen 2 Touch 2 Function Setting The Funct...

Page 93: ...nes will continue to work in tan dem after completion of the tandem job With Off selected the tandem mode will be released after comple tion of the tandem job 6 Touch OK to complete the setting and re...

Page 94: ...as already finished with its assignment Detail By default the Tandem Setting key is not displayed Contact your service representative 2 Note This function cannot be turned On if the setting 2 Tandem S...

Page 95: ...highlight it With On selected the tandem connected machines perform the distribution recovery With Off selected each machine completes the tandem job when finishing its first distributed quantity 6 T...

Page 96: ...n a key counter or a copy card is inserted when pressing the Reset on the control panel Full Auto copying condition Basic Setting Copy set 0001 Simplex Duplex 1 1 ADF ON Density AES Zoom 1 000 Auto Pa...

Page 97: ...tting Screen will be displayed 6 Touch Current Setting to select the copy condition set by step 1 as the initial setting Touch Factory Default to return to the full auto setting 7 Touch OK to complete...

Page 98: ...nitial Set which is set at 3 Copier Setting 1 Re set Setting 1 Initial Setting In addition alter Finishing of Full Auto as desired PrOc dure 1 Press the Utility Counter to display the Utility Screen 2...

Page 99: ...g to set as 3 Copier Setting 1 Reset Setting 1 Initial Setting When Initial Setting is selected for AUTO RESET Key Setting Each Reset Setting becomes enabled 6 Select the finishing conditions when res...

Page 100: ...n inserting the key counter and the copy card PrOc dure 1 Press the Utility Counter to display the Utility Screen 2 Touch 3 Copier Setting The Copier Setting Screen will be displayed 3 Touch 1 Reset S...

Page 101: ...3 5 Touch On to reset and Off not to reset when inserting the key coun ter or the copy card 6 Touch OK to complete the setting and return to the Reset Setting Screen 7 If further changes are required...

Page 102: ...the same size of copy paper as the original placed on the original glass Auto Detect orig Size in ADF The machine automatically selects the same size of copy paper as the original placed in the ADF Ch...

Page 103: ...utomatically display the Job Reserve Screen when the current job has completed scanning originals from the original glass and started printing PrOc dure 1 Press the Utility Counter to display the Util...

Page 104: ...ach There are two setting screens Touch upper and lower arrow keys to switch between the screens 6 Touch Choose Default Tray when APS Off to display the selection screen Touch the desired tray key and...

Page 105: ...r Screen Select one from the following four destinations E Mail E Mail address HDD Box No FTP FTP server address SMB Shared folder PrOc dure 1 Press the Utility Counter to display the Utility Screen 2...

Page 106: ...ge PDF Single Page PDF Multi Page TIFF and Single Page TIFF File Form Setting FTP Select the data form for transmitting scanned data to an FTP server from Multi Page PDF Single Page PDF Multi Page TIF...

Page 107: ...t Scan Size Setting Select the default scanning size PrOc dure 1 Press the Utility Counter to display the Utility Screen 2 Touch 4 Scanner Setting The Scanner Setting Screen will be displayed 3 Touch...

Page 108: ...item 5 Touching Default Density Setting will display the Default Density Set ting Screen Touch Lighter or Darker to specify the desired density level or touch Auto for automatic exposure Touch OK to...

Page 109: ...omplete the setting 7 If further changes are required touch the desired key Touch Utility to restore the Utility Screen Detail When transmitting simultaneously to multiple destinations the file form s...

Page 110: ...panel keypad Service can set the machine to disable the 5 Touch Panel Adjust key in case of malfunction If the key is grayed out press 5 of the control panel keypad to display the Touch Panle Adjust...

Page 111: ...ond line 5 Touch each Check Button at the upper left and lower right corners on the screen to check if the buzzer tone functions normally 6 If the coordinates fall out of the range of the standard val...

Page 112: ...4 Utility Administrator Setting Chapter 4 Utility Administrator Setting...

Page 113: ...administrator is required to enter an admin istrator password This section describes the items which the administrator can set in 6 Admin istrator Setting on the Utility Screen and the prOc dure of se...

Page 114: ...2 Touch 6 Administrator Setting The Password Input Screen will be displayed When the Password Input Screen is not displayed prOc ed to step 4 3 Enter the eight digit administrator password and then t...

Page 115: ...istrator Setting Chapter 4 Detail Close Exit and each directory key on the Utility Screen Touch Close to restore the previous screen Touch Exit to return to the Basic Screen Touch the directory key in...

Page 116: ...Setting Set the On Off times in hours and minutes 3 Date Setting Set the On Off condition of the machine for a given month 4 Select Time for Power Save Set the machine to turn off and then on during t...

Page 117: ...unction HDD Permit prohibit to save scanned data in HDD Allow Restrict Allow Scanner Function FTP Permit prohibit to transmit scanned data to FTP Allow Restrict Allow Scanner Function SMB Permit prohi...

Page 118: ...30 1step 0 1mm Printer Regist Loop Adjust 10 10 1step 1mm 5 5 1step 1mm Printer Pre Regist ADU 10 10 1step 1mm Tray 1 4 5 5 1step 1mm Lead Edge Margin Selection 20 40 1step 0 1mm Top Image Original G...

Page 119: ...mber of sections to be managed User Authentication Account Authentication User Account Auth Connect Account Name Password Input Timing Account Distribute Number User Authentication Off Ac count Authen...

Page 120: ...page 4 123 Set the SMB settings 7 AppleTalk See page 4 125 Set the AppleTalk settings 8 E Mail See page 4 127 9 HDD See page 4 134 Set the duration for which scanned data is stored be fore automatical...

Page 121: ...size different from the original rotate the image of the original and adjust to fit into the copying paper size On Always On APS AMS Only On APS AMS Re duce Only On APS AMS Only Suspend Interruption...

Page 122: ...the folder box and delete it List and delete the details 2 Data Auto Delete Set the period of time to keep data so that it will be deleted automatically when specified period has passed Not Delete 12...

Page 123: ...eriod of time as Sleep Mode is selected for Low Power Mode Sleep Mode will function instead of Low Power Mode If the period of time selected for Sleep Mode is shorter than that of for Low Power Mode t...

Page 124: ...tomatically Touch the Upper Lower arrow keys in each area to select a specific waiting period before activating Low Power Mode The initial setting is 15 minutes 7 Select the interval of time that must...

Page 125: ...e default setting for the summer time is off PrOc dure 1 Press the Utility Counter to display the Utility Screen 2 Touch 6 Administrator Setting enter the administrator password and then touch OK The...

Page 126: ...e function touch Summer Time to highlight it The Present time will gain one hour 7 The Difference in time setting is provided in order to give the time dif ference information at the same time when an...

Page 127: ...f the machine during periods when power is shut down by the Timer function If the Weekly Timer needs to be activated on your machine contact your service representative Conditions required to use the...

Page 128: ...Weekly Timer Setting Screen will be displayed 5 Touch 1 Weekly Timer On Off Setting The Weekly Timer On Off Setting Screen will be displayed 6 Touch Weekly Timer On to activate Weekly Timer or touch...

Page 129: ...e collective time for the entire week i e the same On Off time for a certain day of the week 2 Note If On time and Off time are the same the power will not be turned on If the setting is 00 00 00 00 y...

Page 130: ...Screen will be displayed 5 Touch 2 Time Setting The Time Setting Screen will be displayed When the Time Setting Screen is displayed the On time of Monday is always highlighted 6 Set On time by enterin...

Page 131: ...aily Setting Screen is displayed The On and Off times are always set at 00 00 00 00 9 Touch to highlight the day s of the week to be set More than one can be selected at a time 10 Enter the On time an...

Page 132: ...n days through Sundays of the given month 2 Note The default setting is collective On for Mondays through Saturdays and Off for Sundays PrOc dure 1 Press the Utility Counter to display the Utility Scr...

Page 133: ...splayed on the center of the screen 7 Use the keys under Daily Setting to collectively set the on off data for the entire month by the day of the week 8 If any change is made in the collective setting...

Page 134: ...e power during the lunch break and then turn it on again according to the Weekly Timer function setting Only one off time interval can be programmed 2 Note The factory default setting is Off PrOc dure...

Page 135: ...Weekly Timer Setting Screen will be displayed 5 Touch 4 Select Time for Power Save The Select Time for Power Save Screen will be displayed 6 Touch On The Power Save Start Time is highlighted Set the s...

Page 136: ...g mode to establish a four digit password required for using the Non Business Hours Setting function The default password of 0000 allows the timer function to be disabled without entering the password...

Page 137: ...hapter 4 3 Touch 1 System Setting The System Setting Screen will be displayed 4 Touch 3 Weekly Timer Setting The Weekly Timer Setting Screen will be displayed 5 Touch 5 Password for Non Business Hours...

Page 138: ...our digit password 7 Touch OK to return to the Weekly Timer Setting Screen 8 If further changes are required touch the desired key Touch Utility to restore the Utility Screen 4 3 9 4 Print Management...

Page 139: ...Utility Administrator Setting Chapter 4 User management list Home position settings selected by user Use management list Information controlled by user authentication or division authentication Font...

Page 140: ...Utility Administrator Setting 4 Oc im9220 4 29 Utility Administrator Setting Chapter 4 Audit log report Audited log...

Page 141: ...he Utility Screen 2 Touch 6 Administrator Setting enter the administrator password and then touch OK The Administrator Setting Screen will be displayed 3 Touch 1 System Setting The System Setting Scre...

Page 142: ...Start on the control pan el to start printing the selected list Press Stop on the control pan el to suspend printing 8 Touch Management List to return to the Print Management List Screen 9 Touch OK to...

Page 143: ...y image Scanner function E Mail Allow restrict to transmit scanned data via E Mail Scanner function HDD Allow restrict to save scanned data in HDD Scanner function FTP Allow restrict to transmit scann...

Page 144: ...er 4 3 Touch 1 System Setting The System Setting Screen will be displayed 4 Touch 5 Prohibit User Operation The Prohibit User Operation Screen will be displayed 5 Select to lock or delete the mode mem...

Page 145: ...the key with a name not entered will not lock the key and will not display the lock mark Touch the Mode memory number you want to delete Use the arrow keys to scroll to the desired Job number if requi...

Page 146: ...tside area of the original only when APS or AMS is activated Except Orig Glass 1 1 Set the machine to delete the outside area of the original except when copying in real size on the original glass 2 N...

Page 147: ...ter 4 4 Touch 6 Expert Adjustment The Expert Adjustment Screen will be displayed 5 Touch Non Image Area Erase Setting The Non Image Area Erase Setting Screen is displayed 6 Select the condition for er...

Page 148: ...e original density Touch Oblique Erase or Rectangle Erase to select the erase mode Touch Lighter or Darker to set the density level five levels Touch Std to set the standard density 8 Touch OK to retu...

Page 149: ...e and set the amount of the outside area to be deleted PrOc dure 1 Press the Utility Counter to display the Utility Screen 2 Touch 6 Administrator Setting enter the administrator password and then tou...

Page 150: ...tting the outside area Enter the desired amount of out side area to be deleted The amount of outside area to be set is be tween 1 to 5mm entering a value above 6 mm is invalid Touch Off if deleting th...

Page 151: ...ge 128 wide to 127 narrow 1 step 0 1mm Hole Punch Adjustment Adjust the dislocation of the punch position for the Punch Kit im9220010 and the Z Fold Unit 9263 Punch Kit Vertical Position Adjustment Av...

Page 152: ...Adjustment Adjust the center staple and fold staple pitch for the Finisher 9261 Available range 120 wide to 160 narrow 1 step 1mm PrOc dure 1 Press the Utility Counter to display the Utility Screen 2...

Page 153: ...istrator Setting 4 42 Oc im9220 Utility Administrator Setting Chapter 4 5 Touch Finisher Adjust The Finisher Adjust Screen is displayed 6 Touch any desired key of adjustment items The adjustment scree...

Page 154: ...ired paper size and a paper feed tray 8 Select and by touching the key on the touch screen keypad and touch Set 9 Touch Close to return to the Finisher Adjust Screen 10 Touch Close to return to the Ex...

Page 155: ...tep 1mm Printer Pre Regist Adjust the amount to pre register based on a paper tray trays 1 to 4 a bypass tray and ADU Available range 10 wide to 10 narrow 1 step 1mm Tray 1 to 4 Available range 5 wide...

Page 156: ...ng enter the administrator password and then touch OK The Administrator Setting Screen will be displayed 3 Touch 1 System Setting The System Setting Screen will be displayed 4 Touch 6 Expert Adjustmen...

Page 157: ...Next or Back to select a desired paper feed tray and an output order face up or face down 8 Select and by touching the key on the touch screen keypad and touch Set 9 Touch Close to return to the Timin...

Page 158: ...paper feed Available range 64 forward to 63 backward 1 step 0 1mm Scanner Orig Glass Left Image Adjust to control scanned image centering with the original glass Available range 30 forward to 30 back...

Page 159: ...ministrator Setting Chapter 4 4 Touch 6 Expert Adjustment The Expert Adjustment Screen will be displayed 5 Touch Centering Adjustment The Centering Adjustment Screen is displayed 6 Touch any desired k...

Page 160: ...ct a desired output order face up or face down 8 Select and by touching the key on the touch screen keypad and touch Set 9 Touch Close to return to the Centering Adjustment Screen 10 Touch Close to re...

Page 161: ...mum size of the original placed on the original glass PrOc dure 1 Press the Utility Counter to display the Utility Screen 2 Touch 6 Administrator Setting enter the administrator password and then touc...

Page 162: ...nal glass Touch Original Size Detect The Original Size popup menu is displayed on the right side Touch any key under Original Size The setting is enabled when it is set 6 Select the minimum size of th...

Page 163: ...city Unit 4 3 18 8 Paper Setting 2 PI Setting Use this function to change the paper size for the Post Inserter 9262 Upper Tray Search Size If 5 5 8 5 is selected the machine will automatically detect...

Page 164: ...pter 4 4 Touch 8 Paper Setting The Paper Setting Screen will be displayed 5 Touch 2 PI Setting The PI Setting Screen is displayed 6 Set the PI upper tray search size Touch U Tray Search Size The U Tra...

Page 165: ...earch Size Setting Screen is displayed Touch any desired key to highlight it Touch OK to complete the setting to return to the previous screen 8 Touch Close to return to the Paper Setting Screen If fu...

Page 166: ...touch panel PrOc dure 1 Press the Utility Counter to display the Utility Screen 2 Touch 6 Administrator Setting enter the administrator password and then touch OK The Administrator Setting Screen wil...

Page 167: ...In Date Time and Annotation No along with character size and font Type In When selecting Type In as an item of the annotation specify the words to be printed within 40 alphanumerical characters Date T...

Page 168: ...method for items Select whether to print the specified items in a line or in three lines PrOc dure 1 Press the Utility Counter to display the Utility Screen 2 Touch 6 Administrator Setting enter the...

Page 169: ...itle key on the Annotation Setting Screen then touch New Register The Annotation New Register Screen will be displayed If selected title key has already been registered New Register re mains dimmed an...

Page 170: ...ion Setting Screen remains dimmed and cannot be touched to complete the setting Touch Item 1 to specify the first line of the annotation Touch one of the key from Type In Date Time Annotation No and N...

Page 171: ...e In indication to display the Input Type In Screen enter the desired words then touch OK To clear the specified words and leave the line blank touch Clear next to Set To specify the Annotation Number...

Page 172: ...reen will be displayed Select the desired size from 4 Character Size keys and font type between the two font keys then touch OK Repeat the above step to specify the Item 2 and Item 3 Touch 3 Lines or...

Page 173: ...The Annotation Edit Screen will be displayed Edit the selected annotation then touch OK to complete the set ting or touch Cancel to clear the setting The Annotation Setting Screen will be restored 7 D...

Page 174: ...9220 4 63 Utility Administrator Setting Chapter 4 Touch Yes to delete or No to cancel 8 Touch Return to return to the System Setting Screen If further changes are required touch the desired key Touch...

Page 175: ...splayed on the left side of the Utility Screen PrOc dure 1 Press the Utility Counter to display the Utility Screen 2 Touch 6 Administrator Setting enter the administrator password and then touch OK Th...

Page 176: ...r to highlight it and enter the extension number of the administrator on the right side of Extension Number us ing the touch panel keypad The five digit numbers including a hyphen can be entered When...

Page 177: ...nt Name cannot be selected when Ac count Authentication is set to Off Password Input Timing Set the timing of entering the password Account Distribute Number Enter the number of accounts The total num...

Page 178: ...etting Chapter 4 3 Touch 3 User Authentication Account Track The User Authentication Account Track Screen will be displayed 4 Touch 1 General Settings The General Settings Screen will be displayed 5 T...

Page 179: ...Timing to select At Panel Reset Timer or At JOB Complete on the right side of Password Input Timing 8 Touch the down arrow key and then touch Account Distribute Number to highlight it Enter the numbe...

Page 180: ...b is immediately suspended as soon as the copy limit is reached In this case copying conditions output data and scanned data will not be hold In order to continue the job with the same account passwor...

Page 181: ...ator Setting Chapter 4 3 Touch 3 User Authentication Account Track The User Authentication Account Track Screen will be displayed 4 Touch 1 General Settings The General Settings Screen will be display...

Page 182: ...ouch Scanner to select Use or Not Use on the right side of Scan ner 8 Touch Select Effect of Reaching Copy Limit to select Immediately After Print or Warning Only on the right side of Select Effect of...

Page 183: ...screen Select the account management setting from the list and change reset or delete the setting PrOc dure 1 Press the Utility Counter to display the Utility Screen 2 Touch 6 Administrator Setting e...

Page 184: ...Chapter 4 5 Follow the instructions below for registering a new account setting Touch New Register to display the New Account Register Screen Touch Account No to display the input screen Enter the ac...

Page 185: ...the account name For the details on entering texts in the input screen see the appendix Touch Password to display the input screen Enter the password and touch OK You may enter eight digits for the p...

Page 186: ...n the changed password or ac count name is duplicated Enter another password or account name 6 Follow the instructions below for changing an account setting Touch the up or down arrow key to display t...

Page 187: ...ts in the input screen see the appendix You may enter eight digits for the pass word eight characters for the account name Touch Limit to display the input screen Enter the copy limit value and touch...

Page 188: ...the instructions below for deleting the account setting Touch the up or down arrow key to display the account name to be deleted and touch it to display the Individual Account Counter Screen Touch De...

Page 189: ...ructions below for resetting the copy count Touch the up or down arrow key to display the account name to re set the count and touch it to display the Individual Account Counter Screen Touch Count Res...

Page 190: ...display the Reset All Counters Con firmation popup screen Touch any key to reset Touch Cancel when not resetting 10 Touch Close to complete the setting and return to the User Authenti cation Account T...

Page 191: ...the user setting from the list and change reset or de lete the setting Detail When User Account Auth Connect is set to On on the General Settings Screen Account Name can be specified PrOc dure 1 Press...

Page 192: ...apter 4 4 Touch 3 User Authentication Setting The User Authentication Setting Screen will be displayed 5 Follow the instructions below for registering a new user setting Touch New Register to display...

Page 193: ...User Name to display the input screen Enter the user name and touch OK You may enter 64 letters for the user name For the details on entering texts in the input screen see the appendix Touch Password...

Page 194: ...ount Name to display the screen to select an account belong to Touch the up or down arrow key to display the desired account name then touch OK Touch any key on the right side of Useable Function to s...

Page 195: ...Follow the instructions below for changing a user setting Touch the up or down arrow key to display the user name to be changed and touch it to display the Individual User Counter Screen Touch Change...

Page 196: ...or the user name For the details on entering texts in the input screen see the appendix Touch Password to display the input screen Enter the password and touch OK You may enter 64 digits for the passw...

Page 197: ...ct the job necessary to authenticate a newly registered user Touch OK to complete the setting 7 Follow the instructions below for deleting the user setting Touch the up or down arrow key to display th...

Page 198: ...es to delete or touch No to cancel 8 Follow the instructions below for resetting the user count Touch the up or down arrow key to display the user name to reset the count and touch it to display the I...

Page 199: ...Setting Chapter 4 Touch any key to reset Touch Cancel when not resetting 9 Follow the instructions below for resetting all counters Touch Reset All Counters to display the All Count Reset Confirma tio...

Page 200: ...tting Use this function to limit the output setting of an unregistered user or ac count When this function is set to On only the initial output setting can be set to any job under a condition of which...

Page 201: ...g Screen will be displayed 5 Touch On activate this function or touch Off to deactivate this func tion 6 Touch OK to complete the setting and return to the User Authentica tion Account Track Screen 7...

Page 202: ...the Utility Counter to display the Utility Screen 2 Touch 6 Administrator Setting enter the administrator password and then touch OK The Administrator Setting Screen will be displayed 3 Touch 4 Netwo...

Page 203: ...y address IP Address Server PC Enter the IP address of the PC on which Job Editor Server is in stalled IP Address Tandem Enter the IP address of the tandem sub machine working in tan dem Line Speed Se...

Page 204: ...s automatically obtained from the DHCP server in which case it is not necessary to enter it Enable Disable Disable IP Address Specify the IP address 0 0 0 0 0 255 0 0 0 0 Subnet Mask Specify the subne...

Page 205: ...Perform ping Max 255 characters combining symbols and alphanumer ics can be used 1 If the range of the permission setting is the same as that of the denial setting the latter setting overrides the for...

Page 206: ...the bindery file server name Max 47 characters combining symbols and alphanu merics can be used NDS Context Name If Novell Directory Service NDS is used specify a priority NDS context name It should...

Page 207: ...t server setting memory Specific setting and Description Default 3 IPP IPP IPP Specify to use IPP or not Use Not Use Use IPP Print Job Accept Specify to accept IPP print jobs Allow Restrict Allow IPP...

Page 208: ...Proxy Server Address Specify the proxy server address 0 0 0 0 Max 255 characters combining symbols and alphanumer ics can be used 0 0 0 0 Proxy Server Port No Specify the proxy server port number 1 6...

Page 209: ...private Max 15 characters combin ing symbols and alphanumer ics can be used 1 Used when communicating with Oc im9220 using applications Specific setting and Description Default 6 SMB Scan Select Use...

Page 210: ...machine Max 31 characters combining symbols and alphanumer ics can be used Zone Name Specify a zone If no zone exists in such a case as when using a machine on a network that has no seed router leave...

Page 211: ...set to On Max 63 characters combining symbols and alphanu merics can be used Password Specify a password Max 15 characters combining symbols and alphanu merics can be used Realm Specify a realm domain...

Page 212: ...5 e mail titles can be saved for frequent use Max 64 characters can be used Text Setting Max 5 e mail bodies can be saved for frequent use Max 256 characters can be used Specific setting and Descripti...

Page 213: ...fy the port number 1 65535 25 Connection Timeout Specify the SMTP time out duration 30 300 seconds 60 Administrator From Address Specify the From address that is used to send e mail from Controller NI...

Page 214: ...bols and alpha numerics can be used 0 0 0 0 User Name Specify a user name to log in to the POP server Max 63 alphanumerics can be used Password Specify a password to log in to the POP server Max 15 al...

Page 215: ...On AP I F Login Name Required if the AP I F Authentication is set to On Max 8 characters combining symbols and alphanumerics can be used AP I F Login Password Required if the AP I F Authentication is...

Page 216: ...he LDAP server address 0 0 0 0 Max 255 characters combining symbols and alpha numerics can be used 0 0 0 0 Search Base Specify the directory path of LDAP server Max 255 characters combining symbols an...

Page 217: ...ilure in Read Community Name or Write Com munity Name of SNMP occurs On Off Off Trans Address 1 5 Setting Address SNMP Trap Trans Specify to transmit the SNMP Trap or not On Off Off SNMP Trap Trans Ad...

Page 218: ...dress Specify the IPX node address Within 15 alphanumerics symbols 00 00 00 00 00 00 Trans IPX Community Name Specify the IPX community name Within 15 alphanumerics symbols public Report Items Select...

Page 219: ...s for TCP IP RAW port numbers IP Filter permission denial and ping PrOc dure 1 Press the Utility Counter to display the Utility Screen 2 Touch 6 Administrator Setting enter the administrator password...

Page 220: ...9 Utility Administrator Setting Chapter 4 5 Touch 1 TCP IP The TCP IP Setting Screen will be displayed 6 For each item select or enter a required value Use Next or Back as required TCP IP DHCP IP Addr...

Page 221: ...4 Utility Administrator Setting 4 110 Oc im9220 Utility Administrator Setting Chapter 4 DNS Host Name DNS Domain Name LPD Line Speed Setting TCP IP RAW port settings TCP IP Filter accept settings...

Page 222: ...P NIC Setting Screen If further changes are required touch the desired key 8 After you have changed the settings turn off the sub power then turn off and on the main power Detail When you turn off and...

Page 223: ...Novell NetWare is not used make sure that Not Use is selected PrOc dure 1 Press the Utility Counter to display the Utility Screen 2 Touch 6 Administrator Setting enter the administrator password and...

Page 224: ...Setting 4 Oc im9220 4 113 Utility Administrator Setting Chapter 4 5 Touch 2 Netware The Netware Setting Screen will be displayed 6 For each item select or enter a required value Use Next or Back as re...

Page 225: ...pter 4 Netware Pserver Setting Netware Nprinter Rprinter Netware Status Setting 7 Touch OK to return to the IP NIC Setting Screen If further changes are required touch the desired key 8 After you have...

Page 226: ...may not run correctly 4 6 5 2 IP NIC Setting 3 IPP Specify the settings for connecting network printer and the IPP settings PrOc dure 1 Press the Utility Counter to display the Utility Screen 2 Touch...

Page 227: ...Oc im9220 Utility Administrator Setting Chapter 4 5 Touch 3 IPP The IPP Setting Screen will be displayed 6 For each item select or enter a required value Use Next or Back as required IPP Setting IPP...

Page 228: ...NIC Setting Screen If further changes are required touch the desired key 8 After you have changed the settings turn off the sub power then turn off and on the main power Detail When you turn off and...

Page 229: ...server setting and the passive function PrOc dure 1 Press the Utility Counter to display the Utility Screen 2 Touch 6 Administrator Setting enter the administrator password and then touch OK The Admi...

Page 230: ...4 119 Utility Administrator Setting Chapter 4 5 Touch 4 FTP The FTP Setting Screen will be displayed 6 For each item select or enter a required value Use Next or Back as required Client Proxy Server A...

Page 231: ...tting Screen If further changes are required touch the desired key 8 After you have changed the settings turn off the sub power then turn off and on the main power Detail When you turn off and on the...

Page 232: ...PrOc dure 1 Press the Utility Counter to display the Utility Screen 2 Touch 6 Administrator Setting enter the administrator password and then touch OK The Administrator Setting Screen will be display...

Page 233: ...rite Community Name 7 Touch OK to return to the IP NIC Setting Screen If further changes are required touch the desired key 8 After you have changed the settings turn off the sub power then turn off a...

Page 234: ...to SMB for transmission PrOc dure 1 Press the Utility Counter to display the Utility Screen 2 Touch 6 Administrator Setting enter the administrator password and then touch OK The Administrator Setting...

Page 235: ...Service Name Workgroup 7 Touch OK to return to the IP NIC Setting Screen If further changes are required touch the desired key 8 After you have changed the settings turn off the sub power then turn of...

Page 236: ...er and the AppleTalk set tings PrOc dure 1 Press the Utility Counter to display the Utility Screen 2 Touch 6 Administrator Setting enter the administrator password and then touch OK The Administrator...

Page 237: ...e Zone Name Current Zone 7 Touch OK to return to the IP NIC Setting Screen If further changes are required touch the desired key 8 After you have changed the settings turn off the sub power then turn...

Page 238: ...ware is installed on the mail server Contact your network administra tor for details To receive the binary divided e mail an e mail client software supporting the mail division function is required No...

Page 239: ...The IP NIC Setting Screen will be displayed 5 Touch 8 E Mail The E Mail Setting Screen will be displayed 6 Touch 1 E Mail TX Setting The E Mail TX Setting Screen will be displayed Specify the followin...

Page 240: ...y Administrator Setting 4 Oc im9220 4 129 Utility Administrator Setting Chapter 4 E Mail Send SMTP Server Address Port Number Connection Timeout Binary Division Binary Division Size E Mail Send Maximu...

Page 241: ...4 Utility Administrator Setting 4 130 Oc im9220 Utility Administrator Setting Chapter 4 Authentication Setting POP before SMTP Password Realm Administrator Mail Address...

Page 242: ...Setting Chapter 4 7 Touch 2 E Mail RX Setting The E Mail RX Setting Screen will be displayed Specify the following items Touch OK to complete the settings and return to the E Mail Setting Screen POP...

Page 243: ...3 Title Setting The E Mail Title Setting Screen will be displayed Save an e mail title Select an appropriate Default Select number Touch Input to display an input screen and enter a title After enteri...

Page 244: ...the body touch OK Touch OK to complete the settings and return to the E Mail Set ting Screen 10 Touch OK to return to the IP NIC Setting Screen If further changes are required touch the desired key 11...

Page 245: ...ontroller HDD before they are automatically deleted PrOc dure 1 Press the Utility Counter to display the Utility Screen 2 Touch 6 Administrator Setting enter the administrator password and then touch...

Page 246: ...n HDD before they are automatically deleted 7 Touch OK to return to the IP NIC Setting Screen If further changes are required touch the desired key 8 After you have changed the settings turn off the s...

Page 247: ...rror notification PrOc dure 1 Press the Utility Counter to display the Utility Screen 2 Touch 6 Administrator Setting enter the administrator password and then touch OK The Administrator Setting Scree...

Page 248: ...ng Screen will be displayed 6 Specify to use e mail notification and a destination address to which to notify Select On or Off to specify to use e mail notification Touch Notification Address Setting...

Page 249: ...and on the main power Detail When you turn off and on the main power you need to wait at least 10 seconds to turn on after turning off If you do not allow a sufficient interval in between the machine...

Page 250: ...ty Administrator Setting Chapter 4 3 Touch 4 Network Setting The Network Setting Screen will be displayed 4 Touch 2 IP NIC Setting The IP NIC Setting Screen will be displayed 5 Touch Next and then tou...

Page 251: ...4 6 Touch 1 CSRC TX Setting to display the CSRC TX Setting Screen Specify the following items using Next or Back as required Touch OK to complete the settings and return to the CSRC Setting Screen CS...

Page 252: ...er 4 Authentication Setting POP Before SMTP SMTP Authentication User Name Password Realm 7 Touch 2 CSRC RX Setting to display the CSRC RX Setting Screen Specify the following items using Next or Back...

Page 253: ...lity Administrator Setting 4 142 Oc im9220 Utility Administrator Setting Chapter 4 CSRC Receive POP Server Address User Name Password APOP Port Number Connection Timeout Auto Check Auto Check Interval...

Page 254: ...ch Return to restore the CSRC Setting Screen 9 Touch Close to return to the IP NIC Setting Screen If further changes are required touch the desired key 10 After you have changed the settings turn off...

Page 255: ...P I F PrOc dure 1 Press the Utility Counter to display the Utility Screen 2 Touch 6 Administrator Setting enter the administrator password and then touch OK The Administrator Setting Screen will be di...

Page 256: ...Oc im9220 4 145 Utility Administrator Setting Chapter 4 5 Touch Next and then touch 12 AP I F The AP I F Setting Screen will be displayed 6 For each item select or enter a required value AP I F AP I F...

Page 257: ...e sub power then turn off and on the main power Detail When you turn off and on the main power you need to wait at least 10 seconds to turn on after turning off If you do not allow a sufficient interv...

Page 258: ...ty Administrator Setting Chapter 4 3 Touch 4 Network Setting The Network Setting Screen will be displayed 4 Touch 2 IP NIC Setting The IP NIC Setting Screen will be displayed 5 Touch Next and then tou...

Page 259: ...to the IP NIC Setting Screen If further changes are required touch the desired key 8 After you have changed the settings turn off the sub power then turn off and on the main power Detail When you turn...

Page 260: ...pecified at the time of shipment PrOc dure 1 Press the Utility Counter to display the Utility Screen 2 Touch 6 Administrator Setting enter the administrator password and then touch OK The Administrato...

Page 261: ...ial setting specified at the time of shipment 7 Touch OK to return to the IP NIC Setting Screen If further changes are required touch the desired key 8 After you have changed the settings turn off the...

Page 262: ...5 CRAM MD5 Authentication method available on general LDAP server If authentica tion fails with Digest MD5 automatically switches to CRAM MD5 for re try GSS SPNEGO Authentication method available in W...

Page 263: ...ty Administrator Setting Chapter 4 4 Touch 2 IP NIC Setting The IP NIC Setting Screen will be displayed 5 Touch Next and then touch 15 LDAP The LDAP Setting Screen will be displayed 6 Touch 1 LDAP On...

Page 264: ...the LDAP Setting Screen LDAP Function Max Search Results Timeout Initial Setting for Search Details Touch the key to display the Initial Setting for Search Details Screen Touch Condition on the right...

Page 265: ...Setting Chapter 4 8 Touch 2 Setting Up LDAP on the LDAP Setting Screen to display the Setting Up LDAP Screen Touch up down arrow to scroll as required then make the following settings Server Address S...

Page 266: ...set to Not Use or Registering and Changing Address of Prohibit User Operation is set to Restrict The settings of Setting Up LDAP Screen can be reset to the factory initial setting Touch Reset All to...

Page 267: ...s setting should be performed by the server administrator If the port number is improperly changed you may have trouble with the network Be sure not to change the port number unless the network ad min...

Page 268: ...ministrator Setting Chapter 4 3 Touch 4 Network Setting The Network Setting Screen will be displayed 4 Touch 2 IP NIC Setting The IP NIC Setting Screen will be displayed 5 Touch Next and then touch 16...

Page 269: ...thentication failure in Read Community Name or Write Community Name of SNMP occurs 7 Specify the Trans Address Setting Touch Trans Address Setting on the SNMP Trap Setting Screen then touch the desire...

Page 270: ...authen tication failure transmission will be performed even if all report items are cleared 8 Specify the Trans IPX Setting Touch Trans IPX Setting on the SNMP Trap Setting Screen to display the SNMP...

Page 271: ...on will be performed even if all report items are cleared 9 Touch OK to return to the IP NIC Setting Screen If further changes are required touch the desired key 10 After you have changed the settings...

Page 272: ...creen 2 Touch 6 Administrator Setting enter the administrator password and then touch OK The Administrator Setting Screen will be displayed 3 Touch 5 Copier Printer Setting The Copier Printer Setting...

Page 273: ...h 6 Administrator Setting enter the administrator password and then touch OK The Administrator Setting Screen will be displayed 3 Touch 5 Copier Printer Setting The Copier Printer Setting Screen will...

Page 274: ...the Utility Screen 2 Touch 6 Administrator Setting enter the administrator password and then touch OK The Administrator Setting Screen will be displayed 3 Touch 5 Copier Printer Setting The Copier Pr...

Page 275: ...riate temperature for the specific paper type and the weight PrOc dure 1 Press the Utility Counter to display the Utility Screen 2 Touch 6 Administrator Setting enter the administrator password and th...

Page 276: ...ate always only when APS or AMS is activated or only when APS AMS or reduce is activated PrOc dure 1 Press the Utility Counter to display the Utility Screen 2 Touch 6 Administrator Setting enter the a...

Page 277: ...een 8 If further changes are required touch the desired key Touch Utility to restore the Utility Screen 4 7 6 Suspend Interruption Select the timing to stop the job in progress when Interrupt is press...

Page 278: ...tting Screen will be displayed 4 Touch the down arrow key and touch Suspend Interruption Touch When Current Set Complete or Stop Immediately to highlight it 5 Touch Close to complete the setting and r...

Page 279: ...e original on the original glass PrOc dure 1 Press the Utility Counter to display the Utility Screen 2 Touch 6 Administrator Setting enter the administrator password and then touch OK The Administrato...

Page 280: ...nning when pulling out the tray during scanning the original PrOc dure 1 Press the Utility Counter to display the Utility Screen 2 Touch 6 Administrator Setting enter the administrator password and th...

Page 281: ...0 Oc im9220 Utility Administrator Setting Chapter 4 5 Touch Close to complete the setting and return to the Administrator Setting Screen 6 If further changes are required touch the desired key Touch U...

Page 282: ...Setting enter the administrator password and then touch OK The Administrator Setting Screen will be displayed 3 Touch 5 Copier Printer Setting The Copier Printer Setting Screen will be displayed 4 To...

Page 283: ...dministrator Setting enter the administrator password and then touch OK The Administrator Setting Screen will be displayed 3 Touch 5 Copier Printer Setting The Copier Printer Setting Screen will be di...

Page 284: ...lity Screen 2 Touch 6 Administrator Setting enter the administrator password and then touch OK The Administrator Setting Screen will be displayed 3 Touch 5 Copier Printer Setting The Copier Printer Se...

Page 285: ...s monitoring the machine status as needed basis The monitored information will be useful for maintenance PrOc dure 1 Press the Utility Counter to display the Utility Screen 2 Touch 6 Administrator Set...

Page 286: ...or Setting Chapter 4 5 Touch Start 6 Touch Return to return to the previous screen 7 Touch Close to complete the setting and return to the Administrator Setting Screen 8 If further changes are require...

Page 287: ...ght characters is entered and touch OK the error message will be displayed and any key inputs be come invalid for five seconds Enter a correct administrator password af ter five seconds pass The wrong...

Page 288: ...word The administrator password input screen will be displayed 5 Touch Input Administrator Password 6 Enter the new eight character password 7 Touch OK to complete the setting and touch OK to return t...

Page 289: ...idential folder The administrator can refer to the name password number or creation time of the folder created by the user and delete the fold er or box if necessary PrOc dure 1 Press the Utility Coun...

Page 290: ...ails of the desired folder or box Touch the desired folder to highlight it When referring to the information touch to highlight the folder which contains the box to be referred to When the folder or b...

Page 291: ...e the detailed information of the folder or box Touch Personal Folder Public Folder or Secure to refer to the details of the desired folder or box Touch the desired folder to highlight it Confirm that...

Page 292: ...or touch No to suspend deleting Touch OK 8 Touch OK to complete the setting and return to the HDD Manage Set ting Screen 9 Touch Close to complete the setting and return to the Administrator Setting...

Page 293: ...l be deleted automatically when specified period has passed The initial setting is Not Delete PrOc dure 1 Press the Utility Counter to display the Utility Screen 2 Touch 6 Administrator Setting enter...

Page 294: ...esired period to highlight it Touch Not Delete to highlight it when not setting the automatically deleting period 7 Touch OK to complete the setting and return to the HDD Manage Set ting Screen 8 Touc...

Page 295: ...e changed unless the Enhanced Se curity mode is set to ON PrOc dure 1 Press the Utility Counter to display the Utility Screen 2 Touch 6 Administrator Setting enter the administrator password and then...

Page 296: ...ck Password Changing 6 Touch Current Password to display the Password Input Screen Enter current password The first password 9 digit alphanumeric serial number of the main body The enterd password wil...

Page 297: ...ator Setting 4 186 Oc im9220 Utility Administrator Setting Chapter 4 7 Touch New Password to display the Password Input Screen 8 Enter the new password and touch OK 9 Touch Check Input to re enter the...

Page 298: ...more for confirmation then touch OK 11 Touch OK to complete the setting and touch Close to return to the Security Setting Screen 12 Touch Close to complete the setting and return to the Administrator...

Page 299: ...ice representative to set a CE password and a administrator pass word to your machine PrOc dure 1 Press the Utility Counter to display the Utility Screen 2 Touch 6 Administrator Setting enter the admi...

Page 300: ...K at the lower right side of the screen to display the Confir mation popup screen 7 Touch Yes to complete the setting The machine power will be turned off then on Touch No to cancel the setting Touch...

Page 301: ...es can be registered E Mail mail address HDD Box No FTP FTP server address SMB shared folder The Group of registered E Mail addresses can be deleted PrOc dure 1 Press the Utility Counter to display th...

Page 302: ...ss Change Delete The Scan Destination Address Change Delete Screen will be dis played 5 Select the address type to change delete the E Mail destination ad dress Touch E Mail Display the register name...

Page 303: ...ange Delete Screen Select the changing item from Address Register Name and Ref erence Name and change it in the input screen Touch Common to set it as daily use Touch OK To delete touch Delete Touch Y...

Page 304: ...splay the Scan Destination Address Change Delete Screen Select the changing item from Register Name Reference Name and Password and change it in the input screen Touch Com mon to set it as daily use T...

Page 305: ...e of the destination address using the search key or the up and down arrow keys Touch the register name to highlight it To change touch Change to display the Scan Destination Address Change Delete Scr...

Page 306: ...te Touch Yes on the Delete Confirmation popup screen To suspend deleting touch No 8 Select the address type to change delete the SMB destination ad dress Touch SMB Display the register name of the des...

Page 307: ...estination Address Change Delete Screen Select the changing item from Profile Name Character for Search Password Login Name Host Address and File Path and change it in the input screen Touch Common to...

Page 308: ...or the up and down arrow keys Touch the register name to highlight it Touch Delete Touch Yes on the Delete Confirmation popup screen To suspend deleting touch No 10 Touch Return to restore the Scanne...

Page 309: ......

Page 310: ...5 Web Utilities Setting Chapter 5 Web Utilities Setting...

Page 311: ...b browser then return the data to the machine import 5 Box Edit Change the name of the box or file created in the HDD or display the thumbnail of the top page of the file Prerequisites Browser Interne...

Page 312: ...ow Follow the prOc dure below to access the Web Utilities of the machine using the web browser PrOc dure 1 Turn on the power to the PC connected with the machine over a net work 2 Activate the web bro...

Page 313: ...tor set ting The Account Name entry box accepts letters numbers Any symbols will be rejected with an error message displayed in the window Max 1 000 account entries can be registered An error message...

Page 314: ...the password text box then click on OK The Machine Manager Setting menu will be displayed 4 Click on Account Track setting The Account Track Setting menu will be displayed 5 Click on Account Track dat...

Page 315: ...tilities Setting Chapter 5 Limit 99 999 999 copies max 7 Click on Apply The registered content will be displayed in the window The new account track data will be transmitted to the machine imme diatel...

Page 316: ...ng menu or any menu item to jump to the desired window 5 2 2 Editing Account Track Data Change or delete the account track data password account name or limit value or reset the counters PrOc dure 1 O...

Page 317: ...e text box and an 8 digit administrator password in the password text box then click on OK The Machine Manager Setting menu will be displayed 4 Click on Account Track setting The Account Track Setting...

Page 318: ...ack Add Data window will be displayed Change the account name password or limit value as desired For details in entering prOc dure refer to page 5 4 Click on Apply The edited content will be displayed...

Page 319: ...check box es to select the account track data of the counter to be cleared If all the counters are to be cleared click on SelectAll Click on the radio button a white circle heading the Copy Printer Co...

Page 320: ...eb Utilities Setting Chapter 5 Click on Apply to immediately reset the counters to zero The message Setting was changed will be displayed Click on Back to return to the Account Track Data List or any...

Page 321: ...ter Click on the check box es to select the account track data to be deleted If all the data are to be cleared click on SelectAll Click on the radio button a white circle heading the Delete Ex cept fo...

Page 322: ...5 13 Web Utilities Setting Chapter 5 Click on Apply to immediately delete the data The message Setting was deleted will be displayed Click on Back to return to the Account Track Data List or any menu...

Page 323: ...5 Web Utilities Setting 5 14 Oc im9220 Web Utilities Setting Chapter 5 9 Save Counter Click on Save this table as a file...

Page 324: ...Web Utilities Setting 5 Oc im9220 5 15 Web Utilities Setting Chapter 5 Click on Save In the dialogue box designate the folder for saving the data then click on Save...

Page 325: ...annot be saved while the machine is in operation In this case try this prOc dure again after the machine starts idling Click on Back in the browser window to return to the Account Track Data List for...

Page 326: ...mote Panel functions Touch panel screens can be displayed on the web browser and operated using a mouse Control panel keys can be displayed on the web browser and operated using a mouse Passwords can...

Page 327: ...an 8 digit administrator password in the password text box then click on OK The Administrator Setting menu will be displayed 4 Click on Remote Panel setting The Remote Panel Setting menu will be disp...

Page 328: ...19 Web Utilities Setting Chapter 5 6 Click on Registration The IP address will be applied to the machine immediately so that is valid for the user operations 7 Click on Administrator Setup Menu to res...

Page 329: ...sed in the machine Using Scan Transmission Setting in the administrator setting you cannot newly register an E mail HDD FTP SMB address or group the entries The Scan transmission setting key appears i...

Page 330: ...er 5 3 Enter admin in the User Name text box and an 8 digit administrator password in the password text box then click on OK The Administrator Setting menu will be displayed 4 Click on Scan transmissi...

Page 331: ...5 Web Utilities Setting 5 22 Oc im9220 Web Utilities Setting Chapter 5 5 Register the E Mail HDD FTP and SMB as required...

Page 332: ...complete the entry The registered content will be displayed Click on Back to return to the Scan Transmission Setting window 7 Display the Entry List Click on Entry List of the desired item under the e...

Page 333: ...Entry List of the desired item as described in step 7 Click on the entry name to be changed The window for changing the selected item will be displayed Change the contents as desired then click on Re...

Page 334: ...k on the check box in the Delete column of the item to be deleted then click on Delete If all the data are to be cleared click on Selec tAll The window for deleting the selected item will be displayed...

Page 335: ...to a file type for batch prOc ssing can be edited efficiently and returned to the machine The file transmitted to a PC normally contains the four data types men tioned above however each data type can...

Page 336: ...ager Setting The Enter Network Password dialogue box will be displayed 3 Enter admin in the User Name text box and an 8 digit administrator password in the password text box then click on OK The Machi...

Page 337: ...5 5 Export the machine setting file Select the desired file type from the pull down menu then click on Ex port The File Download dialogue box will be displayed Click on OK In the dialogue box designa...

Page 338: ...g file The machine setting file transmitted to a PC is a TAB separated text file which can be edited using an application software such as Text Editor or Table Editor A new setting file can also be cr...

Page 339: ...5 Web Utilities Setting 5 30 Oc im9220 Web Utilities Setting Chapter 5 ed then click on Import The result message will be displayed when the registration is complet ed...

Page 340: ...progress is completed The data cannot be recognized Confirm that the data is the machine setting file Data size is too large Confirm that the data is the machine setting file Check if the file size e...

Page 341: ...should include NAME NUMBER REFERENCE or DAILY separat ed by a tab NAME should be 24 bytes or less Use up to 9 digits numbers 0 9 only to specify a NUMBER REFERENCE should be 24 bytes or less Mark DAIL...

Page 342: ...5 Oc im9220 5 33 Web Utilities Setting Chapter 5 LOGINNAME should be 47 bytes or less PASSWORD should be 14 bytes or less REFERENCE should be 24 bytes or less Mark DAILY USE with 1 or DAILY NOT USE w...

Page 343: ...re satisfied on the machine The Box Screen is not currently displayed on the touch panel of the ma chine The machine is mounted with the HDD Enhanced Security mode is not used PrOc dure 1 Open the Web...

Page 344: ...Utilities Setting Chapter 5 4 Click on Box edit The Box Edit window will be displayed 5 Click on the desired user name Selected user name will be marked with an asterisk at its head The user name mark...

Page 345: ...ot be selected To change the box name prOc ed to the next step To change the file name or check the thumbnail prOc ed to step 8 7 Change the box name Clicking on the desired box name as in step 6 a te...

Page 346: ...isk and the thumbnail of the top page of selected file will be displayed in the File Name area To change the file name prOc ed to the next step 9 Change the file name Clicking on the desired file name...

Page 347: ...5 Web Utilities Setting 5 38 Oc im9220 Web Utilities Setting Chapter 5 Enter the new name within 30 alphanumeric characters...

Page 348: ...enter the username and password again to log in 2 Note The number in parentheses on the right side of the title User Name in dicates the count of registered users The number in parentheses on the rig...

Page 349: ......

Page 350: ...6 Web Connection Setting Chapter 6 Web Connection Setting...

Page 351: ...cess all of the features of PageSope Web Connection the operat ing computer must meet the following requirements 1 Download MSXML3 0 from Microsoft Download Center and install it on your system Web Br...

Page 352: ...ting Netscape Navigator Select Preferences under Edit Click Privacy Security and then click Cookies Check Allow cookies based on privacy settings or Allow all cookies under Cookie Acceptance Policy 3...

Page 353: ...s bar enter the IP address of the image controller as shown below Then press the Enter key http IP address of the image controller Example When the IP address of the image controller is 192 168 0 10 h...

Page 354: ...tail If user authentication is set the user name and password entry screen will appear 1 Oc Web Connection Logo Click the Oc logo to jump to the Oc web site http konicaminolta jp Click the Web Connect...

Page 355: ...or Mode only For the details of each tab see the following sections 6 Menus Selects the information or setup item to be displayed The menus that ap pear vary depending on the tab selection For the det...

Page 356: ...ails In order to ensure the security against data used in Administrator Mode set SSL SSL can be set on the Network tab of Administrator Mode For the details on the SSL setting see page 6 37 PrOc dures...

Page 357: ...ings is displayed Administrator Password This screen appears when you click Administrator Password on the Sys tem tab The screen is used to change the administrator password Current Password Enter the...

Page 358: ...System tab of the User Mode Screen to display this screen Device Place Enter the location where the device is set up Maximum 255 alphanumer ic characters can be used Click Detail on the System tab of...

Page 359: ...concerning product support Click Online Assistance on the System tab of the User Mode Screen to dis play information entered on this screen Contact Name Enter the support contact for the product Maxi...

Page 360: ...the manual over the LAN Enter http IP address for the PC pswc_help pswc_help html The administrator must have the online manual to make it available over the LAN server Use a PC on which Microsoft II...

Page 361: ...value of the device will be entered imported You can click the Browse button and select a setting file to import Click the Import button to import the setting file from PC to the device Export Export...

Page 362: ...ork only to enable new parameters Network Setting Clear This screen appears when you click Network Setting Clear under the Main tenance menu You can use the screen to initialize the network settings t...

Page 363: ...ll not Detail If you want to initialize the main body after resetting the network wait un til the controller restarts about 2 minutes and turn the main power switch OFF Wait 10 seconds or longer befor...

Page 364: ...ystem The alert items that are checked their checkbox es will be sent as alert by e mail E Mail Notification Sets whether or not to enable alert mail notice function Notification E Mail Address Enter...

Page 365: ...ut Set parallel port timeout 10 300 seconds Network Timeout Set receive network timeout 10 300 seconds Apply button Click the button to apply the new settings Clear button Click the button to clear th...

Page 366: ...e settings also appear if you select Controller Settings on the touch panel s Utility Screen 2 Controller Setting 2 Printer Settings 1 Basic Settings Enter for individual items PDL Input Tray Output T...

Page 367: ...ings Clear button Click the button to clear the settings that were entered PS Settings Option This screen appears when you click PS Settings under the Default Settings menu The screen is used to set P...

Page 368: ...used to set default values for TIFF settings These settings also appear if you select Controller Settings on the touch panel s Utility Screen 2 Controller Setting 2 Printer Settings 4 TIFF Settings En...

Page 369: ...Scan tab You can use the screen to enter edit or delete the subject for e mail Apply button Click the button to apply the new settings Edit button Click the button to open the editing screen Clear bu...

Page 370: ...n use maximum 64 characters 3 Click the OK button on the Completed screen It will take you back to the subject list screen To Delete Subjects 1 Check the number of the subject to delete and click the...

Page 371: ...settings Edit button Click the button to open the editing screen Clear button Click the button to set it to the default before changes were applied Delete button Click the button to delete a selected...

Page 372: ...take you back to the body text list screen To Delete Bodies 1 Check the number of the body text to delete and click the Delete but ton 2 Click the OK button on the Body Deletion screen 3 Click the OK...

Page 373: ...used to set a summary of the image controller interface TCP IP settings When TCP IP is set to disable you still need to set parameters Make sure to enter parameters correctly Enter for individual item...

Page 374: ...enable or disable access permission access refusal and their ranges of TCP IP filtering When the same range is specified for the accept setting and the refuse setting the refuse setting has priority...

Page 375: ...ill need to set parameters Make sure to enter parameters correctly Enter for individual items NetWare Print Frame Type Mode Pserver Print Server Name Print Server Password Print Queue Scan Rate Binder...

Page 376: ...e Status under the NetWare menu on the Network tab This screen is used to confirm NetWare status IPP This screen appears when you click IPP on the Network tab This screen is used to enter and confirm...

Page 377: ...screen appears when you click FTP on the Network tab then click Client under the FTP menu The screen is used to enter and confirm vari ous settings concerning the FTP client When FTP Client is set to...

Page 378: ...click FTP on the Network tab then click Server under the FTP menu The screen is used to enter and confirm var ious settings concerning the FTP server FTP Server Select enable or disable Apply button...

Page 379: ...his screen appears when you click SNMP on the Network tab The screen is used to enter and confirm settings concerning SNMP SNMP Select enable or disable Apply button Click the button to apply the new...

Page 380: ...s when you click SMB on the Network tab then click Scan under the SMB menu The screen is used to enter and confirm set tings concerning SMB scan SMB Scan Select enable or disable Apply button Click th...

Page 381: ...nter and confirm settings concerning SMB printing When SMB Print is set to disable you still need to set parameters Make sure to enter parameters correctly Enter for individual items SMB Print NetBIOS...

Page 382: ...en is used to enter and confirm settings concerning Apple Talk When Apple Talk is set to disable you still need to set parameters Make sure to enter parameters correctly Enter for individual items App...

Page 383: ...s a domain name of Active Directory in addition to the login name and password Enter for individual items LDAP LDAP Server Address Port Number Use SSL Port Number SSL Search Root Search Timeout Max of...

Page 384: ...screen is used to enter and confirm settings concerning receiving e mail When E Mail Receive is set to disable you still need to set parameters Make sure to enter parameters correctly Enter for indivi...

Page 385: ...When E Mail Send is set to disable you still need to set parameters Make sure to enter parameters correctly Enter for individual items Send SMTP Server Address Port Number Connection Timeout Max Mail...

Page 386: ...ing SSL TLS You can configure them separately depending whether or not certificates are in stalled 2 Note Only Create a Self Signed Certificate Request a Certificate and In stall a Certificate can be...

Page 387: ...elf Signed Certificate Setting screen appears Enter settings and click Create Following the screen indicating that the certificate is being created an other screen appears saying The certificate has b...

Page 388: ...ng 6 Oc im9220 6 39 Web Connection Setting Chapter 6 Requesting a certificate to instal Click Setting The SSL TLS Setting screen appears Check Request a Certificate and click Next The Request a Certif...

Page 389: ...creen indicating that the certificate is being requested an other screen appears indicating the request has been completed Click OK The Certificate Signing Request Data screen appears Click Save The f...

Page 390: ...he certificate installation screen appears Enter the data of the certificate that you requested Click Next The Encryption Strength Setting and the Mode using SSL TLS screen ap pears Enter discretionar...

Page 391: ...6 If a certificate has been installed 2 Note Initially Request a Certificate is checked Remove an already installed certificate first before requesting a new one Requesting a certificate to switch in...

Page 392: ...at the certificate is being requested an other screen appears indicating the request has been completed Click OK The Certificate Signing Request Data screen appears Click Save The file will be saved C...

Page 393: ...Enter the data of the certificate that you requested Click Next The Encryption Strength Setting and the Mode using SSL TLS screen ap pears Enter discretionary settings and click Create Creation result...

Page 394: ...n Setting Chapter 6 Changing mode settings Changing encryption strength setting Click Settings The SSL TLS Setting screen appears Check Set a Encryption Strength and click Next The Encryption Strength...

Page 395: ...Oc im9220 Web Connection Setting Chapter 6 Click Create The completion screen appears Click OK It will take you back to the SSL TLS Information screen Changing mode using SSL TLS Click Settings The S...

Page 396: ...onnection Setting Chapter 6 Check Mode using SSL TLS and click Next The Mode using SSL TLS screen appears Select a discretionary mode and click Create The completion screen appears Click OK It will ta...

Page 397: ...on Setting 6 48 Oc im9220 Web Connection Setting Chapter 6 Removing a certificate Click Settings The SSL TLS Setting screen appears Check Remove a Certificate and click Next The Remove a Certificate s...

Page 398: ...oval confirmation screen appears Click OK It will take you back to the SSL TLS Information screen Authentication Auto Logout This screen appears when you click Authentication on the Network tab The sc...

Page 399: ...the button to clear the settings that were entered AP I F This screen appears when you click AP I F on the Network tab The screen is used to enter and confirm settings concerning the AP I F Enter for...

Page 400: ...7 Appendix Chapter 7 Appendix...

Page 401: ...o input characters on the character in put screen 1 Press the corresponding key to input the desired character 2 Press the OK key The character input screen closes The input characters are displayed o...

Page 402: ...Paper Jam Maintenance Staple Empty Toner Empty Output Full Service Call Remove Punch Waste 2 Print Main menus Sub menus Target items Interface Interface Parallel Timeout Network Timeout Default Settin...

Page 403: ...dress 4 Start address 4 Ending address 5 Access Refusal Address Start address 1 Ending address 1 Start address 2 Ending address 2 Start address 3 Ending address 3 Start address 4 Ending address 4 Star...

Page 404: ...uthentication Method User Authentication Login Name Password Domain Name E Mail Email Receive Receive Receiving Server Address User Name Password APOP Connection Timeout Port Number Email Send Send SM...

Page 405: ...7 Appendix 7 6 Oc im9220 Appendix Chapter 7 7 3 Configuration Setting Print Sample...

Page 406: ...Appendix 7 Oc im9220 7 7 Appendix Chapter 7 Print Sample...

Page 407: ...7 Appendix 7 8 Oc im9220 Appendix Chapter 7 Print Sample...

Page 408: ...Appendix 7 Oc im9220 7 9 Appendix Chapter 7 Print Sample...

Page 409: ...7 Appendix 7 10 Oc im9220 Appendix Chapter 7 7 4 Demo Page PCL Demo Page Print Print Sample...

Page 410: ...Appendix 7 Oc im9220 7 11 Appendix Chapter 7 PS Demo Page Print Print Sample...

Page 411: ...7 Appendix 7 12 Oc im9220 Appendix Chapter 7 PCL Font List Print Sample...

Page 412: ...Appendix 7 Oc im9220 7 13 Appendix Chapter 7 Print Sample...

Page 413: ...7 Appendix 7 14 Oc im9220 Appendix Chapter 7 Print Sample...

Page 414: ...Appendix 7 Oc im9220 7 15 Appendix Chapter 7 PS Font List Print Sample...

Page 415: ...7 Appendix 7 16 Oc im9220 Appendix Chapter 7 Print Sample...

Page 416: ...Appendix 7 Oc im9220 7 17 Appendix Chapter 7 Print Sample...

Page 417: ...7 Appendix 7 18 Oc im9220 Appendix Chapter 7 7 5 PCL Font List...

Page 418: ...Appendix 7 Oc im9220 7 19 Appendix Chapter 7...

Page 419: ...7 Appendix 7 20 Oc im9220 Appendix Chapter 7...

Page 420: ...Appendix 7 Oc im9220 7 21 Appendix Chapter 7 7 6 Symbol Set...

Page 421: ...7 Appendix 7 22 Oc im9220 Appendix Chapter 7...

Page 422: ...Appendix 7 Oc im9220 7 23 Appendix Chapter 7...

Page 423: ...7 Appendix 7 24 Oc im9220 Appendix Chapter 7...

Page 424: ...Appendix 7 Oc im9220 7 25 Appendix Chapter 7...

Page 425: ...7 Appendix 7 26 Oc im9220 Appendix Chapter 7...

Page 426: ...works Not only con necting it converts the format address protocol etc of the data according to the network to be connected Hard disk Mass storage device to save data The data is maintained even if th...

Page 427: ...sed for printing requir ing specifically high quality developed by US Adobe Printer driver Software acting as an intermediate between the computer and printer Proxy Server A server provided to act as...

Page 428: ...8 Index Chapter 8 Index...

Page 429: ...report 4 29 Authentication 6 49 Auto Detect orig Size in ADF 3 55 Auto Image Rotation 4 165 Auto Logout 6 49 Auto Paper Select 2 13 Auto Paper Type Selection 3 24 B Banner Option 2 10 Banner Tray 2 1...

Page 430: ...4 188 Except Orig Glass 1 1 4 35 F Face Up Down for 1 Sheet 4 172 Feed Tray Auto Selection 3 21 File Form Setting E Mail 3 59 File Form Setting FTP 3 59 File Form Setting HDD 3 59 File Form Setting S...

Page 431: ...Mode 6 6 M Machine NIC Setting 4 91 Maintenance 6 13 N NetWare 4 112 Netware 6 26 Netware Nprinter Rprinter 4 114 Netware Pserver Setting 4 114 Netware Setting 4 113 Netware Status Setting 4 114 Netw...

Page 432: ...t Function Setting 3 51 ROM Version 6 10 S Scan Tab 6 20 Scanner ADF Left Image 4 47 Scanner ADF Regist Loop Adjust 4 44 Scanner Orig Glass Left Image 4 47 Scanner function E Mail 4 32 Scanner functio...

Page 433: ...djust 3 63 Transmitting Machine Setting File 5 26 Tray Setting 1 7 4 52 Tray Setting Screen 1 9 Type 1 2 U Use management list 4 28 User paper 1 3 User Authentication 4 66 User Authentication Setting...

Page 434: ...Printing for Professionals Oc 100 Oakview Drive Trumbull CT 06611 Oc 2007...

Reviews: