Operating & Maintaining the Objet30 3-D Printer
7–52
DOC-24000 Rev. C
10. Inspect
the
new
lamp
reflector,
and
make
sure
that
a
black
strip
is
attached
to
the
inside
of
it.
If
not,
install
one—on
the
side
of
the
reflector
opposite
(not
next
to)
the
block.
Note:
Extra black strips are included in the printer Start-up Kit. If
necessary, you can remove the black strip from the old reflector and install
it in the new reflector (as long as the black paint has not faded).
11. Discard
the
old
reflector
and
lamp.
12. Insert
the
new
UV
lamp/reflector
unit
into
the
housing.
13. Make
sure
that
the
UV
‐
lamp
cable
is
in
place,
inside
the
housing,
and
then
tighten
the
securing
screws.
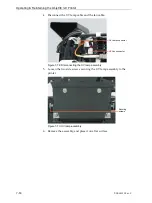
Figure 7-77: Cable position when installing the UV lamp
14. Replace
the
lamp
cover,
and
tighten
the
securing
screws.
15. Replace
the
UV
lamp
assembly
in
the
printer,
making
sure
that
the
cable
fits
into
the
slot
together
with
the
side
securing
screw.
Figure 7-78: UV-lamp cable after replacing the assembly
16. Tighten
the
two
side
securing
screws.
17. Reconnect
the
power
connections
(see
72).
Dispose of the used UV lamp in accordance with environmental and safety
requirements.


